
:max_bytes(150000):strip_icc():format(webp)/watch-free-movies-online-1356647-32f79b8cc3ed484ca1f9f898f503e416.png)
Updated 2024 Approved Top 10 Best Intro Maker Websites
Top 10 Best Intro Maker Websites
Video intros are short video clips that are typically used for branding purposes. They appear at the beginning of a lengthy video. You may use these intro videos to market your brand. They will increase your professional appearance if they are appropriately produced and include all necessary facts about your real movie or product.
If you are a content creator, you should always take these things seriously and deliver them effectively. We recognize that producing intros is time-consuming and aggravating, but nothing is straightforward. In this post, we’ll help you find the best intro maker website by looking at some excellent options and discussing why you should check them out. Let’s get going!
In this article
01 Part 1: Top 10 Best Intro Maker Websites [Free and Paid]
02 Part 2: Tips for Making Better Intro Online
Part 1: Top 10 Best Intro Maker Websites [Free and Paid]
Intros are quite necessary, especially when you are a famous YouTuber, Social Media Influencer, or even promoting your business. People decide whether they want to see the video further or not by viewing the intro video. So, the intro should be eye-catching to gain the audience’s attention. Following are the few best intro maker website available in the market:
1. Canva
This is one of the best intro maker website free for Facebook, YouTube, Pinterest, videos, and other social media platforms. People have been utilizing this website for many years and are continuously impressed by its new features. It comes with thousands of templates for use as an intro, such as DIY Canva logo pack, Minima Blog and Social Pack, etc. Moreover, the free version of Canva leaves a watermark, but you can get rid of it by upgrading your package.
Features
- Includes a simple and intuitive user interface
- Millions of templates for users to use in different segments of the video
- Thousands of royalty-free filters and effects
- Allows you to record the videos for editing as well
2. MotionDen
MotionDen allows you to create unique animated intros by utilizing their library of ready-made expert templates, unquestionably their best suit. These are organized into logical categories, such as e-commerce or YouTube, to help you easily choose the ideal design for your specialty.
MotionDen does not require a credit card or a test period and allows you to produce up to five films utilizing their whole video template library. However, you will have to deal with the terrible watermark constantly. To eliminate it and broadcast HD quality films directly to YouTube, the most popular package costs $29 per month.
Features
- It Lets you create unique animated intros for your video
- A straightforward and unique interface is there to operate
- Allows you to create five videos without any credit card
- Helps you edit the intro template with text, color and apply filters
3. Placeit
Placeit is an intro creator powered by Envato, the world’s top digital asset store. Unsurprisingly, this implies their video intro builder delivers a powerful creative punch, with something like a library of over 20,000 classified templates for you to customize and a diverse selection of music tracks to accompany your movie.
Unfortunately, there is no free version of Placeit. It’s only $9 for each opening video. With an annual membership of $89.69, you may have complete access to every one of Placeit’s templates and limitless downloads.
Features
- Allows you to add logo, text, and color to your intros
- 20,000 categorized templates to increase the attractiveness
- Helps you add background music to your intros
- No download limit in the paid version of the software
4. Renderforest
Renderforest allows you to create high-quality intros in a matter of minutes. It offers a massive library of over 50,000 intro templates that you can customize and modify in minutes with scripts, logos, color schemes, and music. Renderforest offers a free intro creator bundle that allows you to generate an infinite number of 360p films up to three minutes long. They will, however, have a watermark and a restricted amount of music tracks to pick from. Paid memberships begin at $5.99 per month and are invoiced yearly.
Features
- 50,000 easily editable intro templates
- The free version allows you to create 360p videos
- Includes background music to add in your intro videos
- No need to install the software since it is completely web-based
5. Video Bolt
Video Bolt is a fantastic intro creator! Unlike the previous entries on this list, Video Bolt focuses solely on video-creating tools. When you subscribe to Video Bolt, you have exposure to all they have to provide, including great templates for intros, tales, product promotions, music pre-process, and more.
Video Bolt features a vast collection of high-quality intro templates. So, whatever your specialized emphasis is, there will undoubtedly be several templates that are a suitable fit. However, the free version does leave a watermark on your videos.
Features
- A vast collection of high-quality intro templates
- Contains background music to make your intro video sound excellent
- This tool is really fast as compared to others
- It features a variety of customization tools for intro videos
6. Panzoid
Panzoid is a tool for developing unique content and an online community. Don’t be misled by the grungy, limited interface; with a little work, you can create extremely customizable video intros with this online free intro maker website.
You have the option of starting your project from scratch or using one of the templates produced by the Panzoid community. Panzoid includes a free version with a watermark, but its subscription plans start at just $1.99 per month (billed yearly) for the Starter plan.
Features
- Intuitive and straightforward interface to operate
- Customizable template for better performance
- It features a simple and easy-to-do editing
7. InVideo
The first thing to mention about InVideo is that it is intended to function with the Chrome browser. As a result, if you’re using another browser, this may not perform as smoothly as you’d expect. InVideo is a fantastic tool for generating an intro video. It differs greatly from the majority of the other applications in this category, which have relatively limited customization choices.
The most interesting thing about InVideo is that you can begin with prepared templates and then apply your tweaks to make them distinctive and consistent with your brand. However, all the videos in the free version feature a watermark.
Features
- It features multiple high-quality editing options
- It comes with pre-made templates to use for intro
- You can customize your own template with this tool
8. OFFEO
OFFEO is a free intro creator for those who want to be designers. Its biggest selling point is the sheer amount – thousands of themes and graphical components you can utilize to make your entrance pop. All of their design pieces have a true aesthetic appeal to them, from dynamic drawings to high-quality stock pictures — everything you need to build a great beginning film.
OFFEO’s templates are conveniently organized into categories like intros, outros, and logos, as well as by industry.
Features
- Thousands of attractive themes for intro videos
- Includes dynamic drawings and high-quality stock pictures
- It is completely free for everyone to use
- Simple and intuitive interface for convenience
9. Visme
Visme is another intro maker website that easily creates high-quality and eye-catching content. Visme is created with a brand philosophy in mind. It allows you to save your brand’s or company’s color palettes, photographs, videos, and other materials.
Visme comes with many templates and access to a large library of stock photos, making it simple for non-designers to utilize the tool and get decent results. The free version of Visme allows you to create up to videos without a watermark.
Features
- Allows you to create three videos without a watermark with the free version
- A vast collection of themes and stock photos
- Simple and intuitive interface to operate
10. Videocreek
Videocreek is another wonderful service for creating free video intros for your YouTube and other social media platforms. It offers over 80 templates to choose from. You may use any of the themes provided, add your trademark or video, and create your video intro.
This platform is easy to use, and you can make high-definition intro movies at no extra charge. And since the website is free to operate, it leaves no watermark.
Features
- It leaves no watermark on the videos
- It offers over 80 templates to choose from
- It contains multiple themes to apply to videos

Part 2: Tips for Making Better Intro Online
After going through all the intro maker websites’ features above, you might have decided to create the intro of your videos to make them look more interesting. However, if you are still stuck with the decision, don’t worry because we will refer to the best intro maker website in this section.
We recommend using InVideo for creating your intro. Although it’s a paid tool, even the free version offers more than enough features to create eye-catching intro videos. The only concern should be the watermark that it leaves, but you can always remove it through a high-quality editor or buy the premium version to get rid of it.
Moreover, we also have some useful tips for you to create a better intro online:
- Pick music that will bring your intro videos to life
- Allow Your Brand’s Personality to excel in Your Intro Videos
- Consider your intro clips to be your social media business card
Conclusion
You can either invest a lot of time mastering high-quality professional technologies like Adobe After Effects, or you could pay big money to a freelancer to make your intro films.
However, if you’re searching for a less expensive solution but still concerned about the value of your intro, we’re confident you’ll be able to make your ideal intro using one of the aforementioned intro maker website.
02 Part 2: Tips for Making Better Intro Online
Part 1: Top 10 Best Intro Maker Websites [Free and Paid]
Intros are quite necessary, especially when you are a famous YouTuber, Social Media Influencer, or even promoting your business. People decide whether they want to see the video further or not by viewing the intro video. So, the intro should be eye-catching to gain the audience’s attention. Following are the few best intro maker website available in the market:
1. Canva
This is one of the best intro maker website free for Facebook, YouTube, Pinterest, videos, and other social media platforms. People have been utilizing this website for many years and are continuously impressed by its new features. It comes with thousands of templates for use as an intro, such as DIY Canva logo pack, Minima Blog and Social Pack, etc. Moreover, the free version of Canva leaves a watermark, but you can get rid of it by upgrading your package.
Features
- Includes a simple and intuitive user interface
- Millions of templates for users to use in different segments of the video
- Thousands of royalty-free filters and effects
- Allows you to record the videos for editing as well
2. MotionDen
MotionDen allows you to create unique animated intros by utilizing their library of ready-made expert templates, unquestionably their best suit. These are organized into logical categories, such as e-commerce or YouTube, to help you easily choose the ideal design for your specialty.
MotionDen does not require a credit card or a test period and allows you to produce up to five films utilizing their whole video template library. However, you will have to deal with the terrible watermark constantly. To eliminate it and broadcast HD quality films directly to YouTube, the most popular package costs $29 per month.
Features
- It Lets you create unique animated intros for your video
- A straightforward and unique interface is there to operate
- Allows you to create five videos without any credit card
- Helps you edit the intro template with text, color and apply filters
3. Placeit
Placeit is an intro creator powered by Envato, the world’s top digital asset store. Unsurprisingly, this implies their video intro builder delivers a powerful creative punch, with something like a library of over 20,000 classified templates for you to customize and a diverse selection of music tracks to accompany your movie.
Unfortunately, there is no free version of Placeit. It’s only $9 for each opening video. With an annual membership of $89.69, you may have complete access to every one of Placeit’s templates and limitless downloads.
Features
- Allows you to add logo, text, and color to your intros
- 20,000 categorized templates to increase the attractiveness
- Helps you add background music to your intros
- No download limit in the paid version of the software
4. Renderforest
Renderforest allows you to create high-quality intros in a matter of minutes. It offers a massive library of over 50,000 intro templates that you can customize and modify in minutes with scripts, logos, color schemes, and music. Renderforest offers a free intro creator bundle that allows you to generate an infinite number of 360p films up to three minutes long. They will, however, have a watermark and a restricted amount of music tracks to pick from. Paid memberships begin at $5.99 per month and are invoiced yearly.
Features
- 50,000 easily editable intro templates
- The free version allows you to create 360p videos
- Includes background music to add in your intro videos
- No need to install the software since it is completely web-based
5. Video Bolt
Video Bolt is a fantastic intro creator! Unlike the previous entries on this list, Video Bolt focuses solely on video-creating tools. When you subscribe to Video Bolt, you have exposure to all they have to provide, including great templates for intros, tales, product promotions, music pre-process, and more.
Video Bolt features a vast collection of high-quality intro templates. So, whatever your specialized emphasis is, there will undoubtedly be several templates that are a suitable fit. However, the free version does leave a watermark on your videos.
Features
- A vast collection of high-quality intro templates
- Contains background music to make your intro video sound excellent
- This tool is really fast as compared to others
- It features a variety of customization tools for intro videos
6. Panzoid
Panzoid is a tool for developing unique content and an online community. Don’t be misled by the grungy, limited interface; with a little work, you can create extremely customizable video intros with this online free intro maker website.
You have the option of starting your project from scratch or using one of the templates produced by the Panzoid community. Panzoid includes a free version with a watermark, but its subscription plans start at just $1.99 per month (billed yearly) for the Starter plan.
Features
- Intuitive and straightforward interface to operate
- Customizable template for better performance
- It features a simple and easy-to-do editing
7. InVideo
The first thing to mention about InVideo is that it is intended to function with the Chrome browser. As a result, if you’re using another browser, this may not perform as smoothly as you’d expect. InVideo is a fantastic tool for generating an intro video. It differs greatly from the majority of the other applications in this category, which have relatively limited customization choices.
The most interesting thing about InVideo is that you can begin with prepared templates and then apply your tweaks to make them distinctive and consistent with your brand. However, all the videos in the free version feature a watermark.
Features
- It features multiple high-quality editing options
- It comes with pre-made templates to use for intro
- You can customize your own template with this tool
8. OFFEO
OFFEO is a free intro creator for those who want to be designers. Its biggest selling point is the sheer amount – thousands of themes and graphical components you can utilize to make your entrance pop. All of their design pieces have a true aesthetic appeal to them, from dynamic drawings to high-quality stock pictures — everything you need to build a great beginning film.
OFFEO’s templates are conveniently organized into categories like intros, outros, and logos, as well as by industry.
Features
- Thousands of attractive themes for intro videos
- Includes dynamic drawings and high-quality stock pictures
- It is completely free for everyone to use
- Simple and intuitive interface for convenience
9. Visme
Visme is another intro maker website that easily creates high-quality and eye-catching content. Visme is created with a brand philosophy in mind. It allows you to save your brand’s or company’s color palettes, photographs, videos, and other materials.
Visme comes with many templates and access to a large library of stock photos, making it simple for non-designers to utilize the tool and get decent results. The free version of Visme allows you to create up to videos without a watermark.
Features
- Allows you to create three videos without a watermark with the free version
- A vast collection of themes and stock photos
- Simple and intuitive interface to operate
10. Videocreek
Videocreek is another wonderful service for creating free video intros for your YouTube and other social media platforms. It offers over 80 templates to choose from. You may use any of the themes provided, add your trademark or video, and create your video intro.
This platform is easy to use, and you can make high-definition intro movies at no extra charge. And since the website is free to operate, it leaves no watermark.
Features
- It leaves no watermark on the videos
- It offers over 80 templates to choose from
- It contains multiple themes to apply to videos
Part 2: Tips for Making Better Intro Online
After going through all the intro maker websites’ features above, you might have decided to create the intro of your videos to make them look more interesting. However, if you are still stuck with the decision, don’t worry because we will refer to the best intro maker website in this section.
We recommend using InVideo for creating your intro. Although it’s a paid tool, even the free version offers more than enough features to create eye-catching intro videos. The only concern should be the watermark that it leaves, but you can always remove it through a high-quality editor or buy the premium version to get rid of it.
Moreover, we also have some useful tips for you to create a better intro online:
- Pick music that will bring your intro videos to life
- Allow Your Brand’s Personality to excel in Your Intro Videos
- Consider your intro clips to be your social media business card
Conclusion
You can either invest a lot of time mastering high-quality professional technologies like Adobe After Effects, or you could pay big money to a freelancer to make your intro films.
However, if you’re searching for a less expensive solution but still concerned about the value of your intro, we’re confident you’ll be able to make your ideal intro using one of the aforementioned intro maker website.
Best AVI Video Splitters: Top 16 Tools to Cut and Edit Your Videos [Multi-Platform Support]
With the growing fame of video-sharing and social media applications like Twitter, Instagram, and TikTok, the demand for simple and fast video cutting and trimming tools has dramatically increased. Nowadays, you don’t have to play with complex video editing tools to produce high-quality videos.
Thanks to several user-friendly editing software to make things easy for everybody. However, finding the right programs to trim/cut videos is still challenging, especially in AVI format.
But, guess what? These top 16 AVI video cutters for Windows, MAC, Android, iPhone, and online will make video cutting and trimming fun, especially when you learn to do it using Filmora.
In this Article
Part 1: Best AVI Video Cutter to Trim/Cut AVI Video on Windows and MAC – Filmora Video Cutter [with steps}
Part 2: Top 3 Free AVI Video Cutter on Windows
Part 3: Top 3 Free AVI Video Cutter on MAC
Part 4: Top 3 Free AVI Video Cutter on Android
Part 5: Top 3 Free AVI Video Cutter on iPhone
Part 6: Top 3 Free AVI Video Cutter Online
Part 7: Bottom Line
Part 8: FAQs
Part 1: Best AVI Video Cutter to Trim/Cut AVI Video on Windows and MAC – Filmora Video Cutter [with steps]
Filmora by Wondershare is a star video editor with outstanding outcomes. Whether you have a MAC or Windows PC, you can download Filmora regardless of your operating system. The program best serves those who intend to make high-quality videos. The software provides editing support for all video formats, including AVI.
Although Filmora is an affordable editor with tons of audio and video editing options, you can still download the software for free and create projects if watermarks don’t bother you. Moreover, you can count this tool’s capabilities in cropping, resizing, and Chroma screen support. But that’s not the only sweet fruit.
In fact, Filmora is equipped with many jaw-dropping features, including preset templates, auto beat sync, split-screen, speed ramping, motion tracking, keyframing, creative transitions, titles, filters, and much more. And the best part is, you can learn and understand Filmora in no time. That’s why the program is loved and supported by all types of users.
So does Filmora helps cut and trim AVI videos? Yes! It does if you follow these steps correctly.
Step 1: Download Filmora Video Editor
First, download Filmora Video Editor by choosing your operating system, as seen in the screenshot below.
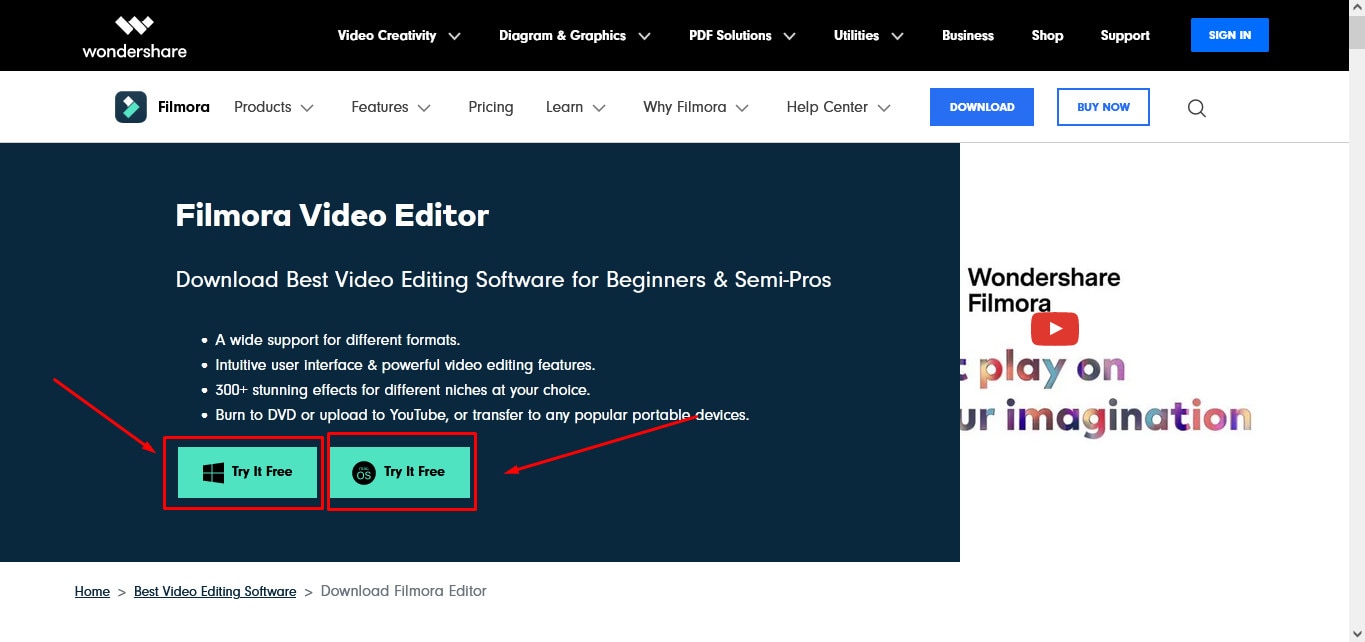
Run the setup and let it finish without any pause or break.
Step 2: Import Your Video to Filmora Video Editor
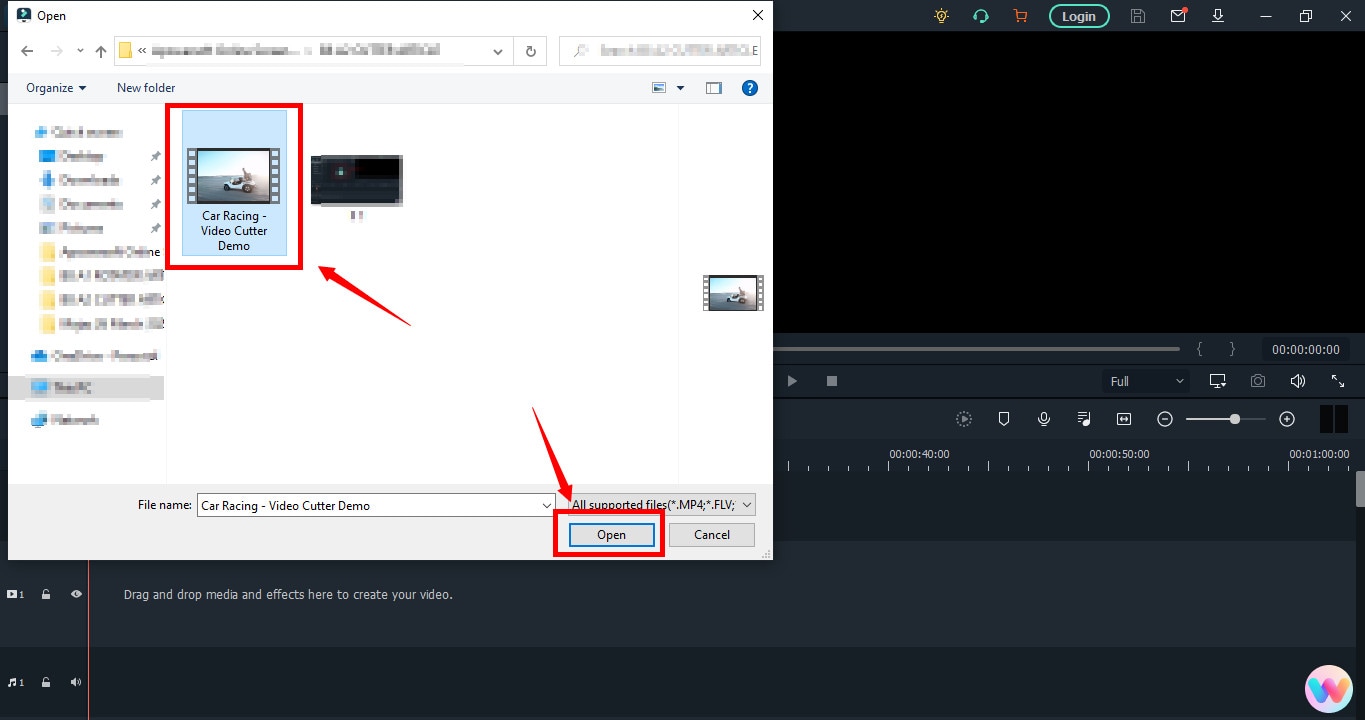
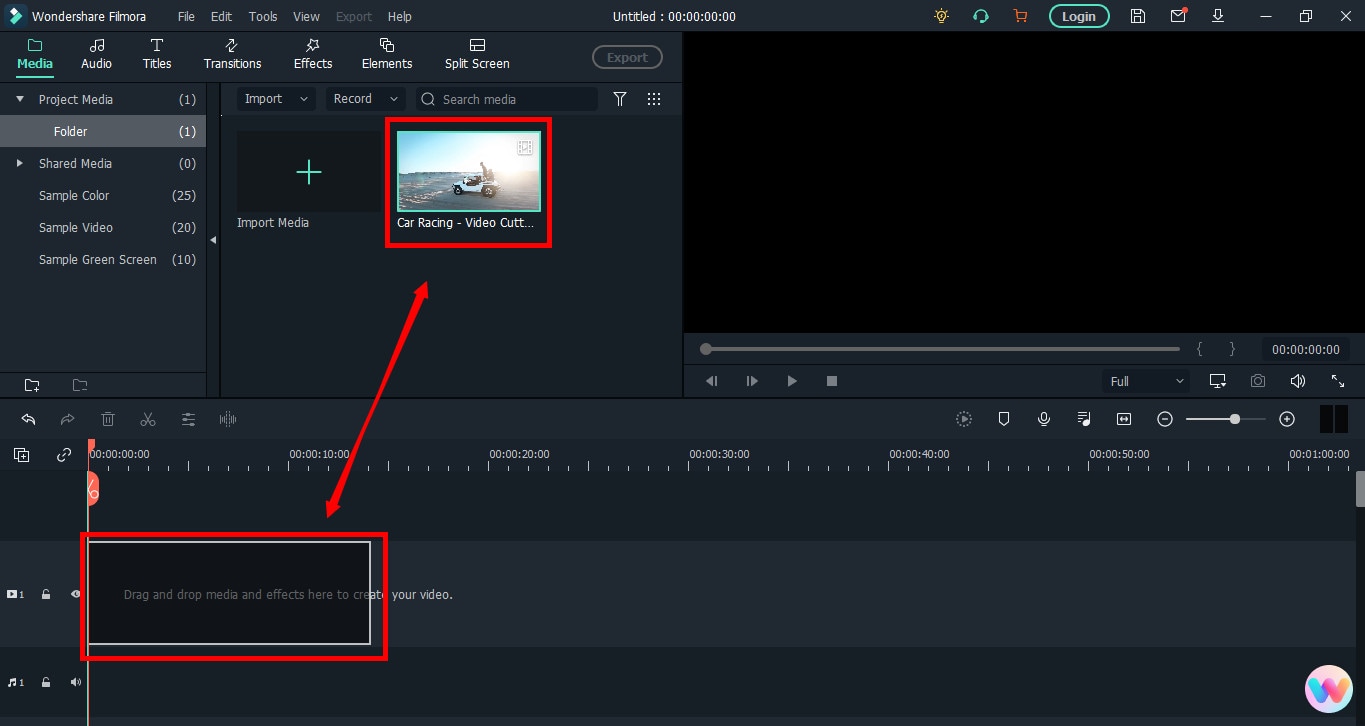
Importing your AVI video is a very simple process. Just click on the “Film Clip” icon.
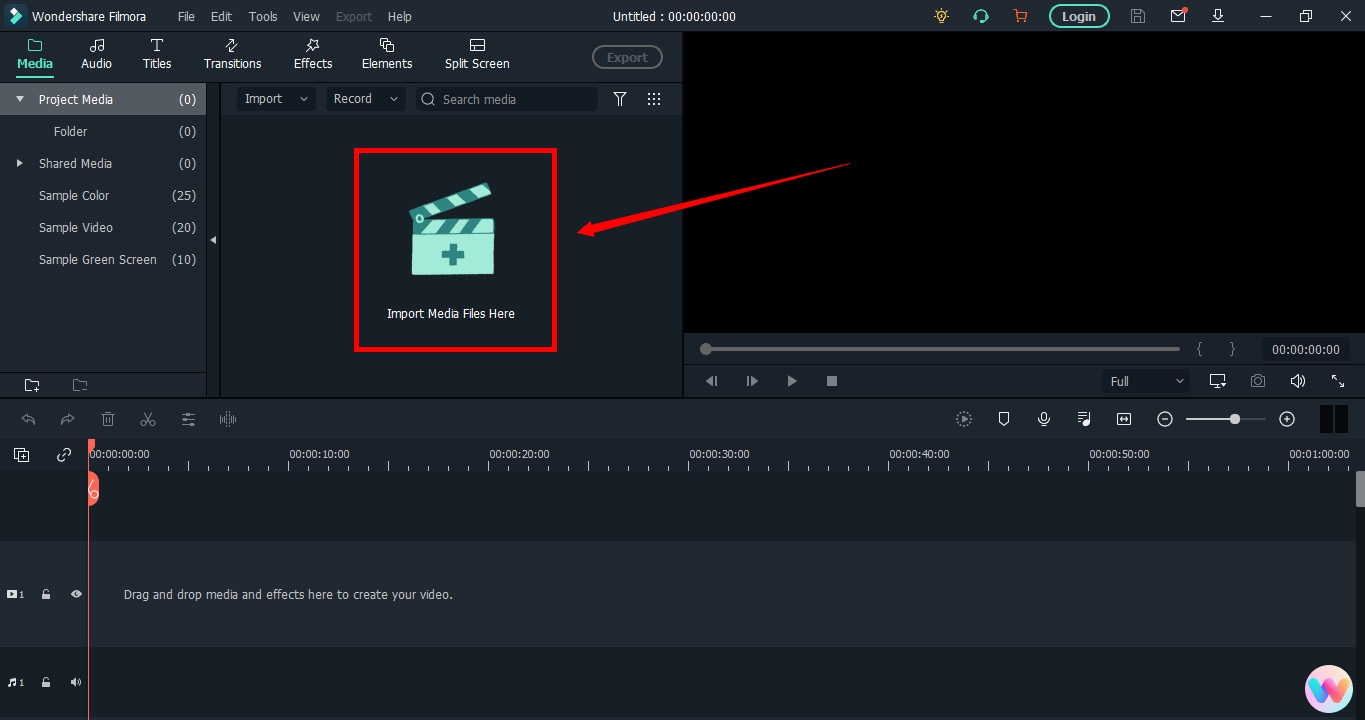
It will open a new window screen on your computer to select the video from the directory. Find the clip you want to import and cut. Use your mouse to select it and click the “Open” button.
The video will be loaded in the “Media” folder of Filmora. The clip’s thumbnail should be visible to assure you have done everything correctly.
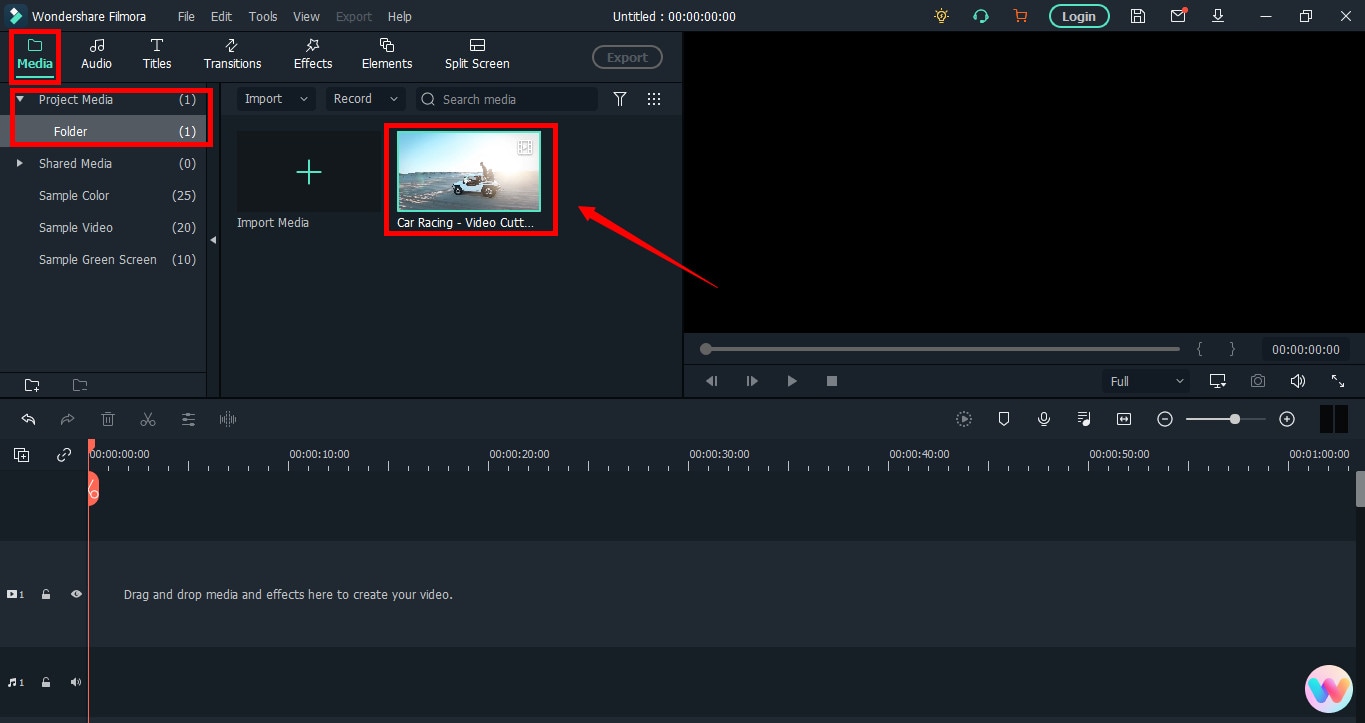
If you can see that, let’s go to the next step.
Step 3: Drag and Drop Video to Filmora’s Timeline
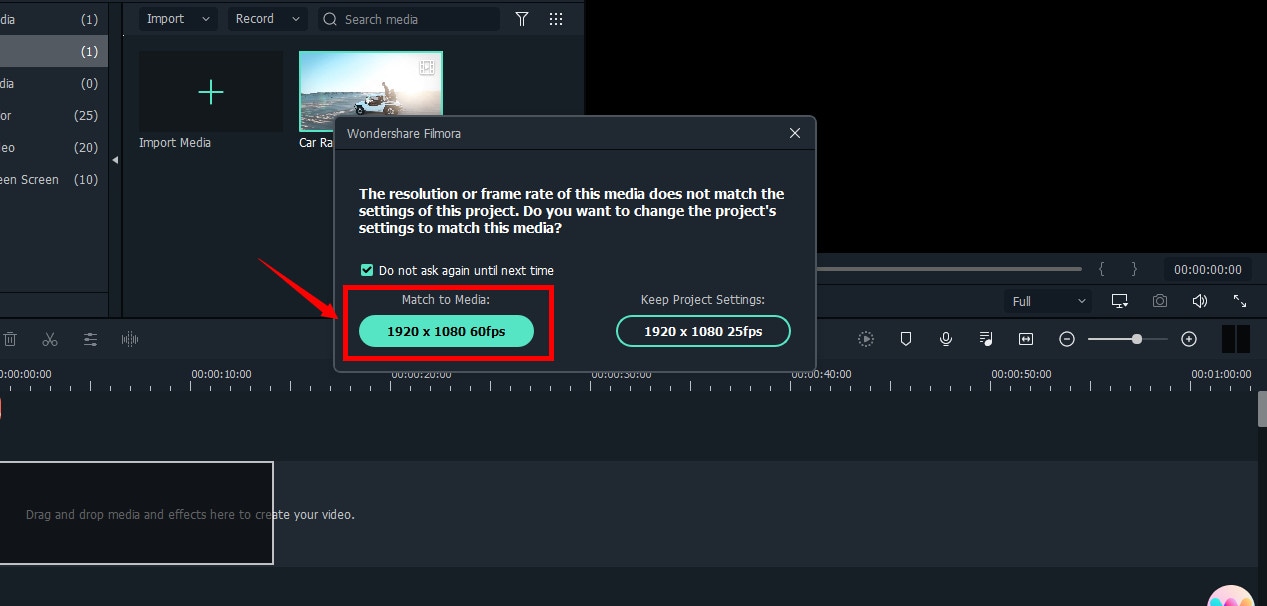
Select the video in the media folder by clicking over it once. Now, without leaving the hold of the left button of your mouse, slide the video down to the track in the timeline.
After that, a message will pop up, asking about your preference for the project settings. It is recommended to choose the “Match to Media” option unless you’re an experienced video editor who knows how to play with the resolution and frame rates.
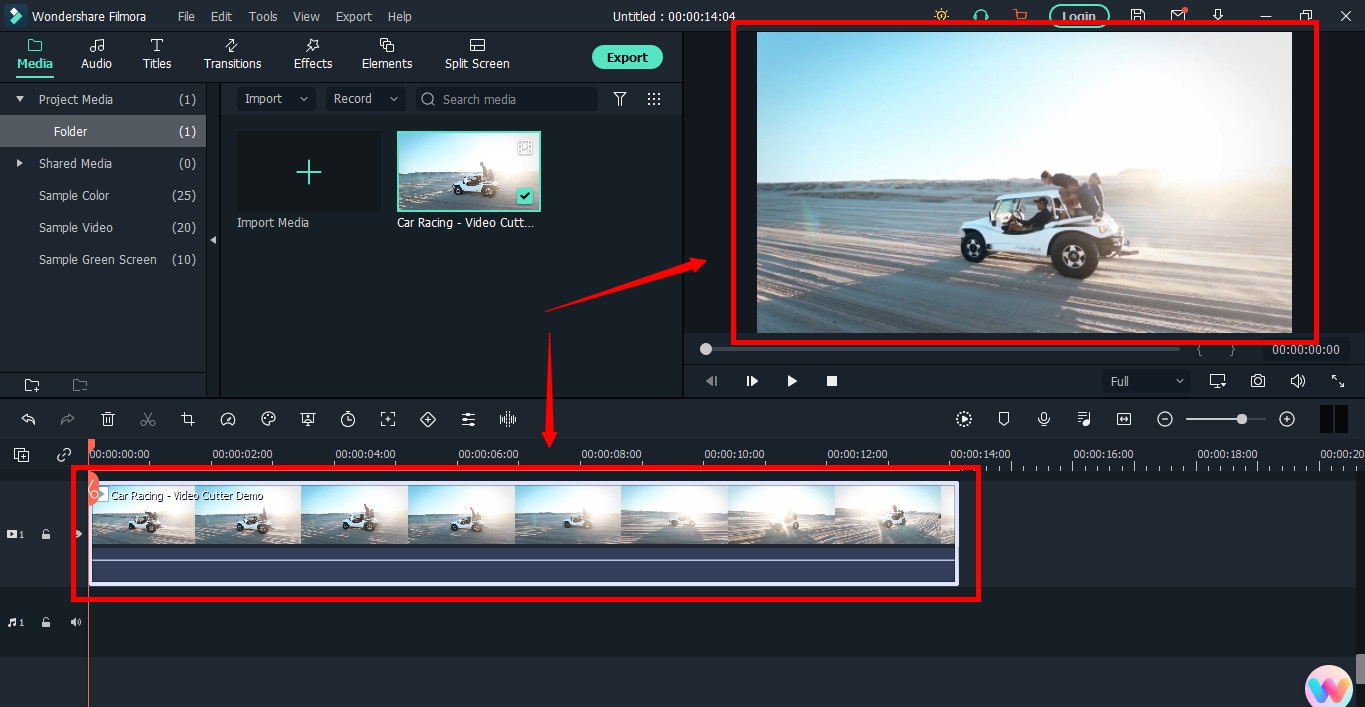
You will see the video on the timeline with its preview on the “Preview Screen” on the right side of the interface.
Step 4: Cutting Your Video in Filmora
Here comes the core step you have been waiting for. But before you go any further, you need to know about the “Playhead.”
Playhead is an orange-reddish marker you can find on the timeline.
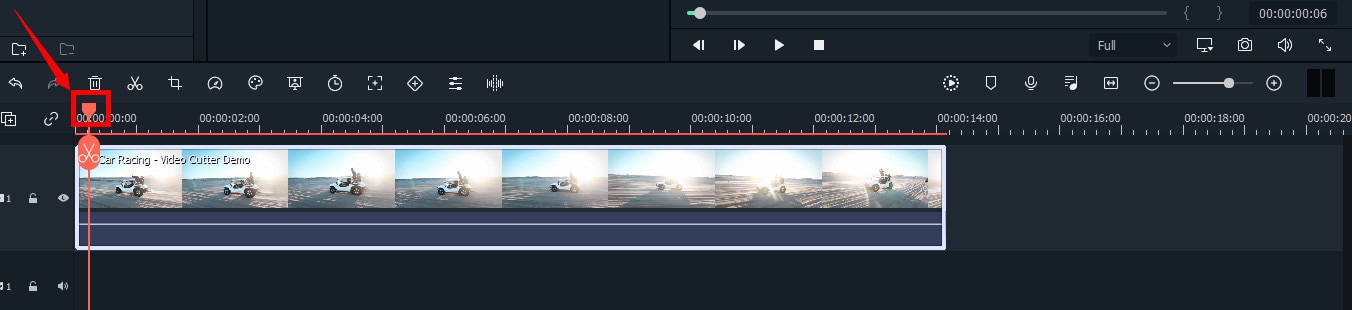
It has an important role in cutting your videos.
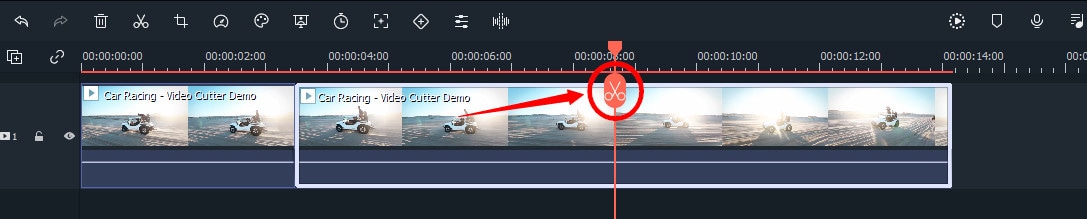
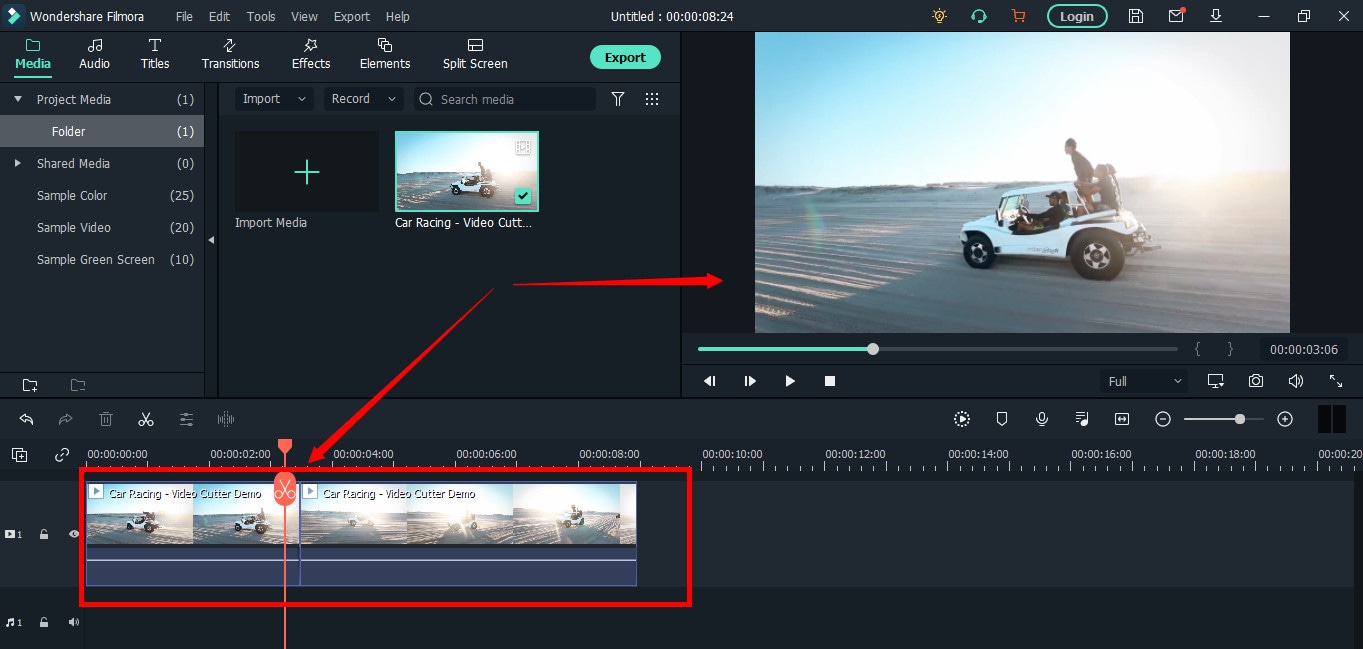
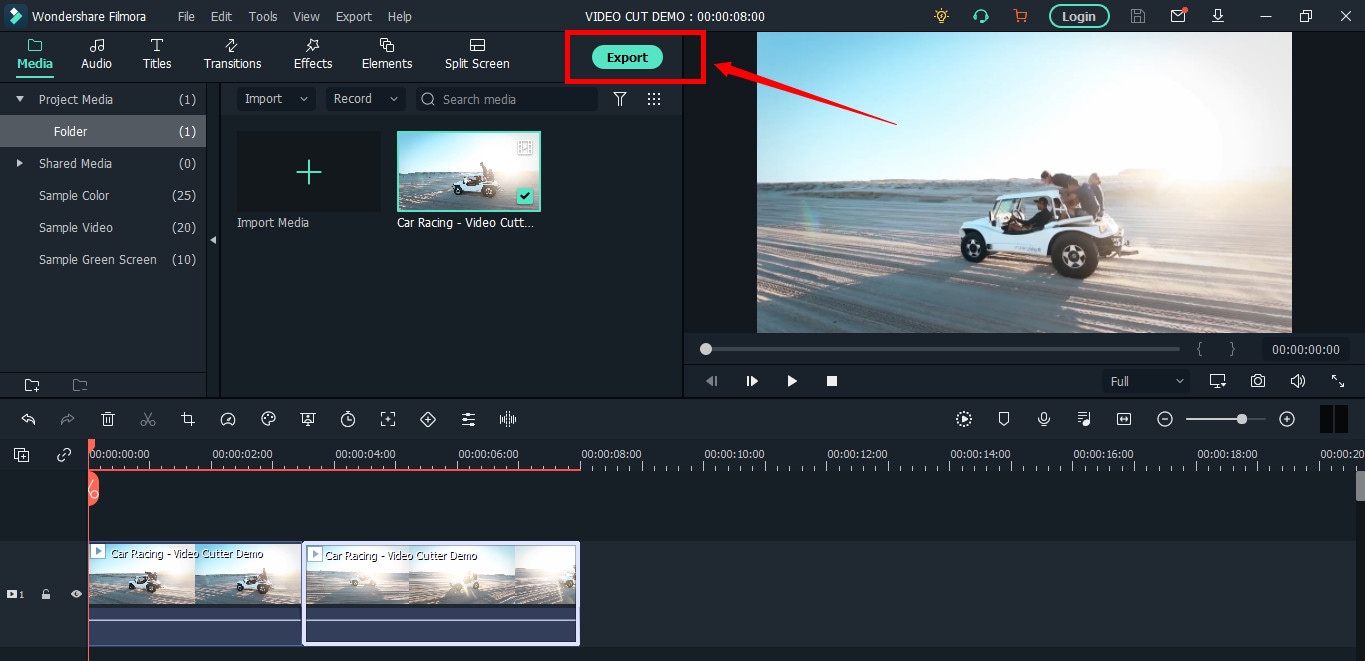
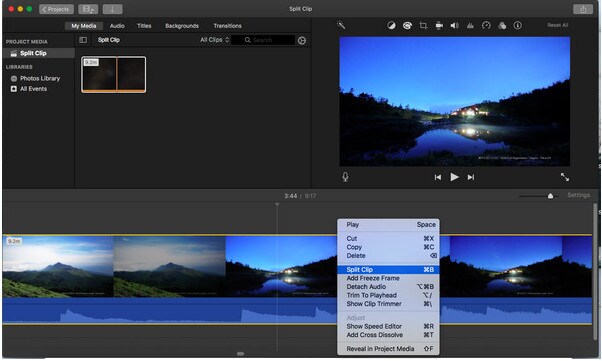
So, move the playhead to your desired frame and click on the “scissor” icon to make the “starting” cut.
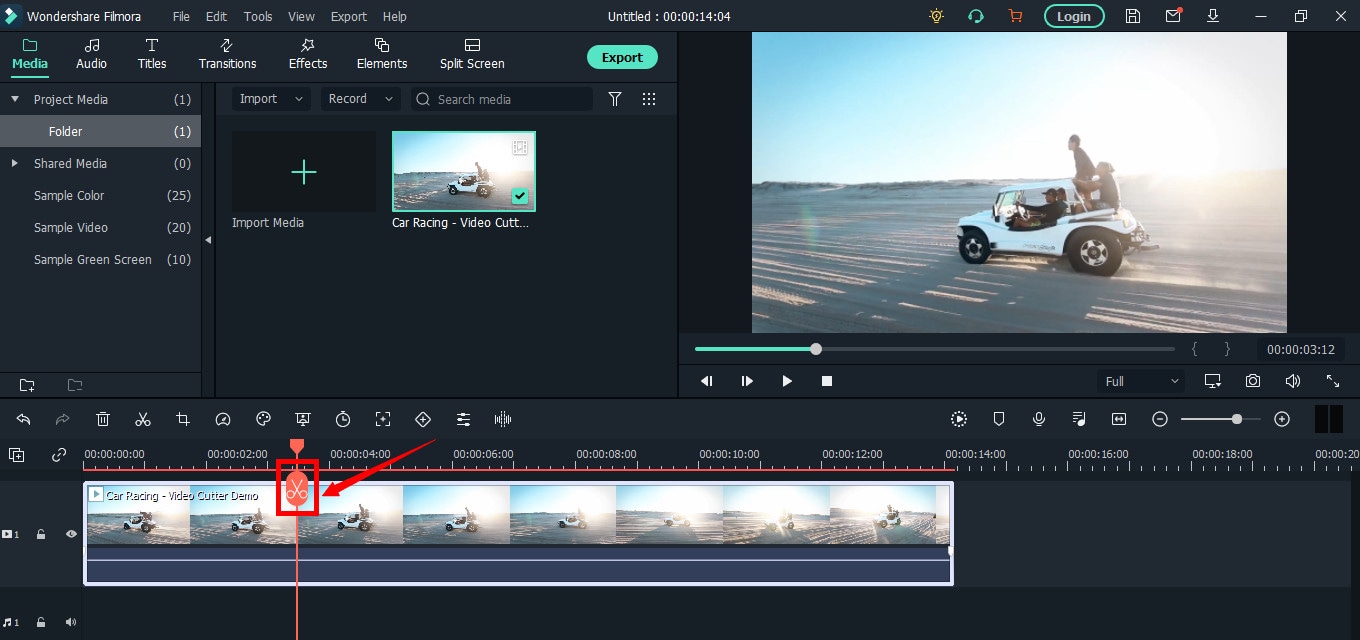
As soon as you do it, you will see that the single clip is now divided into two parts similar to this image.
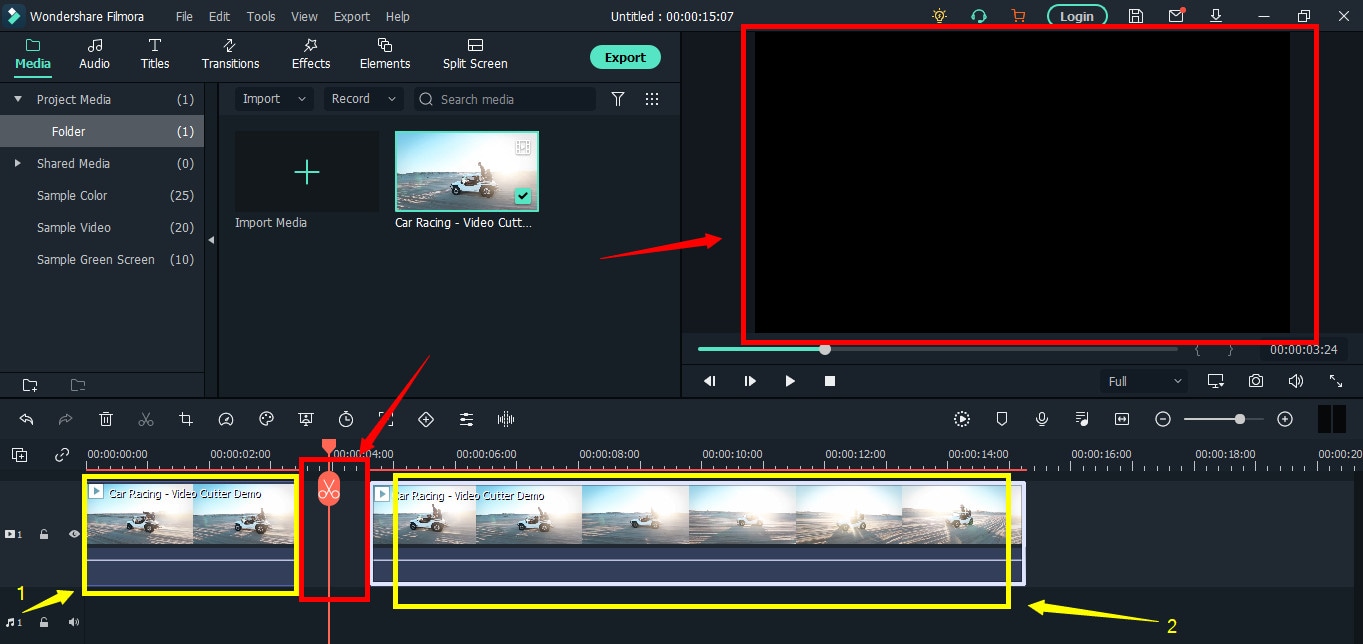
The “Red” marked area in the above screenshot ensures a gap between the clips on the timeline. The “Yellow” arrows confirm two separate clips of the same video.
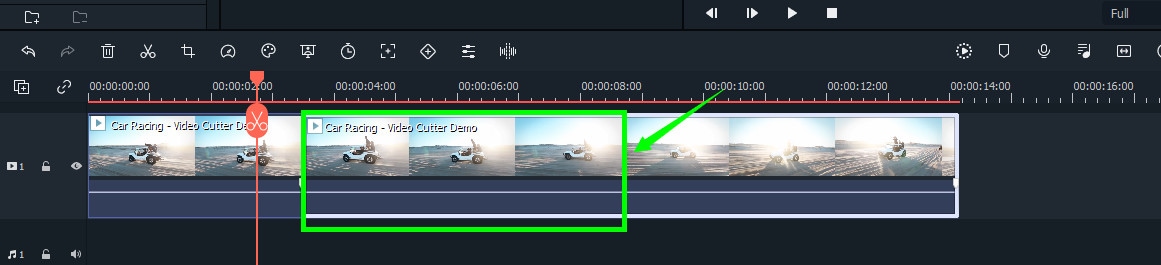
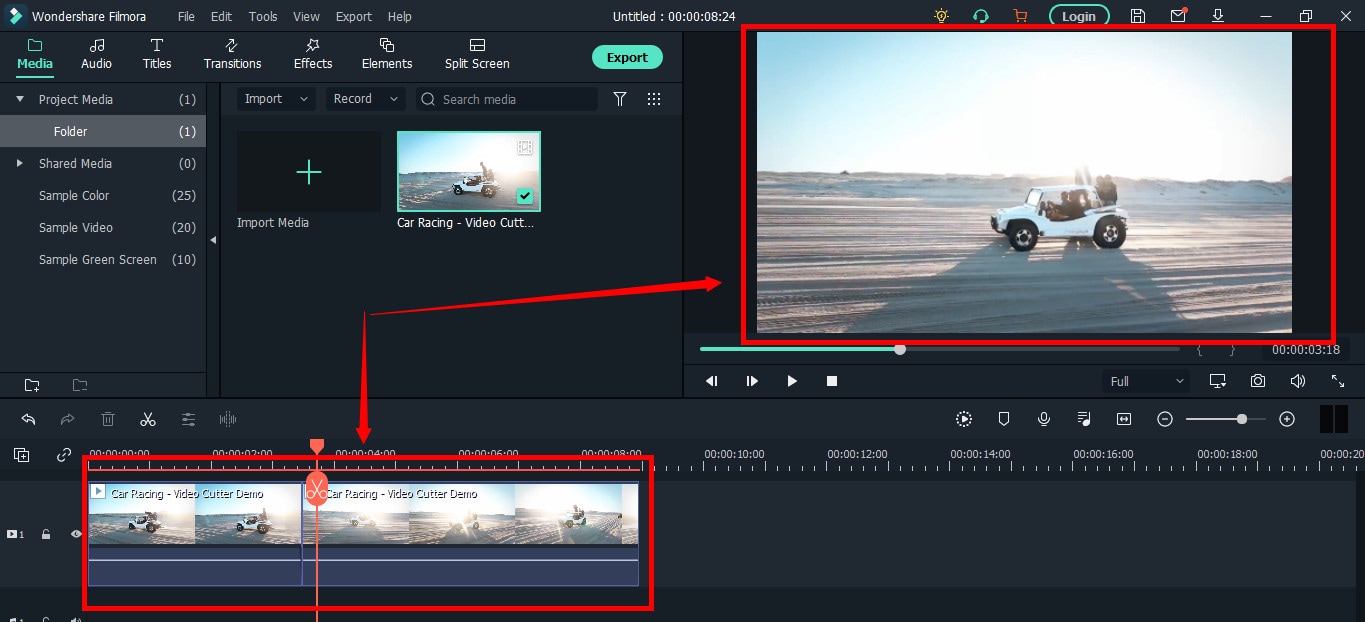
Place the two clips together as seen in this “Green” area.
And place the playhead anywhere on the clip. And click on the “scissor” icon once again to make the “ending” cut (second cut).
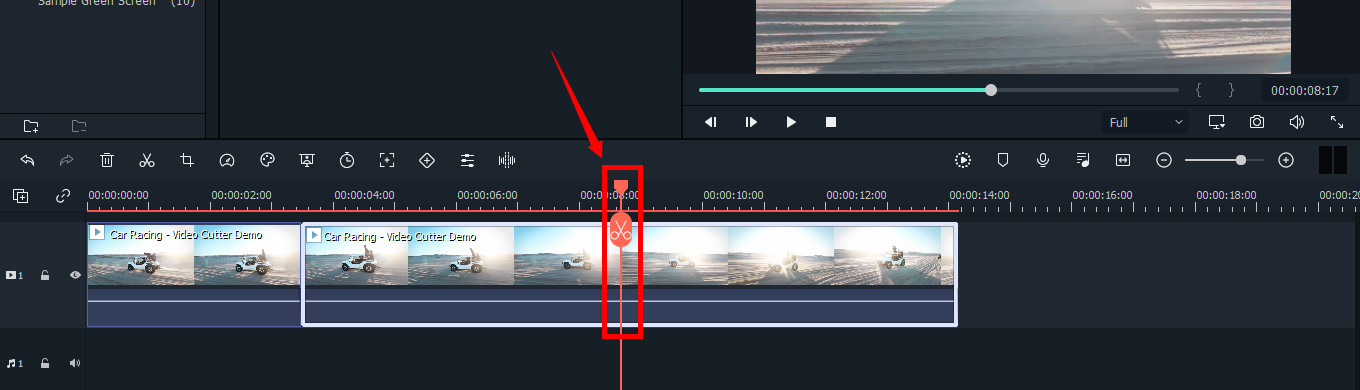
If done correctly, there should be three clips now of the same video, as you can observe in this screenshot.
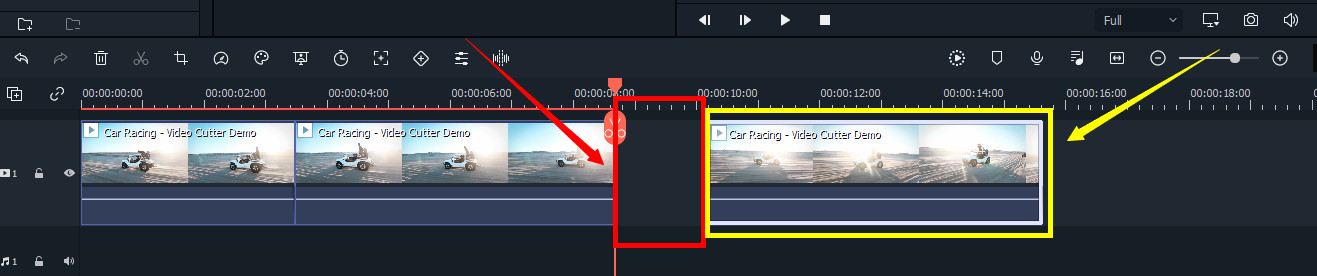
Again, the “Red” area in the above photo indicates the gap, and the “Yellow” area ensures a third segment of the video.
Note: The gaps you can see in the divided clips are made intentionally for understanding. Practically, Filmora doesn’t move the clip or make gaps in between after you have made the cuts.
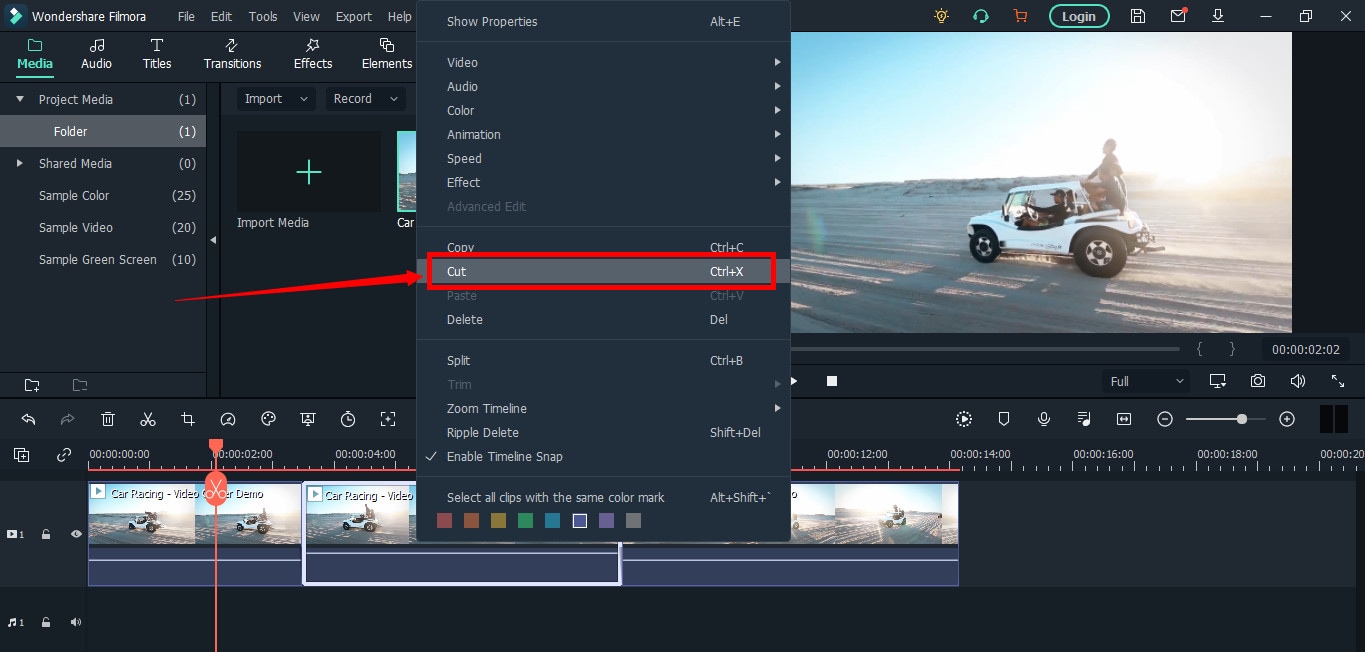
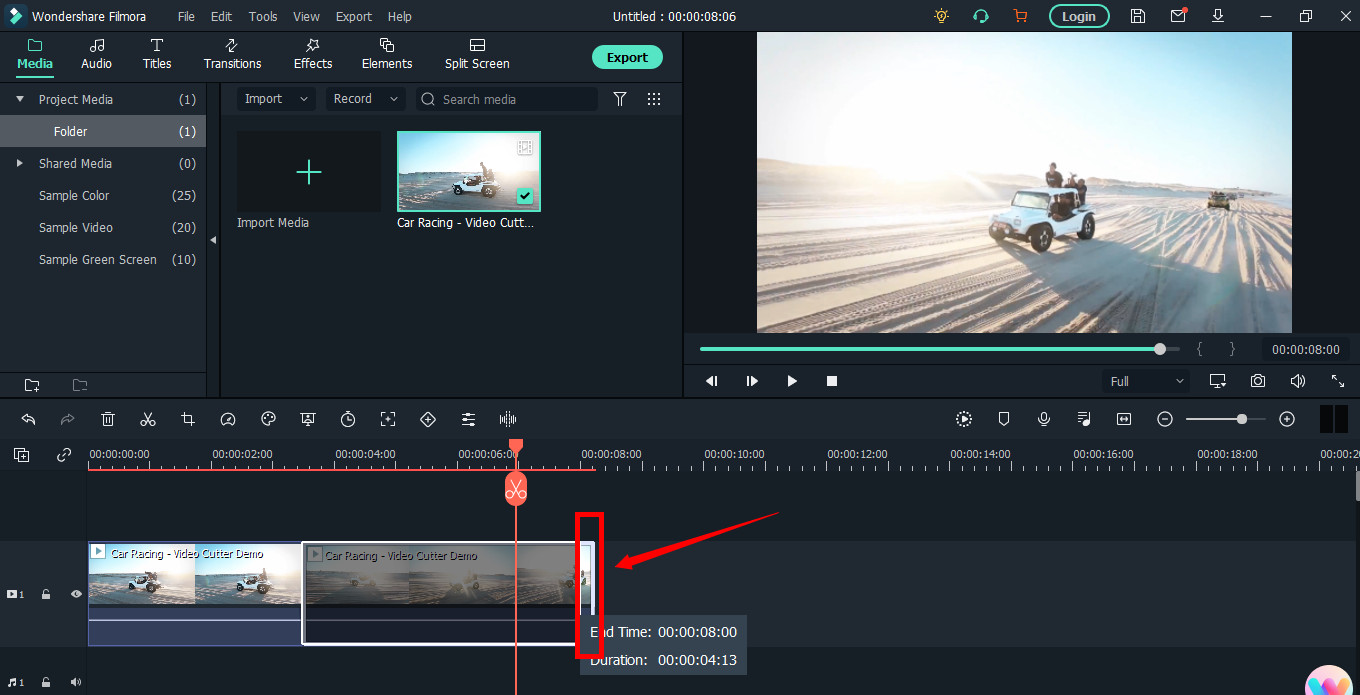
Keep in mind that there are three clips on the timeline. Now, if you want to remove the second clip from the video, you need to select that portion first by clicking on it.
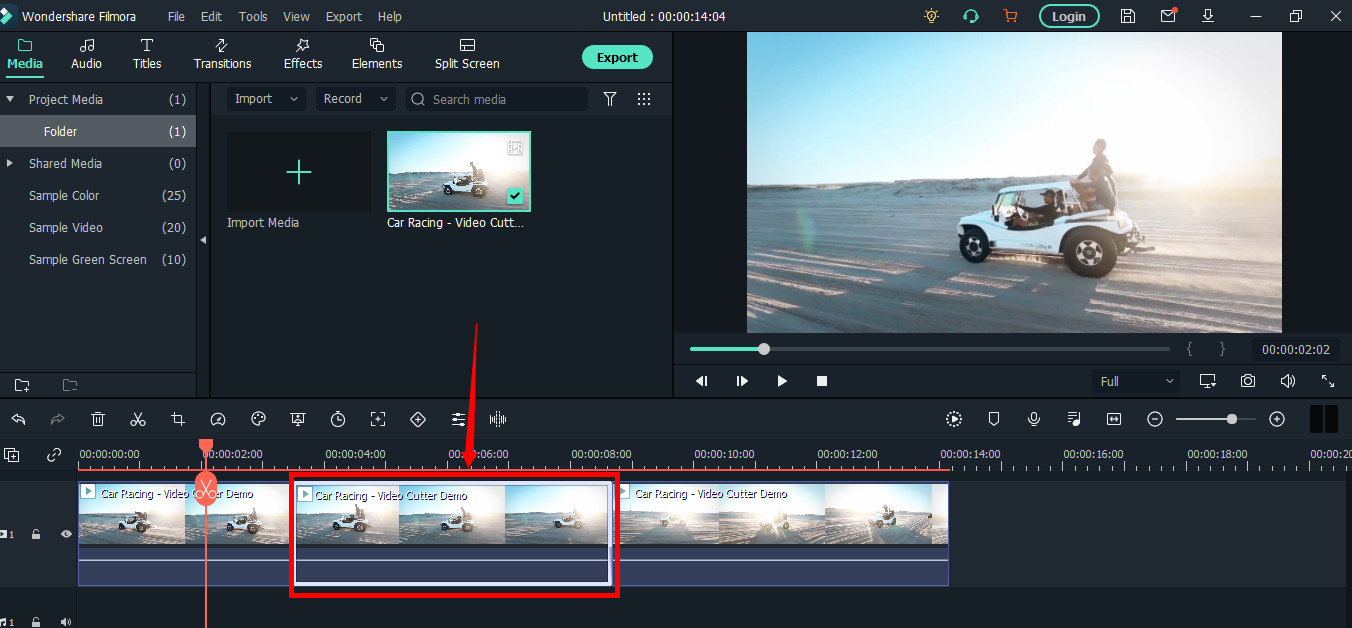
Then, right-click on the mouse and choose “Cut” from the menu.
Within a semi-second, the selected portion will be removed from the timeline. And you will be able to see the remaining parts of the video. Now, pull the second clip using your mouse and place it at the end of the first clip without leaving a gap in between.
Then, click the “Play” button under the preview screen to see the results.
You can see in the above two screenshots that there’s a jump between the scenes due to cuts, confirming that video has been cut significantly.
Step 5: Trimming Your Video in Filmora
Remember that cutting and trimming in Filmora are two different things. Trimming allows you to remove a particular video part from visibility without deleting the portion.
So feel free to skip this step if you’re happy learning the cutting technique. But if you’re interested in trimming, here’s how you do it.
Take your mouse cursor at the beginning or end of the clip you want to trim. Keep holding the clip’s corner and slide the mouse back or front to trim the part
Note: Since the trim tool doesn’t delete the video, the final project based on trimming will be of a larger size. Therefore, it is advised to cut videos rather than trimming for fast rendering, better results, and small video size.
Step 6: Save Project and Export Your Cut/Trimmed AVI Video
Choose “Save Project” from the “File” menu.
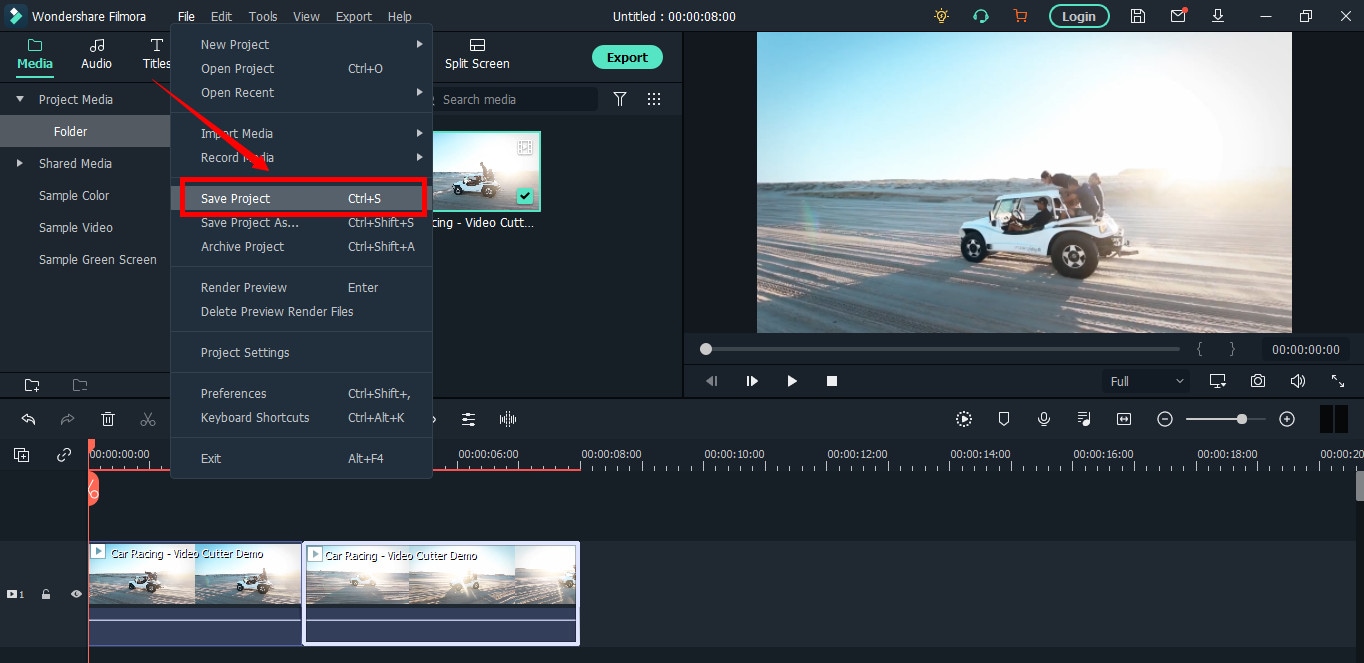
Select the directory to save the project, rename the new video, and click the “Save” button.

Click on the “Export” button to save the video in AVI or any other video format of your choice on your computer.
Part 2: Top 3 Free AVI Video Cutter on Windows
As a Windows user, finding an excellent video cutter is relatively easy. However, not all software permits importing AVI videos. In the same way, some video trimmers come at a price. So if you really don’t want to pay and enjoy cutting your AVI files, try using these three video cutting tools.
Microsoft Photos (Windows 10)
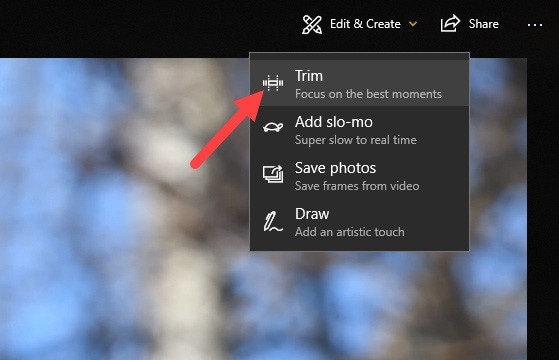
Microsoft Photos or Photo App is a free photo viewer and editor with your Windows 10. It offers incredible photo editing and enhancement along with different tools for organizing and editing videos in a very friendly way. Likewise, you can create drawings over the videos and add 3D effects and background music to your clips.
You can also trim AVI videos with Microsoft Photos quickly. All you need to do is open your clip with the Photo App, choose the “Trim” option, select a portion of the video you want to trim, and go ahead.
That’s it!
Features
- Quick video trimming
- Cool text effects
- 3D library and effects
- It has a clear interface
- You can find and tag people’s faces
- The program has 15+ filters for editing
- Motion tracking option for drawing on videos
- Allows you to view and organize your files easily
Pros
- Microsoft Photos is free for Windows users
- It automatically creates albums
- The program has a touch-friendly interface
- You can integrate your OneDrive with the software
Cons
- Lacks before and after view
- Not included in older Windows versions
- It doesn’t support selective focus or panorama stitching
Handbrake
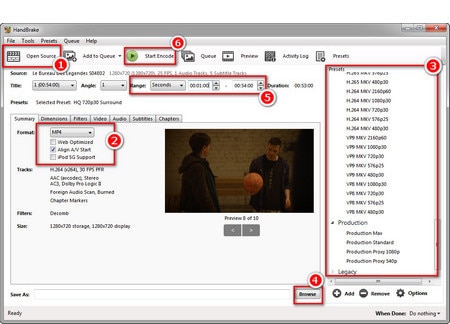
Handbrake is best-known for its video transcoding traits. Unlike typical video editors, this open-source tool includes limited options to rip Blu-rays and DVDs. Moreover, you can mix the 5.1 soundtracks and convert them to stereo to make the audio compatible with your TV speakers.
But the exciting thing about Handbrake is that you can use this software on your macOS 10.13 or later versions to cut AVI videos for free. However, it’s a bit technical process, as there’s no timeline to help you trim or make cuts on the clips directly with the help of your mouse.
You are required to mention a time range (seconds, minutes, or hours) to keep a specific part of the video while the software removes the non-ranged parts of the clip. For instance, you have a video of 10 seconds. You start the range from 5 seconds and end it at 10 seconds. So, the first four seconds of the video will be cut from the entire clip.
Features
- Video cutting, cropping, and resizing
- Low-quality and old video restoration
- Video conversion from any format to MKV or MP4
Pros
- Handbrake is free
- You can convert batch videos with ease
- It supports MAC, Windows, and Linux OS
- Allows you to import video files in all major formats
- The software comes with various video conversion presets
Cons
- Handbrake is not a user-friendly tool
- The video file output is limited to two formats (MKV and MP4) only
Gihosoft Video Cutter
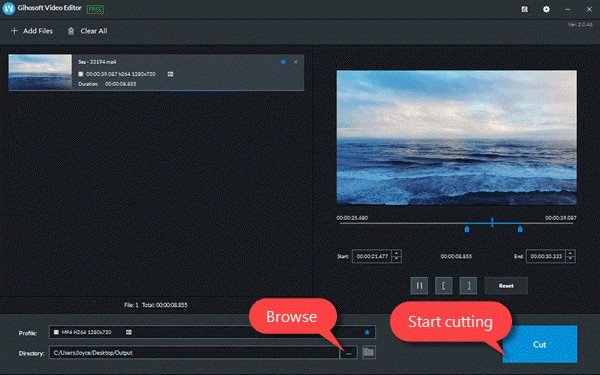
Gihosoft is a clean, free, lossless video cutter on your Windows PC. It’s a simple tool that helps you cut video files into various output formats. So be it AVI, MPEG, or any other file, with Gihosoft, everything becomes handy.
Another fascinating fact about this software is that it allows you to cut videos in three simple steps without losing the quality. So right after installing the program, you simply need to import your file, choose the start and end time, and click the “Cut” button to remove the part of the video.
Features
- Fast video and audio cutting
- Easy drag and drop audio/video files
- It supports most audio and video formats
Pros
- Free for both Windows and MAC operating systems
- The cutter saves video in original quality
Cons
- It does not include basic video editing features
Part 3: Top 3 Free AVI Video Cutter on MAC
Are you looking for a great AVI video cutter for your MAC? Sadly, you have limited product choices as compared to Windows users. But to ensure you don’t waste time looking for a suitable tool, here’s a list of three AVI video cutting programs you can use on your Macintosh.
iMovie
The first and foremost recommended software for free video cutting on MAC is Apple’s own tool, iMovie . It is a built-in program that comes with your system, so there is no need to spend extra on a video editor. iMovie allows you to browse and import most video files, including AVI, right from your computer. Also, this tool is equipped with multiple functions, such as audio editing, video quality enhancement, and much more.
This MAC’s video editor is ideal for beginners. Many home users and small business owners find this tool extremely simple, as they don’t like to be confused with complex features. So, if you want to make cuts to your video clips, start working on iMovie. And within a few clicks, you can trim or cut your videos for free.
Features
- Video cutting and trimming
- Cropping and rotation
- Effects and transitions
- Built-in themes
- HD and 4K video support
- Movie sharing
- Audio adjustments
- Chroma screen controls
- Character tracking
Pros
- Free to use for MAC users
- Clean timeline
- One-click video cutting and trimming
- Easy-to-remember keyboard shortcuts
- Direct share projects to your social media, like YouTube
Cons
- It takes a lot of time to export videos
- iMovie needs high HDD storage space
VideoPad by NCH

VideoPad by NCH is a beginner-level video editor with all the basic features. The software is specifically designed for home movie makers. That is why VideoPad is easy to understand and use.
VideoPad is entirely free of cost for non-commercial purposes, but it has limited features. On the other hand, if you want to enjoy full traits, you can purchase the tool.
VideoPad supports video files, including AVI, WMV, MPEG, MOV, MP4, ASF, and XviD. Likewise, you can also burn movies to Blu-ray, DVD, HD-DVD, or CD. And most importantly, you can easily cut or trim AVI videos on your MAC, as the software is available on both MAC and Windows systems.
Features
- Audio tools
- Video rotation
- Video sharing
- Visual effects
- Video transitions
- 3D Video editing
- Color correction
- Overlays and texts
- Video optimization
- Great plugin support
- Direct video uploading
- Multiple video resolutions
- Video cutting and trimming
- Files exportation to various devices
- Stereoscopic conversion from 2D to 3D
Pros
- You can use the basic tools for free
- Allows 360-degree video production
- It supports a wide range of video formats
- Compatible with MAC and Windows computers
Cons
- The auto speech feature performs poorly
- The free version has annoying notifications
Xilisoft Video Cutter
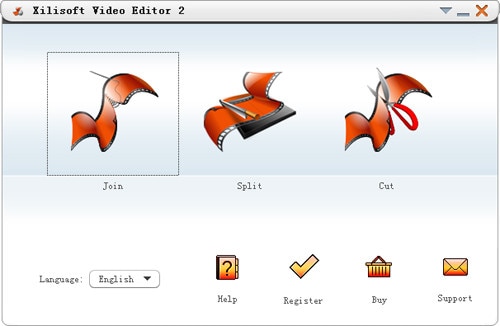
Xilisoft Video Cutter is the simplest tool to cut videos on MAC. This software has a straightforward option to cut the clip after importing it to the timeline. The program is fast and has a user-friendly interface.
Moreover, you can polish your videos by merging multiple clips or increasing the video quality once you’re done with the cutting process. At the same time, this video cutter allows you to import all video formats, including XviD, DivX, MOV, FLV, MP4, MPEG-4/, MKV, MPEG, WMV, and AVI.
Features
- Video joining
- Support multiple output video formats, including HD
Pros
- Easy video cutting and merging
- It doesn’t require a large storage space
- Extremely uncomplicated interface
- Real-time preview to make better cuts
- Available on both MAC and Windows systems
Cons
- The trial version is free to use but limits you from enjoying extra features
Part 4: Top 3 Free AVI Video Cutter on Android
After capturing nice videos with your Android mobile phone, you may need to cut unnecessary scenes to make your clips look professional. While there are numerous Android cutters, not all support the AVI format. So below, you will find the 3 best AVI video cutters for Android, which are free to use.
Quick – Video Editor & Maker
Quick – Video Editor & Maker is a free video editor with PRO results. Many photographers and vloggers love using this app to cut clips immediately. Furthermore, the application offers a wide range of options to assure you don’t have to look to any other tool to rotate or compress video. Quick – Video Editor & Maker lets you import videos in all major formats, including AVI, MPEG, WMA, and more.
Features
- Video cutting, fading, and rotation
- Speed control tools
- Conversion from video to GIF
Pros
- Free app
- Simple interface
Cons
- Lack of updates
- Some users complain about app crash
Funimate Video Editor & Maker
If you want to make some professional-grade video edits quickly, you are welcome to download and use Funimate Video Editor & Maker on your Android device. It’s a free tool to cut videos. It has an easy procedure, and you can cut AVI videos in a few seconds.
Plus, you can use the app to add custom animations, effects, and many other exciting elements. You can share your makes on social media like TikTok, Instagram, and other platforms. Contrarily, the app itself is a community with millions of Funimate-users who share their creations daily. You can also join or watch videos from other creators to learn more about new techniques and trends in video editing.
Features
- Video trimming and splitting
- Animation and cropping
- Filters and AI effects
- Speed adjustment
- Keyframing and video merging
Pros
- Free Android application with several editing tools
- Easy trimming, splitting, and cropping
- Aspect ratio, border, and color customization
- Direct social media sharing
Cons
- Free users cannot use templates
- The free version stamps watermarks on each project
Part 5: Top 3 Free AVI Video Cutter on iPhone
No wonder iPhone’s camera captures high-quality videos. But the problem begins when there’s no free app to cut AVI videos. So if you’re recording great spots, but deep inside, you really want to remove some parts, then these 3 free AVI video cutters will work smoothly on your iPhone.
Cut, Trim, Split Video Editor
Download Cut, Trim, Split Video Editor on your iPhone to delete/cut unwanted portions of your video clips. The tool is also best for trimming iPhone-recorded clips without messing with the frames. Or, if you just want to split the video into multiple parts for your next WhatsApp status, this iPhone app can do that job for you.
The app supports multiple video file types, including MOV, MP4, AVI, MPEG, MPEG-2, and 3GPP
Features
- Easy trimming and cutting video clips
- Splitting big-sized videos into two smaller clips
- Import video from file-sharing platforms, like iCloud, using Wi-Fi
Pros
- Free app for fast video cutting and sharing
- Simple UI interface
Cons
- The free version shows advertisements
Splice - Video Editor & Maker
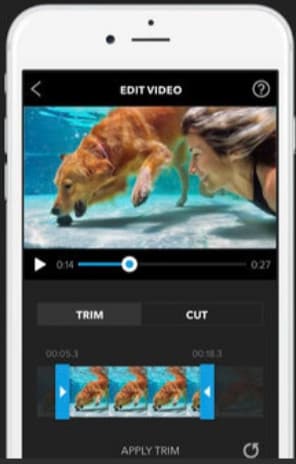
Splice is an extraordinary video editor that makes it easy to make fully customized and professional videos from your iPhone. The app is also best for video cutting. Besides, it has many interesting features, which you can use from your device.
Features
- Cutting, trimming, and cropping your videos
- Exposure, saturation, and exposure adjustment
- Slow and fast motion with speed ramping option
- Video masking and overlay
- Color correction and text overlays
Pros
- Free basic features, such as video cutting
- iTunes integration
- Supports AVI video input
- User-friendly application
- Access to the music library
- Quick and simple social sharing
Cons
- Output videos require high mobile storage space
Part 6: Top 3 Free AVI Video Cutter Online
Don’t want to install video cutters on your MAC, Windows, smartphone, or any other device? No problem! You can use online video cutters and trimmers to split, cut, or trim your clips for free.
However, the problem still exists in online tools, as not all web-based editors allow importing AVI files. So to save your time and energy, you can directly go to the following online AVI cutters to complete your tasks.
Kapwing
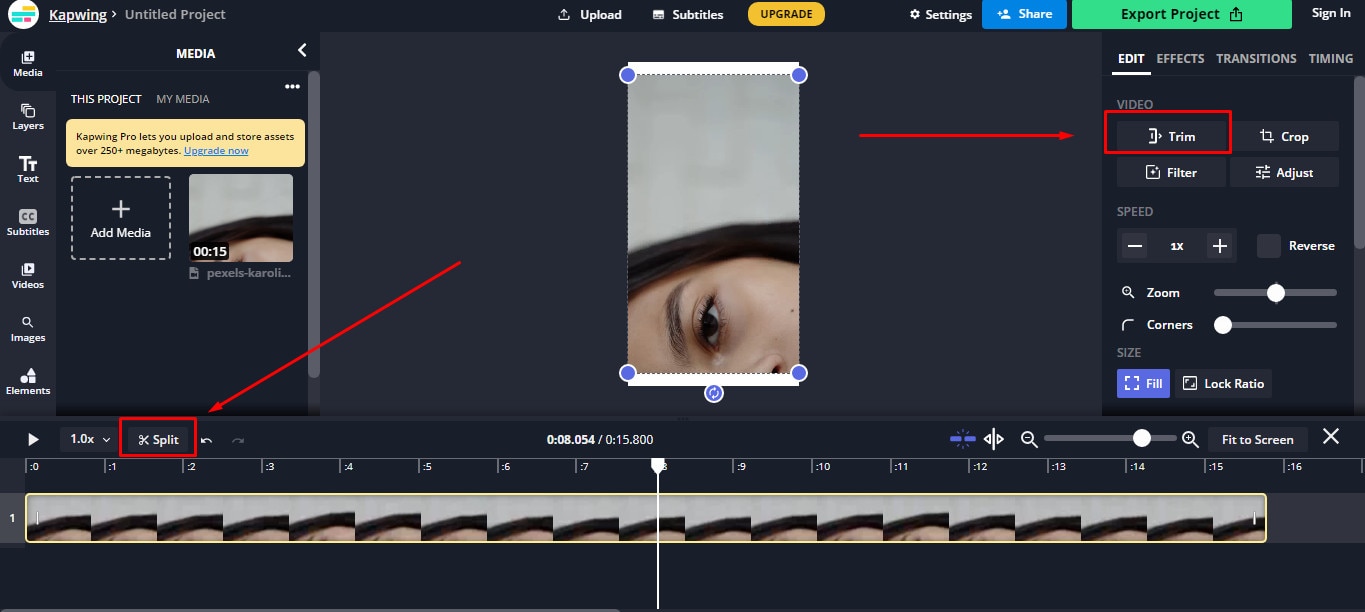
Kapwing is an online video editor best for casual creatives, such as Vloggers and YouTubers. You can use this web-based platform to cut your videos. Gladly, Kapwing supports all AVI incomings. You can upload your AVI video files to this platform and use its trim or split feature. To do that, you need to upload your AVI video and choose the “Trim” or “Split” tool to see the magic. Once done with the trimming process, you can explore Kapwing’s other incredible traits and apply them to your project.
Features
- Video splitting, trimming, and merging
- Audio capturing
- Speed adjustment
- Image and video library
- Text editing and overlay
- Auto-generated subtitles
- Several collaboration tools
- Video creation from scratch
- Templates, shapes, and emojis
- Simple drag-and-drop interface
- Video transitions, plugins, and elements
Pros
- Free online video trimmer
- User-friendly interface
- You can export 30-minutes long projects
- Allows you to export unlimited videos with a watermark
- One watermark-free video export is available each month
Cons
- Cannot export long videos with a free account
- Only 10 minutes transcription limit is available for free users
- You need to purchase a monthly or annual subscription to remove the watermark from multiple videos
Clideo
Clideo is not just a video cutter but an online solution to all your video editing problems. The tool is super popular, with 4 million+ users a month. And why not? This is one of those web-based platforms that allow AVI video files to be imported and exported without converting them into any other formats.
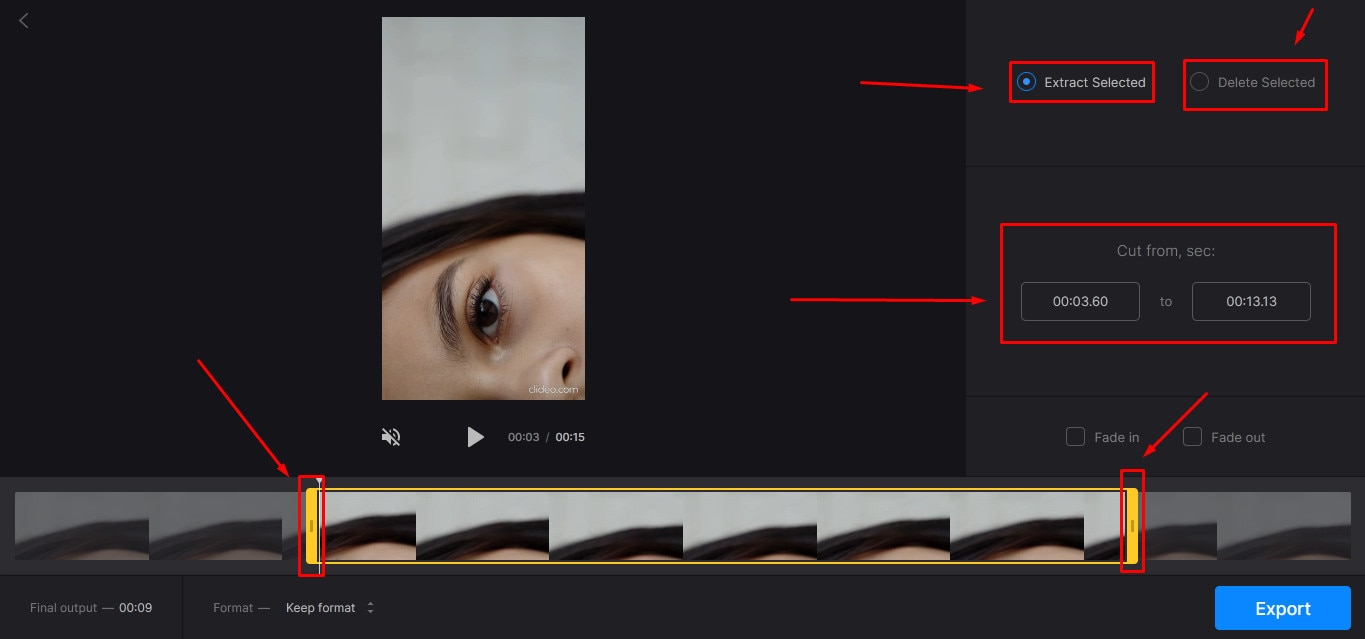
Nevertheless, if you’re only looking for video cutting options, this tool makes your life easy. Simply upload your video, and select the portion of it by setting start and end times. Choose whether you want to delete or extract the selected part from the clip, and hit the “Export” button.
And within a few moments, you can enjoy a trimmed video clip. And if you plan to be more creative, you can look for other Clideo features to make videos more fascinating.
Features
- Video combining and cutting
- Resize and crop clips
- Compress your videos
- Add text and subtitles
- Add music to your video files
- Filters and color correction tools
- Audio mute, cutting, and muting
- Video rotation, flipping, and speed adjustment
Pros
- Basic tools can be used for free
- Best for beginners and intermediate users
- Ideal for AVI videos and also supports other video formats
Cons
- You cannot use the free version regularly
Aspose
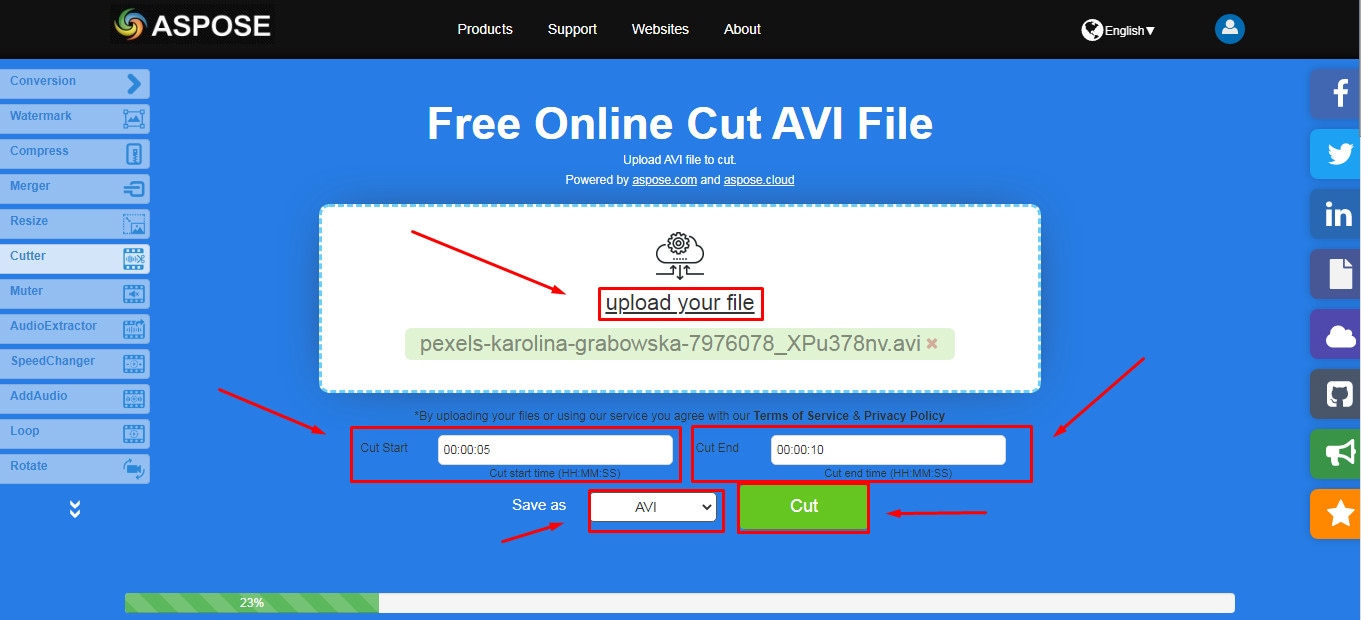
Aspose is a free web-based application to cut clips. You can use this tool on any operating system. It supports all major video file formats, including AVI, MKV, MOV, MP4, FLV, WMV, WEBM, and GIF. Additionally, you can use Aspose for various other reasons, such as audio extraction, video resizing, and more.
Features
- Video cutting and compressing
- Looping, rotation, and video merging
- Adding watermarks on videos
- Sound muting
- Speed change and audio addition
Pros
- Aspose is a free online tool
- It offers straightforward options to cut and edit videos
Cons
- No color correction option
- Slow video cutting process
- Lacks timeline and other valuable features
Part 7: Bottom Line
Tired of finding AVI cutters? Relax and try these top 16 AVI video cutters for Windows, MAC, iPhone, Android, and online. Almost all these tools are free to use and are extremely handy. On the other hand, if you want to cut and trim videos professionally, download Filmora and follow the step-by-step guide in this article for making clean cuts.
Part 8: FAQs
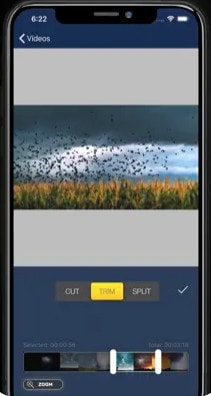
Q1. How do I trim an AVI video?
To trim an AVI video file, ensure that the software or tool you use supports AVI input. Generally, you need to upload or import a clip on the program, select the portion of the video, and apply the cut/trim feature to make it happen.
Q2. Which is the best online video cutter?
Kapwing and Clideo are the two best online video cutters you can use for free. Both web-based tools also allow you to cut your AVI videos.
Q3. Which is the best video cutter and joiner software?
Filmora, iMovie, and Kapwing are some of the best video cutters and joiner tools. These video editors are also free to use and come with different features.
Q4. How do I trim an AVI file in Windows 10?
Trimming an AVI video file in Windows 10 is very simple. Launch the Microsoft Photos (Photo App) application on your computer, add clip, and select the “Trim” tool to trim a specific video part.
Q5. How can I cut a video on my computer for free?
MAC and Windows users can download Filmora to cut videos for free. Filmora also offers a wide range of other features to make your clips exciting. Contrarily, Windows users can use the built-in Photo App in Windows 10 or download Gihosoft or Handbrake software to cut clips. Likewise, MAC users can download VideoPad, Xilisoft Video Cutter, or iMovie for free.
With the growing fame of video-sharing and social media applications like Twitter, Instagram, and TikTok, the demand for simple and fast video cutting and trimming tools has dramatically increased. Nowadays, you don’t have to play with complex video editing tools to produce high-quality videos.
Thanks to several user-friendly editing software to make things easy for everybody. However, finding the right programs to trim/cut videos is still challenging, especially in AVI format.
But, guess what? These top 16 AVI video cutters for Windows, MAC, Android, iPhone, and online will make video cutting and trimming fun, especially when you learn to do it using Filmora.
In this Article
Part 1: Best AVI Video Cutter to Trim/Cut AVI Video on Windows and MAC – Filmora Video Cutter [with steps}
Part 2: Top 3 Free AVI Video Cutter on Windows
Part 3: Top 3 Free AVI Video Cutter on MAC
Part 4: Top 3 Free AVI Video Cutter on Android
Part 5: Top 3 Free AVI Video Cutter on iPhone
Part 6: Top 3 Free AVI Video Cutter Online
Part 7: Bottom Line
Part 8: FAQs
Part 1: Best AVI Video Cutter to Trim/Cut AVI Video on Windows and MAC – Filmora Video Cutter [with steps]
Filmora by Wondershare is a star video editor with outstanding outcomes. Whether you have a MAC or Windows PC, you can download Filmora regardless of your operating system. The program best serves those who intend to make high-quality videos. The software provides editing support for all video formats, including AVI.
Although Filmora is an affordable editor with tons of audio and video editing options, you can still download the software for free and create projects if watermarks don’t bother you. Moreover, you can count this tool’s capabilities in cropping, resizing, and Chroma screen support. But that’s not the only sweet fruit.
In fact, Filmora is equipped with many jaw-dropping features, including preset templates, auto beat sync, split-screen, speed ramping, motion tracking, keyframing, creative transitions, titles, filters, and much more. And the best part is, you can learn and understand Filmora in no time. That’s why the program is loved and supported by all types of users.
So does Filmora helps cut and trim AVI videos? Yes! It does if you follow these steps correctly.
Step 1: Download Filmora Video Editor
First, download Filmora Video Editor by choosing your operating system, as seen in the screenshot below.
Run the setup and let it finish without any pause or break.
Step 2: Import Your Video to Filmora Video Editor
Importing your AVI video is a very simple process. Just click on the “Film Clip” icon.
It will open a new window screen on your computer to select the video from the directory. Find the clip you want to import and cut. Use your mouse to select it and click the “Open” button.
The video will be loaded in the “Media” folder of Filmora. The clip’s thumbnail should be visible to assure you have done everything correctly.
If you can see that, let’s go to the next step.
Step 3: Drag and Drop Video to Filmora’s Timeline
Select the video in the media folder by clicking over it once. Now, without leaving the hold of the left button of your mouse, slide the video down to the track in the timeline.
After that, a message will pop up, asking about your preference for the project settings. It is recommended to choose the “Match to Media” option unless you’re an experienced video editor who knows how to play with the resolution and frame rates.
You will see the video on the timeline with its preview on the “Preview Screen” on the right side of the interface.
Step 4: Cutting Your Video in Filmora
Here comes the core step you have been waiting for. But before you go any further, you need to know about the “Playhead.”
Playhead is an orange-reddish marker you can find on the timeline.
It has an important role in cutting your videos.
So, move the playhead to your desired frame and click on the “scissor” icon to make the “starting” cut.
As soon as you do it, you will see that the single clip is now divided into two parts similar to this image.
The “Red” marked area in the above screenshot ensures a gap between the clips on the timeline. The “Yellow” arrows confirm two separate clips of the same video.
Place the two clips together as seen in this “Green” area.
And place the playhead anywhere on the clip. And click on the “scissor” icon once again to make the “ending” cut (second cut).
If done correctly, there should be three clips now of the same video, as you can observe in this screenshot.
Again, the “Red” area in the above photo indicates the gap, and the “Yellow” area ensures a third segment of the video.
Note: The gaps you can see in the divided clips are made intentionally for understanding. Practically, Filmora doesn’t move the clip or make gaps in between after you have made the cuts.
Keep in mind that there are three clips on the timeline. Now, if you want to remove the second clip from the video, you need to select that portion first by clicking on it.
Then, right-click on the mouse and choose “Cut” from the menu.
Within a semi-second, the selected portion will be removed from the timeline. And you will be able to see the remaining parts of the video. Now, pull the second clip using your mouse and place it at the end of the first clip without leaving a gap in between.
Then, click the “Play” button under the preview screen to see the results.
You can see in the above two screenshots that there’s a jump between the scenes due to cuts, confirming that video has been cut significantly.
Step 5: Trimming Your Video in Filmora
Remember that cutting and trimming in Filmora are two different things. Trimming allows you to remove a particular video part from visibility without deleting the portion.
So feel free to skip this step if you’re happy learning the cutting technique. But if you’re interested in trimming, here’s how you do it.
Take your mouse cursor at the beginning or end of the clip you want to trim. Keep holding the clip’s corner and slide the mouse back or front to trim the part
Note: Since the trim tool doesn’t delete the video, the final project based on trimming will be of a larger size. Therefore, it is advised to cut videos rather than trimming for fast rendering, better results, and small video size.
Step 6: Save Project and Export Your Cut/Trimmed AVI Video
Choose “Save Project” from the “File” menu.
Select the directory to save the project, rename the new video, and click the “Save” button.
Click on the “Export” button to save the video in AVI or any other video format of your choice on your computer.
Part 2: Top 3 Free AVI Video Cutter on Windows
As a Windows user, finding an excellent video cutter is relatively easy. However, not all software permits importing AVI videos. In the same way, some video trimmers come at a price. So if you really don’t want to pay and enjoy cutting your AVI files, try using these three video cutting tools.
Microsoft Photos (Windows 10)
Microsoft Photos or Photo App is a free photo viewer and editor with your Windows 10. It offers incredible photo editing and enhancement along with different tools for organizing and editing videos in a very friendly way. Likewise, you can create drawings over the videos and add 3D effects and background music to your clips.
You can also trim AVI videos with Microsoft Photos quickly. All you need to do is open your clip with the Photo App, choose the “Trim” option, select a portion of the video you want to trim, and go ahead.
That’s it!
Features
- Quick video trimming
- Cool text effects
- 3D library and effects
- It has a clear interface
- You can find and tag people’s faces
- The program has 15+ filters for editing
- Motion tracking option for drawing on videos
- Allows you to view and organize your files easily
Pros
- Microsoft Photos is free for Windows users
- It automatically creates albums
- The program has a touch-friendly interface
- You can integrate your OneDrive with the software
Cons
- Lacks before and after view
- Not included in older Windows versions
- It doesn’t support selective focus or panorama stitching
Handbrake
Handbrake is best-known for its video transcoding traits. Unlike typical video editors, this open-source tool includes limited options to rip Blu-rays and DVDs. Moreover, you can mix the 5.1 soundtracks and convert them to stereo to make the audio compatible with your TV speakers.
But the exciting thing about Handbrake is that you can use this software on your macOS 10.13 or later versions to cut AVI videos for free. However, it’s a bit technical process, as there’s no timeline to help you trim or make cuts on the clips directly with the help of your mouse.
You are required to mention a time range (seconds, minutes, or hours) to keep a specific part of the video while the software removes the non-ranged parts of the clip. For instance, you have a video of 10 seconds. You start the range from 5 seconds and end it at 10 seconds. So, the first four seconds of the video will be cut from the entire clip.
Features
- Video cutting, cropping, and resizing
- Low-quality and old video restoration
- Video conversion from any format to MKV or MP4
Pros
- Handbrake is free
- You can convert batch videos with ease
- It supports MAC, Windows, and Linux OS
- Allows you to import video files in all major formats
- The software comes with various video conversion presets
Cons
- Handbrake is not a user-friendly tool
- The video file output is limited to two formats (MKV and MP4) only
Gihosoft Video Cutter
Gihosoft is a clean, free, lossless video cutter on your Windows PC. It’s a simple tool that helps you cut video files into various output formats. So be it AVI, MPEG, or any other file, with Gihosoft, everything becomes handy.
Another fascinating fact about this software is that it allows you to cut videos in three simple steps without losing the quality. So right after installing the program, you simply need to import your file, choose the start and end time, and click the “Cut” button to remove the part of the video.
Features
- Fast video and audio cutting
- Easy drag and drop audio/video files
- It supports most audio and video formats
Pros
- Free for both Windows and MAC operating systems
- The cutter saves video in original quality
Cons
- It does not include basic video editing features
Part 3: Top 3 Free AVI Video Cutter on MAC
Are you looking for a great AVI video cutter for your MAC? Sadly, you have limited product choices as compared to Windows users. But to ensure you don’t waste time looking for a suitable tool, here’s a list of three AVI video cutting programs you can use on your Macintosh.
iMovie
The first and foremost recommended software for free video cutting on MAC is Apple’s own tool, iMovie . It is a built-in program that comes with your system, so there is no need to spend extra on a video editor. iMovie allows you to browse and import most video files, including AVI, right from your computer. Also, this tool is equipped with multiple functions, such as audio editing, video quality enhancement, and much more.
This MAC’s video editor is ideal for beginners. Many home users and small business owners find this tool extremely simple, as they don’t like to be confused with complex features. So, if you want to make cuts to your video clips, start working on iMovie. And within a few clicks, you can trim or cut your videos for free.
Features
- Video cutting and trimming
- Cropping and rotation
- Effects and transitions
- Built-in themes
- HD and 4K video support
- Movie sharing
- Audio adjustments
- Chroma screen controls
- Character tracking
Pros
- Free to use for MAC users
- Clean timeline
- One-click video cutting and trimming
- Easy-to-remember keyboard shortcuts
- Direct share projects to your social media, like YouTube
Cons
- It takes a lot of time to export videos
- iMovie needs high HDD storage space
VideoPad by NCH
VideoPad by NCH is a beginner-level video editor with all the basic features. The software is specifically designed for home movie makers. That is why VideoPad is easy to understand and use.
VideoPad is entirely free of cost for non-commercial purposes, but it has limited features. On the other hand, if you want to enjoy full traits, you can purchase the tool.
VideoPad supports video files, including AVI, WMV, MPEG, MOV, MP4, ASF, and XviD. Likewise, you can also burn movies to Blu-ray, DVD, HD-DVD, or CD. And most importantly, you can easily cut or trim AVI videos on your MAC, as the software is available on both MAC and Windows systems.
Features
- Audio tools
- Video rotation
- Video sharing
- Visual effects
- Video transitions
- 3D Video editing
- Color correction
- Overlays and texts
- Video optimization
- Great plugin support
- Direct video uploading
- Multiple video resolutions
- Video cutting and trimming
- Files exportation to various devices
- Stereoscopic conversion from 2D to 3D
Pros
- You can use the basic tools for free
- Allows 360-degree video production
- It supports a wide range of video formats
- Compatible with MAC and Windows computers
Cons
- The auto speech feature performs poorly
- The free version has annoying notifications
Xilisoft Video Cutter
Xilisoft Video Cutter is the simplest tool to cut videos on MAC. This software has a straightforward option to cut the clip after importing it to the timeline. The program is fast and has a user-friendly interface.
Moreover, you can polish your videos by merging multiple clips or increasing the video quality once you’re done with the cutting process. At the same time, this video cutter allows you to import all video formats, including XviD, DivX, MOV, FLV, MP4, MPEG-4/, MKV, MPEG, WMV, and AVI.
Features
- Video joining
- Support multiple output video formats, including HD
Pros
- Easy video cutting and merging
- It doesn’t require a large storage space
- Extremely uncomplicated interface
- Real-time preview to make better cuts
- Available on both MAC and Windows systems
Cons
- The trial version is free to use but limits you from enjoying extra features
Part 4: Top 3 Free AVI Video Cutter on Android
After capturing nice videos with your Android mobile phone, you may need to cut unnecessary scenes to make your clips look professional. While there are numerous Android cutters, not all support the AVI format. So below, you will find the 3 best AVI video cutters for Android, which are free to use.
Quick – Video Editor & Maker
Quick – Video Editor & Maker is a free video editor with PRO results. Many photographers and vloggers love using this app to cut clips immediately. Furthermore, the application offers a wide range of options to assure you don’t have to look to any other tool to rotate or compress video. Quick – Video Editor & Maker lets you import videos in all major formats, including AVI, MPEG, WMA, and more.
Features
- Video cutting, fading, and rotation
- Speed control tools
- Conversion from video to GIF
Pros
- Free app
- Simple interface
Cons
- Lack of updates
- Some users complain about app crash
Funimate Video Editor & Maker
If you want to make some professional-grade video edits quickly, you are welcome to download and use Funimate Video Editor & Maker on your Android device. It’s a free tool to cut videos. It has an easy procedure, and you can cut AVI videos in a few seconds.
Plus, you can use the app to add custom animations, effects, and many other exciting elements. You can share your makes on social media like TikTok, Instagram, and other platforms. Contrarily, the app itself is a community with millions of Funimate-users who share their creations daily. You can also join or watch videos from other creators to learn more about new techniques and trends in video editing.
Features
- Video trimming and splitting
- Animation and cropping
- Filters and AI effects
- Speed adjustment
- Keyframing and video merging
Pros
- Free Android application with several editing tools
- Easy trimming, splitting, and cropping
- Aspect ratio, border, and color customization
- Direct social media sharing
Cons
- Free users cannot use templates
- The free version stamps watermarks on each project
Part 5: Top 3 Free AVI Video Cutter on iPhone
No wonder iPhone’s camera captures high-quality videos. But the problem begins when there’s no free app to cut AVI videos. So if you’re recording great spots, but deep inside, you really want to remove some parts, then these 3 free AVI video cutters will work smoothly on your iPhone.
Cut, Trim, Split Video Editor
Download Cut, Trim, Split Video Editor on your iPhone to delete/cut unwanted portions of your video clips. The tool is also best for trimming iPhone-recorded clips without messing with the frames. Or, if you just want to split the video into multiple parts for your next WhatsApp status, this iPhone app can do that job for you.
The app supports multiple video file types, including MOV, MP4, AVI, MPEG, MPEG-2, and 3GPP
Features
- Easy trimming and cutting video clips
- Splitting big-sized videos into two smaller clips
- Import video from file-sharing platforms, like iCloud, using Wi-Fi
Pros
- Free app for fast video cutting and sharing
- Simple UI interface
Cons
- The free version shows advertisements
Splice - Video Editor & Maker
Splice is an extraordinary video editor that makes it easy to make fully customized and professional videos from your iPhone. The app is also best for video cutting. Besides, it has many interesting features, which you can use from your device.
Features
- Cutting, trimming, and cropping your videos
- Exposure, saturation, and exposure adjustment
- Slow and fast motion with speed ramping option
- Video masking and overlay
- Color correction and text overlays
Pros
- Free basic features, such as video cutting
- iTunes integration
- Supports AVI video input
- User-friendly application
- Access to the music library
- Quick and simple social sharing
Cons
- Output videos require high mobile storage space
Part 6: Top 3 Free AVI Video Cutter Online
Don’t want to install video cutters on your MAC, Windows, smartphone, or any other device? No problem! You can use online video cutters and trimmers to split, cut, or trim your clips for free.
However, the problem still exists in online tools, as not all web-based editors allow importing AVI files. So to save your time and energy, you can directly go to the following online AVI cutters to complete your tasks.
Kapwing
Kapwing is an online video editor best for casual creatives, such as Vloggers and YouTubers. You can use this web-based platform to cut your videos. Gladly, Kapwing supports all AVI incomings. You can upload your AVI video files to this platform and use its trim or split feature. To do that, you need to upload your AVI video and choose the “Trim” or “Split” tool to see the magic. Once done with the trimming process, you can explore Kapwing’s other incredible traits and apply them to your project.
Features
- Video splitting, trimming, and merging
- Audio capturing
- Speed adjustment
- Image and video library
- Text editing and overlay
- Auto-generated subtitles
- Several collaboration tools
- Video creation from scratch
- Templates, shapes, and emojis
- Simple drag-and-drop interface
- Video transitions, plugins, and elements
Pros
- Free online video trimmer
- User-friendly interface
- You can export 30-minutes long projects
- Allows you to export unlimited videos with a watermark
- One watermark-free video export is available each month
Cons
- Cannot export long videos with a free account
- Only 10 minutes transcription limit is available for free users
- You need to purchase a monthly or annual subscription to remove the watermark from multiple videos
Clideo
Clideo is not just a video cutter but an online solution to all your video editing problems. The tool is super popular, with 4 million+ users a month. And why not? This is one of those web-based platforms that allow AVI video files to be imported and exported without converting them into any other formats.
Nevertheless, if you’re only looking for video cutting options, this tool makes your life easy. Simply upload your video, and select the portion of it by setting start and end times. Choose whether you want to delete or extract the selected part from the clip, and hit the “Export” button.
And within a few moments, you can enjoy a trimmed video clip. And if you plan to be more creative, you can look for other Clideo features to make videos more fascinating.
Features
- Video combining and cutting
- Resize and crop clips
- Compress your videos
- Add text and subtitles
- Add music to your video files
- Filters and color correction tools
- Audio mute, cutting, and muting
- Video rotation, flipping, and speed adjustment
Pros
- Basic tools can be used for free
- Best for beginners and intermediate users
- Ideal for AVI videos and also supports other video formats
Cons
- You cannot use the free version regularly
Aspose
Aspose is a free web-based application to cut clips. You can use this tool on any operating system. It supports all major video file formats, including AVI, MKV, MOV, MP4, FLV, WMV, WEBM, and GIF. Additionally, you can use Aspose for various other reasons, such as audio extraction, video resizing, and more.
Features
- Video cutting and compressing
- Looping, rotation, and video merging
- Adding watermarks on videos
- Sound muting
- Speed change and audio addition
Pros
- Aspose is a free online tool
- It offers straightforward options to cut and edit videos
Cons
- No color correction option
- Slow video cutting process
- Lacks timeline and other valuable features
Part 7: Bottom Line
Tired of finding AVI cutters? Relax and try these top 16 AVI video cutters for Windows, MAC, iPhone, Android, and online. Almost all these tools are free to use and are extremely handy. On the other hand, if you want to cut and trim videos professionally, download Filmora and follow the step-by-step guide in this article for making clean cuts.
Part 8: FAQs
Q1. How do I trim an AVI video?
To trim an AVI video file, ensure that the software or tool you use supports AVI input. Generally, you need to upload or import a clip on the program, select the portion of the video, and apply the cut/trim feature to make it happen.
Q2. Which is the best online video cutter?
Kapwing and Clideo are the two best online video cutters you can use for free. Both web-based tools also allow you to cut your AVI videos.
Q3. Which is the best video cutter and joiner software?
Filmora, iMovie, and Kapwing are some of the best video cutters and joiner tools. These video editors are also free to use and come with different features.
Q4. How do I trim an AVI file in Windows 10?
Trimming an AVI video file in Windows 10 is very simple. Launch the Microsoft Photos (Photo App) application on your computer, add clip, and select the “Trim” tool to trim a specific video part.
Q5. How can I cut a video on my computer for free?
MAC and Windows users can download Filmora to cut videos for free. Filmora also offers a wide range of other features to make your clips exciting. Contrarily, Windows users can use the built-in Photo App in Windows 10 or download Gihosoft or Handbrake software to cut clips. Likewise, MAC users can download VideoPad, Xilisoft Video Cutter, or iMovie for free.
The Best of the Best: Lego Stop Motion Creators
Best Lego Stop Motion Maker

Ollie Mattison
Mar 27, 2024• Proven solutions
Brickfilms, the cool name for Lego stop-motion animations, is a raging success on YouTube and other video streaming sites. No longer are you limited to build and play with your Lego sets. You can now use apps to bring a story alive. Drag those bricks down from the attic or pull them out of the kids’ box, as you could have a potential goldmine in your home.
Preparation Tips for Shooting Lego Stop Motion Movies
Before you select your stop-motion movie maker , you need to secure some of the essential props to make your film-making a success. You only need a basic set of Lego bricks and your smartphone or iPad if you want to keep it simple. You could use a desk lamp for lighting or a professional camera to add some professionalism should you wish.
Start by setting up your scene. You need a flat and stable surface. It needs to be at a height where you will be comfortable working for an extended period. If you set it up on your floor, you could regret this when the aches in your knees and back kick in. Keep your set in place by using masking tape, so it doesn’t move if you accidentally bump into it.

Now you are ready to start. Lego movies are painstaking. It will take a while to get into a rhythm and to get something of value to be watched by others. Don’t be discouraged. You will get quicker and better with practice. You just need to get started.
With everything in place, as well as a realistic mindset, it is time to choose the stop motion app that will help you produce the best Lego movies.
You might also like:
Best Stop Motion App for Lego Movie
1. I Can Animate
- Cost of app: $2.99 on Apple Store or $4.99 per item on Google Play
- For children 4+
- Unique feature – the timeline allows for simple reordering and editing

I Can Animate is a way to produce movies quickly and with little need for that much tech knowledge. You can use your iOS device, whether tablet or phone, to create and then share your videos. This app is produced by Kudlian Software Ltd and retails on different prices on Apple Store and Google Play.
I Can Animate is unique in its simplicity. You use the camera on your iOS device, and the app will show you the differences between frames, so you can check your progress. This is called onion skinning and is essential to the success of your animation.
There are some basic editing features. These features include an ability to view the images on a timeline and duplicate or reorder these. You can also change the exposure, balance and focus settings to ensure there is a replication of conditions between photographs.

A useful option is the ability to connect a Bluetooth keyboard and capture your images without returning to your device. This means you can secure your phone or tablet and avoid knocking or changing the angle by tapping on the screen. Also helpful for streamlining the filming process is the inbuilt time-lapse feature. You can automatically capture images one after another without having to return to the camera.
You can then share these movies by exporting them to Facebook, YouTube or Dropbox.
2. Stop Motion Studio
- Free basic package with in-app purchases
- Pro version costing $9.99 on Apple Store and $4.99 on Google Play
- For children 4+
- Unique feature – the ability to add and edit audio

Stop Motion Studio, produced by Cateater, is an app offered for people age 4 and over and is available on iOS and Android – for your phone or your tablet. There is also a full-featured movie editing software that you can buy for your PC and Mac.
The app is free to download, with some free features. However, there are in-App purchases for some of the better features. You can purchase the Stop Motion Studio Pro app at the cost of $4.99 for Android devices, which then opens all the advanced features in the app.
The advanced features include a function to add and adjust audio, importing and cropping images as well as 4K Ultra HD and much more. The Green Screen function is particularly smart, as this allows you to include a background, which is preloaded onto the phone.
Reviews are positive. Most note that the product appears simple to use – and you can get high-quality Lego movies without feeling daunted. However, the intuitive nature of the app design belies the smart tools available for your movie production. You can add in text, speech bubbles and titles. You can add facial expressions to your Lego figures. The eraser tool is wonderful, as you can delete unwanted objects from your images.
3. The Lego Movie 2™ Movie Maker
- Free
- For children 8+
- Unique feature – a chance to be part of a Lego moviemaking community

This branded movie maker is free on iOS and Android . It is suitable for children aged 8 and above, so a little more advanced than the more basic I Can Animate – but it is designed only to be used on your phone, using the in-built camera. There is the option to add sounds and visual effects to the live footage, as well as edit material within the app. There is no save facility, which means your project needs to be sensible for the time you have before sharing to the site.
You will need to set up an account to be able to share your movies. However, for parents, this adds a reassuring level of moderation and support. Every video is moderated before it is shared. The set-up of the account is not too arduous. You are asked for your home country, your email address and your date of birth. All your videos will be anonymised as part of a stringent adherence to GDPR and safeguarding policies. The strength of this app is the infrastructure of a large brand that understands how to protect children. Be aware, your movie will become the property of the Lego group when uploaded.
Probably the most attractive selling point of this app is that there is no third-party advertising. Consequently, there are hours of uninterrupted fun offered.
4. LifeLapse Stop Motion Maker
- Free for the basic package
- PRO subscription plan, after a 7-day trial
- Pro Monthly $7.99/ Pro Yearly $39.99 on App Store
- For users 12+ with a focus on B2B adult target market
- Unique feature – professional-level design features – with Instagram cropping guidelines
Created by Bolandia Creative Inc., Life Lapse Stop Motion Maker is designed for a more sophisticated audience. It is available on iOS and Android . It is aimed at users 12 and above, and there is a definite feel of a professional design package. The interface is a clean white with simple black icons for the function buttons. Essentially, the company is aiming the app at other businesses looking to produce marketing material.
This is not to say that the app cannot be used by Lego movie makers. The app has an intuitive interface, with simple icons that make it clear how the features can be used. There is the option to adjust the brightness, contrast, saturation and warmth of each image. You can also change the speed and size of images.

The apparent marketing leaning of this app is evident in the offer of Instagram crop guidelines, which will allow businesses to upload the stop-motion animations to the site. However, the in-app tutorials are excellent for helping younger people compose the Lego movies with a degree of sophistication that the other apps don’t provide. There is the option of an exposure lock, so the conditions stay the same for each photograph. You can use the ghosted image overlay, which allows you to check the difference from one frame to another.
Particularly useful, the grids allow you to clearly map the changes from one image to the next. This stop motion maker app helps you to track your stop-motion animation with some accuracy and it’s quite popular for making Instagram Stop Motion Videos .
5. Onion Cam2
- Free
- For children aged 4+
- Unique feature – simplicity and the onion skin feature allowing you to easily track the stop motion effect

From the developers Yosuke Seki, this StopMotion camera is a simple tool for taking a series of images to produce your Lego movie and then play it back. You can now store the images within the app, which is new from Onion Cam1, which means you can come back to your movies and continue your work. You can also export your video with OnionCam 2.
The “onion” in the title comes from the onion-skin function which allows you to check the lapse between photographs. There is a translucent display of the picture you took last time – allowing you to gradually build up your time-lapse movie.
The guidelines are also a useful way to measure the changes you are making.
If you want an app that allows you to create a simple movie without too many bells and whistles, then this is the app for you. There are not too many advanced features, only the changing order function stands out. However, your young child should be able to use this app without much intervention from you.
Basic Tips for Improving Lego stop motion videos
The essential ingredients for the best Lego movies include creativity and patience. If you have both vital qualities, read on to understand how to maximise the effects in your film.
1. Get your timing right
If you want your characters to move quickly, then you need fewer images and movements per second. If you’re going to slow the characters down, you need to take more pictures with more actions. Getting this right is a matter of trial and error, to begin with.
However, you can make this easier for yourself by planning a little. If you have a shooting rate of 15-frames per second, then you will need to plan out 15 images to fill a second of film. Each action in your movie that would last a second will need 15 pictures with gradual changes per image.
2. Making your characters’ movements natural
If you are not careful, your characters will move around in a jerky fashion. In real life, we ease in and ease out of actions. We start and finish an action slowly. Therefore, when taking images, use more pictures at the start and end of a movement, giving the impression of easing in and out of actions.
3. Master the walk cycle
A great place to start your Lego movie-making is in the perfection of the walk. Your characters will go through 4 movements in a walk.
- One leg will step forward, heel down, and toe up.
- The toe on this foot then descends
- The other leg passes the standing leg
- The passing leg heel hits the floor
This movement will likely take about 20 frames. When moving the arms, make sure the opposite arms move with the leg – so the left arm swings as the right leg is moving forward.
4. Practice and perfect
Finally, watch how people move in real life. Notice how the heads, arms, and legs move together. Then, try to recreate this with your Lego characters. Watch your material, reflect on what could be improved, and try again. The only way to become a great Lego movie maker is to practice, practice, and practice some more!
Conclusion
Finding ways to produce content that stands out on social media is becoming increasingly difficult as video content is growing more popular. Online stop motion makers provide a simple way to use photos and videos to create attention-grabbing videos.


Ollie Mattison
Ollie Mattison is a writer and a lover of all things video.
Follow @Ollie Mattison
Ollie Mattison
Mar 27, 2024• Proven solutions
Brickfilms, the cool name for Lego stop-motion animations, is a raging success on YouTube and other video streaming sites. No longer are you limited to build and play with your Lego sets. You can now use apps to bring a story alive. Drag those bricks down from the attic or pull them out of the kids’ box, as you could have a potential goldmine in your home.
Preparation Tips for Shooting Lego Stop Motion Movies
Before you select your stop-motion movie maker , you need to secure some of the essential props to make your film-making a success. You only need a basic set of Lego bricks and your smartphone or iPad if you want to keep it simple. You could use a desk lamp for lighting or a professional camera to add some professionalism should you wish.
Start by setting up your scene. You need a flat and stable surface. It needs to be at a height where you will be comfortable working for an extended period. If you set it up on your floor, you could regret this when the aches in your knees and back kick in. Keep your set in place by using masking tape, so it doesn’t move if you accidentally bump into it.
Now you are ready to start. Lego movies are painstaking. It will take a while to get into a rhythm and to get something of value to be watched by others. Don’t be discouraged. You will get quicker and better with practice. You just need to get started.
With everything in place, as well as a realistic mindset, it is time to choose the stop motion app that will help you produce the best Lego movies.
You might also like:
Best Stop Motion App for Lego Movie
1. I Can Animate
- Cost of app: $2.99 on Apple Store or $4.99 per item on Google Play
- For children 4+
- Unique feature – the timeline allows for simple reordering and editing
I Can Animate is a way to produce movies quickly and with little need for that much tech knowledge. You can use your iOS device, whether tablet or phone, to create and then share your videos. This app is produced by Kudlian Software Ltd and retails on different prices on Apple Store and Google Play.
I Can Animate is unique in its simplicity. You use the camera on your iOS device, and the app will show you the differences between frames, so you can check your progress. This is called onion skinning and is essential to the success of your animation.
There are some basic editing features. These features include an ability to view the images on a timeline and duplicate or reorder these. You can also change the exposure, balance and focus settings to ensure there is a replication of conditions between photographs.
A useful option is the ability to connect a Bluetooth keyboard and capture your images without returning to your device. This means you can secure your phone or tablet and avoid knocking or changing the angle by tapping on the screen. Also helpful for streamlining the filming process is the inbuilt time-lapse feature. You can automatically capture images one after another without having to return to the camera.
You can then share these movies by exporting them to Facebook, YouTube or Dropbox.
2. Stop Motion Studio
- Free basic package with in-app purchases
- Pro version costing $9.99 on Apple Store and $4.99 on Google Play
- For children 4+
- Unique feature – the ability to add and edit audio
Stop Motion Studio, produced by Cateater, is an app offered for people age 4 and over and is available on iOS and Android – for your phone or your tablet. There is also a full-featured movie editing software that you can buy for your PC and Mac.
The app is free to download, with some free features. However, there are in-App purchases for some of the better features. You can purchase the Stop Motion Studio Pro app at the cost of $4.99 for Android devices, which then opens all the advanced features in the app.
The advanced features include a function to add and adjust audio, importing and cropping images as well as 4K Ultra HD and much more. The Green Screen function is particularly smart, as this allows you to include a background, which is preloaded onto the phone.
Reviews are positive. Most note that the product appears simple to use – and you can get high-quality Lego movies without feeling daunted. However, the intuitive nature of the app design belies the smart tools available for your movie production. You can add in text, speech bubbles and titles. You can add facial expressions to your Lego figures. The eraser tool is wonderful, as you can delete unwanted objects from your images.
3. The Lego Movie 2™ Movie Maker
- Free
- For children 8+
- Unique feature – a chance to be part of a Lego moviemaking community
This branded movie maker is free on iOS and Android . It is suitable for children aged 8 and above, so a little more advanced than the more basic I Can Animate – but it is designed only to be used on your phone, using the in-built camera. There is the option to add sounds and visual effects to the live footage, as well as edit material within the app. There is no save facility, which means your project needs to be sensible for the time you have before sharing to the site.
You will need to set up an account to be able to share your movies. However, for parents, this adds a reassuring level of moderation and support. Every video is moderated before it is shared. The set-up of the account is not too arduous. You are asked for your home country, your email address and your date of birth. All your videos will be anonymised as part of a stringent adherence to GDPR and safeguarding policies. The strength of this app is the infrastructure of a large brand that understands how to protect children. Be aware, your movie will become the property of the Lego group when uploaded.
Probably the most attractive selling point of this app is that there is no third-party advertising. Consequently, there are hours of uninterrupted fun offered.
4. LifeLapse Stop Motion Maker
- Free for the basic package
- PRO subscription plan, after a 7-day trial
- Pro Monthly $7.99/ Pro Yearly $39.99 on App Store
- For users 12+ with a focus on B2B adult target market
- Unique feature – professional-level design features – with Instagram cropping guidelines
Created by Bolandia Creative Inc., Life Lapse Stop Motion Maker is designed for a more sophisticated audience. It is available on iOS and Android . It is aimed at users 12 and above, and there is a definite feel of a professional design package. The interface is a clean white with simple black icons for the function buttons. Essentially, the company is aiming the app at other businesses looking to produce marketing material.
This is not to say that the app cannot be used by Lego movie makers. The app has an intuitive interface, with simple icons that make it clear how the features can be used. There is the option to adjust the brightness, contrast, saturation and warmth of each image. You can also change the speed and size of images.
The apparent marketing leaning of this app is evident in the offer of Instagram crop guidelines, which will allow businesses to upload the stop-motion animations to the site. However, the in-app tutorials are excellent for helping younger people compose the Lego movies with a degree of sophistication that the other apps don’t provide. There is the option of an exposure lock, so the conditions stay the same for each photograph. You can use the ghosted image overlay, which allows you to check the difference from one frame to another.
Particularly useful, the grids allow you to clearly map the changes from one image to the next. This stop motion maker app helps you to track your stop-motion animation with some accuracy and it’s quite popular for making Instagram Stop Motion Videos .
5. Onion Cam2
- Free
- For children aged 4+
- Unique feature – simplicity and the onion skin feature allowing you to easily track the stop motion effect
From the developers Yosuke Seki, this StopMotion camera is a simple tool for taking a series of images to produce your Lego movie and then play it back. You can now store the images within the app, which is new from Onion Cam1, which means you can come back to your movies and continue your work. You can also export your video with OnionCam 2.
The “onion” in the title comes from the onion-skin function which allows you to check the lapse between photographs. There is a translucent display of the picture you took last time – allowing you to gradually build up your time-lapse movie.
The guidelines are also a useful way to measure the changes you are making.
If you want an app that allows you to create a simple movie without too many bells and whistles, then this is the app for you. There are not too many advanced features, only the changing order function stands out. However, your young child should be able to use this app without much intervention from you.
Basic Tips for Improving Lego stop motion videos
The essential ingredients for the best Lego movies include creativity and patience. If you have both vital qualities, read on to understand how to maximise the effects in your film.
1. Get your timing right
If you want your characters to move quickly, then you need fewer images and movements per second. If you’re going to slow the characters down, you need to take more pictures with more actions. Getting this right is a matter of trial and error, to begin with.
However, you can make this easier for yourself by planning a little. If you have a shooting rate of 15-frames per second, then you will need to plan out 15 images to fill a second of film. Each action in your movie that would last a second will need 15 pictures with gradual changes per image.
2. Making your characters’ movements natural
If you are not careful, your characters will move around in a jerky fashion. In real life, we ease in and ease out of actions. We start and finish an action slowly. Therefore, when taking images, use more pictures at the start and end of a movement, giving the impression of easing in and out of actions.
3. Master the walk cycle
A great place to start your Lego movie-making is in the perfection of the walk. Your characters will go through 4 movements in a walk.
- One leg will step forward, heel down, and toe up.
- The toe on this foot then descends
- The other leg passes the standing leg
- The passing leg heel hits the floor
This movement will likely take about 20 frames. When moving the arms, make sure the opposite arms move with the leg – so the left arm swings as the right leg is moving forward.
4. Practice and perfect
Finally, watch how people move in real life. Notice how the heads, arms, and legs move together. Then, try to recreate this with your Lego characters. Watch your material, reflect on what could be improved, and try again. The only way to become a great Lego movie maker is to practice, practice, and practice some more!
Conclusion
Finding ways to produce content that stands out on social media is becoming increasingly difficult as video content is growing more popular. Online stop motion makers provide a simple way to use photos and videos to create attention-grabbing videos.
Ollie Mattison
Ollie Mattison is a writer and a lover of all things video.
Follow @Ollie Mattison
Best Animation Software for All Skill Levels: Top Picks
Top 8 Best Animation Maker for Beginners and Pros

Shanoon Cox
Mar 27, 2024• Proven solutions
Having plenty of free animation makers in the market, you must be in a dilemma to decide the best one for you. We believe that there is one animation creator for everyone to suit their specific needs, irrespective of your level of proficiency in animation.
Only you can figure out which one is the best animated profile picture maker for you. When you choose the right software tool for your animation work, the results will always come outstanding.
We have featured a meticulously picked list of animation maker software applications to ease off your burden. Go ahead and explore your creative streak with the best animation creator.
Part 1: Best Animation Software for Beginners
1. Maya
Price: Free for 30 days. $205/monthly. $1620/1 year. $4375/3 years
Maya is one among the leading 3D animation, simulation, modeling and rendering software application empowered with exceptional toolset. You can use it to make animation, motion graphics, environments, character creation, as well as virtual reality to name a few.
Key Features:
- Arnold RenderView integrated with Maya enables you to experience real-time changes in scenes that include lighting, camera, or materials.
- The Motion Graphics toolset uses instanced objects and instantly creates complex procedural effects and animations.
- Using the MASH toolset you can add new nodes consisting of signal, curve, world, placer, etc. along with existing node updates.
Support: Win, Mac, Linux.

2. Photoshop
Price: $20.99/month.
Because of its influential drawing efficiencies Photoshop has been considered as a mighty tool for creating animations. It renders Disney-style animation due to its frame by frame animation techniques.
You can utilize the onion skinning process for incredible animation experience using the ‘Timeline’ feature (with frame by frame approach).
Key Features:
- It supports a varied range of QuickTime video formats, image sequence formats, and color mode and bit depth for animation.
- With the help of the Timeline panel, you can make animation frames, where the configuration of layers is represented by a single frame.
- In Photoshop the opacity, styles, position represents the layer properties and a gradual change in them gives you the feeling of transformation or movement in animations. It results in automatic modification and addition of multiple frames in a series among two existing frames.
Support: Win, Mac.

3. Adobe Animate
Price: $20.99/month.
Adobe Animate is a brilliant tool to make animations with interactive vectors that you can use in games, web as well as on apps and make banners and cartoons movable. Infographics and tutorials become lively with this tool and you can share them on numerous platforms as well using mobile, computer or TV.
Key Features:
- Use the tilt and pressure sensitive vector brushes to draw and sketch characters and with frame by frame animation make them talk, walk and blink.
- Design and develop interfaces, start screens, game environment and player sprites to get the best interactive web-based content.
- You can export your work to WebGL, HTML5 Canvas, Flash/Adobe AIRetc.
Support: Win, Mac.

4. Moho
Price: Free for 30 days. $399.99/lifetime
Moho is a complete animation tool dedicated to digital artists and professionals which was used to make movies like Song of the Sea and The Breadwinner (both were nominated for OSCAR).
Key Features:
- Having smart warp, this tool enables you to shape, bend, animate, and twist assets including vectors and images and is compatible with Smart Bones.
- Using the realistic motion blur feature you can manage the number of frames and how they blend to moving objects or characters for creating amazing results.
- The vector Bezier handles allow you to have more control on designing and make exceptional line bends having minimal points and perfectly optimized to sync with animation.
Support: Win, Mac.

Part 2: Best Animation Software for Pros
1. Autodesk motion builder
Price: Free for 30 days. $1855/1 year. $5010/3 years
Autodesk motion builder is one of the coolest animation creators that allow 3D character animation. The highly interactive and responsive environment enables you for capturing, editing, and then playing back complicated character animations. Directors or animators, all of them love the results of Autodesk motion builder.
Key Features:
- The real-time 3D engine builds human movements.
- It manipulates motion capture data with production-proven tools that allow motion capture editing.
- It can interact with other 3D applications through the interoperable FBX data exchange and software development kit.
Support: Win, Mac.

2. Blender
Price: Free
Blender is an open source 3D animation creator available free of cost. Talk about modeling, animation, rigging, rendering, simulation, motion tracking, compositing, video editing, or game creation.
Key Features:
- Industry standard libraries are available in the simulation tool, such as MantaFlow and bullet.
- The modeling toolset in Blender can not only do modeling, but also does retopology, sculpting, curves as well.
- The animation toolset enables you to synchronize sound, automates walk-cycle, edits the pose of characters, impart independent movements with Non Linear Animation as well.
Support: Win, Mac, Linux.

3. Vyond
Price: $299/1 year. $649/1 year. $999/1 year
Vyond is a flexible animation creator that customizes the animated characters with various hues of color and efficiently showcasing the diversity of their race. There are options to slide scales and offer a flexible environment for animating objects and characters alike.
Key Features:
- Create any character around you or recreate yourself, with the amazing character creator tool.
- For voiceover narration you just need to give a voice track and the characters can also auto-lip-sync when you give them a voice.
- There are numerous industries and occupations that you can incorporate in your animation to keep the audience engaged.
Support: Win, Mac.

4. After Effects
Price: $20.99/month
Cinematic intros, movie titles, as well as transitions can easily be created using this tool. It enables you to make it rain or start a fire, animate a character, or logo, and a lot more. It is compatible with other Adobe apps, such as Adobe Dynamic Link, Photoshop CC, Audition CC, Illustrator CC, as well as Team Projects.
Key Features:
- Creating visual effects or motion graphics for TV, film, web, and videos is easy for designers, animators, and compositors with After Effects.
- Using the animation presets you can slide, spin, or swipe texts for animated credits, titles, etc.
- Cartoon, logos, or shapes your key-frames can make all of them moving with amazing background music.
Support: Win, Mac.
![]()
Final Verdict
Apart from the best animation software for beginners mentioned here, you can make use of Wondershare Filmora to create breathtaking videos. This powerful video editing tool can help you make one of the best videos using features such as precision speed control, frame by frame preview, color tuning, noise removal, and 4K editing support etc.
Shanoon Cox
Shanoon Cox is a writer and a lover of all things video.
Follow @Shanoon Cox
Shanoon Cox
Mar 27, 2024• Proven solutions
Having plenty of free animation makers in the market, you must be in a dilemma to decide the best one for you. We believe that there is one animation creator for everyone to suit their specific needs, irrespective of your level of proficiency in animation.
Only you can figure out which one is the best animated profile picture maker for you. When you choose the right software tool for your animation work, the results will always come outstanding.
We have featured a meticulously picked list of animation maker software applications to ease off your burden. Go ahead and explore your creative streak with the best animation creator.
Part 1: Best Animation Software for Beginners
1. Maya
Price: Free for 30 days. $205/monthly. $1620/1 year. $4375/3 years
Maya is one among the leading 3D animation, simulation, modeling and rendering software application empowered with exceptional toolset. You can use it to make animation, motion graphics, environments, character creation, as well as virtual reality to name a few.
Key Features:
- Arnold RenderView integrated with Maya enables you to experience real-time changes in scenes that include lighting, camera, or materials.
- The Motion Graphics toolset uses instanced objects and instantly creates complex procedural effects and animations.
- Using the MASH toolset you can add new nodes consisting of signal, curve, world, placer, etc. along with existing node updates.
Support: Win, Mac, Linux.
2. Photoshop
Price: $20.99/month.
Because of its influential drawing efficiencies Photoshop has been considered as a mighty tool for creating animations. It renders Disney-style animation due to its frame by frame animation techniques.
You can utilize the onion skinning process for incredible animation experience using the ‘Timeline’ feature (with frame by frame approach).
Key Features:
- It supports a varied range of QuickTime video formats, image sequence formats, and color mode and bit depth for animation.
- With the help of the Timeline panel, you can make animation frames, where the configuration of layers is represented by a single frame.
- In Photoshop the opacity, styles, position represents the layer properties and a gradual change in them gives you the feeling of transformation or movement in animations. It results in automatic modification and addition of multiple frames in a series among two existing frames.
Support: Win, Mac.
3. Adobe Animate
Price: $20.99/month.
Adobe Animate is a brilliant tool to make animations with interactive vectors that you can use in games, web as well as on apps and make banners and cartoons movable. Infographics and tutorials become lively with this tool and you can share them on numerous platforms as well using mobile, computer or TV.
Key Features:
- Use the tilt and pressure sensitive vector brushes to draw and sketch characters and with frame by frame animation make them talk, walk and blink.
- Design and develop interfaces, start screens, game environment and player sprites to get the best interactive web-based content.
- You can export your work to WebGL, HTML5 Canvas, Flash/Adobe AIRetc.
Support: Win, Mac.
4. Moho
Price: Free for 30 days. $399.99/lifetime
Moho is a complete animation tool dedicated to digital artists and professionals which was used to make movies like Song of the Sea and The Breadwinner (both were nominated for OSCAR).
Key Features:
- Having smart warp, this tool enables you to shape, bend, animate, and twist assets including vectors and images and is compatible with Smart Bones.
- Using the realistic motion blur feature you can manage the number of frames and how they blend to moving objects or characters for creating amazing results.
- The vector Bezier handles allow you to have more control on designing and make exceptional line bends having minimal points and perfectly optimized to sync with animation.
Support: Win, Mac.
Part 2: Best Animation Software for Pros
1. Autodesk motion builder
Price: Free for 30 days. $1855/1 year. $5010/3 years
Autodesk motion builder is one of the coolest animation creators that allow 3D character animation. The highly interactive and responsive environment enables you for capturing, editing, and then playing back complicated character animations. Directors or animators, all of them love the results of Autodesk motion builder.
Key Features:
- The real-time 3D engine builds human movements.
- It manipulates motion capture data with production-proven tools that allow motion capture editing.
- It can interact with other 3D applications through the interoperable FBX data exchange and software development kit.
Support: Win, Mac.
2. Blender
Price: Free
Blender is an open source 3D animation creator available free of cost. Talk about modeling, animation, rigging, rendering, simulation, motion tracking, compositing, video editing, or game creation.
Key Features:
- Industry standard libraries are available in the simulation tool, such as MantaFlow and bullet.
- The modeling toolset in Blender can not only do modeling, but also does retopology, sculpting, curves as well.
- The animation toolset enables you to synchronize sound, automates walk-cycle, edits the pose of characters, impart independent movements with Non Linear Animation as well.
Support: Win, Mac, Linux.
3. Vyond
Price: $299/1 year. $649/1 year. $999/1 year
Vyond is a flexible animation creator that customizes the animated characters with various hues of color and efficiently showcasing the diversity of their race. There are options to slide scales and offer a flexible environment for animating objects and characters alike.
Key Features:
- Create any character around you or recreate yourself, with the amazing character creator tool.
- For voiceover narration you just need to give a voice track and the characters can also auto-lip-sync when you give them a voice.
- There are numerous industries and occupations that you can incorporate in your animation to keep the audience engaged.
Support: Win, Mac.
4. After Effects
Price: $20.99/month
Cinematic intros, movie titles, as well as transitions can easily be created using this tool. It enables you to make it rain or start a fire, animate a character, or logo, and a lot more. It is compatible with other Adobe apps, such as Adobe Dynamic Link, Photoshop CC, Audition CC, Illustrator CC, as well as Team Projects.
Key Features:
- Creating visual effects or motion graphics for TV, film, web, and videos is easy for designers, animators, and compositors with After Effects.
- Using the animation presets you can slide, spin, or swipe texts for animated credits, titles, etc.
- Cartoon, logos, or shapes your key-frames can make all of them moving with amazing background music.
Support: Win, Mac.
![]()
Final Verdict
Apart from the best animation software for beginners mentioned here, you can make use of Wondershare Filmora to create breathtaking videos. This powerful video editing tool can help you make one of the best videos using features such as precision speed control, frame by frame preview, color tuning, noise removal, and 4K editing support etc.
Shanoon Cox
Shanoon Cox is a writer and a lover of all things video.
Follow @Shanoon Cox
Also read:
- Updated Top 5 Final Cut Pro Editing Tips You Should Know for 2024
- New 2024 Approved S Best Free Green Screen Editors for Mobile Phones
- Updated Video Editing on a Shoestring Top Software
- Updated Get Noticed on YouTube Effective Thumbnail Sizes and Designs for 2024
- New In 2024, Want that Vintage Nostalgia Back in Your Photos? Well, Then You Need a VHS App, and Youre at the Right Place to Find One
- The Ultimate Guide to Converting MP3 Audio to MP4 Video for 2024
- Updated 2024 Approved Free to Edit Top Video Editing Software without Watermarks or Fees
- New In 2024, Wax Video Editor A Comprehensive Guide to Editing Like a Pro
- New 2024 Approved VHS Revival on Mobile Top Apps for Retro Video Filters
- Updated What to Expect From an M4R Converter A Pre-Learning Checklist
- New In 2024, Background Noise Be Gone Mastering Audio Cleanup in Final Cut Pro X
- 2024 Approved The Ultimate VLC Guide Slow Motion Video Playback on Desktop and Mobile Devices
- New Expert Picks Top Online Vertical Video Editors for 2024
- Updated From Novice to Pro The Definitive Wav Converter Handbook for 2024
- The Ultimate Guide to Adobe Premiere Rush Alternatives (Updated 2023) for 2024
- New The Ultimate List of Linux Video Editors Adobe Premiere Replacements for 2024
- New Get VN Video Editor for Mac or Get Alternatives to Edit on Mac for 2024
- 2024 Approved Online WebM Video Optimization Tools for Smaller Files
- New In 2024, Slow Down and Savor How to Add Slow Motion Effects in Windows Live Movie Maker
- New 2024 Approved 10 Exceptional Audio Conversion Software Options
- In 2024, S Best Android Video Editors A Mix of Free and Paid Options
- Updated 2024 Approved How to Pick the Perfect Video to Audio Converter My 5-Step Guide
- New The Ultimate Choice Final Cut Pro or LumaFusion for Your Video Needs
- New 2024 Approved Should You Buy Videopad? An Honest Review and Recommendation
- Updated In 2024, Mastering Color in Final Cut Pro A Step-by-Step Guide
- New 2024 Approved Free DVD Playback Made Easy Top 10 Windows 10 Players
- 2024 Approved Trim and Split Divx Videos with These Free Tools
- New In 2024, Beyond the Basics 5 Advanced Tips for Using the 16X9 Ratio Calculator
- Updated In 2024, Reverse Engineering How to Reverse Video Clips in Final Cut Pro
- Uncomplicate Your Workflow 5 Free Online Tone Tools for 2024
- New Video Velocity 10 Free Apps to Control Video Speed on Your Mobile for 2024
- Updated In 2024, Premiere Elements Not for You? Try These 10 Exceptional Alternatives Instead
- Updated Mac VLC Trimming Made Easy Preserve Video Quality with These Tips for 2024
- Updated Open-Source Video Editing Excellence Top Picks
- New 2024 Approved Add Wow Factor to Your Videos Top Free Special Effects Apps
- Updated QuickTime Video Acceleration Boost Your Productivity for 2024
- 2024 Approved Make a Lasting Impression Top Movie Intro Design Software
- Updated In 2024, Merging Made Easy The Top 5 Free Online Video Combination Tools
- Best Anti Tracker Software For Infinix Smart 8 | Dr.fone
- Fix the Error of Unfortunately the Process.com.android.phone Has Stopped on OnePlus 12 | Dr.fone
- How to Fake Snapchat Location without Jailbreak On Motorola Edge 40 | Dr.fone
- In 2024, 9 Mind-Blowing Tricks to Hatch Eggs in Pokemon Go Without Walking On Apple iPhone 12 | Dr.fone
- Hassle-Free Ways to Remove FRP Lock from Nokia C22 Phones with/without a PC
- Wondering the Best Alternative to Hola On Lava Yuva 3? Here Is the Answer | Dr.fone
- In 2024, Top 12 Prominent Vivo V30 Fingerprint Not Working Solutions
- Updated Little Known Ways of Adding Emojis to Photos on iPhone & Android 2023
- In 2024, Complete Review & Guide to Techeligible FRP Bypass and More For Samsung Galaxy M34 5G
- How to Mirror Your Tecno Camon 20 Pro 5G Screen to PC with Chromecast | Dr.fone
- Why does the pokemon go battle league not available On Honor X50i | Dr.fone
- In 2024, How to Unlock iCloud Activation Lock and iCloud Account On Apple iPhone 8 Plus?
- Best Fixes For Infinix Zero 30 5G Hard Reset | Dr.fone
- How to Upgrade Apple iPhone 15 Plus without iTunes? | Dr.fone
- In 2024, Bypass Activation Lock On Apple iPhone 7 - 4 Easy Ways
- 7 Ways to Unlock a Locked Vivo Y17s Phone
- In 2024, Latest Guide How To Bypass Nokia C12 Pro FRP Without Computer
- In 2024, How to Use Google Assistant on Your Lock Screen Of Honor X9b Phone
- In 2024, How to Turn Off Google Location to Stop Tracking You on Samsung Galaxy S23 FE | Dr.fone
- Full Guide to Fix iToolab AnyGO Not Working On Infinix Hot 40 | Dr.fone
- 2 Ways to Transfer Text Messages from Honor Magic5 Ultimate to iPhone 15/14/13/12/11/X/8/ | Dr.fone
- In 2024, How to Unlock iPhone 12 Pro, Apples New iPhone | Dr.fone
- In 2024, AVS Video Editor A Comprehensive Analysis
- The Most Useful Tips for Pokemon Go Ultra League On Vivo Y200 | Dr.fone
- How to restore wiped music on Motorola Edge 40 Pro
- Best Motorola Moto G14 Pattern Lock Removal Tools Remove Android Pattern Lock Without Losing Data
- In 2024, Top 11 Free Apps to Check IMEI on iPhone 14 Plus
- In 2024, 10 Fake GPS Location Apps on Android Of your Samsung Galaxy A14 4G | Dr.fone
- Updated The Aspect Ratio Handbook Mastering Social Media Visual Content
- Title: Updated 2024 Approved Top 10 Best Intro Maker Websites
- Author: Morgan
- Created at : 2024-05-19 16:01:19
- Updated at : 2024-05-20 16:01:19
- Link: https://ai-video-tools.techidaily.com/updated-2024-approved-top-10-best-intro-maker-websites/
- License: This work is licensed under CC BY-NC-SA 4.0.
