

Unleash Your Creativity 10 Public Domain Image Sites for 2024
Unleash Your Creativity: 10 Public Domain Image Sites
10 Best Public Domain Image Websites

Liza Brown
Mar 27, 2024• Proven solutions
Finding an image you like on the Internet doesn’t take long, since almost every website you can stumble upon, contains at least one picture. This doesn’t mean that you can just download any photo and use it in your blog, online marketing campaign or for any other purpose. Moreover, stock image websites like Getty Images or iStock let you purchase the right to use a photo commercially. As a reaction to an expanding stock image industry, many photographers, museums and cultural institutions are choosing to forfeit their rights and to publish public domain images. So, in this article, we are going to take you through the ten best public domain image websites where you can download pictures for free.
What Are Public Domain Images?
By definition, public domain images are photos, vectors or clip art that are available to anyone because their copyright has either expired or they never had a copyright owner. Consequently, anyone can use these images for both commercial or private projects without having to purchase the rights to do so. An image can enter a public domain under the following circumstances:
- Scientists, educators or artists can use the Creative Commons Zero (CC0) license to dedicate their images to the public domain
- A picture’s copyright is no longer in effect
- A photo was never the subject to copyright
It is of utmost importance to check if an image is within the public domain before you use it publicly in order to avoid potential legal complications.
How and Where to Find Public Domain Images?
A simple google search will reveal hundreds of websites that let you download public domain and royalty-free images. Which source you’re going to use depends on the type of image you’re looking for, since some websites are dedicated only to photography, while others feature impressive collections of public domain images of artworks. In addition, you’ll only want to download public domain images from the websites that offer information about the author because using a public domain image without crediting its author is strictly prohibited.
Best Websites for Downloading Public Domain Images
We’ve searched the Internet and we utilized our results to compile a collection of the most reliable websites that grant its users access to vast numbers of public domain images. Let’s take a look at some of the best websites that let you download public domain images.
1. Pexels

Graphic designers and all other creatives in constant need of a fresh supply of public domain images don’t need a special introduction to Pexels. The stock image platform is dedicated to photography and video, so you can’t use it to search for vectors or clip art. Even so, you can use Pexles to search for public domain images based on a particular keyword or browse through its collection of free images and discover photos spontaneously. Clicking on the Popular Searches tab will enable you to see the images from Light, Nature or Animals and it will shorten the amount of time you have to spend looking for a photo you want to download.
Pros:
- Neatly organized website
- Free and easy sign-up
- Offers a huge selection of free public domain images and videos according to the CC0 license
- Hand-picked High quality Images
Cons:
- Some categories should contain more images
- Optimizing the search terms can be difficult
2. Pixabay

Besides offering an impressive collection of royalty-free photos, Pixabay also lets you search for public domain vectors, illustrations, and videos. The website hosts more than a million high-resolution photos and videos you can download for free. To make things even better, becoming a member of the Pixabay’s community and creating an account on this platform won’t take more than a few minutes of your time. Pixabay also offers advanced search tools that enable you to combine searches, search for the author of an image or group search terms. In addition, you can also browse through the photographers that contribute their images to the platform on a regular basis.
Pros:
- Powerful search tools and various filters
- Huge collection of public domain images
Cons
- Customer support could be better
3. Wikimedia Commons

This is probably the largest website on the Internet where you can download public domain images. There are more than 49 million images, illustrations, vector graphics and videos available that can be downloaded for free. Some media files on Wikimedia Commons have certain restrictions, but these restrictions are mostly related to image citations, which means that you can use them only if you credit the author. Such a huge selection of media files can be overwhelming for the newcomers to the Wikimedia Commons platform, but once you grow accustomed to the website’s interface discovering images becomes a straightforward process.
Pros:
- All images are available in high resolution
- Nearly all images can be used without any restrictions
Cons:
- Getting used to the website’s interface takes time
- The number of search results can be overwhelming
4. Flickr Commons

For more than a decade Flickr has been a popular online destination for photographers in need of a platform that enables them to present their work. The Flickr Commons is a project that unites more than a hundred institutions in an effort to create a library of public domain images. The project makes available a stunning amount of historical photographs and it grants you access to highly esteemed collections of photographs. Flick Commons is perfectly suited for researchers and scholars in need of public domain photos, they can use in their essays or research papers.
Pros:
- Unlimited access to historical photos
- Extends the knowledge available to the general public
Cons:
- Doesn’t offer videos or illustrations
- Search results are poorly organized
5. Unsplash

With a library that contains over 800,000 photos, Unsplash is easily one of the largest websites that offer public domain images. All pictures on this platform are organized into different categories, which makes finding a photo you want to use in a commercial or non-commercial project a relatively simple process. Alternatively, you can insert a keyword into a search bar and Unsplash will show you the results within seconds. However, the images you can find on this platform are similar to those you can purchase on stock photography websites, although some of them have an artistic touch that is hard to find on the majority of stock photos.
Pros:
- Excellent source of high-resolution photos
- Quick and easy search
Cons:
- Unsplash is dedicated solely to photography
- Limited amount of available public domain images
6. From Old Books
In case you are searching for images from old books you should look no further. This is a private collection of 2,600 images that are hard to find anywhere else on the Internet. You can browse through woodcuts, old texts or old holiday images, which makes this platform an excellent choice for anyone interested in rare images that were featured in old books. All pictures you can find on the From Old Books website are free to use on non-commercial projects, but you must pay a small fee if you want to download a high-resolution image you can use on a commercial project.
- Images are organized into categories
- Access to rare images
Cons
- Some images are not free
- Rudimentary website design
7. Morguefile

Morguefile is a website that offers stock footage to its users, but some of the images can’t be downloaded for free. That’s why you must click on the Free Photos tab before you start searching for public domain images on this website. The website hosts nearly 400.000 photos, videos, and vector graphics, but you must make sure that a file you want to download is within the public domain before you download it. The only downside is that the images aren’t organized into categories which can make finding the images you’re searching for more difficult than it needs to be.
Pros:
- Creating an account on Morguefile is free
- All free photos can be used on commercial projects
Cons:
- Images can be organized better
- Fewer free images than on other public domain image websites
8. Public Domain Archive
As the website’s name indicates, this is an archive of public domain images you can download for free and use in commercial contexts. All photos are organized into categories like abstract, free stock photos, people or wood which makes the search simpler. However, these categories don’t contain more than a few hundred photos and some of them offer as few as five pictures you can download. All photos are in high resolution and ready for professional use. The download process can be completed effortlessly in just a few quick steps. New images are added on a weekly basis.
Pros:
- Professional quality of images
- All images are free
Cons:
- A limited selection of photos
- Doesn’t offer vector graphics
9. NYPL Digital Gallery

NYPL Digital Gallery is an excellent resource for anyone who is not interested in stock photography. The New Your Public Library has made hundreds of thousands of historical images available to the public and you can use it to browse through items, collections or divisions. Before you enter a keyword you should click on the search only public domain materials tick box to ensure that the search results are going to display only images that can be used without restrictions. Additionally, the NYPL Digital Gallery lets you browse through its collection of digital books while its collections of photographs include the work of some of the highly esteemed American photographers.
Pros
- Public domain images are available in different resolutions
- Offers valuable research materials
Cons
- Some images are subject to copyright
- Only aimed at scholars and researchers
10. Viintage
Viintage is a gold mine for graphic designers as it grants them access to hundreds of vintage posters, book covers, and images. However, the amount of public domain images this website offers is limited and if you want to download the images from the collections of works created by famous artists from the late 19th and early 20th centuries you must purchase the premium version of Viintage. The website lacks some basic search options as it only allows you to type in the search term into the search bar. The images are not organized into categories which further complicates the process of finding a public domain image you’re looking for.
Pros:
- Offers a collection of rare vintage public domain images
- A great resource for graphic designers
Cons:
- Most images on Viintage can’t be downloaded for free
- Search tools are far from perfect
You may also like: Best Image Hosting Sites >>
How to Cite Public Domain Images Properly?
If you’re planning on using a public domain image in a blog or on your website, you must cite the source from which you acquired a particular image. The image citations should include the following information:
- The title of the image
- Author’s name
- Information about the institution at which an image is kept
- The source from which you acquired an image
In case you don’t have access to all of these information or if the information is simply not available you should include all details about a public domain image you have the access to. Furthermore, there are several styles of image citations that depend on the source from which an image was acquired.
Conclusion
Spending large sums of money on images you can use in commercial or private projects is not always necessary. The public domain images are widely available and they can be used in a broad range of contexts. Which website that lets you download public domain images do you like to use the most? Leave a comment and share your opinions with us.
Dont worry when you forget the syntax of an HTML element, like and iframe, a link, a table, an image or anything else. Visit HTML CheatSheet and generate the code you need.
Liza Brown
Liza Brown is a writer and a lover of all things video.
Follow @Liza Brown
Liza Brown
Mar 27, 2024• Proven solutions
Finding an image you like on the Internet doesn’t take long, since almost every website you can stumble upon, contains at least one picture. This doesn’t mean that you can just download any photo and use it in your blog, online marketing campaign or for any other purpose. Moreover, stock image websites like Getty Images or iStock let you purchase the right to use a photo commercially. As a reaction to an expanding stock image industry, many photographers, museums and cultural institutions are choosing to forfeit their rights and to publish public domain images. So, in this article, we are going to take you through the ten best public domain image websites where you can download pictures for free.
What Are Public Domain Images?
By definition, public domain images are photos, vectors or clip art that are available to anyone because their copyright has either expired or they never had a copyright owner. Consequently, anyone can use these images for both commercial or private projects without having to purchase the rights to do so. An image can enter a public domain under the following circumstances:
- Scientists, educators or artists can use the Creative Commons Zero (CC0) license to dedicate their images to the public domain
- A picture’s copyright is no longer in effect
- A photo was never the subject to copyright
It is of utmost importance to check if an image is within the public domain before you use it publicly in order to avoid potential legal complications.
How and Where to Find Public Domain Images?
A simple google search will reveal hundreds of websites that let you download public domain and royalty-free images. Which source you’re going to use depends on the type of image you’re looking for, since some websites are dedicated only to photography, while others feature impressive collections of public domain images of artworks. In addition, you’ll only want to download public domain images from the websites that offer information about the author because using a public domain image without crediting its author is strictly prohibited.
Best Websites for Downloading Public Domain Images
We’ve searched the Internet and we utilized our results to compile a collection of the most reliable websites that grant its users access to vast numbers of public domain images. Let’s take a look at some of the best websites that let you download public domain images.
1. Pexels
Graphic designers and all other creatives in constant need of a fresh supply of public domain images don’t need a special introduction to Pexels. The stock image platform is dedicated to photography and video, so you can’t use it to search for vectors or clip art. Even so, you can use Pexles to search for public domain images based on a particular keyword or browse through its collection of free images and discover photos spontaneously. Clicking on the Popular Searches tab will enable you to see the images from Light, Nature or Animals and it will shorten the amount of time you have to spend looking for a photo you want to download.
Pros:
- Neatly organized website
- Free and easy sign-up
- Offers a huge selection of free public domain images and videos according to the CC0 license
- Hand-picked High quality Images
Cons:
- Some categories should contain more images
- Optimizing the search terms can be difficult
2. Pixabay
Besides offering an impressive collection of royalty-free photos, Pixabay also lets you search for public domain vectors, illustrations, and videos. The website hosts more than a million high-resolution photos and videos you can download for free. To make things even better, becoming a member of the Pixabay’s community and creating an account on this platform won’t take more than a few minutes of your time. Pixabay also offers advanced search tools that enable you to combine searches, search for the author of an image or group search terms. In addition, you can also browse through the photographers that contribute their images to the platform on a regular basis.
Pros:
- Powerful search tools and various filters
- Huge collection of public domain images
Cons
- Customer support could be better
3. Wikimedia Commons
This is probably the largest website on the Internet where you can download public domain images. There are more than 49 million images, illustrations, vector graphics and videos available that can be downloaded for free. Some media files on Wikimedia Commons have certain restrictions, but these restrictions are mostly related to image citations, which means that you can use them only if you credit the author. Such a huge selection of media files can be overwhelming for the newcomers to the Wikimedia Commons platform, but once you grow accustomed to the website’s interface discovering images becomes a straightforward process.
Pros:
- All images are available in high resolution
- Nearly all images can be used without any restrictions
Cons:
- Getting used to the website’s interface takes time
- The number of search results can be overwhelming
4. Flickr Commons
For more than a decade Flickr has been a popular online destination for photographers in need of a platform that enables them to present their work. The Flickr Commons is a project that unites more than a hundred institutions in an effort to create a library of public domain images. The project makes available a stunning amount of historical photographs and it grants you access to highly esteemed collections of photographs. Flick Commons is perfectly suited for researchers and scholars in need of public domain photos, they can use in their essays or research papers.
Pros:
- Unlimited access to historical photos
- Extends the knowledge available to the general public
Cons:
- Doesn’t offer videos or illustrations
- Search results are poorly organized
5. Unsplash
With a library that contains over 800,000 photos, Unsplash is easily one of the largest websites that offer public domain images. All pictures on this platform are organized into different categories, which makes finding a photo you want to use in a commercial or non-commercial project a relatively simple process. Alternatively, you can insert a keyword into a search bar and Unsplash will show you the results within seconds. However, the images you can find on this platform are similar to those you can purchase on stock photography websites, although some of them have an artistic touch that is hard to find on the majority of stock photos.
Pros:
- Excellent source of high-resolution photos
- Quick and easy search
Cons:
- Unsplash is dedicated solely to photography
- Limited amount of available public domain images
6. From Old Books
In case you are searching for images from old books you should look no further. This is a private collection of 2,600 images that are hard to find anywhere else on the Internet. You can browse through woodcuts, old texts or old holiday images, which makes this platform an excellent choice for anyone interested in rare images that were featured in old books. All pictures you can find on the From Old Books website are free to use on non-commercial projects, but you must pay a small fee if you want to download a high-resolution image you can use on a commercial project.
- Images are organized into categories
- Access to rare images
Cons
- Some images are not free
- Rudimentary website design
7. Morguefile
Morguefile is a website that offers stock footage to its users, but some of the images can’t be downloaded for free. That’s why you must click on the Free Photos tab before you start searching for public domain images on this website. The website hosts nearly 400.000 photos, videos, and vector graphics, but you must make sure that a file you want to download is within the public domain before you download it. The only downside is that the images aren’t organized into categories which can make finding the images you’re searching for more difficult than it needs to be.
Pros:
- Creating an account on Morguefile is free
- All free photos can be used on commercial projects
Cons:
- Images can be organized better
- Fewer free images than on other public domain image websites
8. Public Domain Archive
As the website’s name indicates, this is an archive of public domain images you can download for free and use in commercial contexts. All photos are organized into categories like abstract, free stock photos, people or wood which makes the search simpler. However, these categories don’t contain more than a few hundred photos and some of them offer as few as five pictures you can download. All photos are in high resolution and ready for professional use. The download process can be completed effortlessly in just a few quick steps. New images are added on a weekly basis.
Pros:
- Professional quality of images
- All images are free
Cons:
- A limited selection of photos
- Doesn’t offer vector graphics
9. NYPL Digital Gallery
NYPL Digital Gallery is an excellent resource for anyone who is not interested in stock photography. The New Your Public Library has made hundreds of thousands of historical images available to the public and you can use it to browse through items, collections or divisions. Before you enter a keyword you should click on the search only public domain materials tick box to ensure that the search results are going to display only images that can be used without restrictions. Additionally, the NYPL Digital Gallery lets you browse through its collection of digital books while its collections of photographs include the work of some of the highly esteemed American photographers.
Pros
- Public domain images are available in different resolutions
- Offers valuable research materials
Cons
- Some images are subject to copyright
- Only aimed at scholars and researchers
10. Viintage
Viintage is a gold mine for graphic designers as it grants them access to hundreds of vintage posters, book covers, and images. However, the amount of public domain images this website offers is limited and if you want to download the images from the collections of works created by famous artists from the late 19th and early 20th centuries you must purchase the premium version of Viintage. The website lacks some basic search options as it only allows you to type in the search term into the search bar. The images are not organized into categories which further complicates the process of finding a public domain image you’re looking for.
Pros:
- Offers a collection of rare vintage public domain images
- A great resource for graphic designers
Cons:
- Most images on Viintage can’t be downloaded for free
- Search tools are far from perfect
You may also like: Best Image Hosting Sites >>
How to Cite Public Domain Images Properly?
If you’re planning on using a public domain image in a blog or on your website, you must cite the source from which you acquired a particular image. The image citations should include the following information:
- The title of the image
- Author’s name
- Information about the institution at which an image is kept
- The source from which you acquired an image
In case you don’t have access to all of these information or if the information is simply not available you should include all details about a public domain image you have the access to. Furthermore, there are several styles of image citations that depend on the source from which an image was acquired.
Conclusion
Spending large sums of money on images you can use in commercial or private projects is not always necessary. The public domain images are widely available and they can be used in a broad range of contexts. Which website that lets you download public domain images do you like to use the most? Leave a comment and share your opinions with us.
Dont worry when you forget the syntax of an HTML element, like and iframe, a link, a table, an image or anything else. Visit HTML CheatSheet and generate the code you need.
Liza Brown
Liza Brown is a writer and a lover of all things video.
Follow @Liza Brown
Capture Your Best: Top 10 Webcam Recording Software for Windows 10
10 Best Webcam Recording Software for Windows 10

Richard Bennett
Mar 27, 2024• Proven solutions
Which webcam softwarehave you installed on your laptop or desktop? Using the right webcam software to live stream videos, screen record videos, or chat on Skype results in high-quality images, smooth streaming, and high-quality images and videos.
There is a huge number of free webcam software with advanced features yet free for you to download, and use on your PC.
But how would you determine the best webcam software to use?
Before you mounted that webcam on your desktop or laptop, you had a reason. It’s your webcam features and purpose that should guide you to select the right software for the webcam camera.
In this article, we will show you 10 webcam software for Windows in this guide. Included are the most useful factors to consider as you make your choice – complexity of use, free/paid, integrations, editing tools, and more. You will learn:
- Part 1: The Best Webcam & Screen Recorder for Windows and Mac [Video Tutorial]
- Part 2: Top 10 Best Free Webcam Software for Windows
First take a quick look of the 10 best webcam software that is available on your Windows from a video:
For Win 7 or later (64-bit)
 Secure Download
For macOS 10.14 or later
Secure Download
Part 1: The Best Webcam & Screen Recorder for Computer
You need a sound and webcam recorder to record your video tutorials, streaming videos, presentations, or any other type of video. Wondershare Filmora is the software to use. Other than its most admired friendly intuitive interface, it’s simple and easy to use-suitable for both beginners and professionals.
For Win 7 or later (64-bit)
Secure Download
For macOS 10.14 or later
Secure Download
Among the outstanding features, you’ll find in Filmora include,
- Fast-paced recording speed of up to 120 fps
- Adverse professional editing tools that are easy to use
- Simultaneous recording from both webcam and computer screen
- Compatible with 50+ different file formats
- Rich title text and tutorial features
It’s free to download. Have a try now! Join in the Wondershare Video Community and get some inspiration from other Filomora users.
Part 2: Top 10 Best Free Webcam Software for Windows
To help you evaluate which webcam software best suits your needs, I’ve featured the strengths, shortcomings, and support services in each software review.
This is the list of the best free webcam software for Windows 10.
| 1 - Logitech Capture | 2 - CyberLink Youcam |
|---|---|
| 3 - ManyCam | 4 - SplitCam |
| 5 - Bandicam | 6 - NCH - Video Capture Software |
| 7 - YAWCAM | 8 - Windows Camera |
| 9 - Fake Webcam | 10 - IP Camera Viewer |
1. Logitech Capture
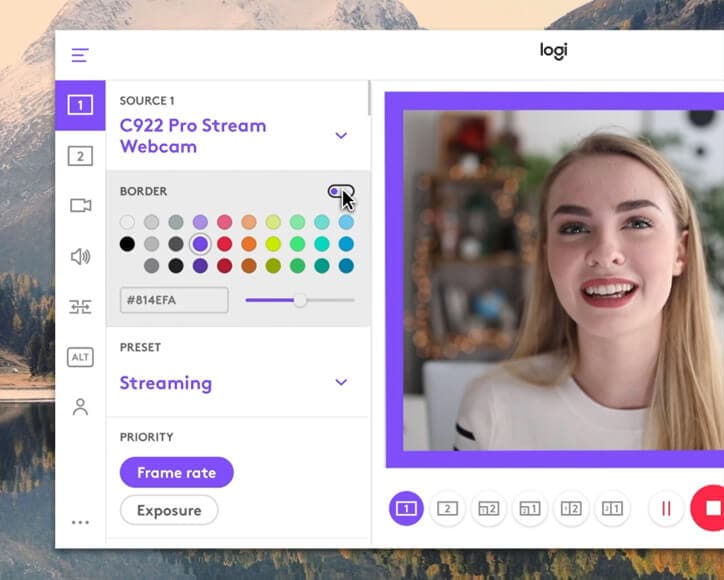
The multiple source recording feature and direct streaming app are the key strengths of this software. According to its mission statement- All-In-One Content Creation- you can use this software to record, edit, customize, and stream to your favorite channel.
Operating systems: Windows 10/8/7
Price: Free
Supported webcams: 1080P PRO STREAM, BRIO STREAM, C920s HD PRO, C922 PRO STREAM
Logitech Capture is among the few free webcam recording software for Windows 10 with studio controls applicable during recording. You can use this feature to adjust your image, create frames, adjust focus and transitions, and enable ChromaKey as you record.
In case you want to create a picture-in-picture presentation, this software allows you to use two webcams simultaneously. With the source switching and the auto-focus features, you can record the best tutorials or guides that show all dimensions and your image.
Pros
- Rich in transitions and effects
- Portrait optimization for mobile devices
- Its Capture app offers direct streaming to YouTube
- You can take passports or still images
Cons
- Limited to YouTube channel
- Account registration is mandatory
2. CyberLink Youcam
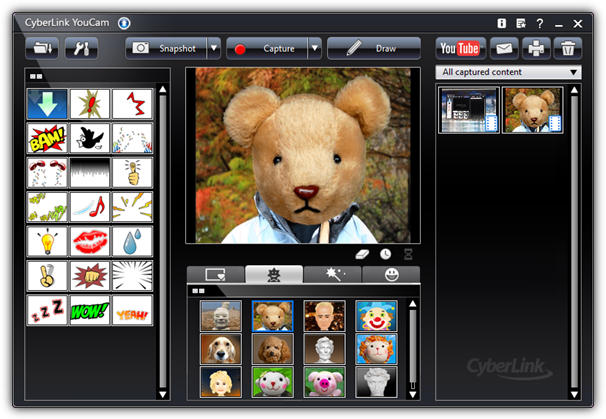
If you are used to video chatting and video recording, then, you’ll have 200+ fun effects to make your real-time videos as interesting as possible. In fact, the seamless app integration feature will keep your live streaming chats without buffering for long.
Operating systems: Windows 10/8/1.8/7
Price: Free/ Paid
Supported file formats: WMV, MP4, AVI
YouCam is the best free webcam software Windows 10 for YouTubers, business professionals, Streamers, home users, and Vloggers. It seamlessly integrates with live streaming media channels like Twitch, Wirecast, OBS Studio, Facebook Live, Xsplit, and YouTube Live.
The YouCam’s AR technology is one of its hidden treasures that will lighten up your skin by applying a natural-looking makeup. If your room is badly light, use the Live Skin Smoothing feature. Just below it is the TrueTheater Enhancement option to help you automatically adjust your facial sharpness and lighting.
Pros
- Hundreds of animated emojis
- Suitable for video conferencing services
- Plenty of interactive colorful particles and distortions
- Availability of face beautification tool
Cons
- Only limited to the Windows operating system
- Very few features for the free plan
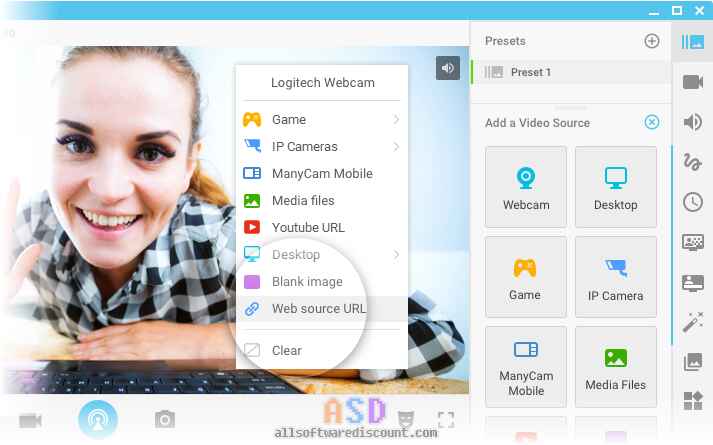
3. ManyCam
Downloading this webcam software guarantees you smooth streaming and effortless recording of videos. Also, this software will help you during game steaming, online education, mobile live streaming, and live telehealth communication.
Operating systems: Windows 10/8/7 and macOS X
Price: Free /Paid
Supported file formats: MJPEG, IP, MP4, AVI, MPEG, MOV
ManyCam is a free webcam recording software for windows 10 . It’s among the most widely used software internationally-not for many reasons, but because of its friendly intuitive user interface and live streaming tools for lessons and lecturers.
So, if you are a lecturer/teacher, you can use the Software Development Kit (SDK) to integrate the webcam with any online teaching platform. Among the features designed to facilitate better online teaching include the picture in picture, Chroma Key, multiple video sources, and screen sharing.
Pro
- Ability to stream 4K videos
- Real-time camera control settings
- No watermark even on the free plan
- Screencasting and screen recording feature
- Real-time drop and drag effects
Cons
- Expensive business subscription plans
- No Light enhancement features
- Most features are manual as opposed to being automatic

Filmora WebCame & Screen Recorder
Filmora - WebCame & Screen Recorder
• No-time delay to record webcam and screen while live streaming or gaming
• Edit recording video for marketing replay or adding game commentary
• Cross-platform supported - (Windows, Mac, iOS, Android)
Start Webcam & Screen Record Start Webcam & Screen Record Start Webcam & Screen Record Learn More >
4. SplitCam
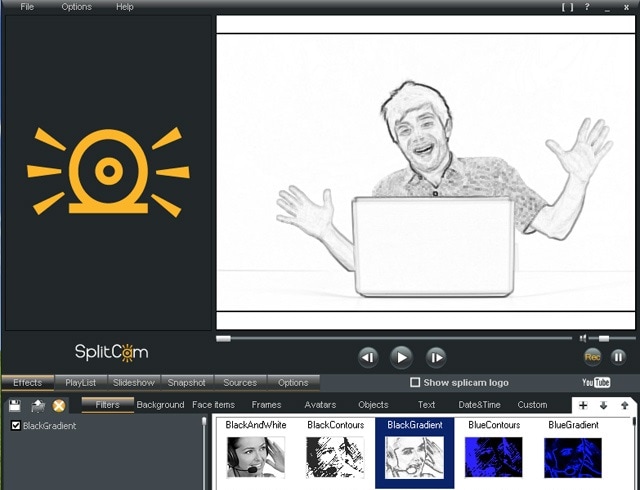
To stream your desktop/laptop screen SplitCam is the most appropriate software. With only the inbuilt virtual webcam, you can share your screen videos to media channels and IMS. Other uses of this software are recording webcam chatting , streaming live videos, and messaging.
Operating systems: Windows 10/8/7
Price: Free
SplitCam is not as popular as the other free webcam software windows 10 like ManyCam and YouCam. This is because it doesn’t integrate with some of the world’s renowned social media platforms- Facebook and Instagram. However, you can use this software to stream, take snapshots, and record videos for YouTube, Skype, Justin.tv, Gtalk, and Windows Live Messenger.
SplitCam is rich in fantastic webcam effects. Haven’t you been surprised to see someone appear to be streaming from the ocean or the Amazon Mountain? This is what you can do with SplitCam. Other cool effects are frames, texts on videos, filters, and facial items like masks and fake face glasses.
Pros
- Open and simple interface
- Integratable with the messaging apps
- Supports a wide range of resolutions ( between 320x180 and 2048x1536)
Cons
- Applicable to a small number of channels
- Supported file formats not defined
5. Bandicam
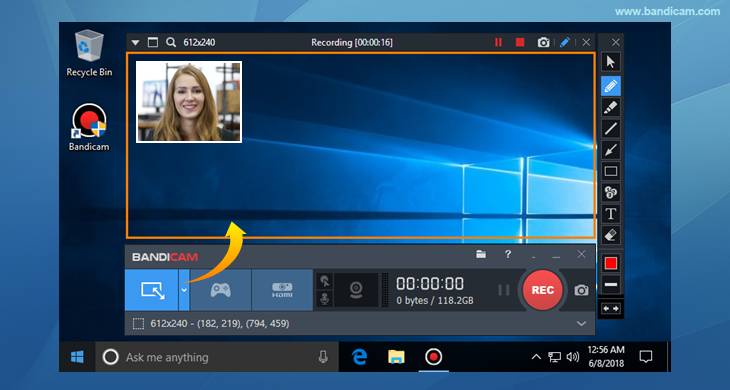
Do you want a recorder for screen recording, recording your gameplay, or capturing videos from devices like smartphones and PlayStation? Look for no other software but BandiCam. You can also merge two or more video files, remove unwanted parts, and select the only part to screen record.
Operating systems: Windows Vista, 10/8/7
Price: Free/paid
Supported file format: AVI, MP4, JPEG, TIF, GIF, PNG
Supported graphics cards: Nvidia NVENC, Nvidia NVENC (),
BandiCam is another HD webcam software Windows 10 with the capability of capturing high compression videos and games on your PC screen videos without compromising the video quality. Don’t forget to record all webinars aired in your niche.
Netflix is becoming more popular each day due to the thrilling videos. With the BandiCam screen recorder, you can record live-streamed videos on Netflix for over 24hrs. These are the tools to edit your recorded video: real-time drawing tool, webcam overlay, sound mixer, and Chroma Key.
Pros
- No hidden features
- Widescreen capture
- Can record 2D/3D videos in HD mode
- Can capture fast-paced videos of up to 144 FPS
Cons
- Not suitable for beginners
- Cannot be used to live stream videos
6. NCH - Video Capture Software

Of all the listed webcam software in this review, this software has the most diverse functions. You can record streaming videos, record your computer screen, record from external devices, and record from a webcam. It’s also perfect for recording audios and simultaneous recording from screen and webcam.
Operating systems: Windows 10, 8, 8.1, 7, XP, Vista 64 bit and Mac OS X 10.5 and above
Price: Free/paid
Supported file formats: MP4, WMV, AVI, MPG, FLV, MOV
Debut Video Capture is the only free webcam recording software for Windows 10 believed to capture or record videos from any external source. It has also preset settings for HD and TV with pre-production enhancement features like color adjustment settings, overlay buttons and frame rate, aspect ratio, and resolution settings.
If you always think of becoming rich, the Express Burn Disc Burner is the tool that will help you make money. Record the most trending videos and use this tool to burn DVDs and CDs.
Pros
- Can record videos for any social media platform
- Supports a wide range of audio and video file formats
- All features are open and easy to use
- Availability of video editing software
Cons
- Only monthly subscriptions for paid plans
- Watermark for the free download
- Difficult to record a full-screen movie
Try Filmora to Smoothly Record WebCame and Screen!
Filmora Web Camera & Screen Recorder can capture any area of the PC screen and webcam. It’s perfect to capture and record while making a live gaming match, marketing promotion, guiding a tour, and more. Plus, you can edit the recording video files in Filmora directly! Worth to have a try!
Start Webcam & Screen Recording Start Webcam & Screen Recording Start Webcam & Screen Recording Learn More >
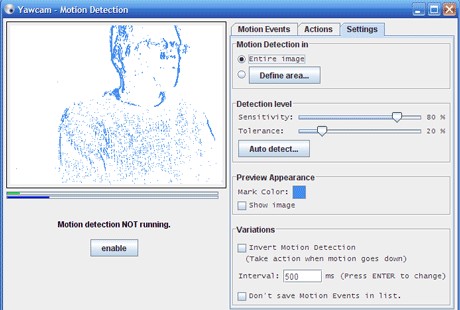
7. YAWCAM
This webcam software can be referred to as the simplest for all beginners with the will to start streaming and recording videos for personal or home use.
Supported file formats: PNG, JPG, MJPEG, GIF, JavaScript
Price: Free
Supported operating systems: Windows 2000/10/8/7/ Vista and XP
YAWCAM is an absolutely free webcam software windows 10. Why is it the simplest software to use? Just download and you will find all features on one page. Simple language commands aligned in a drop-down menu ready to be used with only one click.
Some of the best features include overlay texts and images, scheduler, motion detection, and an inbuilt webserver. For you to use this webcam software, use these supported devices; DirectX compatible webcams, DV-camera, or video capture devices.
Pros
- No watermark
- Easy to use
- Friendly user interface
Cons
- Few transitions and effects
8. Windows Camera
We all trust any app or software by Microsoft over others! If you also do, then you can download Windows Camera and use it to record videos, take snapshots and shoot videos.
Operating system: Windows 10
Price: Free
Supported devices: Xbox One, Windows, mobile
Windows Camera is among the best free webcam software for Windows 10. This is because of the software’s few but easy-to-use and effective features that are expertly designed for PCs and tablets installed with Windows 10.
The automatic photo back combined with the photo-shoot timer makes it perfect for taking selfies and passports. Using the panorama feature, you can take photos of the best scenes and share them on media platforms.
Pros
- Simplicity is its main strength
- Supports resolutions above 1080p
- Good for photographers
Cons
- Has no built-in virtual webcam
- Requires a camera to support 4K videos
9. Fake Webcam

Supported file formats: AVI, MPEG, DVD, VCD, WMV, 3GP, MP4, SVCD, MOV, ASF,
Price: Free /paid
Operating systems: Windows 7/8/10 (32/64 bit)
Fake Webcam is a free webcam software Windows 10 whose name is creatively used to suggest it almost functions like a webcam. This doesn’t fall far from the truth! You can truly use this software to broadcast, add effects and filters, record on full screen, and fake your voice.
To share or stream your photos and videos on Skype, YIM, or Gtalk, using the screen recorder would give the best results. What makes Fake Webcam stand out is the free video converter and the free video toolkit.
Pros
- Free support tools
- Supports all video and audio formats
- Can convert file formats and stream to any channel
- Availability of the screen recorder
- Integratable with almost all instant messengers
Cons
- Major tools not free(Fake Webcam and Screen recorder)
10. IP Camera Viewer
Do you run a supermarket store, mall or you’ve installed security surveillance cameras in your compound? IP Camera Viewer is the most effective webcam software for video monitoring systems.
Supported file formats: JPEG, MPEG-4, MJPEG, and
Price: Free
Operating systems: Windows 10 / 8 / 7 /2012 /Vista and XP
IP Camera Viewer is the most used free webcam recording software for windows 10 as its compatible with almost all IP camera models like Panasonic, Toshiba, Canon, D-Link, Sony, and more the 2000 others. With the capability of viewing and controlling 4 camera feeds at once, you can use this software to monitor your entire compound.
Some of the important advanced IP Camera Viewer functions include listening to webcam audios, adjust image settings, zoom or tilt images, schedule monitoring times, and detect motions.
Pros
- Automatically uploads recorded videos and photos to a server
- Compatible with almost all IP camera models
- Simple and easy to use
Cons
- No inbuilt media player
- Cannot adjust the image or video quality
You may also want to read >>> 10 Best Webcams | A Buyer’s Guide
![]()
A cross-platform for making videos anywhere for all creators

Why your video editing isn’t good enough? How about some creative inspo?
- 100 Million+ Users
- 150+ Countries and Regions
- 4 Million+ Social Media Followers
- 5 Million+ Stock Media for Use
* Secure Download

FAQs about Webcam Software for Windows
1. What is Webcam Software?
A webcam is a video camera that feeds or streams images or video in real-time to or over a computer network. And webcam software enables users to record video or stream video over the Internet.
Webcam software is an application that allows you to capture video from your laptop/desktop webcam and record or stream video over the Internet. You can use them to deliver professional videos, streaming, and online courses easily.
2. Does Windows have built-in webcam software?
Windows 10 has an in-built webcam app called Camera that lets you record videos and take pictures with your webcam. This is definitely better than downloading 3rd party webcam recording software where spyware/malware is rampant.
3. Does a webcam need software?
Yes, if the camera hardware offers depth, low-light support, night vision, etc. If you use any software on the camera, these functions are only available if the driver is installed.
Conclusion
After a keen of all the webcam software above, it’s evident that every developer had an intended purpose. You cannot therefore just randomly wake up and download any without considering its functions, supported devices, file formats, and the auxiliary apps available. All this information is contained herein.
According to some users, there are free webcam software Windows 10 that more often would not show any video images but the audio is absolutely clear. To help your fellow user, what bad experience have you ever had after recording a game using webcam software ? Kindly share your comment or suggestion on our social media platforms.


Richard Bennett
Richard Bennett is a writer and a lover of all things video.
Follow @Richard Bennett
Richard Bennett
Mar 27, 2024• Proven solutions
Which webcam softwarehave you installed on your laptop or desktop? Using the right webcam software to live stream videos, screen record videos, or chat on Skype results in high-quality images, smooth streaming, and high-quality images and videos.
There is a huge number of free webcam software with advanced features yet free for you to download, and use on your PC.
But how would you determine the best webcam software to use?
Before you mounted that webcam on your desktop or laptop, you had a reason. It’s your webcam features and purpose that should guide you to select the right software for the webcam camera.
In this article, we will show you 10 webcam software for Windows in this guide. Included are the most useful factors to consider as you make your choice – complexity of use, free/paid, integrations, editing tools, and more. You will learn:
- Part 1: The Best Webcam & Screen Recorder for Windows and Mac [Video Tutorial]
- Part 2: Top 10 Best Free Webcam Software for Windows
First take a quick look of the 10 best webcam software that is available on your Windows from a video:
For Win 7 or later (64-bit)
Secure Download
For macOS 10.14 or later
Secure Download
Part 1: The Best Webcam & Screen Recorder for Computer
You need a sound and webcam recorder to record your video tutorials, streaming videos, presentations, or any other type of video. Wondershare Filmora is the software to use. Other than its most admired friendly intuitive interface, it’s simple and easy to use-suitable for both beginners and professionals.
For Win 7 or later (64-bit)
Secure Download
For macOS 10.14 or later
Secure Download
Among the outstanding features, you’ll find in Filmora include,
- Fast-paced recording speed of up to 120 fps
- Adverse professional editing tools that are easy to use
- Simultaneous recording from both webcam and computer screen
- Compatible with 50+ different file formats
- Rich title text and tutorial features
It’s free to download. Have a try now! Join in the Wondershare Video Community and get some inspiration from other Filomora users.
Part 2: Top 10 Best Free Webcam Software for Windows
To help you evaluate which webcam software best suits your needs, I’ve featured the strengths, shortcomings, and support services in each software review.
This is the list of the best free webcam software for Windows 10.
| 1 - Logitech Capture | 2 - CyberLink Youcam |
|---|---|
| 3 - ManyCam | 4 - SplitCam |
| 5 - Bandicam | 6 - NCH - Video Capture Software |
| 7 - YAWCAM | 8 - Windows Camera |
| 9 - Fake Webcam | 10 - IP Camera Viewer |
1. Logitech Capture
The multiple source recording feature and direct streaming app are the key strengths of this software. According to its mission statement- All-In-One Content Creation- you can use this software to record, edit, customize, and stream to your favorite channel.
Operating systems: Windows 10/8/7
Price: Free
Supported webcams: 1080P PRO STREAM, BRIO STREAM, C920s HD PRO, C922 PRO STREAM
Logitech Capture is among the few free webcam recording software for Windows 10 with studio controls applicable during recording. You can use this feature to adjust your image, create frames, adjust focus and transitions, and enable ChromaKey as you record.
In case you want to create a picture-in-picture presentation, this software allows you to use two webcams simultaneously. With the source switching and the auto-focus features, you can record the best tutorials or guides that show all dimensions and your image.
Pros
- Rich in transitions and effects
- Portrait optimization for mobile devices
- Its Capture app offers direct streaming to YouTube
- You can take passports or still images
Cons
- Limited to YouTube channel
- Account registration is mandatory
2. CyberLink Youcam
If you are used to video chatting and video recording, then, you’ll have 200+ fun effects to make your real-time videos as interesting as possible. In fact, the seamless app integration feature will keep your live streaming chats without buffering for long.
Operating systems: Windows 10/8/1.8/7
Price: Free/ Paid
Supported file formats: WMV, MP4, AVI
YouCam is the best free webcam software Windows 10 for YouTubers, business professionals, Streamers, home users, and Vloggers. It seamlessly integrates with live streaming media channels like Twitch, Wirecast, OBS Studio, Facebook Live, Xsplit, and YouTube Live.
The YouCam’s AR technology is one of its hidden treasures that will lighten up your skin by applying a natural-looking makeup. If your room is badly light, use the Live Skin Smoothing feature. Just below it is the TrueTheater Enhancement option to help you automatically adjust your facial sharpness and lighting.
Pros
- Hundreds of animated emojis
- Suitable for video conferencing services
- Plenty of interactive colorful particles and distortions
- Availability of face beautification tool
Cons
- Only limited to the Windows operating system
- Very few features for the free plan
3. ManyCam
Downloading this webcam software guarantees you smooth streaming and effortless recording of videos. Also, this software will help you during game steaming, online education, mobile live streaming, and live telehealth communication.
Operating systems: Windows 10/8/7 and macOS X
Price: Free /Paid
Supported file formats: MJPEG, IP, MP4, AVI, MPEG, MOV
ManyCam is a free webcam recording software for windows 10 . It’s among the most widely used software internationally-not for many reasons, but because of its friendly intuitive user interface and live streaming tools for lessons and lecturers.
So, if you are a lecturer/teacher, you can use the Software Development Kit (SDK) to integrate the webcam with any online teaching platform. Among the features designed to facilitate better online teaching include the picture in picture, Chroma Key, multiple video sources, and screen sharing.
Pro
- Ability to stream 4K videos
- Real-time camera control settings
- No watermark even on the free plan
- Screencasting and screen recording feature
- Real-time drop and drag effects
Cons
- Expensive business subscription plans
- No Light enhancement features
- Most features are manual as opposed to being automatic
Filmora WebCame & Screen Recorder
Filmora - WebCame & Screen Recorder
• No-time delay to record webcam and screen while live streaming or gaming
• Edit recording video for marketing replay or adding game commentary
• Cross-platform supported - (Windows, Mac, iOS, Android)
Start Webcam & Screen Record Start Webcam & Screen Record Start Webcam & Screen Record Learn More >
4. SplitCam
To stream your desktop/laptop screen SplitCam is the most appropriate software. With only the inbuilt virtual webcam, you can share your screen videos to media channels and IMS. Other uses of this software are recording webcam chatting , streaming live videos, and messaging.
Operating systems: Windows 10/8/7
Price: Free
SplitCam is not as popular as the other free webcam software windows 10 like ManyCam and YouCam. This is because it doesn’t integrate with some of the world’s renowned social media platforms- Facebook and Instagram. However, you can use this software to stream, take snapshots, and record videos for YouTube, Skype, Justin.tv, Gtalk, and Windows Live Messenger.
SplitCam is rich in fantastic webcam effects. Haven’t you been surprised to see someone appear to be streaming from the ocean or the Amazon Mountain? This is what you can do with SplitCam. Other cool effects are frames, texts on videos, filters, and facial items like masks and fake face glasses.
Pros
- Open and simple interface
- Integratable with the messaging apps
- Supports a wide range of resolutions ( between 320x180 and 2048x1536)
Cons
- Applicable to a small number of channels
- Supported file formats not defined
5. Bandicam
Do you want a recorder for screen recording, recording your gameplay, or capturing videos from devices like smartphones and PlayStation? Look for no other software but BandiCam. You can also merge two or more video files, remove unwanted parts, and select the only part to screen record.
Operating systems: Windows Vista, 10/8/7
Price: Free/paid
Supported file format: AVI, MP4, JPEG, TIF, GIF, PNG
Supported graphics cards: Nvidia NVENC, Nvidia NVENC (),
BandiCam is another HD webcam software Windows 10 with the capability of capturing high compression videos and games on your PC screen videos without compromising the video quality. Don’t forget to record all webinars aired in your niche.
Netflix is becoming more popular each day due to the thrilling videos. With the BandiCam screen recorder, you can record live-streamed videos on Netflix for over 24hrs. These are the tools to edit your recorded video: real-time drawing tool, webcam overlay, sound mixer, and Chroma Key.
Pros
- No hidden features
- Widescreen capture
- Can record 2D/3D videos in HD mode
- Can capture fast-paced videos of up to 144 FPS
Cons
- Not suitable for beginners
- Cannot be used to live stream videos
6. NCH - Video Capture Software
Of all the listed webcam software in this review, this software has the most diverse functions. You can record streaming videos, record your computer screen, record from external devices, and record from a webcam. It’s also perfect for recording audios and simultaneous recording from screen and webcam.
Operating systems: Windows 10, 8, 8.1, 7, XP, Vista 64 bit and Mac OS X 10.5 and above
Price: Free/paid
Supported file formats: MP4, WMV, AVI, MPG, FLV, MOV
Debut Video Capture is the only free webcam recording software for Windows 10 believed to capture or record videos from any external source. It has also preset settings for HD and TV with pre-production enhancement features like color adjustment settings, overlay buttons and frame rate, aspect ratio, and resolution settings.
If you always think of becoming rich, the Express Burn Disc Burner is the tool that will help you make money. Record the most trending videos and use this tool to burn DVDs and CDs.
Pros
- Can record videos for any social media platform
- Supports a wide range of audio and video file formats
- All features are open and easy to use
- Availability of video editing software
Cons
- Only monthly subscriptions for paid plans
- Watermark for the free download
- Difficult to record a full-screen movie
Try Filmora to Smoothly Record WebCame and Screen!
Filmora Web Camera & Screen Recorder can capture any area of the PC screen and webcam. It’s perfect to capture and record while making a live gaming match, marketing promotion, guiding a tour, and more. Plus, you can edit the recording video files in Filmora directly! Worth to have a try!
Start Webcam & Screen Recording Start Webcam & Screen Recording Start Webcam & Screen Recording Learn More >
7. YAWCAM
This webcam software can be referred to as the simplest for all beginners with the will to start streaming and recording videos for personal or home use.
Supported file formats: PNG, JPG, MJPEG, GIF, JavaScript
Price: Free
Supported operating systems: Windows 2000/10/8/7/ Vista and XP
YAWCAM is an absolutely free webcam software windows 10. Why is it the simplest software to use? Just download and you will find all features on one page. Simple language commands aligned in a drop-down menu ready to be used with only one click.
Some of the best features include overlay texts and images, scheduler, motion detection, and an inbuilt webserver. For you to use this webcam software, use these supported devices; DirectX compatible webcams, DV-camera, or video capture devices.
Pros
- No watermark
- Easy to use
- Friendly user interface
Cons
- Few transitions and effects
8. Windows Camera
We all trust any app or software by Microsoft over others! If you also do, then you can download Windows Camera and use it to record videos, take snapshots and shoot videos.
Operating system: Windows 10
Price: Free
Supported devices: Xbox One, Windows, mobile
Windows Camera is among the best free webcam software for Windows 10. This is because of the software’s few but easy-to-use and effective features that are expertly designed for PCs and tablets installed with Windows 10.
The automatic photo back combined with the photo-shoot timer makes it perfect for taking selfies and passports. Using the panorama feature, you can take photos of the best scenes and share them on media platforms.
Pros
- Simplicity is its main strength
- Supports resolutions above 1080p
- Good for photographers
Cons
- Has no built-in virtual webcam
- Requires a camera to support 4K videos
9. Fake Webcam
Supported file formats: AVI, MPEG, DVD, VCD, WMV, 3GP, MP4, SVCD, MOV, ASF,
Price: Free /paid
Operating systems: Windows 7/8/10 (32/64 bit)
Fake Webcam is a free webcam software Windows 10 whose name is creatively used to suggest it almost functions like a webcam. This doesn’t fall far from the truth! You can truly use this software to broadcast, add effects and filters, record on full screen, and fake your voice.
To share or stream your photos and videos on Skype, YIM, or Gtalk, using the screen recorder would give the best results. What makes Fake Webcam stand out is the free video converter and the free video toolkit.
Pros
- Free support tools
- Supports all video and audio formats
- Can convert file formats and stream to any channel
- Availability of the screen recorder
- Integratable with almost all instant messengers
Cons
- Major tools not free(Fake Webcam and Screen recorder)
10. IP Camera Viewer
Do you run a supermarket store, mall or you’ve installed security surveillance cameras in your compound? IP Camera Viewer is the most effective webcam software for video monitoring systems.
Supported file formats: JPEG, MPEG-4, MJPEG, and
Price: Free
Operating systems: Windows 10 / 8 / 7 /2012 /Vista and XP
IP Camera Viewer is the most used free webcam recording software for windows 10 as its compatible with almost all IP camera models like Panasonic, Toshiba, Canon, D-Link, Sony, and more the 2000 others. With the capability of viewing and controlling 4 camera feeds at once, you can use this software to monitor your entire compound.
Some of the important advanced IP Camera Viewer functions include listening to webcam audios, adjust image settings, zoom or tilt images, schedule monitoring times, and detect motions.
Pros
- Automatically uploads recorded videos and photos to a server
- Compatible with almost all IP camera models
- Simple and easy to use
Cons
- No inbuilt media player
- Cannot adjust the image or video quality
You may also want to read >>> 10 Best Webcams | A Buyer’s Guide
![]()
A cross-platform for making videos anywhere for all creators
Why your video editing isn’t good enough? How about some creative inspo?
- 100 Million+ Users
- 150+ Countries and Regions
- 4 Million+ Social Media Followers
- 5 Million+ Stock Media for Use
* Secure Download
FAQs about Webcam Software for Windows
1. What is Webcam Software?
A webcam is a video camera that feeds or streams images or video in real-time to or over a computer network. And webcam software enables users to record video or stream video over the Internet.
Webcam software is an application that allows you to capture video from your laptop/desktop webcam and record or stream video over the Internet. You can use them to deliver professional videos, streaming, and online courses easily.
2. Does Windows have built-in webcam software?
Windows 10 has an in-built webcam app called Camera that lets you record videos and take pictures with your webcam. This is definitely better than downloading 3rd party webcam recording software where spyware/malware is rampant.
3. Does a webcam need software?
Yes, if the camera hardware offers depth, low-light support, night vision, etc. If you use any software on the camera, these functions are only available if the driver is installed.
Conclusion
After a keen of all the webcam software above, it’s evident that every developer had an intended purpose. You cannot therefore just randomly wake up and download any without considering its functions, supported devices, file formats, and the auxiliary apps available. All this information is contained herein.
According to some users, there are free webcam software Windows 10 that more often would not show any video images but the audio is absolutely clear. To help your fellow user, what bad experience have you ever had after recording a game using webcam software ? Kindly share your comment or suggestion on our social media platforms.
Richard Bennett
Richard Bennett is a writer and a lover of all things video.
Follow @Richard Bennett
Best Text Motion Tracking Software
Best Text Motion Tracking Software

Ollie Mattison
Mar 27, 2024• Proven solutions
Have you ever been mesmerized by a video with text or emoji’s moving together with objects? That effect is produced using motion tracking and isn’t very complicated. Today, we will introduce some text motion tracking software (free & paid) tools that allow you to pin text to video with minimum effort. There will also be detailed tutorials on how to utilize each tool. Let’s get started.
Best Text Motion Tracking Software [+Howtos]
Note: The list below is in no particular order.
1. Filmora
Pricing: Free (watermark) /starts at $49.99/year
Operating System: Windows & Mac
The newly released Wondershare Filmora X version has added the motion tracking features, which allows you to track moving objects in a video clip, and attach images, texts, elements and videos to follow the movement path.
How to Use Filmora Video Editor To Do Text Motion Tracking?
- Import the video footage to the timeline and then click the Motion Track icon in the tool bar to enable the Motion Tracking option.
![]()
- In the preview window, drag and adjust the tracking box to select a moving object as the target.
![]()
- Click the Start Tracking menu to start the moton tracking render, and Filmora video editor will compute the moving path automatically
- Now, go to the Titles tab and drag a subtitle, titles, lower 3rd, or callout to the track just above the motion-tracked video. Customize your texts, adjust its size, position, etc. in the preview window.
![]()
- Next, double click the video footage to enter the Motion Track option. Select the title as a follower. Playback the video, and you will see the text will move accordingly.
Below is a step by step video tutorial about how to use the motion tracking feature in Filmora. Keep watching.
2. Premiere Pro CC
Pricing: 14-day trial, minimum $20.99/month
Operating System: Windows, Mac
Adobe Premiere Pro is an industry-leading video editor. Premiere Pro CC has all the editing tools a pro video editor needs.
There is no automatic tracking feature in Premiere Pro to pin text to video. Therefore, you need to manually position your text and add keyframes frame by frame. But the overall effort required and the final result isn’t much different from traditional editors.
How To Do Text Motion Tracking In Premiere Pro CC? [Main Steps]
- Import your video to the timeline
- Add text by Pressing ‘T’ on your keyboard and clicking on the preview window (your footage)
- Change the position & duration of the text layer on the timeline according to the position & duration of motion tracking
- Make sure you’re on the frame you want to start tracking from
- Click on your text layer → then go to effects controls
- Change the position of the text to the point you want to track → click on the stopwatch icon to add a keyframe
- Move a few frames forward → adjust the position again → add another keyframe
- Don’t put the keyframes too close or too farther apart
- Play through to check it out → adjust the position and number of keyframes if any issues arise
The whole process is relatively easy, although tedious. But the process becomes very complicated when you have more dynamic motion in your clip
3. After Effects
Pricing: 7-day trial, $20.99/month (individual)
Operating System: Windows & Mac
Adobe After Effects is an editor that focuses on animation & creative composition. This app has been developed as a companion to Premiere Pro for creating short & flashy motion graphics and visual effects for projects.
Motion tracking in After Effects can be done using the Point Tracker, which has one-point and up to four-point tracking. Other tracking options include the built-in 3D Camera Tracker that lets you reverse engineer a scene and the spline tracker that enables you to track masks on an object. There is also Mocha AE, a planar tracker from BorisFX. The Point Tracker is the most flexible and versatile in After Effects. We’ll use it to pin text to video.
How To Do Text Motion Tracking In After Effects? [Main Steps]
- Create a new composition/open an old one and make sure your clip is imported
- Create a null object by right-clicking on the window (screenshot below)
- Select your clip → click on tracker → click on track motion
- Two square boxes will appear
- Move the squares to the point you want to track (make sure to select an object with relatively high contrast for easier tracking)
- Position the smaller square on the object you want to track
- Make the second box is big enough (not too big) so that the tracked object stays within this square in the next frame
- Click on the analyze forward button (screenshot above)
- If the square box fails to track the object at any frame, reposition it and move on
- Make sure motion target is set to null object (e.g., Null 1)
- Now add the text
- While clicking on the pick whip tool of the text layer, drag it to the null object
- Play through to check the result
- You can manually change the position of the text in any frame by adjusting its position and adding a keyframe
We’re done. As we stated above, other types of trackers are also available for you to experiment with. The overall tracking functionality is much better than Premiere Pro.
4. Sony Vegas Pro
Pricing: 30-day trial, minimum $19.99/month
Operating System: Windows
Sony Vegas Pro is a non-linear video editor with the so-called “power of Artificial Intelligence.” It is one of the few editors out there that has acquired popularity among professionals and amateurs alike.
Text motion tracking in Vegas Pro is done using Bézier Masking FX (new update introduces a separate tab for motion tracking). The tracking process is automatic. Keyframes are created automatically frame by frame. It isn’t perfect, but it gets the job done in most cases. When it fails to track objects correctly, you can manually edit the keyframes.
How To Do Text Motion Tracking In Sony Vegas Pro? [Main Steps]
- Import your video
- Click on your video → go to the starting point of text motion tracking
- Click on Bézier Masking → drag the default one to your video
- A new options tab will appear & a square box with a circle (tracking box) will appear in the preview window
- Go to General options → set blend to 1,000
- Go to Mask 1 → Tracking → options → set the precision to high → set keyframe interval between 1 & 5
- Position the black dot of the tracking box to the point you want to track
- Click on start below the keyframe interval option
- After processing is complete → go to tools → extensions → add text to motion track → click on ok in the text position tab
- Enter your text, edit it if you want
- Play through to check the result
Conclusion:
As we’ve seen above, all the editors have some kind of automatic tracking feature, Premiere Pro being the only manual exception. All of them do a reasonably good job when it comes to pinning text to video. Professionals would be more satisfied with the added versatility and control in After Effects. Filmora, Filmora, Vegas Pro and Premiere Pro, on the other hand, are better suited for amateurs.
Ollie Mattison
Ollie Mattison is a writer and a lover of all things video.
Follow @Ollie Mattison
Ollie Mattison
Mar 27, 2024• Proven solutions
Have you ever been mesmerized by a video with text or emoji’s moving together with objects? That effect is produced using motion tracking and isn’t very complicated. Today, we will introduce some text motion tracking software (free & paid) tools that allow you to pin text to video with minimum effort. There will also be detailed tutorials on how to utilize each tool. Let’s get started.
Best Text Motion Tracking Software [+Howtos]
Note: The list below is in no particular order.
1. Filmora
Pricing: Free (watermark) /starts at $49.99/year
Operating System: Windows & Mac
The newly released Wondershare Filmora X version has added the motion tracking features, which allows you to track moving objects in a video clip, and attach images, texts, elements and videos to follow the movement path.
How to Use Filmora Video Editor To Do Text Motion Tracking?
- Import the video footage to the timeline and then click the Motion Track icon in the tool bar to enable the Motion Tracking option.
![]()
- In the preview window, drag and adjust the tracking box to select a moving object as the target.
![]()
- Click the Start Tracking menu to start the moton tracking render, and Filmora video editor will compute the moving path automatically
- Now, go to the Titles tab and drag a subtitle, titles, lower 3rd, or callout to the track just above the motion-tracked video. Customize your texts, adjust its size, position, etc. in the preview window.
![]()
- Next, double click the video footage to enter the Motion Track option. Select the title as a follower. Playback the video, and you will see the text will move accordingly.
Below is a step by step video tutorial about how to use the motion tracking feature in Filmora. Keep watching.
2. Premiere Pro CC
Pricing: 14-day trial, minimum $20.99/month
Operating System: Windows, Mac
Adobe Premiere Pro is an industry-leading video editor. Premiere Pro CC has all the editing tools a pro video editor needs.
There is no automatic tracking feature in Premiere Pro to pin text to video. Therefore, you need to manually position your text and add keyframes frame by frame. But the overall effort required and the final result isn’t much different from traditional editors.
How To Do Text Motion Tracking In Premiere Pro CC? [Main Steps]
- Import your video to the timeline
- Add text by Pressing ‘T’ on your keyboard and clicking on the preview window (your footage)
- Change the position & duration of the text layer on the timeline according to the position & duration of motion tracking
- Make sure you’re on the frame you want to start tracking from
- Click on your text layer → then go to effects controls
- Change the position of the text to the point you want to track → click on the stopwatch icon to add a keyframe
- Move a few frames forward → adjust the position again → add another keyframe
- Don’t put the keyframes too close or too farther apart
- Play through to check it out → adjust the position and number of keyframes if any issues arise
The whole process is relatively easy, although tedious. But the process becomes very complicated when you have more dynamic motion in your clip
3. After Effects
Pricing: 7-day trial, $20.99/month (individual)
Operating System: Windows & Mac
Adobe After Effects is an editor that focuses on animation & creative composition. This app has been developed as a companion to Premiere Pro for creating short & flashy motion graphics and visual effects for projects.
Motion tracking in After Effects can be done using the Point Tracker, which has one-point and up to four-point tracking. Other tracking options include the built-in 3D Camera Tracker that lets you reverse engineer a scene and the spline tracker that enables you to track masks on an object. There is also Mocha AE, a planar tracker from BorisFX. The Point Tracker is the most flexible and versatile in After Effects. We’ll use it to pin text to video.
How To Do Text Motion Tracking In After Effects? [Main Steps]
- Create a new composition/open an old one and make sure your clip is imported
- Create a null object by right-clicking on the window (screenshot below)
- Select your clip → click on tracker → click on track motion
- Two square boxes will appear
- Move the squares to the point you want to track (make sure to select an object with relatively high contrast for easier tracking)
- Position the smaller square on the object you want to track
- Make the second box is big enough (not too big) so that the tracked object stays within this square in the next frame
- Click on the analyze forward button (screenshot above)
- If the square box fails to track the object at any frame, reposition it and move on
- Make sure motion target is set to null object (e.g., Null 1)
- Now add the text
- While clicking on the pick whip tool of the text layer, drag it to the null object
- Play through to check the result
- You can manually change the position of the text in any frame by adjusting its position and adding a keyframe
We’re done. As we stated above, other types of trackers are also available for you to experiment with. The overall tracking functionality is much better than Premiere Pro.
4. Sony Vegas Pro
Pricing: 30-day trial, minimum $19.99/month
Operating System: Windows
Sony Vegas Pro is a non-linear video editor with the so-called “power of Artificial Intelligence.” It is one of the few editors out there that has acquired popularity among professionals and amateurs alike.
Text motion tracking in Vegas Pro is done using Bézier Masking FX (new update introduces a separate tab for motion tracking). The tracking process is automatic. Keyframes are created automatically frame by frame. It isn’t perfect, but it gets the job done in most cases. When it fails to track objects correctly, you can manually edit the keyframes.
How To Do Text Motion Tracking In Sony Vegas Pro? [Main Steps]
- Import your video
- Click on your video → go to the starting point of text motion tracking
- Click on Bézier Masking → drag the default one to your video
- A new options tab will appear & a square box with a circle (tracking box) will appear in the preview window
- Go to General options → set blend to 1,000
- Go to Mask 1 → Tracking → options → set the precision to high → set keyframe interval between 1 & 5
- Position the black dot of the tracking box to the point you want to track
- Click on start below the keyframe interval option
- After processing is complete → go to tools → extensions → add text to motion track → click on ok in the text position tab
- Enter your text, edit it if you want
- Play through to check the result
Conclusion:
As we’ve seen above, all the editors have some kind of automatic tracking feature, Premiere Pro being the only manual exception. All of them do a reasonably good job when it comes to pinning text to video. Professionals would be more satisfied with the added versatility and control in After Effects. Filmora, Filmora, Vegas Pro and Premiere Pro, on the other hand, are better suited for amateurs.
Ollie Mattison
Ollie Mattison is a writer and a lover of all things video.
Follow @Ollie Mattison
Mac-Friendly MKV Video Editing Software: Top 3 Picks
Trim MKV Files with the Best MKV Trimmer on Mac
Ollie Mattison
Oct 26, 2023• Proven solutions
Sometimes, videos downloaded from the internet can be way too lengthy, with quite a few unwanted parts. These videos often have an MKV file format and need to be trimmed! Editing unnecessary parts within an MKV video will make it more appealing. If you are a MacBook user, you may not find a lot of video trimmers out there that do the job right. To trim MKV mac video, you need intuitive software with a user-friendly interface. A suitable video trimmer with additional editing features is a jackpot for users who create video content often. In this article, we will suggest some easy-to-use video trimmers to make this task simple for you. Keep reading!
In this article
Part 1: Top 3 MKV Trimmers to Trim MKV Files on Mac
There is not much information available out there about the MKV trimmer for Mac. However, we did some research to find out a few MKV trimmers that work exceptionally well. Here you go:
1. Wondershare Filmora for Mac
Wondershare Filmora for Mac is one of the most used software for MKV trimming as it has a lot of customizable options to cut a video into smaller parts. You can trim video to any length and size according to your preference. Filmora also has an advanced feature through which you can cut out repetition automatically.
Wondershare Filmora has both advanced and basic tools that work exceptionally well to create compelling videos. It has an audio ducking feature that one can use to manage sound within the video. You can use advanced features to make your content unique and of exceptional quality.
Among many unique features, its presets for various parameters make it easy to use even for beginners. With the use of royalty-free visuals, you can enhance the quality of the output file significantly. Filmora is fantastic for MKV trimming and has great editing tools to make videos highly professional.
Features
- Filmora has an audio ducking feature through which audio fades automatically to highlight dialogues.
- Its ability to cut out repetition is commendable as it makes the editing process faster and more professional.
- The royalty-free visual effects enhance the video quality and make it stand out amongst other videos.
- Through color grading, you can correct the video tone and make it even brighter.
- The speed control helps make the video shorter as you can speed up the time-lapse and slow down unique shots.
- Filmora also allows you to track moving objects in your video and edit elements to it.
Pros
- Color grading
- AI portrait
- Cloud-based storage
- Cuts out repetition
- Audio ducking
- Green screen effect
- Royalty-free visual effects
Cons
- The free version contains the watermark
2. Avidemux

Avidemux is known for its simple interface, which contributes to an easy splitting of videos without ruining the quality. With the simple drag and drop motion, you can edit videos without putting in much effort. The editing tools menu on the left side is ideal for selecting tools and applying them to the video.
Avidemux is not only an exceptional software for cropping and trimming videos but also has de-noising filters. The spartan interface has to be one of its unique features as it makes importing videos and photos easier. You can add transitions to the video after cropping to make the video look smooth.
People love to use this software to cut MKV files as it maintains the quality. You can trim the videos with high precision and not lose any significant parts from the actual footage. The software is frequently updated with modern tools to help create aesthetically pleasing videos.
You may also interested in: How to edit with Avidemux
Pros
- Easy to trim MKV videos
- Functions with various platforms
- Automated scripts
- Different presets
Cons
- No keyboard shortcuts
3. MKVtools

MKVtools are one of the best cross-platform tools that you can use for both Windows and Mac. Through this software, a user can edit, trim, merge, inspect, and mix videos. It has a user-friendly interface through which you can edit videos to make them smaller in size.
MKVtools is easily a user’s most preferred choice as they have all the tools to make a video appear attractive. You can use it to add subtitles, add slow motion, fasten the video and do so much more using the editing tool. The trim MKV tool on mac supports various kinds of formats and can hold multiple audio and video files. The toolbox has various open-source utilities to make the final output HD-quality. Want to know the best part? The error and repetition detection functions are ideal for editing video without losing quality.
Pros
- Holds limitless audio and video files
- Open-Source utilities
- HD-quality video editing
- Cross-platform tool
Cons
- Complicated to use for beginners
Part 2: Trim MKV on Mac with Filmora
Filmora is one of the best and intuitive tools to edit and trim MKV Mac files. The process to cut out unwanted parts is very easy. You can easily trim any MKV file regardless of its size, even if you are a beginner. Here are easy steps to trim the MKV file with Filmora quickly:
Step 1: Import MKV video from your Mac
The first step to edit an MKV video is to import it into the tool for editing. Click on the File option in the toolbar and tap the import button. Select the MKV file from your Mac and click import to upload the file on Filmora.

Step 2: Trim MKV video
After uploading the video, split it into a few frames and zoom in by moving the slider as much as you want. Left-click on the frame you want to edit and tap on the split option to create further segments.

Step 3: Save and edit MKV video
You can also adjust the video size and make it smaller while maintaining the quality. Tap crop and zoom by clicking right to adjust the frame. Click ok when you are done and save the video.

Trim MKV quickly with touch bar
Spending time editing and trimming MKV files can be annoying, especially if you have to go through extended footage. You can quickly cut video from the touch bar if you have a MacBook pro. Resizing one video multiple times has never been easy, but you can do it quickly with the touch bar function.
Open the video preview by double-clicking on the video in the media archives file. Choose endpoint and source by clicking on the icon. Finally, cut the segment to resize the video and keep repeating the process until you are happy with the size.
Part 3: Final words
MKV files are lengthy and probably have a lot of footage that you should trim. However, the lack of experience and proper knowledge of MKV trimmer mac tools can make this simple task challenging. We have discussed how to trim MKV files with the best MKV trimmer on Mac. The process is quite simple and easy and works well for both professionals and beginners. We hope you find our suggestions easy to follow and use them to optimize your video editing skills.
Ollie Mattison
Ollie Mattison is a writer and a lover of all things video.
Follow @Ollie Mattison
Ollie Mattison
Oct 26, 2023• Proven solutions
Sometimes, videos downloaded from the internet can be way too lengthy, with quite a few unwanted parts. These videos often have an MKV file format and need to be trimmed! Editing unnecessary parts within an MKV video will make it more appealing. If you are a MacBook user, you may not find a lot of video trimmers out there that do the job right. To trim MKV mac video, you need intuitive software with a user-friendly interface. A suitable video trimmer with additional editing features is a jackpot for users who create video content often. In this article, we will suggest some easy-to-use video trimmers to make this task simple for you. Keep reading!
In this article
Part 1: Top 3 MKV Trimmers to Trim MKV Files on Mac
There is not much information available out there about the MKV trimmer for Mac. However, we did some research to find out a few MKV trimmers that work exceptionally well. Here you go:
1. Wondershare Filmora for Mac
Wondershare Filmora for Mac is one of the most used software for MKV trimming as it has a lot of customizable options to cut a video into smaller parts. You can trim video to any length and size according to your preference. Filmora also has an advanced feature through which you can cut out repetition automatically.
Wondershare Filmora has both advanced and basic tools that work exceptionally well to create compelling videos. It has an audio ducking feature that one can use to manage sound within the video. You can use advanced features to make your content unique and of exceptional quality.
Among many unique features, its presets for various parameters make it easy to use even for beginners. With the use of royalty-free visuals, you can enhance the quality of the output file significantly. Filmora is fantastic for MKV trimming and has great editing tools to make videos highly professional.
Features
- Filmora has an audio ducking feature through which audio fades automatically to highlight dialogues.
- Its ability to cut out repetition is commendable as it makes the editing process faster and more professional.
- The royalty-free visual effects enhance the video quality and make it stand out amongst other videos.
- Through color grading, you can correct the video tone and make it even brighter.
- The speed control helps make the video shorter as you can speed up the time-lapse and slow down unique shots.
- Filmora also allows you to track moving objects in your video and edit elements to it.
Pros
- Color grading
- AI portrait
- Cloud-based storage
- Cuts out repetition
- Audio ducking
- Green screen effect
- Royalty-free visual effects
Cons
- The free version contains the watermark
2. Avidemux
Avidemux is known for its simple interface, which contributes to an easy splitting of videos without ruining the quality. With the simple drag and drop motion, you can edit videos without putting in much effort. The editing tools menu on the left side is ideal for selecting tools and applying them to the video.
Avidemux is not only an exceptional software for cropping and trimming videos but also has de-noising filters. The spartan interface has to be one of its unique features as it makes importing videos and photos easier. You can add transitions to the video after cropping to make the video look smooth.
People love to use this software to cut MKV files as it maintains the quality. You can trim the videos with high precision and not lose any significant parts from the actual footage. The software is frequently updated with modern tools to help create aesthetically pleasing videos.
You may also interested in: How to edit with Avidemux
Pros
- Easy to trim MKV videos
- Functions with various platforms
- Automated scripts
- Different presets
Cons
- No keyboard shortcuts
3. MKVtools
MKVtools are one of the best cross-platform tools that you can use for both Windows and Mac. Through this software, a user can edit, trim, merge, inspect, and mix videos. It has a user-friendly interface through which you can edit videos to make them smaller in size.
MKVtools is easily a user’s most preferred choice as they have all the tools to make a video appear attractive. You can use it to add subtitles, add slow motion, fasten the video and do so much more using the editing tool. The trim MKV tool on mac supports various kinds of formats and can hold multiple audio and video files. The toolbox has various open-source utilities to make the final output HD-quality. Want to know the best part? The error and repetition detection functions are ideal for editing video without losing quality.
Pros
- Holds limitless audio and video files
- Open-Source utilities
- HD-quality video editing
- Cross-platform tool
Cons
- Complicated to use for beginners
Part 2: Trim MKV on Mac with Filmora
Filmora is one of the best and intuitive tools to edit and trim MKV Mac files. The process to cut out unwanted parts is very easy. You can easily trim any MKV file regardless of its size, even if you are a beginner. Here are easy steps to trim the MKV file with Filmora quickly:
Step 1: Import MKV video from your Mac
The first step to edit an MKV video is to import it into the tool for editing. Click on the File option in the toolbar and tap the import button. Select the MKV file from your Mac and click import to upload the file on Filmora.
Step 2: Trim MKV video
After uploading the video, split it into a few frames and zoom in by moving the slider as much as you want. Left-click on the frame you want to edit and tap on the split option to create further segments.
Step 3: Save and edit MKV video
You can also adjust the video size and make it smaller while maintaining the quality. Tap crop and zoom by clicking right to adjust the frame. Click ok when you are done and save the video.
Trim MKV quickly with touch bar
Spending time editing and trimming MKV files can be annoying, especially if you have to go through extended footage. You can quickly cut video from the touch bar if you have a MacBook pro. Resizing one video multiple times has never been easy, but you can do it quickly with the touch bar function.
Open the video preview by double-clicking on the video in the media archives file. Choose endpoint and source by clicking on the icon. Finally, cut the segment to resize the video and keep repeating the process until you are happy with the size.
Part 3: Final words
MKV files are lengthy and probably have a lot of footage that you should trim. However, the lack of experience and proper knowledge of MKV trimmer mac tools can make this simple task challenging. We have discussed how to trim MKV files with the best MKV trimmer on Mac. The process is quite simple and easy and works well for both professionals and beginners. We hope you find our suggestions easy to follow and use them to optimize your video editing skills.
Ollie Mattison
Ollie Mattison is a writer and a lover of all things video.
Follow @Ollie Mattison
Also read:
- New 2024 Approved Unleash Your Creative Potential Top Audio Editing Software for Pros
- Updated In 2024, The Ultimate List WebM to MP3 Converters for Every Need
- Updated In 2024, Rising Stars of Lego Animation Top Makers
- New Windows Video Editing Top iMovie Alternatives for PC Users
- Updated In 2024, FCPX Power User Top 40 Keyboard Shortcuts to Boost Your Workflow
- Updated 2024 Approved Soundcloud to MP3 A Beginners Guide to Conversion
- In 2024, The Ultimate List of Free AVI Video Rotators for All Devices
- New 10 Best Free Online Video Trimmers 2023 Reviews for 2024
- New In 2024, Simplify Your Reaction Videos A Step-by-Step Guide with Filmora
- New S Top AVCHD Video Editing Tools Compared for 2024
- New In 2024, From AVI to MKV How to Stream Any Video Format to Your Chromecast
- New 2024 Approved Virtualdub vs Other Video Editors A 2023 Comparison and Review
- New The Ultimate List of Video Joining Tools 10 Easy-to-Use Alternatives for 2024
- Updated In 2024, Mac VLC Trimmer The Best Way to Shorten Videos Without Sacrificing Quality
- Updated Jaycut 101 Unlocking the Power of Free Online Video Editing for 2024
- In 2024, How to Track Motorola Moto G 5G (2023) by Phone Number | Dr.fone
- How to Hide/Fake Snapchat Location on Your Oppo Find X7 | Dr.fone
- Remove FRP Lock on Poco F5 5G
- Full Guide How To Fix Connection Is Not Private on Samsung Galaxy A24 | Dr.fone
- In 2024, How to Transfer Data from Samsung Galaxy A14 4G to BlackBerry | Dr.fone
- In 2024, 5 Quick Methods to Bypass Tecno Phantom V Flip FRP
- 2024 Approved How to Be a Good Podcast Host
- In 2024, 7 Ways to Lock Apps on iPhone SE and iPad Securely | Dr.fone
- In 2024, How to Unlock Apple ID Activation Lock On Apple iPhone X?
- In 2024, Complete Tutorial to Use VPNa to Fake GPS Location On Lava Storm 5G | Dr.fone
- Can I use iTools gpx file to catch the rare Pokemon On Apple iPhone 11 | Dr.fone
- Will the iPogo Get You Banned and How to Solve It On Xiaomi Redmi 13C 5G | Dr.fone
- Updated 2024 Approved Authors Recommended The Best Text Voice Generators for All Platforms
- In 2024, How to Use Life360 on Windows PC For Vivo Y78+? | Dr.fone
- 15 Best Strongest Pokémon To Use in Pokémon GO PvP Leagues For Honor X50i | Dr.fone
- Title: Unleash Your Creativity 10 Public Domain Image Sites for 2024
- Author: Morgan
- Created at : 2024-06-08 23:13:46
- Updated at : 2024-06-09 23:13:46
- Link: https://ai-video-tools.techidaily.com/unleash-your-creativity-10-public-domain-image-sites-for-2024/
- License: This work is licensed under CC BY-NC-SA 4.0.
