
:max_bytes(150000):strip_icc():format(webp)/GettyImages-839864362-59c51d1daf5d3a0010919ae9.jpg)
New In 2024, The Best Free AVI Video Rotators for Windows, MAC, Android, and iPhone in Year
The Best Free AVI Video Rotators for Windows, MAC, Android, and iPhone in [Year]
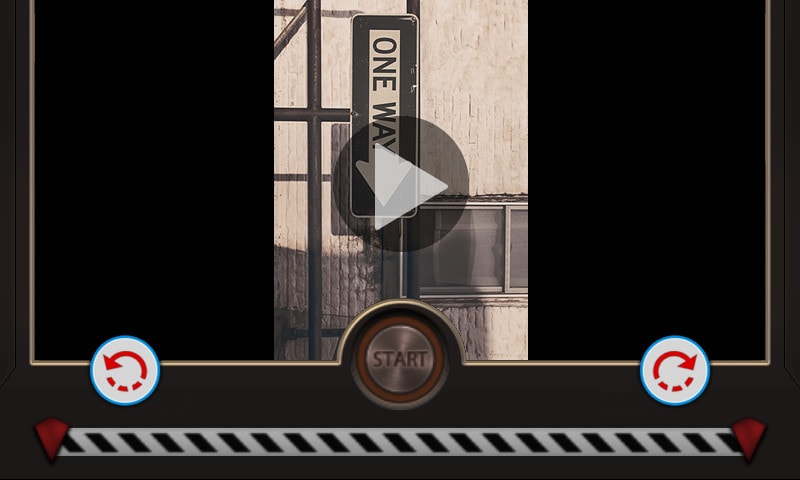
Did you rush to record a video in a mistaken direction? Or were you just excited to film the moments without noticing the position of your camera? Whatever the case, if you regret recording the clip at the incorrect angle, here’s your chance to do the alteration. The article includes the top 16 best free AVI video rotators you can use on MAC, Windows, iPhone, Android, and online. Plus, if you’re looking for a single platform to rotate or flip videos, you can learn the complete process by following the step-by-step Filmora Video Editor tutorial that works on MAC and Windows.
In this Article
Part 1: Best AVI Video Rotators to Rotate AVI Video on Windows and MAC – Filmora Video Editor [with steps]
Part 2: Top 3 Free Video Rotators on Windows
Part 3: Top 3 Free Video Rotators on MAC
Part 4: Top 3 Free Video Rotators on Android
Part 5: Top 3 Free Video Rotators on iPhone
Part 6: Top 3 Free Video Rotators Online
Part 7: Bottom Line
Part 8: FAQs
Part 1: Best AVI Video Rotators to Rotate AVI Video on Windows and MAC – Filmora Video Editor [with steps]
Heard about Filmora but never used it? Surely, you’re missing great fun if you’re a video professional or a beginner video editor.
Filmora is an award-winning video editing software that works for both PC and MAC users. While the tool comes at an affordable price, you can still download the free setup to start showing your creativity.
This video editor has dozens of new effects, transitions, and many more features, which can help you create engaging videos. You can also enjoy some more key features, including audio ducking, color matching, motion tracking, split screen, video filters and transitions, speed control, and multiple exporting formats.
And, of course, video rotation is as easy as ABC! You can follow this step-by-step tutorial to rotate or flip your videos using Filmora 10. You can apply the same procedure if you have a different version.
Step 1: Download and Install Filmora
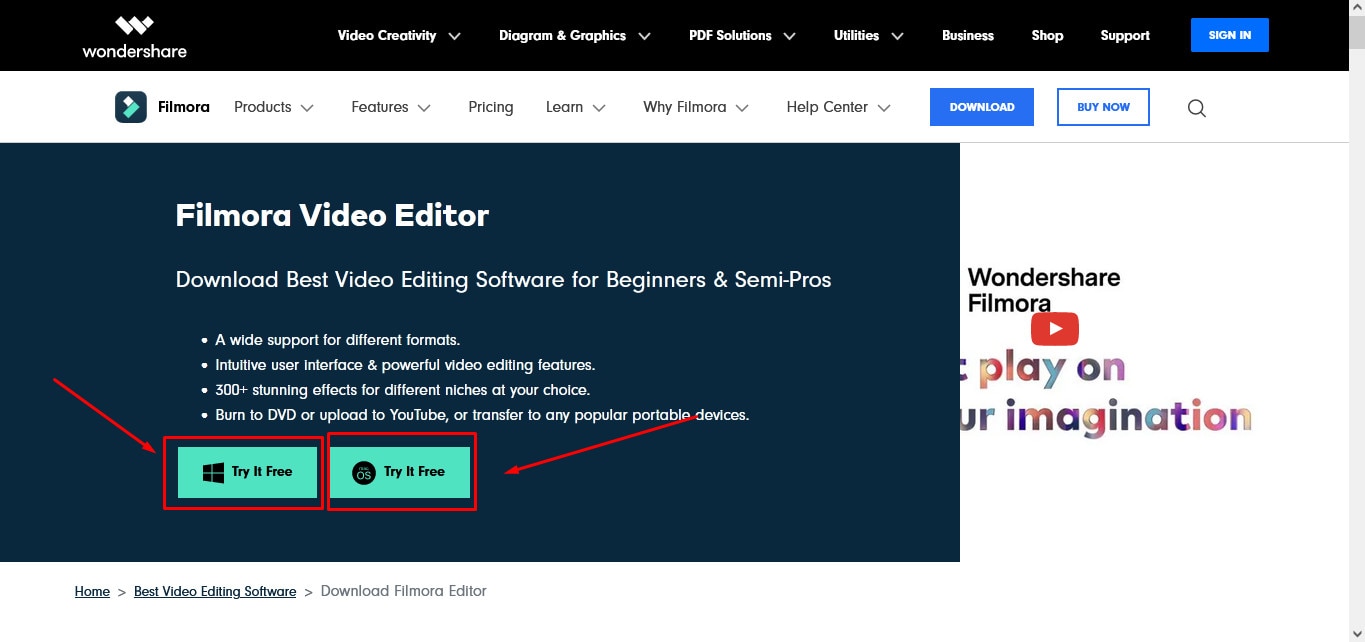
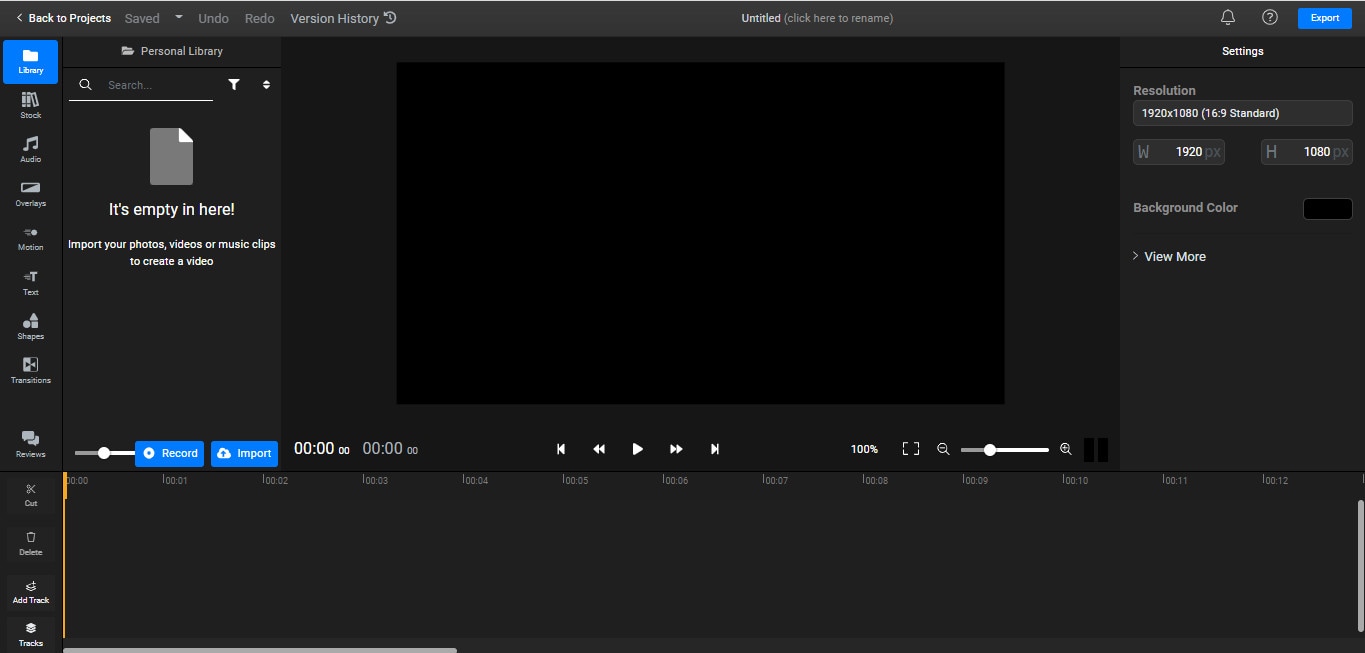
Visit Filmora Video Editor’s official website to download the newest version. Click on the “Try it Free” button according to your operating system (look at the icons on the button to identify the OS).
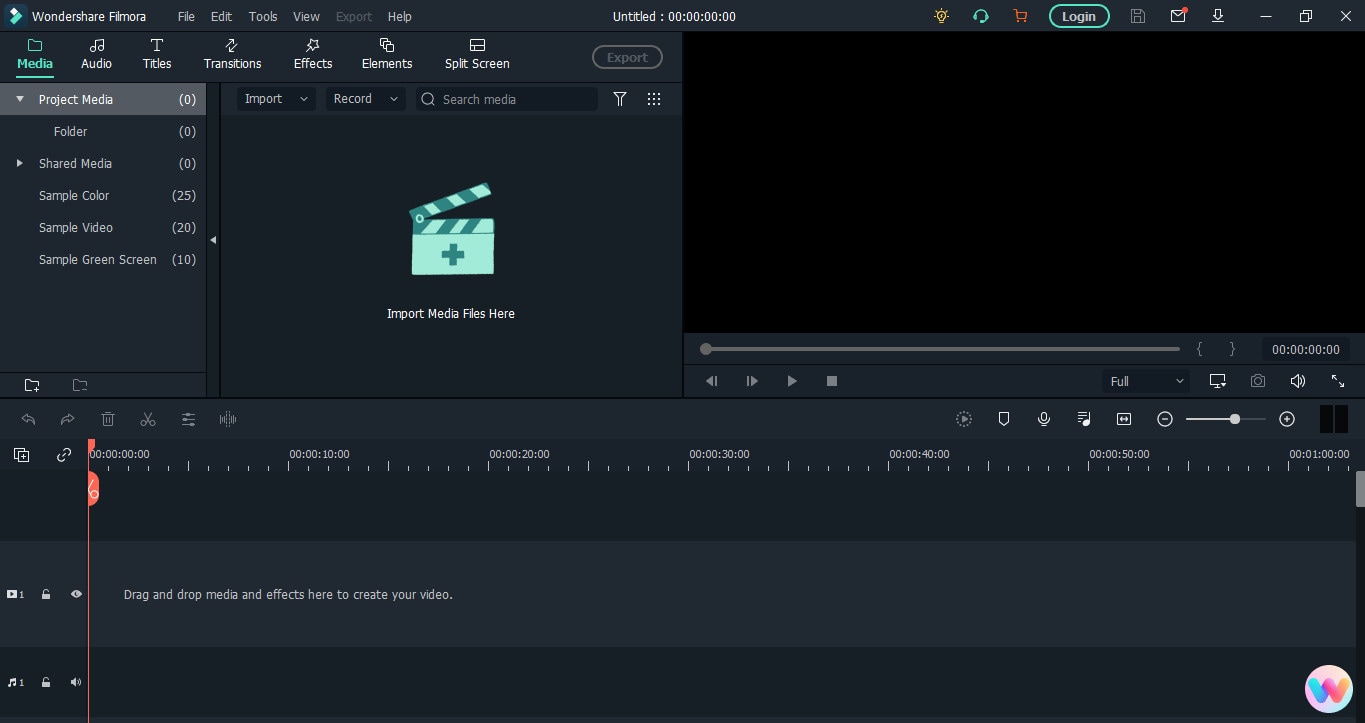
After downloading the setup, double-click the file to install the video editor. Then, open the program.
Feel free to judge the interface (see the image below), as it is pretty simple to understand. So, even if you’re a beginner, you can learn this tool within a few minutes of practice.
Step 2: Import the Video You Want to Rotate
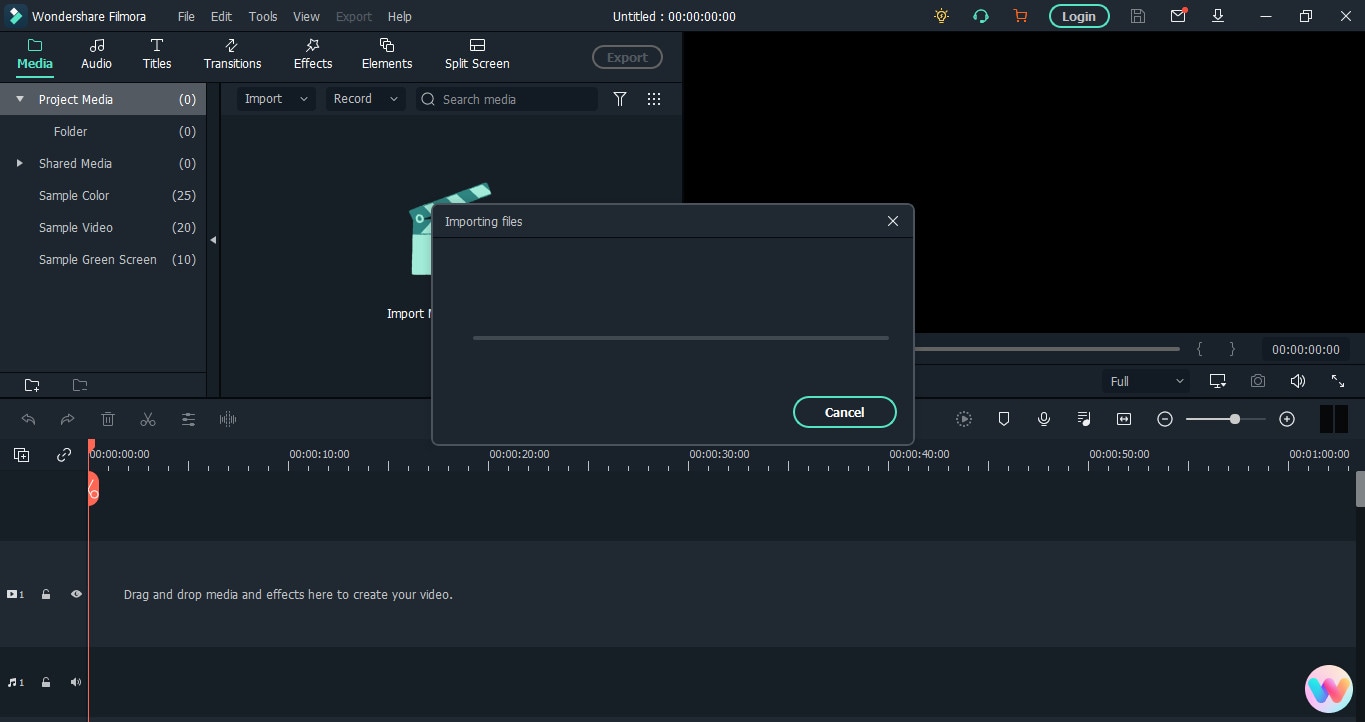
The next is to bring the video file to Filmora’s library before proceeding. To do that, click on the “Movie Clip” icon in the center of the interface to select the clip from your computer’s hard drive.

Double-click or select the video and click the “Open” button to import files. The importing process may take several seconds or a few minutes, depending on the video size.
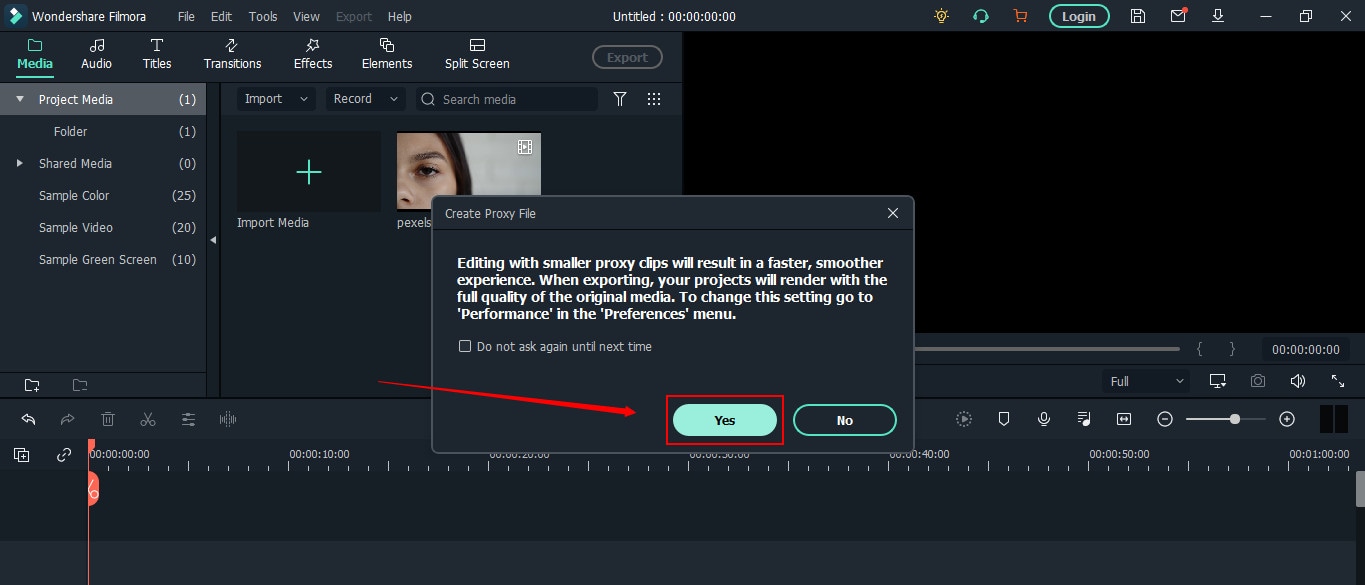
If you’re using Filmora for the first time, you might see the “Create Proxy File” message popping up right after the video import. So, simply click on the “Yes” button to go ahead.
Your video will be stored in the “Project Media” tab and will be visible next to the preview window.
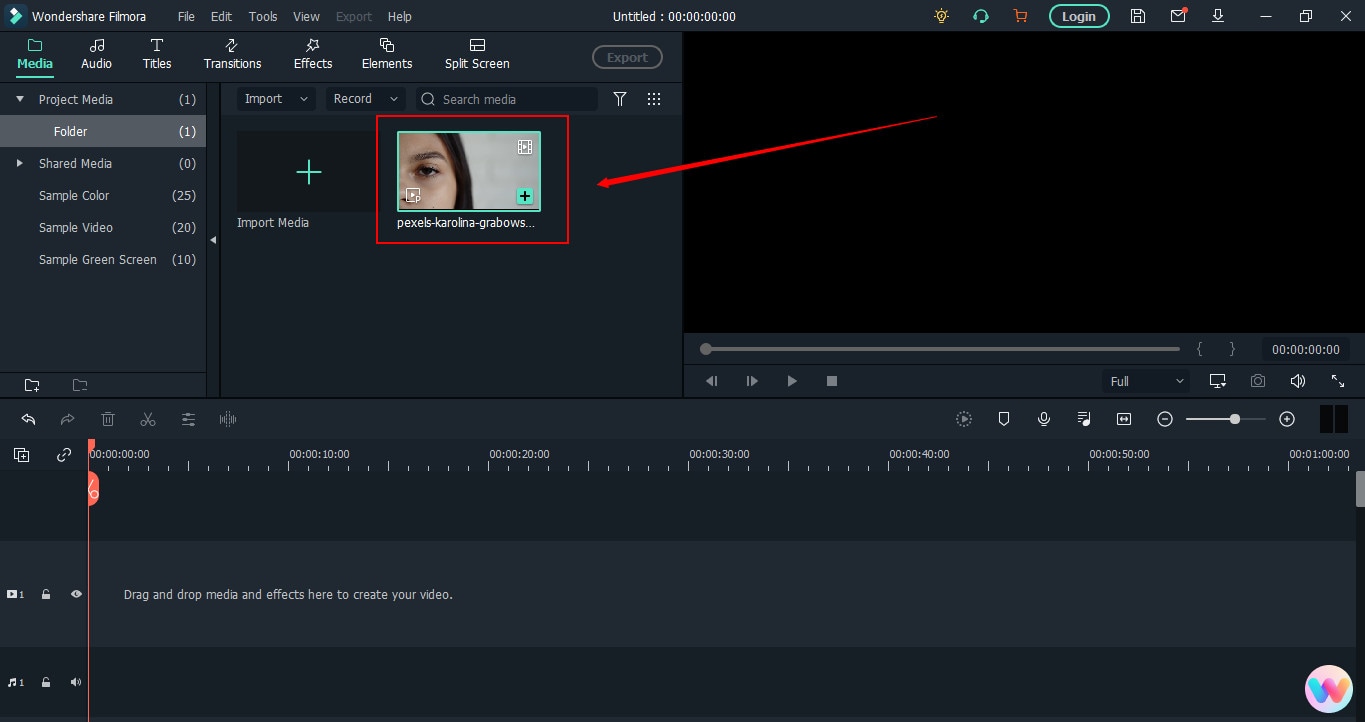
Step 3: Drag and Drop the Video on Filmora’s Timeline
To rotate the video, first, you need to add it to the track. For that, take your mouse on the video, and select it by clicking the right button on your mouse. Keep holding the button to drag the video on the timeline. Remove your finger from the button after placing the clip on the track.

Right after the above step, you will get another message to help you decide whether you want to keep the resolution of the video to its original settings or match the media. Choose “Match to Media” for fast rendering.
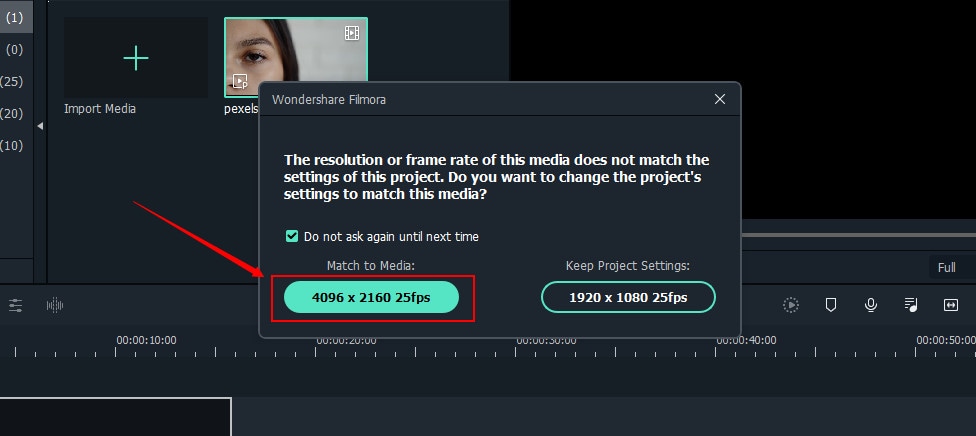
However, if you’re a professional video editor, feel free to select the option that suits you the most.
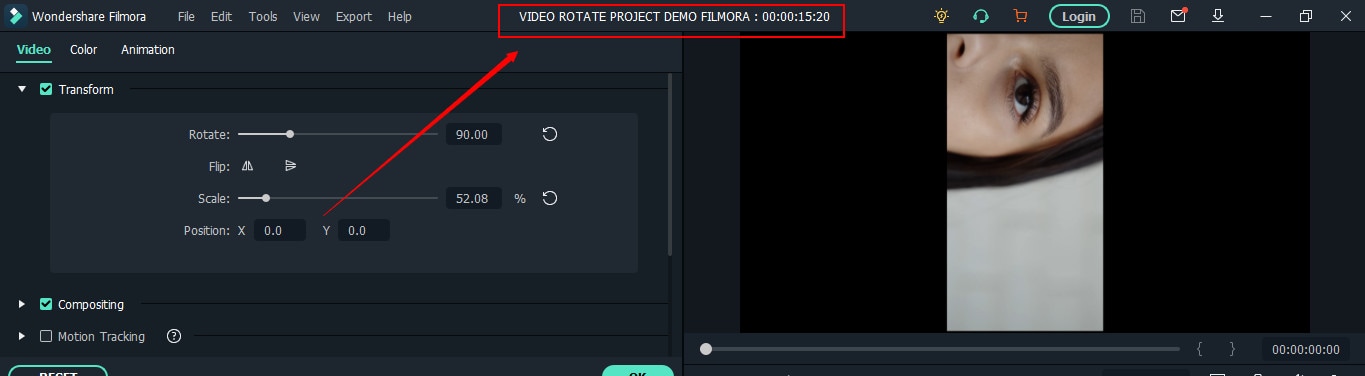
Step 4: Rotate Your Video with Filmora
Double-click anywhere on the video that is already on the timeline.

You will see three tabs – “Video,” “Color,” and “Animation.” So choose the “Video” tab and click on the “Transform” option.
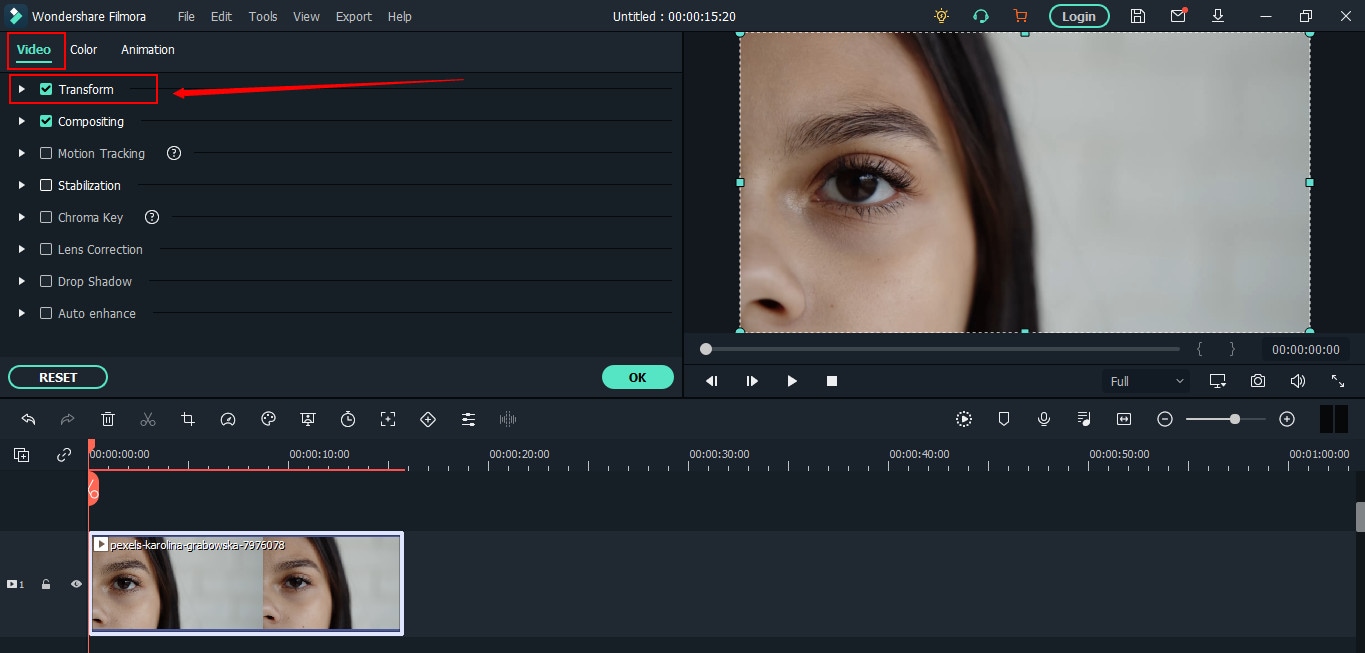
Once done, you will see three important options, which will help you rotate the video.
First, you will notice the “Rotate” option with an adjustment bar. This option will turn your video to different angles of your choice.
All you need to do is play with the adjustments by grabbing the “Round” knob-like button while keeping an eye on the preview window to see the results.
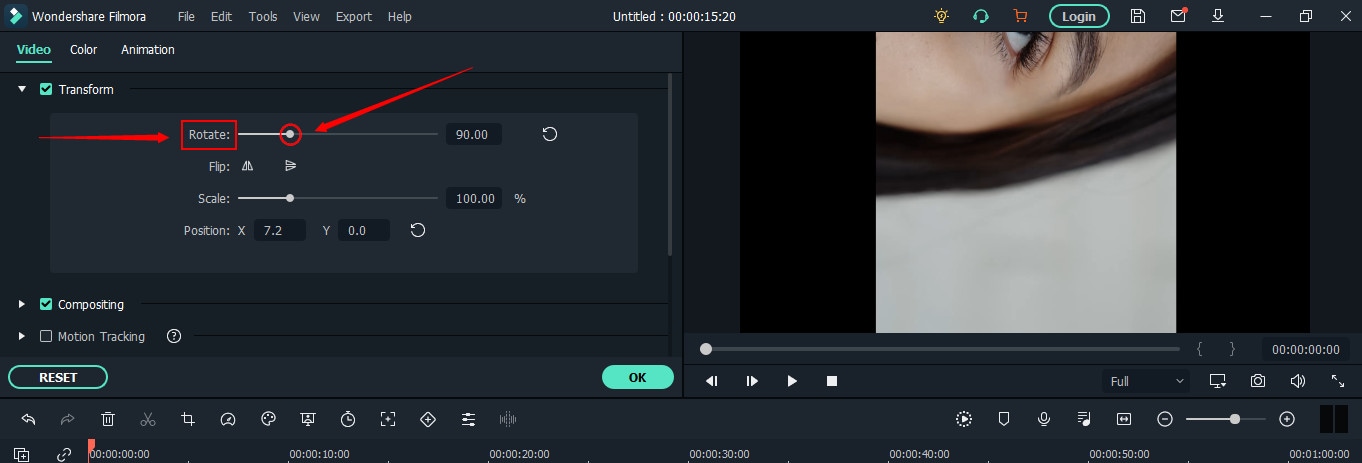
Just below “Rotate,” you will see the “Flip” option with “Horizontal” and “Vertical” mirror icons. Choosing any one of the icons will make your video mirror flip in horizontal or vertical directions.
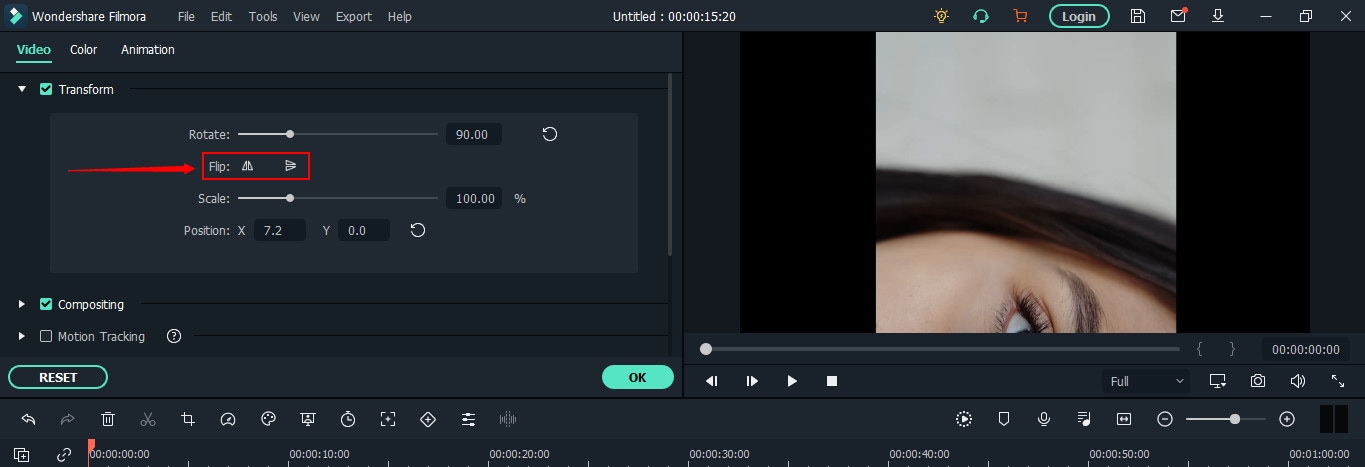
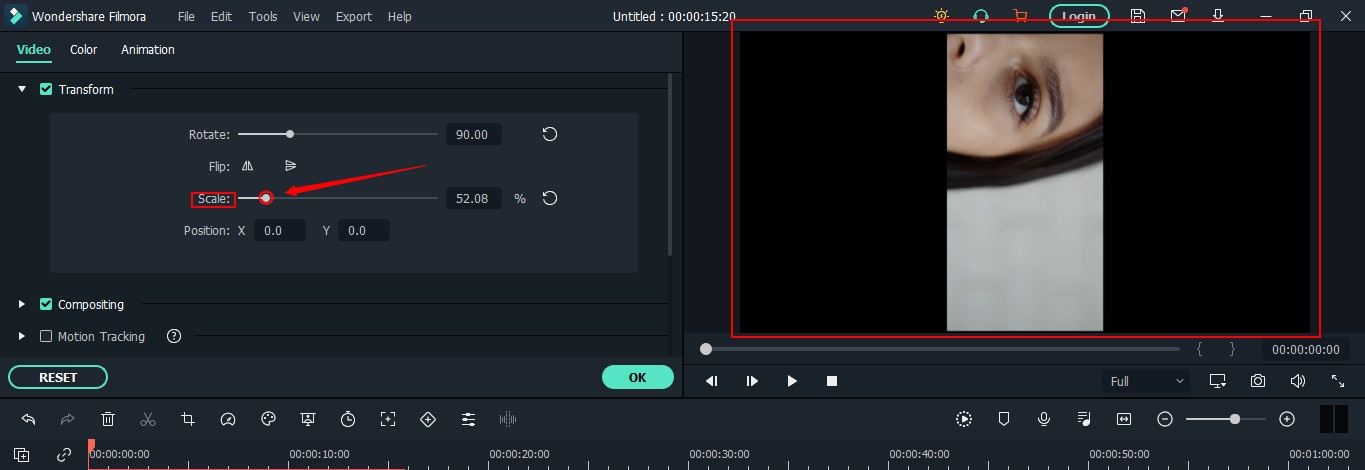
The third option is “Scale” beneath the “Flip” option. Similar to the rotate option, this tool also has an adjustment bar. You can make adjustments to magnify or de-magnify the clip to fit the screen. Although this option isn’t mandatory, you can still use it if you find the need.

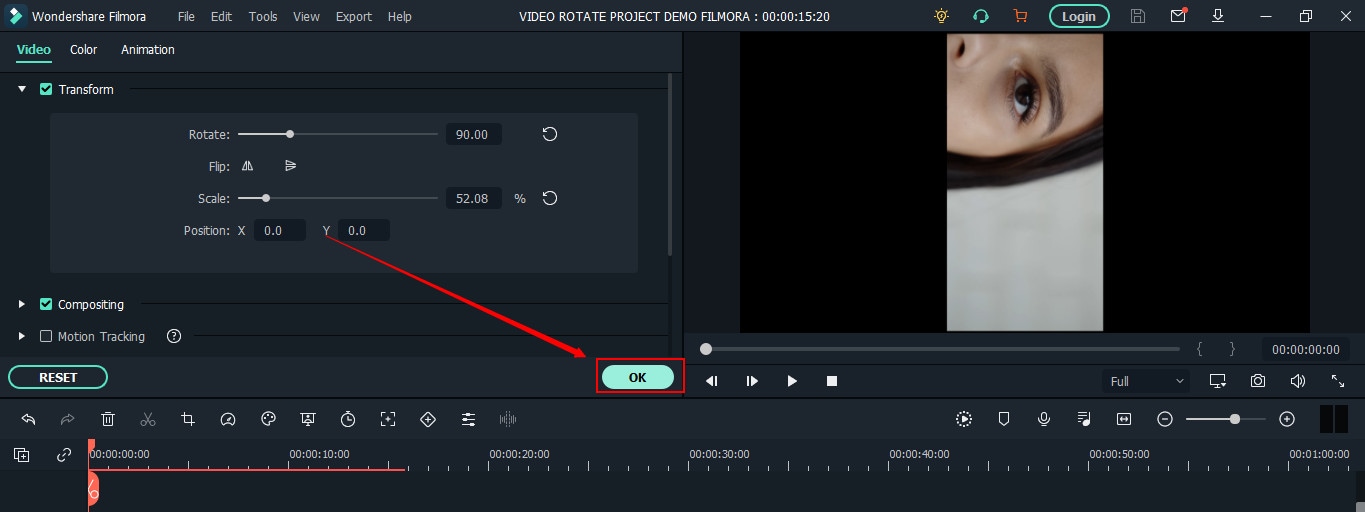
Now, click the “OK” button to apply rotation and return to the timeline.
Step 5: Save and Export Rotated Video to Your Widows or MAC
Here you will learn how to save the project and then export it. If you have already saved the project in the beginning, skip reading this part and directly hit the “Export” button.
Contrarily, you can also directly export your files without saving the project. But you won’t be able to make changes to the same project in the future as all source files will be lost. Therefore, saving the project and then exporting files is recommended.
So, if you’re done with step 4, save your project before going further.
You can go to the “File” tab, choose “Save Project,” and rename the video.
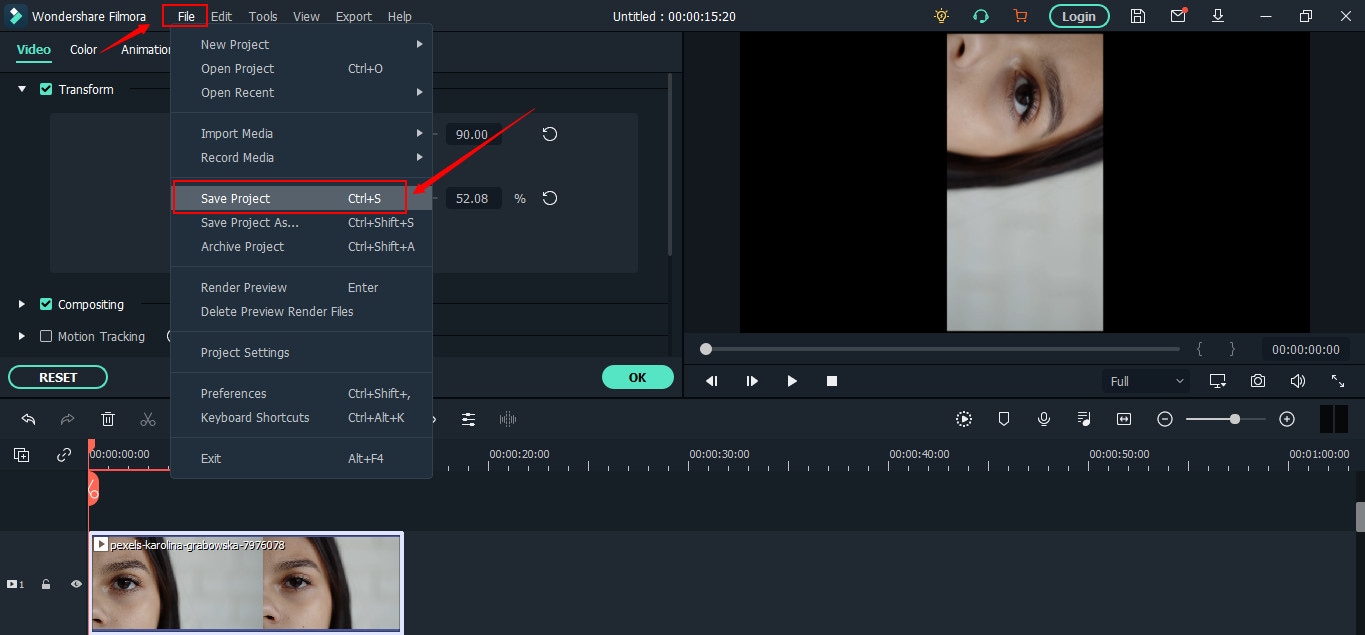
Rename your file and click on the “Save” button.
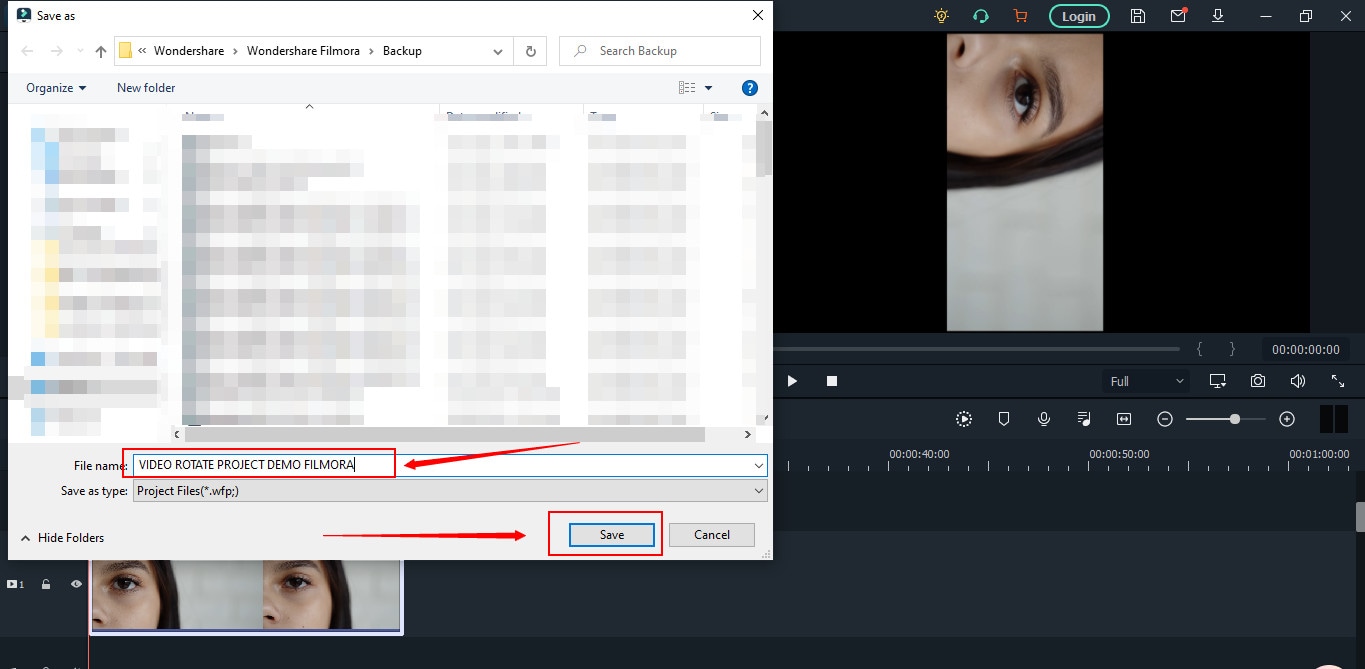
The new name will appear at the top of Filmora’s interface.
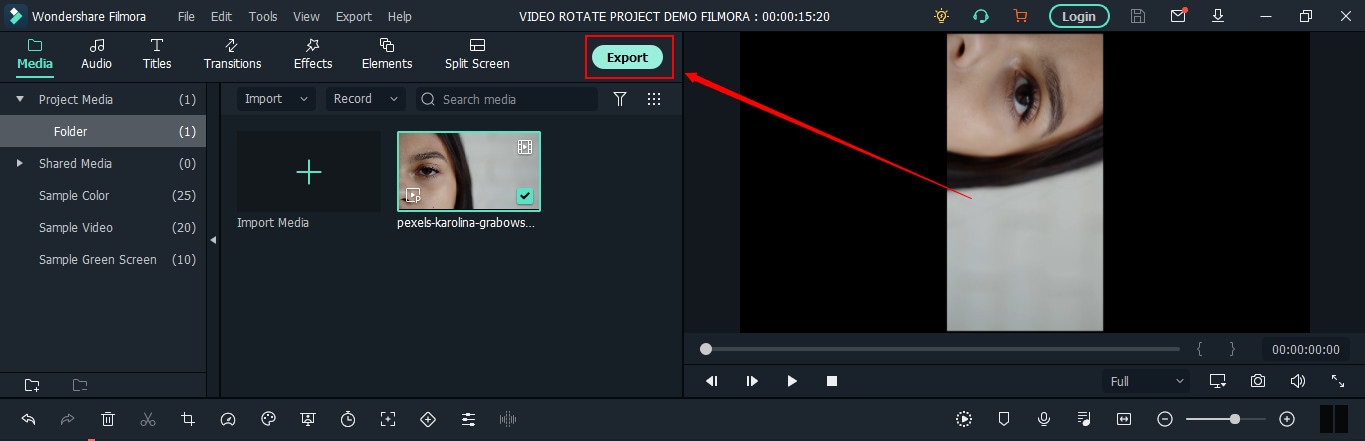
Lastly, click the “Export” button to save the file on your computer.
F 17
Part 2: Top 3 Free Video Rotators on Windows
No luck with finding free movie rotators for your Windows operating system? Don’t stress! These three AVI video rotators will solve your problem.
Free Video Flip and Rotate
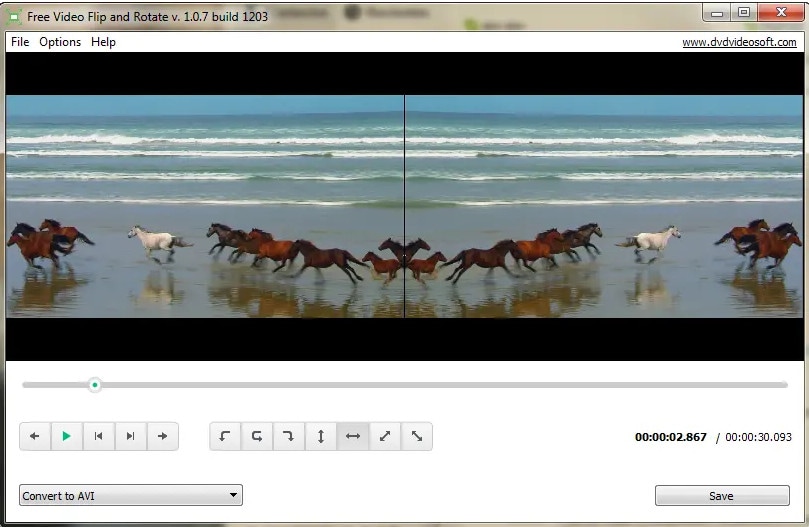
This tool could satisfy your requirements if you’re looking for a core video rotator. As the name sounds, the Free Video Flip and Rotate is software by DVD Video Soft that allows you to modify the orientation of your videos easily. In other words, this is one of the easiest video rotators for Windows users, which is also free to download and use.
It has a simple interface with user-friendly options, which permits you to rotate your videos from different angles. Besides, you can also use this software for mirroring your clips. Moreover, you can save your project in various video formats, such as AVI.
Features
- Vertical flip
- Horizontal flip
- 180° video rotation
- 90° clockwise video rotation
- 90° counter-clockwise video rotation
- Vertical flip with 90° clockwise video rotation
- Horizontal flip with 90° counter-clockwise video rotation
Pros
- One-click results
- Easy to install and run
- Free and user-friendly software
- Does not contain ads or spyware
- Requires 40.50 MB of hard disk space
- Supports AVI and other video formats
- Supports XP, Windows 7, 8, 10, and 11 versions
Cons
- Unavailable for MAC users
- Lack of additional features, such as color correction, cropping, etc.
XMedia Recode
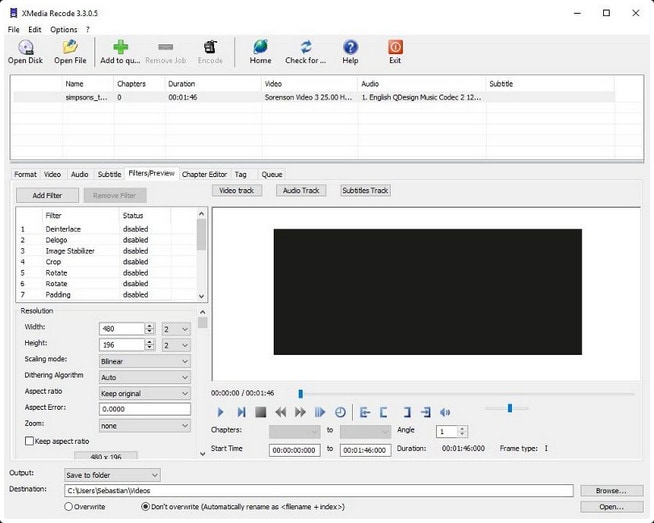
XMedia Recode is a free tool for Windows users. While the software is meant to convert videos into different formats, you can also use it for video rotation. Nevertheless, XMedia Recode has various other options, making it perfect for basic video editing.
Moreover, this software can convert unprotected Blue-rays/DVDs, create different chapters, import subtitle tracks, and many more. However, one of the best features of this video converter-cum-rotator is the video remux. That means you can convert the video container format without changing the original size.
Contrarily, XMedia Recode allows you to rotate and convert videos for countless devices, such as iPhone, iPad, Android, Xbox360, and more. But all this can be done only through Windows operating system. You can download this tool without any paid subscription. However, choose suitable processing for smooth installation, such as Windows 64bit, Windows 32bit, Vista, or XP SP3.
Features
- Blur
- Delogo
- Rotation
- Padding
- Denoise
- Cropping
- Image flip
- Swap U/V
- Clip speed
- Color curves
- Video fading
- Mirror effect
- Image stabilization
- Custom resolution
- Import 32 subtitle tracks
- Direct copy of video and audio stream into your desired format
Pros
- Free software
- Speedy conversion
- Fast batch processing
- Variety of video and audio features
- Works on Windows XP to Windows 10
- Supports 40+ video formats, including AVI
Cons
- A bit complex interface for new users
Altrasoft

Altrasoft is a small software for Windows to help rotate and convert your videos. The total size of the setup is just 971 KB.
This software is best for small video clips, which need to be rotated without wasting time. The program is free to download and use. However, the interface appears a bit old compared to new tools.
Also, unlike XMedia Recode, Altrasoft comes with limited options. So, if you only desire to rotate or flip your video and save it in the AVI or any other format, go ahead and download it.
Features
- Borders
- Zooming
- Rotation
- Color settings
- Audio formatting
- Video codec settings
- Audio codec settings
Pros
- Free to use
- Ideal for short videos
- Extremely light software
- Simple rotation options
- Rotation angle adjustments
Cons
- Outdated interface
- Lack of customer support
Part 3: Top 3 Free Video Rotators on MAC
Have you already lost your MAC storage on downloading some incompetent video rotators which claim to support AVI files? You can try these three video rotators for MAC, which are free and compatible with AVI video formats.
Kdenlive
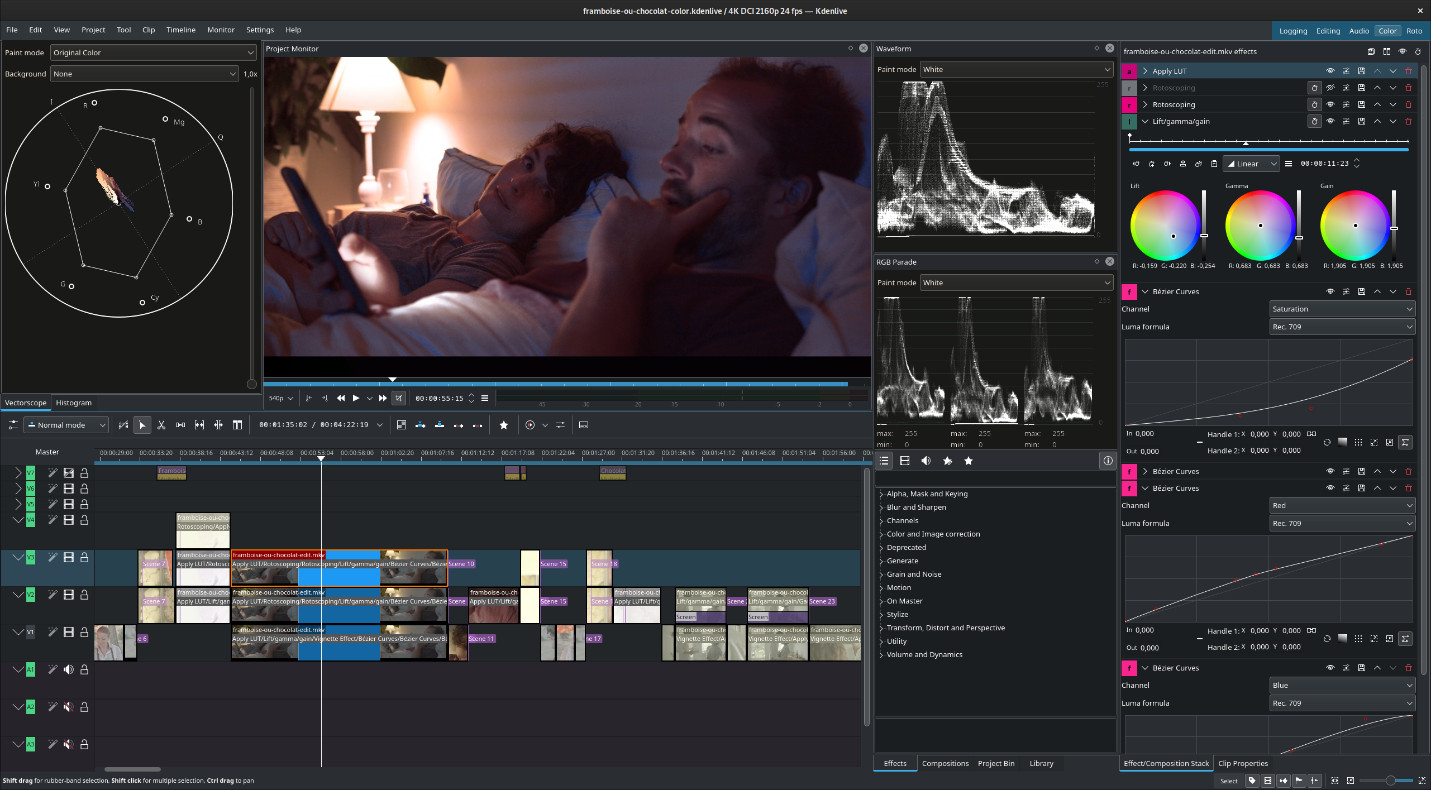
When it comes to free video rotators for MAC, it gets quite challenging to find the right tool. As a MAC OS user, you are left with limited options, especially when trying to rotate videos and save them in AVI format. However, Kdenlive appears to be a problem-solver.
Technically, Kdenlive is a free open source, cross-platform, non-linear video editor with a variety of features. Nevertheless, its Mac version works excellent compared to Windows or Linux.
You can use this software to rotate videos and save them in AVI or any other available format. Also, this program has an attractive interface with a rich library of transition templates and fonts.
Besides, from the video rotation point of view, Kdenlive allows you to turn your videos at any angle.
Features
- Rotate and zoom
- Waveform
- Histogram
- Audio meter
- Vectorscope
- Proxy editing
- Text animation
- Keyframe interpolation
- Color grading and correction
- RGB parade Multi-track video editing
- Custom shortcuts and interface layouts
- Easy line-spacing and letter-spacing adjustment
- Supports seven video formats, including AVI, MOV, HD, UHD, HDV, WEBM, and MP4
Pros
- Free to use
- Fast rendering
- Automatic backup
- Easy video rotation
- Regular bugs fixation
- Cross-platform availability
- Dozens of professional effects and transitions
Cons
- Extremely unstable on Windows OS
IMovie
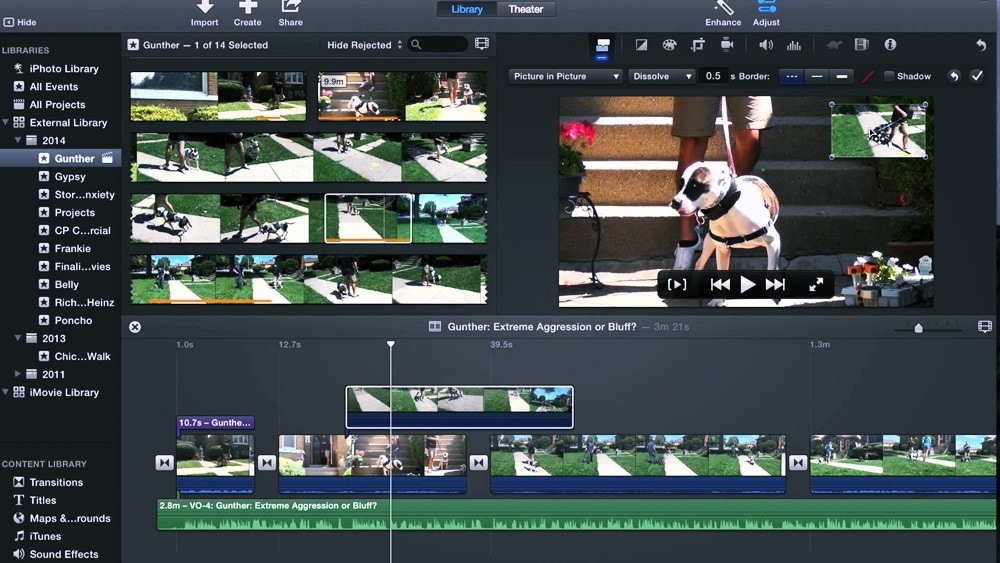
Want to get the job done quickly? Try iMovie in your MAC!
iMovie is a built-in video editing software to help create professional-level videos from your system. But you can also download iMovie if you can’t find it in the system.
Not just videos, but this software also allows you to cut and edit music without changing the files. Many filmmakers also love the tool, as they can add graphics to their projects to get remarkable results.
But that doesn’t stop new users from getting all the benefits the pros get with this software. How? Because it has a pretty straightforward look. You don’t need to click a hundred times to apply a simple effect, as all the options are right in front of you.
And when it’s about rotating a video in AVI format, feel free to rely on iMovie, as it supports several video file formats.
Features
- Video rotation and cropping
- Music and photo import
- 4K and HD video support
- Video transitions and effects
- Pre-installed backdrops and themes
- Supports working on multiple projects
Pros
- Free for MAC users
- Easy to learn
- User-friendly tools
- Extensive audio library
- Excellent movie templates
- Ideal Chroma-keying options
Cons
- Requires high storage space
- Lacks tagging and motion tracking
OpenShot
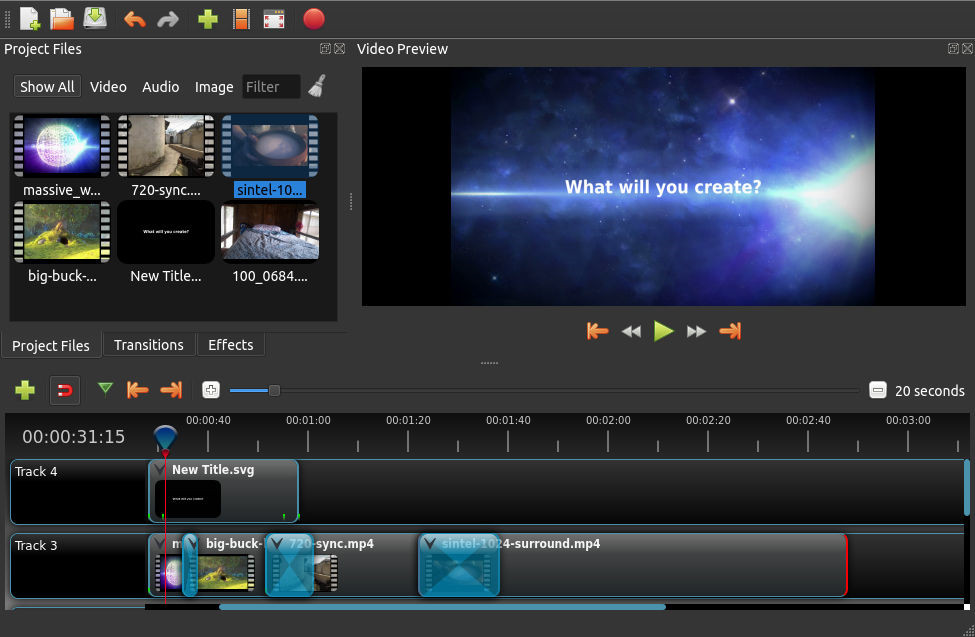
If complex video rotators make you ill, give OpenShot a shot!
It’s a free video editor which is incredibly simple to use. Most professionals around the world appreciate this powerful editing tool. Also, new users can do wonders by simply playing and understanding the options for a few minutes.
So if you plan to use OpenShot Video Editor , you would be glad to know that you can add animations, watermarks, and numerous other effects through this program. Plus, you can also enjoy audio editing within the same platform.
Although OpenShot can be installed for free on multiple operating systems, it still works best on MAC. So there’s no way to ignore this tool for rotating videos in MAC, especially when the options are limited.
Features
- Video rotation and resizing
- Drag and drop support
- Unlimited layers/tracks
- Color correction and settings
- 3D animated effects and titles
- Robust curve-based animations
- Video transitions and real-time previews
- Clip scaling, snapping, cutting, and trimming
- Image overlays, compositing, and watermarks
- Supports AVI and other audio, video, and image formats
Pros
- Free to use
- Easy editing
- No watermarking
- Available in 70+ languages
- Regular updates for improvement
- Stable performance on MAC systems
Cons
- Limited editing options for professionals
- Not suitable for old Windows OS versions
Part 4: Top 3 Free Video Rotators for Android
If using a PC to rotate your videos makes you lazy, you can change the angles of your clips through your Android phone.
So here are the three best video editing apps for Android lovers, which are free to use.
Rotate Video FX
Rotate Video FX is developed by Bizo Mobile. Despite being a small company, it has proven its mettle by offering several apps to its users in more than 100 countries. The firm is also specialized in developing mobile games for multiple platforms.
However, Rotate Video FX is one of its best creations in the world of video rotating mobile applications. This app allows you to choose the video you want to turn directly from your phone’s gallery.
And once the clip has been uploaded, you can rotate it to three different degrees by just touching the “Rotate” button.
Features
- Video rotation to 90, 180, and 270-degree angles
- Clear preview screen with no overlapping options
- Simple play, rotate, and import in a single attempt
- Social media sharing button for quick sending of media
- Automatically saves the rotated video to your phone’s gallery
Pros
- The app is free to use
- More than 1 million downloads
- Works on all android versions
Cons
- No frequent updates
- Not a user-friendly app
- Changes video resolution without permission
Smart Video Rotate and Flip
Clogica is the brainchild behind Smart Video Rotate and Flip video rotator for android. The company has been actively working in app development since 2014. And currently, it has more than 25 apps on the list, with 50 million total users.
Smart Video Rotate and Flip is a simple and smart tool to flip and rotate videos directly from your android device. So if you’re no longer interested in using desktop applications to do the job, here’s your chance to rotate your clips through your mobile phone or tablet.
This app offers a simple way to perform multiple flips and rotations simultaneously. The application works by re-encoding the media or by using the fast mode.
Features
- Allows video rotation and flips on different angles
- The output folder and renaming options
- Big preview screen and fast rendering
- Video recording directly from the application
- Permits you to make a video library within the app
Pros
- Free application
- Easy interface
- The app doesn’t change the video quality
- Allows you to mirror flip and rotate videos
- The latest update makes the app work faster
Cons
- The app contains ads
- Files become large after rotation
- Videos can only be saved to the phone’s internal memory
Rotate Video FREE
Rotate Video FREE is designed by LKR Studio. From 2014 till now, this app development company has produced seven mobile applications in the “Tools” category. And among its entire portfolio, the Rotate Video FREE app is one of the most popular creations.
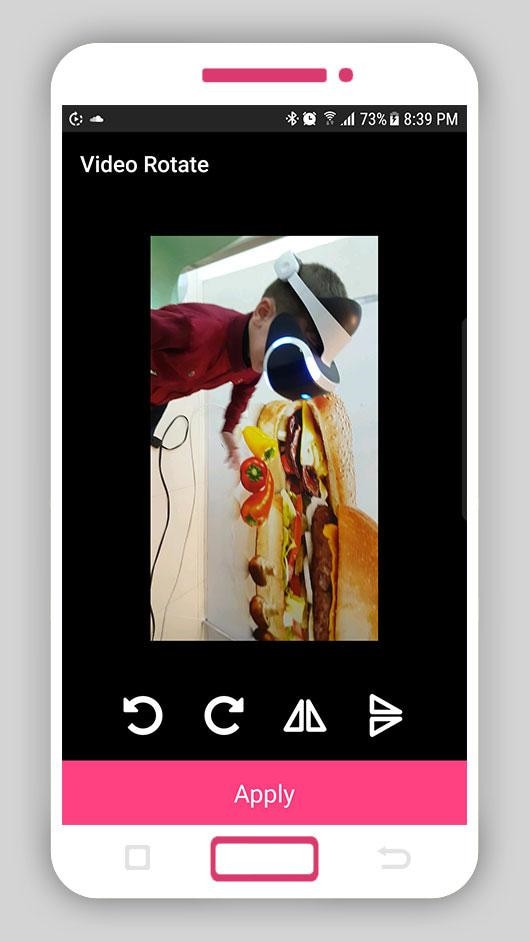
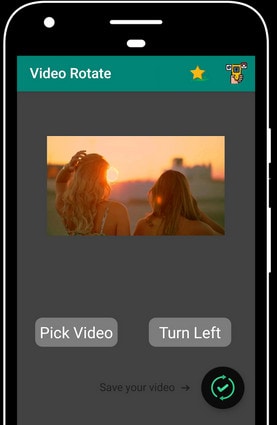
Rotate Video FREE is a highly light and easy video rotator for Android devices. It has a simple interface with two main options: ‘ Pick Video’ to select the clip from your phone’s gallery. Then, the “Turn Left” button helps you rotate the video in multiple directions.
Features
- Rotates video to 90, 180, and 270 degrees
- HD video export quality
- Hassle-free rotate options
Pros
- Free of cost app
- Speedy video rotation process on large files
- Saves video directly to your phone’s memory
- Video rotation without affecting the resolution
Cons
- No mirror flipping
- The free version contains advertisements
- Hard to find the location of the saved videos
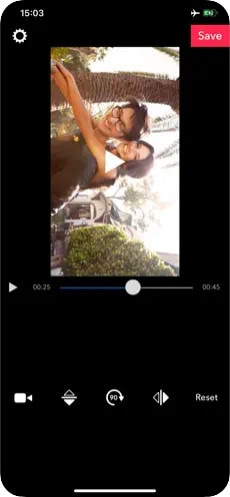
Part 5: Top 3 Free Video Rotators for iPhone
Are you struggling to find a good video rotator for iPhone? Here’s the list of three best iPhone apps to help you rotate your movies using your smartphone in AVI format.
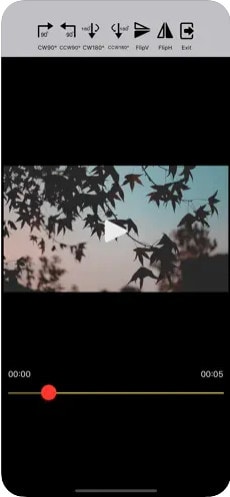
Video Rotate + Flip Video Easy
Finding a video rotator for iPhone is a bit difficult, as most valuable applications comes after paying the price. But Video Rotate + Flip Video Easy app is totally free to download and use.
The app includes all the basic functions to rotate and flip videos in different angles. After downloading the app, you will notice a simple interface with seven options. So all you need to do is to import your video from the phone’s gallery, use the options to rotate the video, and save the rotated video in your phone.
The app is also available in different languages, including German, French, Japanese, English, Portuguese, Simplified Chinese, Spanish, and Russian.
Features
- Vertical mirror flipping
- Horizontal mirror flipping
- Frame wise video rotation
- 90° degrees clockwise and counter clockwise rotations
- 180° degrees clockwise and counter clockwise rotations
Pros
- Fast video conversion
- Small app size (only 16.1 MB)
- Available in multiple languages
- Supports iOS 11.0 or later versions
- The app is free with no watermarks
- You can install the app on your iPad
- Rotated videos can be played on all media players
- It exports the rotated video directly to your camera roll
Cons
- You need to purchase the app to remove advertisements
RFV
Here’s another free app to rotate and flip your videos. You can download RFV on both Android and iPhone smartphones. However, the iPhone version of the app works flawlessly. In fact, the ratings on both platforms also confirm that there are more happy iPhone users of this app than Android users.
RFV is a quick solution to correct your video orientation. So, if you have recorded the video through your iPhone at the wrong angle, you can use the app to flip and turn the clip’s position without much trouble. And you can do all of this just by selecting the options at the bottom of the app’s interface.
Features
- 90° degrees rotations
- Quick resetting
- Horizontal and vertical mirror flipping
- Turn photos into videos
- Video podcast
Pros
- RFV is a free video rotating app
- Easy installation on iPad
- Supports iOS 12.0 or later versions
- Direct loading of clip on the app from camera roll
Cons
- Large app size (41.7 MB)
- Unavailable for older iPhone versions
- It does not support file sizes above 200 MB
- Problems with saving the video on Android phones
Video Rotate – Flip Video
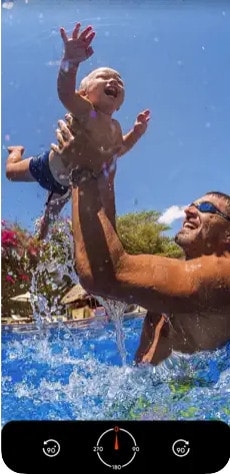
Video Rotate – Flip Video is the third in line when it comes to free video rotators for iPhones. The tool has pretty straightforward options regarding 90-degree clockwise and counter-clockwise rotations. Moreover, you can also play with different angles to adjust the orientation from 0 to 270 degrees.
Once you’re done rotating your video, you can save the new clip directly to your iPhone’s camera roll. At the same time, this app also allows you to share the rotated video on various social and communication platforms.
Features
- The app is specifically designed to rotate videos
- Uncomplicated app interface
- Live video preview
Pros
- Free and fast video rotator app for iPhone
- You can also install the app on an iPad
- Compatible with iOS 10.0 or later versions
Cons
- The app shows advertisements until you buy it
- No reset option – you have to start all over again
Part 6: Top 3 Free Video Rotators Online
Don’t want to fill your device’s storage with software? Well! You can rotate videos online for free in AVI format with ease. Here are the 3 best online video rotating tools.
Flixier
Flixier is a website that helps you create and edit videos through your internet browser. You can upload multiple videos or photos to add effects, text, and many more characteristics. This online platform allows you to add keyframes and transitions to your clips. Likewise, you can adjust your videos’ positioning, scaling, and resizing.
So can you rotate videos on Flixier?
Yes, you can and without paying a cent. The website offers a variety of options to rotate your clips. All you need to do is select the transform option and choose the rotation or flip option to see the results. And when you’re done rotating the video, simply export the file to your computer.
On the other hand, if you think you want to use Flixier frequently, you are required to buy a premium monthly or annual subscription. But until then, you can enjoy all the great traits for free.
Features
- Video rotation (90 degrees left and right)
- Video flipping (horizontal and vertical)
- Robust timeline
- 50+ transitions
- Green screen
- Live collaboration
- Screen recording
- Webcam recording
- Video effects
- Color correction
- Built-in media stock libraries
Pros
- Flixier is free
- No sign-up required
- Superfast rendering
- Variety of video templates
- Unlimited audio and video tracks
- Allows AVI media import and export
- Live video, microphone, and screen recording
Cons
- You need to purchase paid plans for team collaboration
- The free plan comes with limited projects, downloads, and storage
Clideo
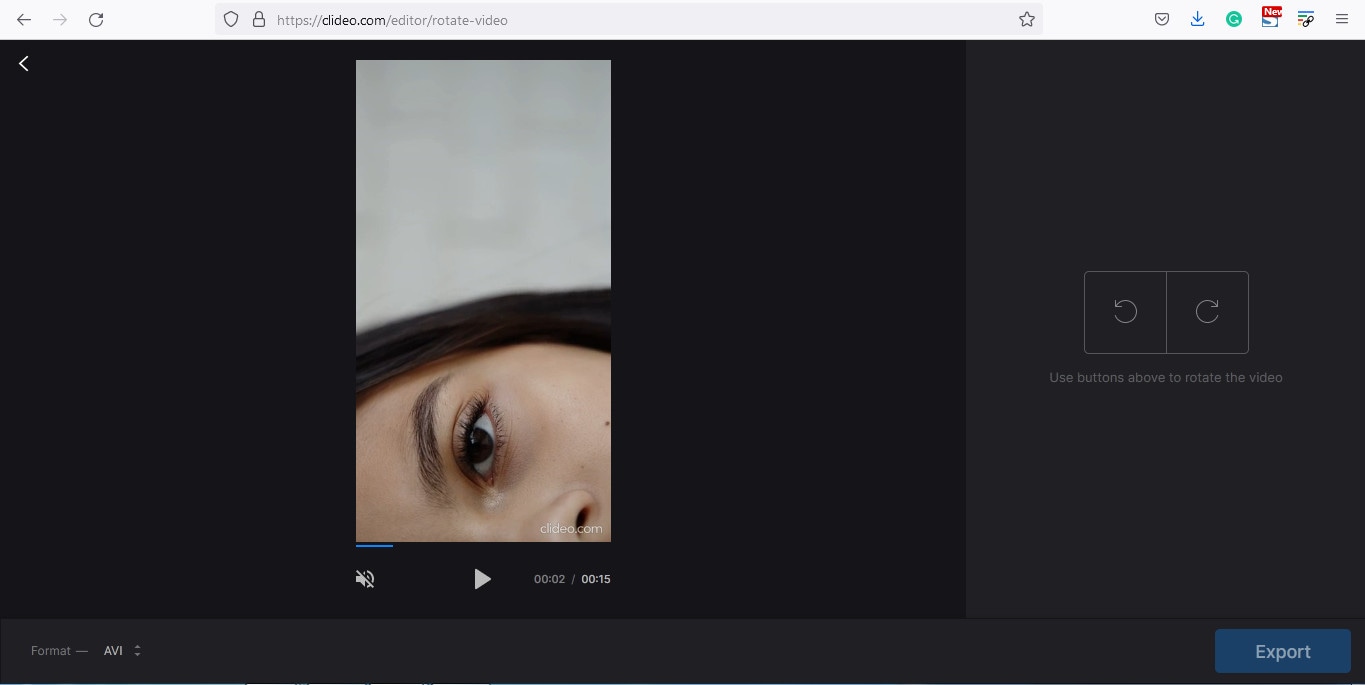
Clideo is a great online tool that allows you to create and edit images and videos in one place. This web-based program comes with a variety of features, including video rotation and flipping.
To make your videos unique, Clideo permits you to add text and music to attract the audience. Moreover, the program supports different video formats, like AVI, MPG, MP4, WMC, MOV, VOB, and more.
You can do everything right from your internet browser without installing the application on your computer. All video files that you import and export on Clideo are well-protected.
As a user, you can select different resolutions, formats, and other features to make exciting videos within a few clicks. And apart from video rotation, the tool offers numerous beneficial options, such as reverse, speed, flip, loop, stop motion, and even memes creation.
Features
- Easy video flipping and rotation
- DPI conversion
- Video compressing
- Speed adjustment
- Slideshow creation
- Filters and presets
- Audio and video cutting
- Video and audio merging
- Subtitles and personalized text
- Color correction and fading effects
Pros
- All basic features are free to use
- Best for beginners
- Non-technical interface
- Supports various video formats (including AVI)
Cons
- This online tool lacks design elements and themes
- You need to buy the premium version to use Clideo daily
Rotate My Video.Net
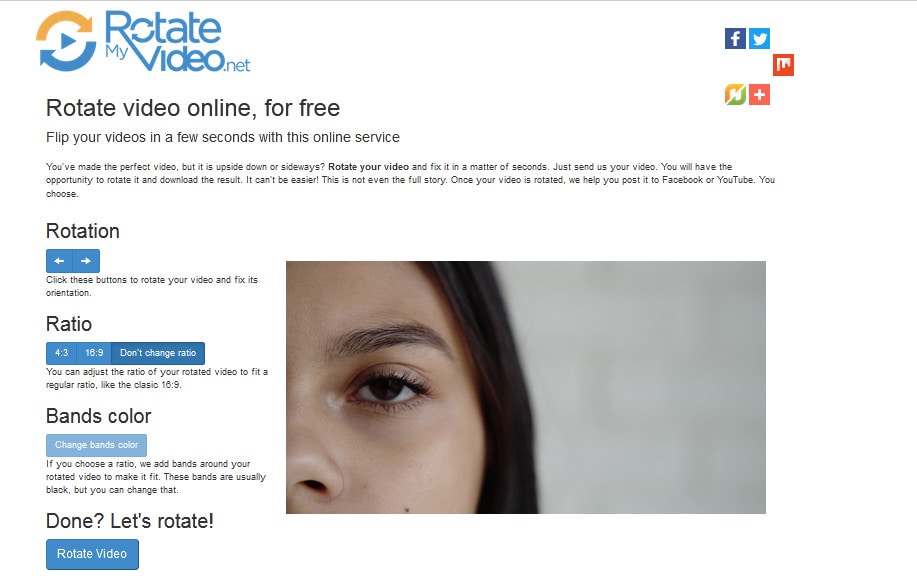
Last but not the least, the Rotate My Video.Net is a free online tool designed for video rotation only. So, if your video is upside down or shot in the wrong direction, feel free to use this tool.
This web-based video rotator allows you to share the video to different social platforms directly from the website. Contrarily, you also save the rotated clips on your system.
Another interesting fact about this tool is that it has no limit. That means you can upload videos on the interface and rotate them as often as possible. However, the tool does not offer other features to groom your videos.
Moreover, the developers claim that the videos are deleted automatically from the server in a few hours. Therefore, your videos stay private and safe.
Features
- 90 degrees clockwise and counter-clockwise rotation
- Video ratio adjustment options (4:3 and 16:9)
- Band color option to fill the empty black space with colors
Pros
- Entirely free – no monthly or yearly subscription required
- Easy and quick process
- Supports AVI video files
- Video quality is not disturbed after rotation
Cons
- Lacks video flipping option
- It does not include any other features
Part 7: Bottom Line
Despite a long list of free video editors, finding the right one that simplifies the task without any trouble is hard. But with these top 16 best free AVI video rotators, you can flip and rotate videos in a couple of minutes. You can find the most suitable rotator Windows, MAC, iPhone, and Android. Or, you can use the online platforms to enjoy rotations at different angles. However, regardless of device or operating system, each rotator has pros and cons. So don’t hesitate to opt for the tool that fulfills all your needs.
Part 8: FAQs
Q1. How do I rotate a video for free?
You can rotate a video for free by downloading a free video rotator according to your operating system. You can also look for online tools for video rotation. Likewise, you can also install Android and iPhone apps to rotate clips from your phone.
Q2. What software can rotate video?
There are many software that helps you rotate videos. However, most of them are paid. So, if you’re looking for some free video rotators on MAC or Windows, you can download Filmora. On the other hand, you can download programs like Altrasoft, XMedia Recode, and Free Video Flip and Rotate for Windows.
Q3. How can I rotate a video without losing quality?
Not all video rotators can promise high-quality results. So if you want to rotate your clip without damaging the quality, you must choose top-notch video editors, like Filmora or iMovie.
Q4. How do you rotate an AVI file on a MAC?
You need to download video rotators, such as Kdenlive, iMovie, or OpenShot, to rotate your AVI files for free. But, you can choose Filmora for MAC to flip and turn your AVI videos to different angles for exceptional results.
Q5. How do I rotate a video online?
To rotate an AVI video online, you need to be extremely picky, as even most online tools don’t support AVI files. But online video editors like Flixier, Clideo, and RotateMyVideo.Net allow you to rotate AVI videos easily.
Did you rush to record a video in a mistaken direction? Or were you just excited to film the moments without noticing the position of your camera? Whatever the case, if you regret recording the clip at the incorrect angle, here’s your chance to do the alteration. The article includes the top 16 best free AVI video rotators you can use on MAC, Windows, iPhone, Android, and online. Plus, if you’re looking for a single platform to rotate or flip videos, you can learn the complete process by following the step-by-step Filmora Video Editor tutorial that works on MAC and Windows.
In this Article
Part 1: Best AVI Video Rotators to Rotate AVI Video on Windows and MAC – Filmora Video Editor [with steps]
Part 2: Top 3 Free Video Rotators on Windows
Part 3: Top 3 Free Video Rotators on MAC
Part 4: Top 3 Free Video Rotators on Android
Part 5: Top 3 Free Video Rotators on iPhone
Part 6: Top 3 Free Video Rotators Online
Part 7: Bottom Line
Part 8: FAQs
Part 1: Best AVI Video Rotators to Rotate AVI Video on Windows and MAC – Filmora Video Editor [with steps]
Heard about Filmora but never used it? Surely, you’re missing great fun if you’re a video professional or a beginner video editor.
Filmora is an award-winning video editing software that works for both PC and MAC users. While the tool comes at an affordable price, you can still download the free setup to start showing your creativity.
This video editor has dozens of new effects, transitions, and many more features, which can help you create engaging videos. You can also enjoy some more key features, including audio ducking, color matching, motion tracking, split screen, video filters and transitions, speed control, and multiple exporting formats.
And, of course, video rotation is as easy as ABC! You can follow this step-by-step tutorial to rotate or flip your videos using Filmora 10. You can apply the same procedure if you have a different version.
Step 1: Download and Install Filmora
Visit Filmora Video Editor’s official website to download the newest version. Click on the “Try it Free” button according to your operating system (look at the icons on the button to identify the OS).
After downloading the setup, double-click the file to install the video editor. Then, open the program.
Feel free to judge the interface (see the image below), as it is pretty simple to understand. So, even if you’re a beginner, you can learn this tool within a few minutes of practice.
Step 2: Import the Video You Want to Rotate
The next is to bring the video file to Filmora’s library before proceeding. To do that, click on the “Movie Clip” icon in the center of the interface to select the clip from your computer’s hard drive.
Double-click or select the video and click the “Open” button to import files. The importing process may take several seconds or a few minutes, depending on the video size.
If you’re using Filmora for the first time, you might see the “Create Proxy File” message popping up right after the video import. So, simply click on the “Yes” button to go ahead.
Your video will be stored in the “Project Media” tab and will be visible next to the preview window.
Step 3: Drag and Drop the Video on Filmora’s Timeline
To rotate the video, first, you need to add it to the track. For that, take your mouse on the video, and select it by clicking the right button on your mouse. Keep holding the button to drag the video on the timeline. Remove your finger from the button after placing the clip on the track.
Right after the above step, you will get another message to help you decide whether you want to keep the resolution of the video to its original settings or match the media. Choose “Match to Media” for fast rendering.
However, if you’re a professional video editor, feel free to select the option that suits you the most.
Step 4: Rotate Your Video with Filmora
Double-click anywhere on the video that is already on the timeline.
You will see three tabs – “Video,” “Color,” and “Animation.” So choose the “Video” tab and click on the “Transform” option.
Once done, you will see three important options, which will help you rotate the video.
First, you will notice the “Rotate” option with an adjustment bar. This option will turn your video to different angles of your choice.
All you need to do is play with the adjustments by grabbing the “Round” knob-like button while keeping an eye on the preview window to see the results.
Just below “Rotate,” you will see the “Flip” option with “Horizontal” and “Vertical” mirror icons. Choosing any one of the icons will make your video mirror flip in horizontal or vertical directions.
The third option is “Scale” beneath the “Flip” option. Similar to the rotate option, this tool also has an adjustment bar. You can make adjustments to magnify or de-magnify the clip to fit the screen. Although this option isn’t mandatory, you can still use it if you find the need.
Now, click the “OK” button to apply rotation and return to the timeline.
Step 5: Save and Export Rotated Video to Your Widows or MAC
Here you will learn how to save the project and then export it. If you have already saved the project in the beginning, skip reading this part and directly hit the “Export” button.
Contrarily, you can also directly export your files without saving the project. But you won’t be able to make changes to the same project in the future as all source files will be lost. Therefore, saving the project and then exporting files is recommended.
So, if you’re done with step 4, save your project before going further.
You can go to the “File” tab, choose “Save Project,” and rename the video.
Rename your file and click on the “Save” button.
The new name will appear at the top of Filmora’s interface.
Lastly, click the “Export” button to save the file on your computer.
F 17
Part 2: Top 3 Free Video Rotators on Windows
No luck with finding free movie rotators for your Windows operating system? Don’t stress! These three AVI video rotators will solve your problem.
Free Video Flip and Rotate
This tool could satisfy your requirements if you’re looking for a core video rotator. As the name sounds, the Free Video Flip and Rotate is software by DVD Video Soft that allows you to modify the orientation of your videos easily. In other words, this is one of the easiest video rotators for Windows users, which is also free to download and use.
It has a simple interface with user-friendly options, which permits you to rotate your videos from different angles. Besides, you can also use this software for mirroring your clips. Moreover, you can save your project in various video formats, such as AVI.
Features
- Vertical flip
- Horizontal flip
- 180° video rotation
- 90° clockwise video rotation
- 90° counter-clockwise video rotation
- Vertical flip with 90° clockwise video rotation
- Horizontal flip with 90° counter-clockwise video rotation
Pros
- One-click results
- Easy to install and run
- Free and user-friendly software
- Does not contain ads or spyware
- Requires 40.50 MB of hard disk space
- Supports AVI and other video formats
- Supports XP, Windows 7, 8, 10, and 11 versions
Cons
- Unavailable for MAC users
- Lack of additional features, such as color correction, cropping, etc.
XMedia Recode
XMedia Recode is a free tool for Windows users. While the software is meant to convert videos into different formats, you can also use it for video rotation. Nevertheless, XMedia Recode has various other options, making it perfect for basic video editing.
Moreover, this software can convert unprotected Blue-rays/DVDs, create different chapters, import subtitle tracks, and many more. However, one of the best features of this video converter-cum-rotator is the video remux. That means you can convert the video container format without changing the original size.
Contrarily, XMedia Recode allows you to rotate and convert videos for countless devices, such as iPhone, iPad, Android, Xbox360, and more. But all this can be done only through Windows operating system. You can download this tool without any paid subscription. However, choose suitable processing for smooth installation, such as Windows 64bit, Windows 32bit, Vista, or XP SP3.
Features
- Blur
- Delogo
- Rotation
- Padding
- Denoise
- Cropping
- Image flip
- Swap U/V
- Clip speed
- Color curves
- Video fading
- Mirror effect
- Image stabilization
- Custom resolution
- Import 32 subtitle tracks
- Direct copy of video and audio stream into your desired format
Pros
- Free software
- Speedy conversion
- Fast batch processing
- Variety of video and audio features
- Works on Windows XP to Windows 10
- Supports 40+ video formats, including AVI
Cons
- A bit complex interface for new users
Altrasoft
Altrasoft is a small software for Windows to help rotate and convert your videos. The total size of the setup is just 971 KB.
This software is best for small video clips, which need to be rotated without wasting time. The program is free to download and use. However, the interface appears a bit old compared to new tools.
Also, unlike XMedia Recode, Altrasoft comes with limited options. So, if you only desire to rotate or flip your video and save it in the AVI or any other format, go ahead and download it.
Features
- Borders
- Zooming
- Rotation
- Color settings
- Audio formatting
- Video codec settings
- Audio codec settings
Pros
- Free to use
- Ideal for short videos
- Extremely light software
- Simple rotation options
- Rotation angle adjustments
Cons
- Outdated interface
- Lack of customer support
Part 3: Top 3 Free Video Rotators on MAC
Have you already lost your MAC storage on downloading some incompetent video rotators which claim to support AVI files? You can try these three video rotators for MAC, which are free and compatible with AVI video formats.
Kdenlive
When it comes to free video rotators for MAC, it gets quite challenging to find the right tool. As a MAC OS user, you are left with limited options, especially when trying to rotate videos and save them in AVI format. However, Kdenlive appears to be a problem-solver.
Technically, Kdenlive is a free open source, cross-platform, non-linear video editor with a variety of features. Nevertheless, its Mac version works excellent compared to Windows or Linux.
You can use this software to rotate videos and save them in AVI or any other available format. Also, this program has an attractive interface with a rich library of transition templates and fonts.
Besides, from the video rotation point of view, Kdenlive allows you to turn your videos at any angle.
Features
- Rotate and zoom
- Waveform
- Histogram
- Audio meter
- Vectorscope
- Proxy editing
- Text animation
- Keyframe interpolation
- Color grading and correction
- RGB parade Multi-track video editing
- Custom shortcuts and interface layouts
- Easy line-spacing and letter-spacing adjustment
- Supports seven video formats, including AVI, MOV, HD, UHD, HDV, WEBM, and MP4
Pros
- Free to use
- Fast rendering
- Automatic backup
- Easy video rotation
- Regular bugs fixation
- Cross-platform availability
- Dozens of professional effects and transitions
Cons
- Extremely unstable on Windows OS
IMovie
Want to get the job done quickly? Try iMovie in your MAC!
iMovie is a built-in video editing software to help create professional-level videos from your system. But you can also download iMovie if you can’t find it in the system.
Not just videos, but this software also allows you to cut and edit music without changing the files. Many filmmakers also love the tool, as they can add graphics to their projects to get remarkable results.
But that doesn’t stop new users from getting all the benefits the pros get with this software. How? Because it has a pretty straightforward look. You don’t need to click a hundred times to apply a simple effect, as all the options are right in front of you.
And when it’s about rotating a video in AVI format, feel free to rely on iMovie, as it supports several video file formats.
Features
- Video rotation and cropping
- Music and photo import
- 4K and HD video support
- Video transitions and effects
- Pre-installed backdrops and themes
- Supports working on multiple projects
Pros
- Free for MAC users
- Easy to learn
- User-friendly tools
- Extensive audio library
- Excellent movie templates
- Ideal Chroma-keying options
Cons
- Requires high storage space
- Lacks tagging and motion tracking
OpenShot
If complex video rotators make you ill, give OpenShot a shot!
It’s a free video editor which is incredibly simple to use. Most professionals around the world appreciate this powerful editing tool. Also, new users can do wonders by simply playing and understanding the options for a few minutes.
So if you plan to use OpenShot Video Editor , you would be glad to know that you can add animations, watermarks, and numerous other effects through this program. Plus, you can also enjoy audio editing within the same platform.
Although OpenShot can be installed for free on multiple operating systems, it still works best on MAC. So there’s no way to ignore this tool for rotating videos in MAC, especially when the options are limited.
Features
- Video rotation and resizing
- Drag and drop support
- Unlimited layers/tracks
- Color correction and settings
- 3D animated effects and titles
- Robust curve-based animations
- Video transitions and real-time previews
- Clip scaling, snapping, cutting, and trimming
- Image overlays, compositing, and watermarks
- Supports AVI and other audio, video, and image formats
Pros
- Free to use
- Easy editing
- No watermarking
- Available in 70+ languages
- Regular updates for improvement
- Stable performance on MAC systems
Cons
- Limited editing options for professionals
- Not suitable for old Windows OS versions
Part 4: Top 3 Free Video Rotators for Android
If using a PC to rotate your videos makes you lazy, you can change the angles of your clips through your Android phone.
So here are the three best video editing apps for Android lovers, which are free to use.
Rotate Video FX
Rotate Video FX is developed by Bizo Mobile. Despite being a small company, it has proven its mettle by offering several apps to its users in more than 100 countries. The firm is also specialized in developing mobile games for multiple platforms.
However, Rotate Video FX is one of its best creations in the world of video rotating mobile applications. This app allows you to choose the video you want to turn directly from your phone’s gallery.
And once the clip has been uploaded, you can rotate it to three different degrees by just touching the “Rotate” button.
Features
- Video rotation to 90, 180, and 270-degree angles
- Clear preview screen with no overlapping options
- Simple play, rotate, and import in a single attempt
- Social media sharing button for quick sending of media
- Automatically saves the rotated video to your phone’s gallery
Pros
- The app is free to use
- More than 1 million downloads
- Works on all android versions
Cons
- No frequent updates
- Not a user-friendly app
- Changes video resolution without permission
Smart Video Rotate and Flip
Clogica is the brainchild behind Smart Video Rotate and Flip video rotator for android. The company has been actively working in app development since 2014. And currently, it has more than 25 apps on the list, with 50 million total users.
Smart Video Rotate and Flip is a simple and smart tool to flip and rotate videos directly from your android device. So if you’re no longer interested in using desktop applications to do the job, here’s your chance to rotate your clips through your mobile phone or tablet.
This app offers a simple way to perform multiple flips and rotations simultaneously. The application works by re-encoding the media or by using the fast mode.
Features
- Allows video rotation and flips on different angles
- The output folder and renaming options
- Big preview screen and fast rendering
- Video recording directly from the application
- Permits you to make a video library within the app
Pros
- Free application
- Easy interface
- The app doesn’t change the video quality
- Allows you to mirror flip and rotate videos
- The latest update makes the app work faster
Cons
- The app contains ads
- Files become large after rotation
- Videos can only be saved to the phone’s internal memory
Rotate Video FREE
Rotate Video FREE is designed by LKR Studio. From 2014 till now, this app development company has produced seven mobile applications in the “Tools” category. And among its entire portfolio, the Rotate Video FREE app is one of the most popular creations.
Rotate Video FREE is a highly light and easy video rotator for Android devices. It has a simple interface with two main options: ‘ Pick Video’ to select the clip from your phone’s gallery. Then, the “Turn Left” button helps you rotate the video in multiple directions.
Features
- Rotates video to 90, 180, and 270 degrees
- HD video export quality
- Hassle-free rotate options
Pros
- Free of cost app
- Speedy video rotation process on large files
- Saves video directly to your phone’s memory
- Video rotation without affecting the resolution
Cons
- No mirror flipping
- The free version contains advertisements
- Hard to find the location of the saved videos
Part 5: Top 3 Free Video Rotators for iPhone
Are you struggling to find a good video rotator for iPhone? Here’s the list of three best iPhone apps to help you rotate your movies using your smartphone in AVI format.
Video Rotate + Flip Video Easy
Finding a video rotator for iPhone is a bit difficult, as most valuable applications comes after paying the price. But Video Rotate + Flip Video Easy app is totally free to download and use.
The app includes all the basic functions to rotate and flip videos in different angles. After downloading the app, you will notice a simple interface with seven options. So all you need to do is to import your video from the phone’s gallery, use the options to rotate the video, and save the rotated video in your phone.
The app is also available in different languages, including German, French, Japanese, English, Portuguese, Simplified Chinese, Spanish, and Russian.
Features
- Vertical mirror flipping
- Horizontal mirror flipping
- Frame wise video rotation
- 90° degrees clockwise and counter clockwise rotations
- 180° degrees clockwise and counter clockwise rotations
Pros
- Fast video conversion
- Small app size (only 16.1 MB)
- Available in multiple languages
- Supports iOS 11.0 or later versions
- The app is free with no watermarks
- You can install the app on your iPad
- Rotated videos can be played on all media players
- It exports the rotated video directly to your camera roll
Cons
- You need to purchase the app to remove advertisements
RFV
Here’s another free app to rotate and flip your videos. You can download RFV on both Android and iPhone smartphones. However, the iPhone version of the app works flawlessly. In fact, the ratings on both platforms also confirm that there are more happy iPhone users of this app than Android users.
RFV is a quick solution to correct your video orientation. So, if you have recorded the video through your iPhone at the wrong angle, you can use the app to flip and turn the clip’s position without much trouble. And you can do all of this just by selecting the options at the bottom of the app’s interface.
Features
- 90° degrees rotations
- Quick resetting
- Horizontal and vertical mirror flipping
- Turn photos into videos
- Video podcast
Pros
- RFV is a free video rotating app
- Easy installation on iPad
- Supports iOS 12.0 or later versions
- Direct loading of clip on the app from camera roll
Cons
- Large app size (41.7 MB)
- Unavailable for older iPhone versions
- It does not support file sizes above 200 MB
- Problems with saving the video on Android phones
Video Rotate – Flip Video
Video Rotate – Flip Video is the third in line when it comes to free video rotators for iPhones. The tool has pretty straightforward options regarding 90-degree clockwise and counter-clockwise rotations. Moreover, you can also play with different angles to adjust the orientation from 0 to 270 degrees.
Once you’re done rotating your video, you can save the new clip directly to your iPhone’s camera roll. At the same time, this app also allows you to share the rotated video on various social and communication platforms.
Features
- The app is specifically designed to rotate videos
- Uncomplicated app interface
- Live video preview
Pros
- Free and fast video rotator app for iPhone
- You can also install the app on an iPad
- Compatible with iOS 10.0 or later versions
Cons
- The app shows advertisements until you buy it
- No reset option – you have to start all over again
Part 6: Top 3 Free Video Rotators Online
Don’t want to fill your device’s storage with software? Well! You can rotate videos online for free in AVI format with ease. Here are the 3 best online video rotating tools.
Flixier
Flixier is a website that helps you create and edit videos through your internet browser. You can upload multiple videos or photos to add effects, text, and many more characteristics. This online platform allows you to add keyframes and transitions to your clips. Likewise, you can adjust your videos’ positioning, scaling, and resizing.
So can you rotate videos on Flixier?
Yes, you can and without paying a cent. The website offers a variety of options to rotate your clips. All you need to do is select the transform option and choose the rotation or flip option to see the results. And when you’re done rotating the video, simply export the file to your computer.
On the other hand, if you think you want to use Flixier frequently, you are required to buy a premium monthly or annual subscription. But until then, you can enjoy all the great traits for free.
Features
- Video rotation (90 degrees left and right)
- Video flipping (horizontal and vertical)
- Robust timeline
- 50+ transitions
- Green screen
- Live collaboration
- Screen recording
- Webcam recording
- Video effects
- Color correction
- Built-in media stock libraries
Pros
- Flixier is free
- No sign-up required
- Superfast rendering
- Variety of video templates
- Unlimited audio and video tracks
- Allows AVI media import and export
- Live video, microphone, and screen recording
Cons
- You need to purchase paid plans for team collaboration
- The free plan comes with limited projects, downloads, and storage
Clideo
Clideo is a great online tool that allows you to create and edit images and videos in one place. This web-based program comes with a variety of features, including video rotation and flipping.
To make your videos unique, Clideo permits you to add text and music to attract the audience. Moreover, the program supports different video formats, like AVI, MPG, MP4, WMC, MOV, VOB, and more.
You can do everything right from your internet browser without installing the application on your computer. All video files that you import and export on Clideo are well-protected.
As a user, you can select different resolutions, formats, and other features to make exciting videos within a few clicks. And apart from video rotation, the tool offers numerous beneficial options, such as reverse, speed, flip, loop, stop motion, and even memes creation.
Features
- Easy video flipping and rotation
- DPI conversion
- Video compressing
- Speed adjustment
- Slideshow creation
- Filters and presets
- Audio and video cutting
- Video and audio merging
- Subtitles and personalized text
- Color correction and fading effects
Pros
- All basic features are free to use
- Best for beginners
- Non-technical interface
- Supports various video formats (including AVI)
Cons
- This online tool lacks design elements and themes
- You need to buy the premium version to use Clideo daily
Rotate My Video.Net
Last but not the least, the Rotate My Video.Net is a free online tool designed for video rotation only. So, if your video is upside down or shot in the wrong direction, feel free to use this tool.
This web-based video rotator allows you to share the video to different social platforms directly from the website. Contrarily, you also save the rotated clips on your system.
Another interesting fact about this tool is that it has no limit. That means you can upload videos on the interface and rotate them as often as possible. However, the tool does not offer other features to groom your videos.
Moreover, the developers claim that the videos are deleted automatically from the server in a few hours. Therefore, your videos stay private and safe.
Features
- 90 degrees clockwise and counter-clockwise rotation
- Video ratio adjustment options (4:3 and 16:9)
- Band color option to fill the empty black space with colors
Pros
- Entirely free – no monthly or yearly subscription required
- Easy and quick process
- Supports AVI video files
- Video quality is not disturbed after rotation
Cons
- Lacks video flipping option
- It does not include any other features
Part 7: Bottom Line
Despite a long list of free video editors, finding the right one that simplifies the task without any trouble is hard. But with these top 16 best free AVI video rotators, you can flip and rotate videos in a couple of minutes. You can find the most suitable rotator Windows, MAC, iPhone, and Android. Or, you can use the online platforms to enjoy rotations at different angles. However, regardless of device or operating system, each rotator has pros and cons. So don’t hesitate to opt for the tool that fulfills all your needs.
Part 8: FAQs
Q1. How do I rotate a video for free?
You can rotate a video for free by downloading a free video rotator according to your operating system. You can also look for online tools for video rotation. Likewise, you can also install Android and iPhone apps to rotate clips from your phone.
Q2. What software can rotate video?
There are many software that helps you rotate videos. However, most of them are paid. So, if you’re looking for some free video rotators on MAC or Windows, you can download Filmora. On the other hand, you can download programs like Altrasoft, XMedia Recode, and Free Video Flip and Rotate for Windows.
Q3. How can I rotate a video without losing quality?
Not all video rotators can promise high-quality results. So if you want to rotate your clip without damaging the quality, you must choose top-notch video editors, like Filmora or iMovie.
Q4. How do you rotate an AVI file on a MAC?
You need to download video rotators, such as Kdenlive, iMovie, or OpenShot, to rotate your AVI files for free. But, you can choose Filmora for MAC to flip and turn your AVI videos to different angles for exceptional results.
Q5. How do I rotate a video online?
To rotate an AVI video online, you need to be extremely picky, as even most online tools don’t support AVI files. But online video editors like Flixier, Clideo, and RotateMyVideo.Net allow you to rotate AVI videos easily.
Download 20 Stunning Adobe Premiere Intro Templates for Free (2023 Edition)
Top 20 Adobe Premiere Title/Intro Templates [Free Download]

Benjamin Arango
Mar 29, 2024• Proven solutions
One of the things that can make your output stand out from the crowd is the titles. Many people think creating eye-catching title effects is beyond them, but with Premiere Pro, you really couldn’t be more wrong.
As Premiere Pro doesn’t have built-in templates, the ability to import free Premiere Pro templates is a must. Anyone need to find a custom title style that suits the project and looks professional and carries impact.
The great thing is that there are many of these resources that are offered entirely free! If you don’t know how to add text/title to Adobe Premiere, here are steps to add text resources .
In this article, we will share with you 20 Free to download Title Templates for Premiere Pro.
- Part1: Top 15 Free Adobe Premiere Pro Title Templates
- Part2: Best 5 Premiere Pro Intro Templates Free Download
- Part3: How to Import and Customize Title Templates in Premiere
You may also like: 10 Free Star Wars Fonts to Make Your Video Amazing
Part 1: Top 15 Free Adobe Premiere Title Templates
Adding the finishing touches to a project, like creating the opening titles or end credits, is often not at the top of anyone’s priority list during the video editing process.
Nonetheless, making a unique opening sequence along with impressive animations in Adobe Premiere Pro can be a time-consuming endeavor, so instead of spending countless hours on producing a perfect combination of text and images, you can just download a title template from the Internet.
1 Premier Pro
Jarle Leirpoll runs this site, and it is a treasure trove of information, help, and advice on Premiere from a man who wrote the book (literally, it’s for sale on the site!) on Premiere.
His first title collection is consisting of 8 templates, including Lower Thirds templates, end credit template, and some special characters. However, it well worth a look around the site as there is plenty more free stuff including presets, and a whole range of tips and tricks to help with your editing.
Features:
- Free Premiere Pro templates to download
- Easy to import the title template to Premiere
- 100% ready to use
In case that you’re just a beginner of video editing software, you can start with Wondershare Filmora (Latest Filmora version 11) to add text to videos, which is powerful but easy-to-use for green hands. Download the Wondershare Filmora below.
There are hundreds of Text and Titles presets available in Filmora, which allows you to add titles, subtitles, scrolling end credits, lower 3d, and openers with ease. You can also apply some animation effects to the selected title presets.
Check the video below to find out how to add text to video with Wondershare Filmora.
Besides the built-in title presets, Wondershare Filmora (Latest Filmora version X) also provides more title templates in Filmstock , which offers lots of special effects templates.
Currently, there are Title Expansion Set, business title set, wedding title set, and lower third expansion set to download. Check the video below to watch the Title Expansion set templates.
 Download Mac Version ](https://tools.techidaily.com/wondershare/filmora/download/ )
Learn more details about How to Add Text to Video with Filmora.
2 Richard Harrington
This is another site that offers templates for download but is also a great place to visit for ideas and information. Richard approaches Premiere from a photographer’s viewpoint, and so has a slightly different view on many topics that are well worth reading.
He has links to a sizable number of templates on Richard Harrington covering a range of styles and subjects, including DVD menus, animated text, and high-quality models. Still, his blog is updated regularly and often includes free downloads.
Features:
- Supports Adobe Premiere intro templates to use
- It includes various templates and presets on Windows and Mac
- More than title templates also has DVD menus and animated text
3 ProVideoCoalition
Another all-encompassing site has a huge amount of information and knowledge to be gained. The templates are just part of the story. They are available on Pro Video Coalition and include numerous files and even some free video content showing their implementation.
Also on this page are links to some other sites offering free content or advice on various aspects of Premiere, making it well worth a visit and definitely worth its place in this top 10.
Of particular interest on this site is the regularly updated news which focuses on the latest hardware and software announcements.
Features:
- Supports lower thirds for Adobe Premiere
- You can customize the Premiere Pro intro template free download
- You can create graphic elements
4 Coremelt
This is a commercial site that offers a wide variety of high-quality plugins and templates for several video editing platforms. However, we are on the lookout for that fabulous price of free here, so a little digging finds this page , here you will find ten templates from one of their best selling products offered entirely free.
All templates are quality professionally produced products and worth the visit alone. For anyone who is looking to take their editing output to the professional level, the commercial products on offer here are well worth a look, high quality, and a reasonable cost.
Features:
- It includes 3D text and motion graphics templates
- Free and safe download the Premiere template

5 Bestproaction
Another commercial site. This one has a range of free templates and presets to download for Premiere. Fourteen open items altogether can be downloaded. This site at least deserves a browse through their catalog after a download. The emphasis here is on low cost but high quality, useful templates, and plugins to suit any project.
Even for those of us with a limited budget, there may be something that catches the eye. It is an excellent site for browsing when looking for inspiration.
Features:
- Offers multimedia products like free Premiere Pro text, title templates
- Includes professional Premiere Pro template for videographers
- You can create graphic elements
6 FXFactory
This is another commercial site that has a smattering of very high-quality free downloads on offer, including a beautiful template for the original Star Wars movie style scrolling titles.
Again, it is worth browsing the catalog when you are on the site, but all the free products can be found here .
FX Factory has also created some great video tutorials on a variety of aspects of video production that are well worth a view when you are at the site.
Features:
- Free Premiere Pro effects templates to download
- Includes a step by step Premiere Pro tutorial
7 Creative Impatience
A fantastic site full of information, tips, and opinion on all aspects of video production, it’s a great place to spend some time, with the bonus of a bunch of free downloads for Premiere.
Of particular note are the tutorials, an excellent source of information and tricks that you may not have seen before, with their YouTube channel being a great source of free guidance for editors of any sort of experience.
Features:
- Apart from free Premiere Pro templates, you can also find blogs
- Easy steps to make Premiere Pro templates
- Safe and clean to use. All real
8Filmimpact
A commercial site is offering some great products at competitive prices. At first glance, this may not seem to be a useful place for our search for the free stuff.
However, all the products do have a free trial download, and as a bonus, the trial for pack one includes four free to use templates. They are quality products too, and well worth a look.

9 Style4Type
Style4Type is an exciting site regularly updated with new free templates as well as offering technical advice and having further templates available as commercial products.
And to the side is even a free download for a PDF file that walks you through installing and using the templates within Premiere once you have them.
There are already a lot of free templates on offer covering a wide variety of styles, but they are added to with regularity, so it is a site to bookmark for the future.
Features:
- Free title templates to use including texture templates
- Professional tools to better your video

10 Premiere Beat
Lots of information on this site as its been running for a decade, it is a website that imparts a wealth of knowledge along the way on not just video editing but music.
The pack includes 21 Premiere title templates to use. Another site that you will want to visit again and again.
Features:
- High-quality Premiere Pro templates to download
- A large number of Premiere templates to use
11 Clean Elegant Rotation Title
It is a clean title template without unnecessary parts. If you like simple titles, this one is best for you. You can customize in Premiere easily with a few clicks. For beginners, it also includes free tutorials to use.
Features:
- Simple and clean Premiere title templates
- Customizable in Premiere
12 Unfolding Titles
It is a clean title template with an unfolding effect. Each text has two unfolding effects, which are convenient to use with customization. It supports 4K and HD versions. In this pack, it wons 10 title formats. After importing Premiere, you can also change text size.
Features:
- 20 unfolding title effects
- Supports rendering your video
13 Orange83
These are five modern title packs for Premiere. With it, you don’t need to use After Effects as you can import them to edit. The best part is you can include your logo and other stuff you like.
Features:
- Include 5 title packs
- Modern and clean titles
14 Video Intro Templates - Premiere Pro intro template free download
It is a free download Premiere Pro intro template that you can add to your video. It is highly recommended to use promotion and commercial video.
This intro template can be adjusted after you import it to Premiere Pro. This Premiere Pro intro template is HD, so you don’t need to worry about the whole video quality.
Features:
- 1920X1080 (HD) is supported
- This intro template doesn’t include built-in music
15 Elegant Promo - another Premiere Pro intro template free to use
It is intro template for Premiere Pro is modern and free to use. The whole style is young and energetic, which will give viewers a fresh new feeling. It includes 12 images and 26 text layers, and all of them are free to download.
You can use it for your presentation, promotional video, and product video. Besides, it doesn’t require a plug in to use this intro template in Premiere Pro.
Features:
- It includes animated intro elements.
- Use an HD intro template to make a popular video.

These are free templates, and they are enough to get anyone up and running with a new project. As said before, with the commercial enterprises that offer freebies, it’s always worth checking out their paid for output as well, you may not be in the market for it right now, but something may stick for a later time.
Part 2: Bonus: Best 5 Premiere Pro Intro Templates Free Download
Even though all websites we featured in this article offer some free intro templates for Adobe Premiere Pro. However, it is still a much better solution to buy a subscription plan on a platform if you are working on a large number of projects each month.
Let’s see which websites you can use to download the intro and title templates for Premiere Pro.
16. Motion Array
In addition to an impressive library of intro templates, Motion Array offers presets, sound effects, royalty-free music, and stock footage.
Furthermore, you can choose the software version to make sure that the templates you download can be used with the version of Adobe Premiere Pro you have installed on your computer.
The website provides you with powerful search tools, so you can select the resolution of the template, up to 8K, or choose which types of templates are going to be displayed.
Using the free subscription plan can limit your options since you’ll only be able to download free templates, and your upload storage will be limited to just 1GB.
The Pro subscription plan that can be purchased for $54 per month will grant you access to an almost endless selection of title templates as well as a huge selection of plugins for Adobe Premiere Pro.

17. Cinecom – Simple Intro for Premiere Pro
It is a designer pack that features ten pre-animated lower-thirds intro templates. You can change the duration of the font and color of the text in each template, and you can choose if you want to download a 1080 or the 4K version of the designer pack.
The templates are compatible with CS6, CC2013, CC2014, and CC2016 versions of the Premiere Pro. The Simple Titles pack can be easily installed, as you just have to drag and drop it into the software.
However, before you can download these title templates, you have to subscribe to Cinecom’s mailing list.
Even though this can be a bit inconvenient, it is very well worth the trouble since you’ll be able to transform or build upon the intro templates and use them freely in all videos you edit in Adobe Premiere Pro.
18. EnvatoElements
You can find much more than intro templates on the EnvatoElements platform since you can choose from 740.000 items you can use for anything from creating a WordPress website to preparing your next business presentation.
The Video Templates category alone features over 4000 items, including Logo Stings or Infographics assets.
There are nearly one hundred available intro templates for Adobe Premiere Pro, but downloading any of them requires you to create an account and purchase a subscription plan.
Prices start from $16.50 per month, and packages include virtually unlimited access to stock photos and videos, video templates, and much more. The EnvatoElements platform also offers assets that can be used with Final Cut Pro, Adobe After Effects or Apple Motion.

19. Videohive
Videohive is a part of the Envato Market platform that also features Web Themes and Templates, Code, Audio, or Graphic sections. It is free to use, but only a limited amount of assets can be downloaded for free.
To download an item, you must purchase it, and prices can range from $16 to $50 for a single title template.
Videohive is also a great source of title templates for Adobe After Effects, as it offers more than 5000 titles and intros that are compatible with this software.
Furthermore, you can download presets for both Premiere Pro and After Effects that can be used to create stop-motion animations, perform color correction, or make the footage look like it was captured with a VHS camera.

20. RocketStock
This option is best suited for video editors who want to create their intros because RocketStok’s Cinematic Style Library extends the scope of options provided by Premiere Pro.
Downloading all fonts except Helvetica Neue is free, but you must check which fonts you can use in commercial projects. You will have no trouble installing the fonts since you can just double-click on the font and follow the on-screen instructions.
Once you’ve installed all the fonts from the library, you can use them to replace the software’s default library. You just have to click on the Replace Style Library option that can be accessed from Premiere Pro’s Title Style tab.
If you don’t feel comfortable creating your titles or if you simply don’t have the time to create your own titles, the Free Cinematic Style Library is not the best choice for you.
On the other hand, Premiere Pro’s users who don’t often use title templates can benefit from downloading RocketStock’s intro library.

Part 3: How to Import and Customize Title Templates in Premiere
If you download the template, all the title templates support customization. You can change its size, font, color, and add 3D effects.
It is easy to import and use it to touch up your video. Check out the steps below to know how to import title templates quickly.
- Install the title template. Choose one template you like and download it to your PC. Remember to unzip it before importing it. Now install them.
- Import the title template. You just need to go to click Effects at the top. Then at right, you will find Presets in the effects section.
- Right-click on presets, and choose Import Presets. If the title template format is .mogrt, you need to open it in Essential Graphics Panel. At the bottom right corner, click the plus icon to import the title template and install it.
- Customize the title template. Once the title template is imported, drag it to the timeline. Click the Editing tab. Here you can customize colors, text, opacities, and positions. There are more options for you to explore.
- You can also copy and paste the title template to another place in the timeline. If you change one place of the pasted template, the original one will remain the same.
Note: each version of Premiere’s interface will look different, but the workflow is similar.
Conclusion
Using title templates can help you achieve a certain visual style faster, so you don’t have to spend a lot of time looking for a perfect background or animating the text.
The Internet provides almost unlimited video editing resources, but not all of these resources can be acquired for free.
Which website you will choose as a source of fresh title templates depends on how often you work on new projects in Adobe Premiere Pro.
If you want to make professional video editing and tired of Premiere, try Filmora! It includes various titles templates to use.
You can sync audio automatically, use detailed color correction to make your title and video like a movie. Download it now (FREE)!
Benjamin Arango
Benjamin Arango is a writer and a lover of all things video.
Follow @Benjamin Arango
Benjamin Arango
Mar 29, 2024• Proven solutions
One of the things that can make your output stand out from the crowd is the titles. Many people think creating eye-catching title effects is beyond them, but with Premiere Pro, you really couldn’t be more wrong.
As Premiere Pro doesn’t have built-in templates, the ability to import free Premiere Pro templates is a must. Anyone need to find a custom title style that suits the project and looks professional and carries impact.
The great thing is that there are many of these resources that are offered entirely free! If you don’t know how to add text/title to Adobe Premiere, here are steps to add text resources .
In this article, we will share with you 20 Free to download Title Templates for Premiere Pro.
- Part1: Top 15 Free Adobe Premiere Pro Title Templates
- Part2: Best 5 Premiere Pro Intro Templates Free Download
- Part3: How to Import and Customize Title Templates in Premiere
You may also like: 10 Free Star Wars Fonts to Make Your Video Amazing
Part 1: Top 15 Free Adobe Premiere Title Templates
Adding the finishing touches to a project, like creating the opening titles or end credits, is often not at the top of anyone’s priority list during the video editing process.
Nonetheless, making a unique opening sequence along with impressive animations in Adobe Premiere Pro can be a time-consuming endeavor, so instead of spending countless hours on producing a perfect combination of text and images, you can just download a title template from the Internet.
1 Premier Pro
Jarle Leirpoll runs this site, and it is a treasure trove of information, help, and advice on Premiere from a man who wrote the book (literally, it’s for sale on the site!) on Premiere.
His first title collection is consisting of 8 templates, including Lower Thirds templates, end credit template, and some special characters. However, it well worth a look around the site as there is plenty more free stuff including presets, and a whole range of tips and tricks to help with your editing.
Features:
- Free Premiere Pro templates to download
- Easy to import the title template to Premiere
- 100% ready to use
In case that you’re just a beginner of video editing software, you can start with Wondershare Filmora (Latest Filmora version 11) to add text to videos, which is powerful but easy-to-use for green hands. Download the Wondershare Filmora below.
There are hundreds of Text and Titles presets available in Filmora, which allows you to add titles, subtitles, scrolling end credits, lower 3d, and openers with ease. You can also apply some animation effects to the selected title presets.
Check the video below to find out how to add text to video with Wondershare Filmora.
Besides the built-in title presets, Wondershare Filmora (Latest Filmora version X) also provides more title templates in Filmstock , which offers lots of special effects templates.
Currently, there are Title Expansion Set, business title set, wedding title set, and lower third expansion set to download. Check the video below to watch the Title Expansion set templates.
Download Mac Version ](https://tools.techidaily.com/wondershare/filmora/download/ )
Learn more details about How to Add Text to Video with Filmora.
2 Richard Harrington
This is another site that offers templates for download but is also a great place to visit for ideas and information. Richard approaches Premiere from a photographer’s viewpoint, and so has a slightly different view on many topics that are well worth reading.
He has links to a sizable number of templates on Richard Harrington covering a range of styles and subjects, including DVD menus, animated text, and high-quality models. Still, his blog is updated regularly and often includes free downloads.
Features:
- Supports Adobe Premiere intro templates to use
- It includes various templates and presets on Windows and Mac
- More than title templates also has DVD menus and animated text
3 ProVideoCoalition
Another all-encompassing site has a huge amount of information and knowledge to be gained. The templates are just part of the story. They are available on Pro Video Coalition and include numerous files and even some free video content showing their implementation.
Also on this page are links to some other sites offering free content or advice on various aspects of Premiere, making it well worth a visit and definitely worth its place in this top 10.
Of particular interest on this site is the regularly updated news which focuses on the latest hardware and software announcements.
Features:
- Supports lower thirds for Adobe Premiere
- You can customize the Premiere Pro intro template free download
- You can create graphic elements
4 Coremelt
This is a commercial site that offers a wide variety of high-quality plugins and templates for several video editing platforms. However, we are on the lookout for that fabulous price of free here, so a little digging finds this page , here you will find ten templates from one of their best selling products offered entirely free.
All templates are quality professionally produced products and worth the visit alone. For anyone who is looking to take their editing output to the professional level, the commercial products on offer here are well worth a look, high quality, and a reasonable cost.
Features:
- It includes 3D text and motion graphics templates
- Free and safe download the Premiere template
5 Bestproaction
Another commercial site. This one has a range of free templates and presets to download for Premiere. Fourteen open items altogether can be downloaded. This site at least deserves a browse through their catalog after a download. The emphasis here is on low cost but high quality, useful templates, and plugins to suit any project.
Even for those of us with a limited budget, there may be something that catches the eye. It is an excellent site for browsing when looking for inspiration.
Features:
- Offers multimedia products like free Premiere Pro text, title templates
- Includes professional Premiere Pro template for videographers
- You can create graphic elements
6 FXFactory
This is another commercial site that has a smattering of very high-quality free downloads on offer, including a beautiful template for the original Star Wars movie style scrolling titles.
Again, it is worth browsing the catalog when you are on the site, but all the free products can be found here .
FX Factory has also created some great video tutorials on a variety of aspects of video production that are well worth a view when you are at the site.
Features:
- Free Premiere Pro effects templates to download
- Includes a step by step Premiere Pro tutorial
7 Creative Impatience
A fantastic site full of information, tips, and opinion on all aspects of video production, it’s a great place to spend some time, with the bonus of a bunch of free downloads for Premiere.
Of particular note are the tutorials, an excellent source of information and tricks that you may not have seen before, with their YouTube channel being a great source of free guidance for editors of any sort of experience.
Features:
- Apart from free Premiere Pro templates, you can also find blogs
- Easy steps to make Premiere Pro templates
- Safe and clean to use. All real
8Filmimpact
A commercial site is offering some great products at competitive prices. At first glance, this may not seem to be a useful place for our search for the free stuff.
However, all the products do have a free trial download, and as a bonus, the trial for pack one includes four free to use templates. They are quality products too, and well worth a look.
9 Style4Type
Style4Type is an exciting site regularly updated with new free templates as well as offering technical advice and having further templates available as commercial products.
And to the side is even a free download for a PDF file that walks you through installing and using the templates within Premiere once you have them.
There are already a lot of free templates on offer covering a wide variety of styles, but they are added to with regularity, so it is a site to bookmark for the future.
Features:
- Free title templates to use including texture templates
- Professional tools to better your video
10 Premiere Beat
Lots of information on this site as its been running for a decade, it is a website that imparts a wealth of knowledge along the way on not just video editing but music.
The pack includes 21 Premiere title templates to use. Another site that you will want to visit again and again.
Features:
- High-quality Premiere Pro templates to download
- A large number of Premiere templates to use
11 Clean Elegant Rotation Title
It is a clean title template without unnecessary parts. If you like simple titles, this one is best for you. You can customize in Premiere easily with a few clicks. For beginners, it also includes free tutorials to use.
Features:
- Simple and clean Premiere title templates
- Customizable in Premiere
12 Unfolding Titles
It is a clean title template with an unfolding effect. Each text has two unfolding effects, which are convenient to use with customization. It supports 4K and HD versions. In this pack, it wons 10 title formats. After importing Premiere, you can also change text size.
Features:
- 20 unfolding title effects
- Supports rendering your video
13 Orange83
These are five modern title packs for Premiere. With it, you don’t need to use After Effects as you can import them to edit. The best part is you can include your logo and other stuff you like.
Features:
- Include 5 title packs
- Modern and clean titles
14 Video Intro Templates - Premiere Pro intro template free download
It is a free download Premiere Pro intro template that you can add to your video. It is highly recommended to use promotion and commercial video.
This intro template can be adjusted after you import it to Premiere Pro. This Premiere Pro intro template is HD, so you don’t need to worry about the whole video quality.
Features:
- 1920X1080 (HD) is supported
- This intro template doesn’t include built-in music
15 Elegant Promo - another Premiere Pro intro template free to use
It is intro template for Premiere Pro is modern and free to use. The whole style is young and energetic, which will give viewers a fresh new feeling. It includes 12 images and 26 text layers, and all of them are free to download.
You can use it for your presentation, promotional video, and product video. Besides, it doesn’t require a plug in to use this intro template in Premiere Pro.
Features:
- It includes animated intro elements.
- Use an HD intro template to make a popular video.
These are free templates, and they are enough to get anyone up and running with a new project. As said before, with the commercial enterprises that offer freebies, it’s always worth checking out their paid for output as well, you may not be in the market for it right now, but something may stick for a later time.
Part 2: Bonus: Best 5 Premiere Pro Intro Templates Free Download
Even though all websites we featured in this article offer some free intro templates for Adobe Premiere Pro. However, it is still a much better solution to buy a subscription plan on a platform if you are working on a large number of projects each month.
Let’s see which websites you can use to download the intro and title templates for Premiere Pro.
16. Motion Array
In addition to an impressive library of intro templates, Motion Array offers presets, sound effects, royalty-free music, and stock footage.
Furthermore, you can choose the software version to make sure that the templates you download can be used with the version of Adobe Premiere Pro you have installed on your computer.
The website provides you with powerful search tools, so you can select the resolution of the template, up to 8K, or choose which types of templates are going to be displayed.
Using the free subscription plan can limit your options since you’ll only be able to download free templates, and your upload storage will be limited to just 1GB.
The Pro subscription plan that can be purchased for $54 per month will grant you access to an almost endless selection of title templates as well as a huge selection of plugins for Adobe Premiere Pro.
17. Cinecom – Simple Intro for Premiere Pro
It is a designer pack that features ten pre-animated lower-thirds intro templates. You can change the duration of the font and color of the text in each template, and you can choose if you want to download a 1080 or the 4K version of the designer pack.
The templates are compatible with CS6, CC2013, CC2014, and CC2016 versions of the Premiere Pro. The Simple Titles pack can be easily installed, as you just have to drag and drop it into the software.
However, before you can download these title templates, you have to subscribe to Cinecom’s mailing list.
Even though this can be a bit inconvenient, it is very well worth the trouble since you’ll be able to transform or build upon the intro templates and use them freely in all videos you edit in Adobe Premiere Pro.
18. EnvatoElements
You can find much more than intro templates on the EnvatoElements platform since you can choose from 740.000 items you can use for anything from creating a WordPress website to preparing your next business presentation.
The Video Templates category alone features over 4000 items, including Logo Stings or Infographics assets.
There are nearly one hundred available intro templates for Adobe Premiere Pro, but downloading any of them requires you to create an account and purchase a subscription plan.
Prices start from $16.50 per month, and packages include virtually unlimited access to stock photos and videos, video templates, and much more. The EnvatoElements platform also offers assets that can be used with Final Cut Pro, Adobe After Effects or Apple Motion.
19. Videohive
Videohive is a part of the Envato Market platform that also features Web Themes and Templates, Code, Audio, or Graphic sections. It is free to use, but only a limited amount of assets can be downloaded for free.
To download an item, you must purchase it, and prices can range from $16 to $50 for a single title template.
Videohive is also a great source of title templates for Adobe After Effects, as it offers more than 5000 titles and intros that are compatible with this software.
Furthermore, you can download presets for both Premiere Pro and After Effects that can be used to create stop-motion animations, perform color correction, or make the footage look like it was captured with a VHS camera.
20. RocketStock
This option is best suited for video editors who want to create their intros because RocketStok’s Cinematic Style Library extends the scope of options provided by Premiere Pro.
Downloading all fonts except Helvetica Neue is free, but you must check which fonts you can use in commercial projects. You will have no trouble installing the fonts since you can just double-click on the font and follow the on-screen instructions.
Once you’ve installed all the fonts from the library, you can use them to replace the software’s default library. You just have to click on the Replace Style Library option that can be accessed from Premiere Pro’s Title Style tab.
If you don’t feel comfortable creating your titles or if you simply don’t have the time to create your own titles, the Free Cinematic Style Library is not the best choice for you.
On the other hand, Premiere Pro’s users who don’t often use title templates can benefit from downloading RocketStock’s intro library.
Part 3: How to Import and Customize Title Templates in Premiere
If you download the template, all the title templates support customization. You can change its size, font, color, and add 3D effects.
It is easy to import and use it to touch up your video. Check out the steps below to know how to import title templates quickly.
- Install the title template. Choose one template you like and download it to your PC. Remember to unzip it before importing it. Now install them.
- Import the title template. You just need to go to click Effects at the top. Then at right, you will find Presets in the effects section.
- Right-click on presets, and choose Import Presets. If the title template format is .mogrt, you need to open it in Essential Graphics Panel. At the bottom right corner, click the plus icon to import the title template and install it.
- Customize the title template. Once the title template is imported, drag it to the timeline. Click the Editing tab. Here you can customize colors, text, opacities, and positions. There are more options for you to explore.
- You can also copy and paste the title template to another place in the timeline. If you change one place of the pasted template, the original one will remain the same.
Note: each version of Premiere’s interface will look different, but the workflow is similar.
Conclusion
Using title templates can help you achieve a certain visual style faster, so you don’t have to spend a lot of time looking for a perfect background or animating the text.
The Internet provides almost unlimited video editing resources, but not all of these resources can be acquired for free.
Which website you will choose as a source of fresh title templates depends on how often you work on new projects in Adobe Premiere Pro.
If you want to make professional video editing and tired of Premiere, try Filmora! It includes various titles templates to use.
You can sync audio automatically, use detailed color correction to make your title and video like a movie. Download it now (FREE)!
Benjamin Arango
Benjamin Arango is a writer and a lover of all things video.
Follow @Benjamin Arango
Social Media Video Hacks: Resize Your Way to More Views and Engagement
Your Number 1 Tip to Resize social media Vertical Video Ratio
An easy yet powerful editor
Numerous effects to choose from
Detailed tutorials provided by the official channel
With more and more content being designed for phones, vertical videos are widely used now.

If you too have recorded videos for posting on your social media sites, resize them in vertical video ratio and to get the right size, take help of a video ratio calculator.
In this article
01 [Benefits of Square and Vertical Videos](#Part 1)
02 [How Vertical Videos Are Displayed](#Part 2)
03 [What’s the Best Tip to Resize Social Media Vertical Video Ratio?](#Part 3)
Part 1 Benefits of Square and Vertical Videos
● What is Square Video & Vertical Video?
A Square Video is the one that has the same width and height while a vertical video is taller than it is wide. A vertical video or a square video is presented in the form of a landscape. A square video has an aspect ratio of 1:1 while a vertical video has an aspect ratio of 9:16.So, in a vertical video, the horizontal video size is less than its vertical size.
● Why Vertical Video is Dominating
It would not be wrong to say that the world has taken a mobile route and with this, the dominance of vertical videos can be seen. As per the studies it has been found that around 75% of the video playback across the globe are from mobile phones and around 94% of the time, the phones are held vertically. These figures completely state the need for the hour-vertical videos.
With users holding their mobile phones vertically the majority of the time, the dominance of the vertical videos is no surprise.
● Benefits of Square and Vertical Videos
There are several benefits of having square and vertical videos. These videos are specifically
designed for mobile phones and thus they can be easily posted on multiple social media sites without any need for change or editing. Other benefits of using vertical videos are their ease of recording through a mobile phone. Vertical videos are beneficial even for the advertisers and promoters as they help them reach more audiences and prospective customers through social media sites and other sites.
Part 2 How Vertical Videos Are Displayed
Vertical videos are majorly displayed on mobile devices as smartphones are used vertically most of the time. The width of these videos is less as compared to their height and this makes them appear fit on the smartphone’s screen. Moreover, using the screen aspect ratio calculator, you can further decide upon the aspect ratio depending on the size of the device screen on which video has to be played.
Part 3 What’s the Best Tip to Resize social media Vertical Video Ratio?
Listed below are the tips for resizing the social media vertical video ratio.
● Learn about the Aspect Ratios
A vertical video is taller than it is wide. Thus, any video that is taller than the 1:1 aspect ratio will be termed a vertical video. The commonly used aspect ratio is 9:16 that uses the complete vertical screen. So, to capture a vertical video, use the camera in portrait mode or edit it as per the vertical aspect ratio. There are also TV aspect ratio calculator tools that can be used for the task.

● Screen splitting
Multiple clips that are horizontal can be placed at the top of each other for a vertical frame as it is tall. The stacking can be done for the related clips or to make them appear as one. Place the clips creatively using patterns or lines.

● Filling the vertical space
If needed, you can creatively fill the vertical space when the shot is not a close one. One of the ideas is by raising the camera of your phone high and then moving it down that will give a deep frame. You can also fill up the vertical space below.

● Side-to-side fast movements must be avoided
Since the width area in the vertical videos is less, it is also better to avoid the fast side-to-side movement as it will create a shaky and blurry effect.

● Make use of text and graphics
To complement videos, using text and graphics is a good option. Use the vertical space smartly and include text, stickers, graphics, and other content for enhancing the video and its meaning.

● Grab attention
It is important for the videos on the social media sites to instantly catch the attention of the viewers, else they will move on to the next one. So, ensure that your vertical videos are eye-catchy and interesting with bright colors, looping animations, GIFs, and other content that is likely to hook up the viewers.

● Rule of Thirds
As per the photography rule of thirds, the main subject is not to be placed at the center and instead it the entire frame is divided into thirds using imaginary horizontal and vertical lines. The subject should be placed on these lines or where the lines meet. Use the guide grid on your phone’s camera to use this rule.

● Using a professional video editing software
If you have a video that is already recorded, you can enhance its looks and appearance using good video editing software and one such recommended tool is Wondershare Filmora Video Editor . The software is compatible with Windows and Mac and allows you to create stunning videos in just a few clicks that can be posted on several social media sites.

Wondershare Filmora - Best Video Editor for Mac/Windows
5,481,435 people have downloaded it.
Build unique custom animations without breaking a sweat.
Focus on creating epic stories and leave the details to Filmora’s auto features.
Start a creative adventure with drag & drop effects and endless possibilities.
Filmora simplifies advanced features to save you time and effort.
Filmora cuts out repetition so you can move on to your next creative breakthrough.
Using this versatile software you can add animations, motion tracking, zooming function, masking, text, and titles. Features like auto-correction, control settings, color wheels, noise reduction, audio sync, audio compression, and others are also supported.

Key Takeaways from This Episode
● With the majority of the video content being viewed on mobile phones, vertical videos have dominated the market.
● Vertical videos can be easily posted on several social media sites and other platforms without any tweaking from your phone.
● Several tips will help you to create a good vertical video for social media and using professional software like Wondershare Filmora is one of them.
With more and more content being designed for phones, vertical videos are widely used now.
If you too have recorded videos for posting on your social media sites, resize them in vertical video ratio and to get the right size, take help of a video ratio calculator.
In this article
01 [Benefits of Square and Vertical Videos](#Part 1)
02 [How Vertical Videos Are Displayed](#Part 2)
03 [What’s the Best Tip to Resize Social Media Vertical Video Ratio?](#Part 3)
Part 1 Benefits of Square and Vertical Videos
● What is Square Video & Vertical Video?
A Square Video is the one that has the same width and height while a vertical video is taller than it is wide. A vertical video or a square video is presented in the form of a landscape. A square video has an aspect ratio of 1:1 while a vertical video has an aspect ratio of 9:16.So, in a vertical video, the horizontal video size is less than its vertical size.
● Why Vertical Video is Dominating
It would not be wrong to say that the world has taken a mobile route and with this, the dominance of vertical videos can be seen. As per the studies it has been found that around 75% of the video playback across the globe are from mobile phones and around 94% of the time, the phones are held vertically. These figures completely state the need for the hour-vertical videos.
With users holding their mobile phones vertically the majority of the time, the dominance of the vertical videos is no surprise.
● Benefits of Square and Vertical Videos
There are several benefits of having square and vertical videos. These videos are specifically
designed for mobile phones and thus they can be easily posted on multiple social media sites without any need for change or editing. Other benefits of using vertical videos are their ease of recording through a mobile phone. Vertical videos are beneficial even for the advertisers and promoters as they help them reach more audiences and prospective customers through social media sites and other sites.
Part 2 How Vertical Videos Are Displayed
Vertical videos are majorly displayed on mobile devices as smartphones are used vertically most of the time. The width of these videos is less as compared to their height and this makes them appear fit on the smartphone’s screen. Moreover, using the screen aspect ratio calculator, you can further decide upon the aspect ratio depending on the size of the device screen on which video has to be played.
Part 3 What’s the Best Tip to Resize social media Vertical Video Ratio?
Listed below are the tips for resizing the social media vertical video ratio.
● Learn about the Aspect Ratios
A vertical video is taller than it is wide. Thus, any video that is taller than the 1:1 aspect ratio will be termed a vertical video. The commonly used aspect ratio is 9:16 that uses the complete vertical screen. So, to capture a vertical video, use the camera in portrait mode or edit it as per the vertical aspect ratio. There are also TV aspect ratio calculator tools that can be used for the task.
● Screen splitting
Multiple clips that are horizontal can be placed at the top of each other for a vertical frame as it is tall. The stacking can be done for the related clips or to make them appear as one. Place the clips creatively using patterns or lines.
● Filling the vertical space
If needed, you can creatively fill the vertical space when the shot is not a close one. One of the ideas is by raising the camera of your phone high and then moving it down that will give a deep frame. You can also fill up the vertical space below.
● Side-to-side fast movements must be avoided
Since the width area in the vertical videos is less, it is also better to avoid the fast side-to-side movement as it will create a shaky and blurry effect.
● Make use of text and graphics
To complement videos, using text and graphics is a good option. Use the vertical space smartly and include text, stickers, graphics, and other content for enhancing the video and its meaning.
● Grab attention
It is important for the videos on the social media sites to instantly catch the attention of the viewers, else they will move on to the next one. So, ensure that your vertical videos are eye-catchy and interesting with bright colors, looping animations, GIFs, and other content that is likely to hook up the viewers.
● Rule of Thirds
As per the photography rule of thirds, the main subject is not to be placed at the center and instead it the entire frame is divided into thirds using imaginary horizontal and vertical lines. The subject should be placed on these lines or where the lines meet. Use the guide grid on your phone’s camera to use this rule.
● Using a professional video editing software
If you have a video that is already recorded, you can enhance its looks and appearance using good video editing software and one such recommended tool is Wondershare Filmora Video Editor . The software is compatible with Windows and Mac and allows you to create stunning videos in just a few clicks that can be posted on several social media sites.
Wondershare Filmora - Best Video Editor for Mac/Windows
5,481,435 people have downloaded it.
Build unique custom animations without breaking a sweat.
Focus on creating epic stories and leave the details to Filmora’s auto features.
Start a creative adventure with drag & drop effects and endless possibilities.
Filmora simplifies advanced features to save you time and effort.
Filmora cuts out repetition so you can move on to your next creative breakthrough.
Using this versatile software you can add animations, motion tracking, zooming function, masking, text, and titles. Features like auto-correction, control settings, color wheels, noise reduction, audio sync, audio compression, and others are also supported.
Key Takeaways from This Episode
● With the majority of the video content being viewed on mobile phones, vertical videos have dominated the market.
● Vertical videos can be easily posted on several social media sites and other platforms without any tweaking from your phone.
● Several tips will help you to create a good vertical video for social media and using professional software like Wondershare Filmora is one of them.
5 Best Free Apps to Compress Videos on iPhone & iPad
5 Best Free Video Compressor Apps That Reduce Video Sizes on iPhone and iPad

Ollie Mattison
Mar 27, 2024• Proven solutions
Capturing full HD or 4K footage with your iPad or iPhone is a straightforward process, but sharing that footage through messaging apps or social media can be a bit more complicated.
The size of video files recorded in 4K resolution is often measured in gigabytes and you have to compress them in order to share them with your friends.
We’ve selected the five best free video compressor apps for iPhones and iPads that will enable you to shrink your videos in minutes and post them on social networks or send them through email and messaging apps.
So, let’s take a look at how you can reduce the size of your videos using free video compressing apps for iOS.
5 Best Video Compressor Apps for iOS that Reduce Video Size
Shrinking a video’s size is easy, even after you record a video clip. Each of the free video compressor apps we included in our top five list allows you to reduce a video’s size quickly before sharing it on social media or sending it to your friends. Read on if you would like to find out more about the best free video compressor apps for iPhones and iPads.
1. Compress Videos & Resize Videos
Price: Free, but contains in-app purchases
With this free video compressor app, you won’t have to worry about the quality of the videos you’re resizing, because it preserves the video’s quality even when videos are shrunk by more than 80%. In this manner, the Compress Videos & Resize Video app can help you free up space on your iPhone or iPad.

How to reduce video size with Compress Videos & Resize Videos?
To start reducing a video’s size you just have to open the app and select all videos, recently added or any other available categories.
After tapping on a particular category, you can proceed to select one or more video clips you would like to reduce. The app is going to display the videos that are stored on your phone or in your iCloud Photo Library and show you the exact size of each video.
Once you’ve selected the videos you’d like to shrink, you should click on the Next button and proceed to the Compression Settings window. Afterward, you can simply change the Frame Rate and Video Dimensions settings by dragging the sliders to the left or to the right. When ready, tap on the Compress button and the Compress Videos & Resize Video app will shrink your videos and save to the Compressed Videos album.
2. Video Compress – Shrink Vids
Price: Free, but offers in-app purchases

You can reduce the size of videos recorded in 4K, Full HD or HD resolution in just a few simple steps. The app lets you resize one or more videos at the same time and choose the resolution of the output video. The only downside is that you must make in-app purchases to remove ads or unlock access to all of the app’s features.
How to compress video with Video Compress – Shrink Vids?
Once you installed this free compressor app for iOS on your device, you should launch it and tap on the + icon to import the video you want to compress into the app. Grant the app permission to access the Photos app and head over to the folder in which the videos you want shrink are stored.
After selecting the videos, you should tap on the Choose Preset button and select one of the available presets. Optionally, you can adjust the bitrate or preview how the videos look before and after the compression. Tap on the Continue button when you are ready and then select the destination album to which the resized videos are going to be exported. After the video compression process is completed the app will ask you if you want to delete the original video files and only keep their resized versions.
3. Video Slimmer App
Price: Free or $2,99 for Pro

Video Slimmer is much more than a simple video compressor app for iOS, as it lets its users trim, rotate or merge videos. The app’s batch processing capabilities are remarkable since you can export resized videos from Video Slimmer quickly. You can free up to 80% of your iPhone’s or iPad’s storage space by compressing videos you store on your iOS-based device.
How to compress videos with Video Slimmer App?
Shrinking multiple videos with Video Slimmer won’t take too much of your time, although the duration of the compression process depends on the size of the video clips. Click on the + icon after you launch the app, in order to select the videos from the camera roll.
Tap on the Gear icon located in the lower right corner of the screen if you would like to adjust the Video Quality and Video Size settings. In addition, the Video Slimmer App lets you choose if you want to delete the original videos from your device after the compression or add a copy of the video to the Photo Library.
Head back to the app’s main menu and tap on the Slim Now button to start compressing the videos you selected. After reducing the size of your videos you can share them on social media or send them to your friends much faster than the original high-resolution files.
4. Video Compress – Reduce Movie Size – Shrink Video
Price: Free

If you are looking for a simple and efficient free video compressor app for iPhone and iPad then Video Compress may be the right choice for you. Its interface is intuitive so you won’t need much time to get used to it even if you never compressed a video before.
How to compress video with it?
All you have to do to start compressing a video is to launch the app and select the videos you’d like to shrink from the Camera Roll. Afterward, you will be taken to the Compress window where you can see the Target Size and the percentage to which the video is going to be compressed. The only limiting factor are the output file formats because the app only allows you to save shrunk videos as MPEG-4 and QuickTime files.
All the compressed videos can be easily shared on social media or sent through email and messaging apps directly from Video Compress.
5. Video Compressor – Shrink Videos
Price: Free, but offers in-app purchases

Video Compressor app makes shrinking videos look easy because it offers a number of presets that let you choose how much you want to reduce the size of a video. Besides saving time this free video compressor for iPhones and iPads can create more storage space on your device.
How to shrink video size with this app?
Identifying large video files on your camera roll won’t take too much time since the app displays the size of all videos. Besides compressing videos, the Video Compressor app also lets you shrink photos you store on your iPhone or iPad.
Select a video you want to compress, by simply tapping on it, and then choose a preset resolution to which that video clip is going to be compressed. Optionally, you can change the Bitrate before tapping on the Compression button.
After the video compression process is over you can organize the shrunk videos effortlessly, however, you must purchase the Pro version of the app if you want to have access to all of the tools Video Compressor has to offer.
Is there any iPhone free video compressor with editor built in?
Editing a video before you share it on social media can help you get rid of unwanted parts and make the colors more vivid. iMovie is an excellent choice if you would like to trim a video or add filters and effects to it and reduce the video size. What’s more, you can use this iOS-native video editing app to reduce the size of the original video files.
Once you complete all video editing tasks you should exit the app’s Edit window by tapping done and then tap on the Share/Save Video option. iMovie offers a variety of output video file formats, so you can choose if you want to save your video in 360p, 540p, HD or 4K resolution. After you pick a preferred output resolution the iMovie is going to add the video to the Photo Library.
Bonus: How to reduce video size on iPhone & iPad when recording?
All recent iPhone and iPad models support recording in a broad spectrum of video resolutions. If you would like to decrease the resolution at which your device captures videos you should head to the Settings menu and tap on the Camera option.

Select Record Video from the Camera menu and then choose the new resolution for your videos. The default resolution is set at 1080p at 30fps, but you can easily reduce it to 720p at 30fps if you want to create videos that don’t take too much storage space.
The Record Slo-Mo option lets you choose between 720p HD at 120fps or 720p HD at 240 fps which allows you to preserve storage space while recording high-quality slow-motion videos.
Conclusion
Videos recorded with iPhones and iPads can be huge in size, and sending them or uploading them to the Internet can be a time-consuming process. Installing a free video compressing app for iOS can be a good idea if you record videos with your iPhone or iPad often. Each of the free video compressor apps we included in this article can shrink videos quickly and efficiently. Which free video compressor app are you going to choose? Leave a comment and let us know.
| Supported iOS | Supported format | User rating | |
|---|---|---|---|
| Video Slimmer | iOS 8.0 or later | MP4, MOV, AVI… | 3.7 |
| Video Compress - Shrink Vids | iOS 10.3 or later | MP4, MOV, AVI | 4.6 |
| iMovie | iOS 10.3 or later | MP4, MOV, AVI, QuickTime… | 3.9 |
| Compress Videos & Resize Video | iOS 8.0 or later | MPEG-4 and QuickTime | 4.6 |
| Video Compressor-Shrink videos | iOS 8.0 or later | MP4, MOV, AVI | 4.7 |
| Video Compress - Reduce Movie Size, Shrink Video | iOS 8.0 or later | MP4, MOV, AVI | 4.6 |
Ollie Mattison
Ollie Mattison is a writer and a lover of all things video.
Follow @Ollie Mattison
Ollie Mattison
Mar 27, 2024• Proven solutions
Capturing full HD or 4K footage with your iPad or iPhone is a straightforward process, but sharing that footage through messaging apps or social media can be a bit more complicated.
The size of video files recorded in 4K resolution is often measured in gigabytes and you have to compress them in order to share them with your friends.
We’ve selected the five best free video compressor apps for iPhones and iPads that will enable you to shrink your videos in minutes and post them on social networks or send them through email and messaging apps.
So, let’s take a look at how you can reduce the size of your videos using free video compressing apps for iOS.
5 Best Video Compressor Apps for iOS that Reduce Video Size
Shrinking a video’s size is easy, even after you record a video clip. Each of the free video compressor apps we included in our top five list allows you to reduce a video’s size quickly before sharing it on social media or sending it to your friends. Read on if you would like to find out more about the best free video compressor apps for iPhones and iPads.
1. Compress Videos & Resize Videos
Price: Free, but contains in-app purchases
With this free video compressor app, you won’t have to worry about the quality of the videos you’re resizing, because it preserves the video’s quality even when videos are shrunk by more than 80%. In this manner, the Compress Videos & Resize Video app can help you free up space on your iPhone or iPad.
How to reduce video size with Compress Videos & Resize Videos?
To start reducing a video’s size you just have to open the app and select all videos, recently added or any other available categories.
After tapping on a particular category, you can proceed to select one or more video clips you would like to reduce. The app is going to display the videos that are stored on your phone or in your iCloud Photo Library and show you the exact size of each video.
Once you’ve selected the videos you’d like to shrink, you should click on the Next button and proceed to the Compression Settings window. Afterward, you can simply change the Frame Rate and Video Dimensions settings by dragging the sliders to the left or to the right. When ready, tap on the Compress button and the Compress Videos & Resize Video app will shrink your videos and save to the Compressed Videos album.
2. Video Compress – Shrink Vids
Price: Free, but offers in-app purchases
You can reduce the size of videos recorded in 4K, Full HD or HD resolution in just a few simple steps. The app lets you resize one or more videos at the same time and choose the resolution of the output video. The only downside is that you must make in-app purchases to remove ads or unlock access to all of the app’s features.
How to compress video with Video Compress – Shrink Vids?
Once you installed this free compressor app for iOS on your device, you should launch it and tap on the + icon to import the video you want to compress into the app. Grant the app permission to access the Photos app and head over to the folder in which the videos you want shrink are stored.
After selecting the videos, you should tap on the Choose Preset button and select one of the available presets. Optionally, you can adjust the bitrate or preview how the videos look before and after the compression. Tap on the Continue button when you are ready and then select the destination album to which the resized videos are going to be exported. After the video compression process is completed the app will ask you if you want to delete the original video files and only keep their resized versions.
3. Video Slimmer App
Price: Free or $2,99 for Pro
Video Slimmer is much more than a simple video compressor app for iOS, as it lets its users trim, rotate or merge videos. The app’s batch processing capabilities are remarkable since you can export resized videos from Video Slimmer quickly. You can free up to 80% of your iPhone’s or iPad’s storage space by compressing videos you store on your iOS-based device.
How to compress videos with Video Slimmer App?
Shrinking multiple videos with Video Slimmer won’t take too much of your time, although the duration of the compression process depends on the size of the video clips. Click on the + icon after you launch the app, in order to select the videos from the camera roll.
Tap on the Gear icon located in the lower right corner of the screen if you would like to adjust the Video Quality and Video Size settings. In addition, the Video Slimmer App lets you choose if you want to delete the original videos from your device after the compression or add a copy of the video to the Photo Library.
Head back to the app’s main menu and tap on the Slim Now button to start compressing the videos you selected. After reducing the size of your videos you can share them on social media or send them to your friends much faster than the original high-resolution files.
4. Video Compress – Reduce Movie Size – Shrink Video
Price: Free
If you are looking for a simple and efficient free video compressor app for iPhone and iPad then Video Compress may be the right choice for you. Its interface is intuitive so you won’t need much time to get used to it even if you never compressed a video before.
How to compress video with it?
All you have to do to start compressing a video is to launch the app and select the videos you’d like to shrink from the Camera Roll. Afterward, you will be taken to the Compress window where you can see the Target Size and the percentage to which the video is going to be compressed. The only limiting factor are the output file formats because the app only allows you to save shrunk videos as MPEG-4 and QuickTime files.
All the compressed videos can be easily shared on social media or sent through email and messaging apps directly from Video Compress.
5. Video Compressor – Shrink Videos
Price: Free, but offers in-app purchases
Video Compressor app makes shrinking videos look easy because it offers a number of presets that let you choose how much you want to reduce the size of a video. Besides saving time this free video compressor for iPhones and iPads can create more storage space on your device.
How to shrink video size with this app?
Identifying large video files on your camera roll won’t take too much time since the app displays the size of all videos. Besides compressing videos, the Video Compressor app also lets you shrink photos you store on your iPhone or iPad.
Select a video you want to compress, by simply tapping on it, and then choose a preset resolution to which that video clip is going to be compressed. Optionally, you can change the Bitrate before tapping on the Compression button.
After the video compression process is over you can organize the shrunk videos effortlessly, however, you must purchase the Pro version of the app if you want to have access to all of the tools Video Compressor has to offer.
Is there any iPhone free video compressor with editor built in?
Editing a video before you share it on social media can help you get rid of unwanted parts and make the colors more vivid. iMovie is an excellent choice if you would like to trim a video or add filters and effects to it and reduce the video size. What’s more, you can use this iOS-native video editing app to reduce the size of the original video files.
Once you complete all video editing tasks you should exit the app’s Edit window by tapping done and then tap on the Share/Save Video option. iMovie offers a variety of output video file formats, so you can choose if you want to save your video in 360p, 540p, HD or 4K resolution. After you pick a preferred output resolution the iMovie is going to add the video to the Photo Library.
Bonus: How to reduce video size on iPhone & iPad when recording?
All recent iPhone and iPad models support recording in a broad spectrum of video resolutions. If you would like to decrease the resolution at which your device captures videos you should head to the Settings menu and tap on the Camera option.
Select Record Video from the Camera menu and then choose the new resolution for your videos. The default resolution is set at 1080p at 30fps, but you can easily reduce it to 720p at 30fps if you want to create videos that don’t take too much storage space.
The Record Slo-Mo option lets you choose between 720p HD at 120fps or 720p HD at 240 fps which allows you to preserve storage space while recording high-quality slow-motion videos.
Conclusion
Videos recorded with iPhones and iPads can be huge in size, and sending them or uploading them to the Internet can be a time-consuming process. Installing a free video compressing app for iOS can be a good idea if you record videos with your iPhone or iPad often. Each of the free video compressor apps we included in this article can shrink videos quickly and efficiently. Which free video compressor app are you going to choose? Leave a comment and let us know.
| Supported iOS | Supported format | User rating | |
|---|---|---|---|
| Video Slimmer | iOS 8.0 or later | MP4, MOV, AVI… | 3.7 |
| Video Compress - Shrink Vids | iOS 10.3 or later | MP4, MOV, AVI | 4.6 |
| iMovie | iOS 10.3 or later | MP4, MOV, AVI, QuickTime… | 3.9 |
| Compress Videos & Resize Video | iOS 8.0 or later | MPEG-4 and QuickTime | 4.6 |
| Video Compressor-Shrink videos | iOS 8.0 or later | MP4, MOV, AVI | 4.7 |
| Video Compress - Reduce Movie Size, Shrink Video | iOS 8.0 or later | MP4, MOV, AVI | 4.6 |
Ollie Mattison
Ollie Mattison is a writer and a lover of all things video.
Follow @Ollie Mattison
Also read:
- 2024 Approved Reverse Video Online The Ultimate Guide
- Updated In 2024, The Ultimate Guide to Animated Text in Video Best Mobile Apps
- New 2024 Approved Top 10 Free Whiteboard Animation Tools for Windows and Mac
- New In 2024, Best Online Stop Motion Software A Comprehensive Review
- New Elevate Your Storytelling A Guide to Making Videos with Photos and Music for 2024
- Updated 2024 Approved Trim, Cut, and Edit Videos for Free (No Watermarks!)
- Updated Top 10 Animation Software for Creating Stunning Animated Videos
- New 2024 Approved Edit Like a Pro Best GoPro Video Editing Software (Besides GoPro Studio)
- In 2024, S Best Free Video Editing Apps for Those Just Starting Out
- New Preserve Audio Perfection How to Convert Video to MP3 without Quality Loss for 2024
- Updated In 2024, Dont Pay a Dime Top 5 Free MPEG Video Splitting Software
- New Budget Video Editing Software Top Picks for 2024
- Updated Click-Worthy Thumbnails A Guide to YouTube Image Sizes and Best Practices for 2024
- Updated Video Editing Showdown Final Cut Pro or LumaFusion for 2024
- New 2024 Approved Unleash the Power of MP4 to MP3 Conversion on Your Mobile
- 2024 Approved Mac Subtitle Editing Made Easy Top Subtitle Edit Alternatives
- New In 2024, From WebM to MP4 Top 10 Converters for Smooth Video Playback
- New 2024 Approved Slow Down Time A Step-by-Step Guide to Creating Slow-Mo Videos on Kapwing
- Updated In 2024, The Best of the Best 10 Cartoon Video Maker Apps for Android and iPhone
- New Adobe Premiere Pro Must-Haves Top Plugins for Video Editors (Free & Premium) for 2024
- New Step-by-Step The Top 10 Video Players for Frame-by-Frame Analysis
- Perfecting Your Facebook Video Cover Tips and Tricks for 2024
- New MP4 Video Editing on a Budget Top 10 Free Editors for 2024
- New 2024 Approved Top 10 Intro Makers for PC Online and Offline - Filmora
- Updated The Art of Video Import and Export in Adobe Premiere Pro 2023 Tips and Tricks
- The Best Free MPEG Video Stitching Software for 2024
- Updated 2024 Approved Free and Fantastic The Best VOB Video Editors
- New The Powerful Video Cutting Function Allows You to Easily Cut Video Files Into Various Fragments for 2024
- New 2024 Approved KineMaster Is a Mobile Video Editor for Ios and Android Users. But if You Still Want to Download KineMaster for Mac, Heres the Deal for You
- Updated 2024 Approved Intro Mastery The Top 10 Online Tools You Need
- Windows Live Movie Maker Tutorial Splitting Videos Made Easy for 2024
- Updated In 2024, Gaming Intro Design Top Picks for Windows and Mac Computers
- New 2024 Approved Windows Movie Maker Free Download Everything You Need to Know
- 2024 Approved The Ultimate Guide to Video Voiceover Software for PC
- Updated 2024 Approved Adobe Premiere Pro 2023 Import, Organize, and Export Your Video Projects Like a Pro
- New In 2024, 10 Best Music Video Makers to Make Fantastic MV
- New 2024 Approved HD Video Editing Software Showdown The Top 5 Contenders
- Updated Buggy FCPX? Try This A Comprehensive Reset Guide for Troubleshooting for 2024
- Updated QuickTime Video Editing Essentials for Mac Users
- New Create Stunning Slow-Mo Effects on Kapwing A Step-by-Step Tutorial for 2024
- New Discover the Power of FCP 90 Days Free, No Strings Attached for 2024
- Updated Understanding Aspect Ratios on Amazon Prime Video
- New In 2024, From Script to Screen A Kids Adventure in Movie Making
- Updated Watermark-Free Videos How to Remove Filmora Branding with or without Paying
- 2024 Approved Smooth Operator The Top Free Online Video Stabilizers Compared
- 2024 Approved The Ultimate Guide to Free Sound Effects for Final Cut Pro Editors
- 2024 Approved Unleash Your Creativity with Minitool Movie Maker Review, Instructions, and Options
- Updated In 2024, Create Cinematic Videos The Ultimate Ken Burns Effect Guide
- How to Bypass Activation Lock from Apple iPhone 7 Plus or iPad?
- In 2024, Go Through This Guide on All Steps in Freezing Frame Sequences in Videos Using Filmora. Details Include Splitting the Clip, Reversing Speed, and More
- In 2024, How to Transfer Contacts from Infinix Hot 30 5G To Phone | Dr.fone
- In 2024, How to Transfer Data from Poco M6 5G to Samsung Phone | Dr.fone
- How to Mirror Motorola Moto G04 to Mac? | Dr.fone
- In 2024, Set Your Preferred Job Location on LinkedIn App of your Nokia 130 Music | Dr.fone
- 5 Ways to Reset Vivo S18e Without Volume Buttons | Dr.fone
- What Are The Stages Of Film Production for 2024
- How to fix runtime error 424 object required error in Excel 2003 | Stellar
- Device unlock OnePlus Nord CE 3 Lite 5G
- Unlock Your Boost Mobile iPhone 14 Pro Before the Plan Expires
- Full Guide to Unlock Your Xiaomi Redmi Note 12 5G
- How to Fix My OnePlus 12 Location Is Wrong | Dr.fone
- In 2024, How To Unlock iPhone 6 Official Method to Unlock Your iPhone 6
- In 2024, How to Show Wi-Fi Password on Vivo V27 Pro
- Top 10 Fingerprint Lock Apps to Lock Your Samsung Galaxy S23 Tactical Edition Phone
- Best Audio Waveform Generator
- The Complete Guide to Itel A70 FRP Bypass Everything You Need to Know
- Apple iPhone 12 Screen Mirroring You Must Know | Dr.fone
- 3 Facts You Need to Know about Screen Mirroring Honor Magic Vs 2 | Dr.fone
- Updated Viddyo for Mac
- iPhone 6s® Data Recovery Software to Recover Lost iOS® Data | Stellar
- Top 7 Phone Number Locators To Track Apple iPhone 13 Pro Max Location | Dr.fone
- Updated 2024 Approved Time-Lapse Mastery Top Video Editing Software (Free & Paid)
- Fix Oppo A78 5G Android System Webview Crash 2024 Issue | Dr.fone
- In 2024, The Updated Method to Bypass OnePlus Nord N30 5G FRP
- In 2024, 6 Ways To Transfer Contacts From Samsung Galaxy M54 5G to iPhone | Dr.fone
- How To Unlock Cricket iPhone 11 Pro for Free
- 2024 Approved How to Use Deep Fried Meme Maker
- How to Bypass Google FRP Lock from Xiaomi Redmi Note 13 Pro 5G Devices
- How to Factory Reset ZTE Axon 40 Lite If I Forgot Security Code or Password? | Dr.fone
- In 2024, Complete Guide For iPhone 7 Lock Screen
- In 2024, How To Quick Guide for Making Google Slideshows
- Mastering Lock Screen Settings How to Enable and Disable on Vivo Y200e 5G
- In 2024, Recommended Best Applications for Mirroring Your Xiaomi Redmi 13C 5G Screen | Dr.fone
- Cellular Network Not Available for Voice Calls On Oppo A1 5G | Dr.fone
- In 2024, Getting the Pokemon Go GPS Signal Not Found 11 Error in Tecno Camon 20 Premier 5G | Dr.fone
- In 2024, How Can Xiaomi 14 ProMirror Share to PC? | Dr.fone
- How to See Someones Location on Apple iPhone 13 Pro Max | Dr.fone
- In 2024, Top 7 Phone Number Locators To Track Samsung Galaxy M34 Location | Dr.fone
- Title: New In 2024, The Best Free AVI Video Rotators for Windows, MAC, Android, and iPhone in Year
- Author: Morgan
- Created at : 2024-04-28 05:32:26
- Updated at : 2024-04-29 05:32:26
- Link: https://ai-video-tools.techidaily.com/new-in-2024-the-best-free-avi-video-rotators-for-windows-mac-android-and-iphone-in-year/
- License: This work is licensed under CC BY-NC-SA 4.0.
