
:max_bytes(150000):strip_icc():format(webp)/SetaLiveWallpaperinWindows11-b8ca3913592d4a5790808131bf8f34e1.jpg)
New In 2024, Expert-Recommended Video Lighting Fixers
Expert-Recommended Video Lighting Fixers
Do you face these kinds of issues a lot while you’re shooting through your phone? Although you may make a video at any time using your iPhone or Android smartphone, you are much more likely to face a dull environment that you cannot adjust at the time. Filming in low light may result in a video that is too dark to see clearly and may potentially degrade video quality.
In such cases, employing a video brightness program on your smartphone or Windows computer might be one of the finest ways to brighten a video. Hence, we’ve compiled a list of some excellent Video Brightness Editor tools for you on this page. Read ahead to learn more about their brightness settings and other options.
In this article
01 Best Online Video Editors to Adjust Video Brightness
02 Best Desktop Video Editors to Adjust Video Brightness
Part 1: Best Online Video Editors to Adjust Video Brightness
There are software and internet resources that can assist you in resolving this issue. You may brighten your movies without exerting any effort if you use the correct video brightener application or website. Read about some of this software when you want to learn more about brightening videos.
1. Veed.io
Is it too dark to watch your visuals? There is “light” at the end of the tunnel, so don’t panic. You may alter the brightness, contrast, color distribution, backdrop, transparency, and more in your movie using Veed.io color, vibrancy, and flare may be added to your videos.
Alternatively, for a dramatic impact, lower it a little! Our expert brightness editor will bring out the finest in your video, no matter what it is. Launch your preferred web browser, such as Chrome, Opera, or Mozilla Firefox.
To brighten your videos, upload your video to VEED’s video editor. Select ‘Adjust’ after clicking the video track. From left to right, move the Brightness key. You can make gorgeous videos for every social media site, especially intro videos, using VEED (with their Intro Maker). To stay on brand, include your emblem and your graphics.
2. Kapwing
Another video brightener is Kapwing Video Editor, which brightens videos online without requiring any installations. There is a choice to enter a video URL to add light to the video when utilizing the following online effects to illuminate the video-sharing site.
You may also edit and brighten video by uploading it from your computer’s hard disk. There are various more video-related tools available on the internet that assist you in beautifying films for social media posting.
Most of the functionality found in the other social network video editors on our list are available, including video templates, ways to resize and cut your video clips, text tools, and even some basic geometric shapes.
You may also convert, trim, resize, and loop videos with at least 15 video tools, many of which are incorporated with the main Studio software. You may perform everything for free and without any hassle. The subtitle tool, for example, is a fantastic tool that allows users to upload subtitles to the industry standard.SRT file.
3. Clipchamp
The first semi-professional video editor on this roster is Clipchamp. Clipchamp includes video templates for just about any scenario you can think of. The program also provides videos in a range of aspect ratios. There’s also a good selection of stock audio and video.
You’ll also receive a video converter, a video compressor, and a webcam recorder, as well as a few more tools for basic video handling. Essentially, the platform includes everything you’ll need to create simple films without having to spend lots of money on technology.
Place your video on the timeline by dragging and dropping it. The editing menu will show when you click on the video. Click “Color Exposure” in the editing menu, and a window with four slider settings will display. To brighten the video, use the “Exposure” slider to the right.
4. Clideo
Clideo is a cute website that can be used to brighten up dreary films. This website allows you to modify video brightness for free, and you may use it without installing something on your computer. The site is free, but there are certain limits, so you’ll need to upgrade to the premium version to use all of the features. Because it is online and operates straight in the browser, you may use it to adjust the brightness of your Windows 7 computer.
All you have to do now is upload the video from your computer that you wish to modify. You may upload up to 500 MBs in the free version. You’ll find modification settings on the right when your movie has been uploaded. To lighten your video, drag the Brightness slider to the right. After you’ve made the necessary edits, you may save the movie to your computer.
Part 2: Best Desktop Video Editors to Adjust Video Brightness
It’s difficult to constantly record a video in great light, so you attempt to brighten a dark movie or modify the brightness of a video to make it appear better for sharing. For the majority of individuals, adjusting the video brightness is a time-consuming and even unpleasant experience in their everyday lives for a variety of reasons.
As a result, many people want to know which desktop video editors are the best for adjusting video brightness. Learn about the applications that can assist you in this endeavor by reading on.
1. Wondershare Filmora Video Editor
Wondershare Filmora is an excellent choice when you need to get started with simple video editing features while also having the possibility to progress. If you’re concerned about dark videos, Filmora can comfortably solve the issue. Click on the Import option and choose the file of your liking. Then apply changes from the adjustment settings to make it look worthwhile!
For Win 7 or later (64-bit)
For macOS 10.12 or later
Filmora video editor allows you to adjust the brightness with the auto enhance feature in one-click. What’s more, it provides the color match feature which allows you to match the color between different clips.
2. VSDC Free Video Editor
The VSDC Free Footage Editor, in the hands of a skilled user, can generate some truly professional-looking videos. The application supports virtually all major video formats and includes complex video effects such as object transformation and color correction, and also advanced audio effects such as volume adjustment and sound normalization. You have the luxury of brightening your videos simply by uploading the video from your desktop and making whatever changes that you want to make.
VSDC Free Video Editor is actually free, unlike certain “high-end” editors. You may utilize the whole feature set of the application without having to contend with annoying watermarks. Unfortunately, there is one snag. You must pay if you want technical assistance. (And there’s a strong possibility you’ll have to.) Subscription for the VSDC Free Video Editor is $1 per month, $5 per half-year, and $10 per year.
3. iMovie
iMovie for Mac allows you to experience your films in new ways. Make Hollywood-style teasers and gorgeous movies in excellent 4K resolution by quickly browsing your footage and instantly sharing your best moments. Color Balance and Color Correction are two options for brightening a movie in iMovie 10.1 or later. The former has four tabs: Auto, Match Color, White Balance, and Skin Tone Balance, which allow you to make automated color adjustments.
The latter has sliders for manually adjusting brightness, contrast, saturation, shadows, and other parameters. Simply choose the clip you want to change and then select the appropriate tool from the toolbar above the viewer. It’s not very technical, but it makes it simple to brighten up a gloomy video.
4. Premiere Pro CC
Premiere Pro includes a user interface that is both appealing and versatile. The startup feature enables you to rapidly return to previous projects, start new ones, or browse for Adobe Stock video. You can switch between workspaces for Assembly, Editing, Color, Effects, Audio, and Titles, and the dark system window tends to make your videos the focus of attention.
Premiere Pro CC is another desktop video editor that you can use to brighten your videos. The various parameters in the Lumetri Color panel window inside Premiere Pro CC may be used to accomplish video color correction.
Premiere Pro’s Lumetri Color Tools elevate the application to the level of Photoshop for video. These tools provide a surprising amount of color modification and a wide range of film and HDR effects. With keyframes, you may modify the white balance, exposure, contrast, highlights, shadows, and black point, among other things. Modifications for Saturation, Vibrance, Faded Film and Sharpen are also accessible.
5. Final Cut Pro
Final Cut Pro comes with a set of robust manual color correction features that can be used to achieve a wide range of color correction and enhancement features. Creating a color correction effect and then modifying the effect’s settings in the Color inspector is how you utilize the tools. Any of the following color correction effects may be used to make manual color modifications to the color tint, brightness, and contrast of the entire clip picture.
Color correction capabilities in Final Cut Pro allow you to fine-tune the look of any video in your project, including still photos, by adjusting color balance, shadow levels, mid-tone thresholds, highlight levels, and much more. Saturation, exposure, and color modifications are all controlled via the Color Board. Adjust the Brightness in the color adjustment panels to brighten your movies.
Conclusion
Adjusting brightness has become a “small problem” for many. Oftentimes, you record a video, and it falls short of the brightness criteria – it’s too dark! However, when you have quality Video Brightness Editors, like the ones we have reviewed above, you’re in good hands. Not only are these apps easy to use with excellent functionality, but they also make editing a piece of cake for everyone.
Mastering Aspect Ratio in Final Cut Pro: A Beginner’s Guide
Wondershare Filmora
Create stunning effects with simple clicks.
Most of you must be wondering what is the purpose of changing the aspect ratio of a video. The aspect ratio is the size of the frame occupied by the video during the play mode. In other words, you can refer to it as the shape of the image concerning its width and height. There are surplus ways to change the size of the images but you must search for optimal tools to establish this task. While modifying the width and height values, make a note of the image resolution. You must resize the images without affecting the resolution and quality of the video. Making changes in one image parameter should not affect the other attributes.

The Final Cut Pro app helps to carry out this task professionally without any issues. This video editor works on every detail of the video and implements respective changes on the image size retaining the quality of the file. Quickly scroll down for more details on the efficient utilization of the Final Cut Pro app in modifying the aspect ratio of the video.
In this article
01 How to change the aspect ratio in the Final Cut Pro?
02 Why Can’t I change the aspect ratio of my video?
03 What is the common aspect ratio of videos?
How to change the aspect ratio in the Final Cut Pro?
The Final Cut Pro app is an exclusive program that edits videos professionally. The easy interface encourages the newbie to work on it without any hesitation. This app comprises essential and advanced controls to bring a great impact on the videos as per your requirements. It is enough if you make the right click to accomplish the desired effect on the video. Here, you will learn how to modify the aspect ratio in your video to resize the media file without affecting its quality.
There is a need to reshape the video frame for various reasons. If you want to upload any videos on a social media website, the platform supports only restricted aspect ratio video size. In those scenarios, you must learn to reshape your memorable captures without distorting the crucial factors in the video files. Watch the steps below carefully to study the change in aspect ratio attributes in the videos.
Step1Install the application
Download the Final Cut Pro app and install it in your system. Then, launch the tool and upload the desired video that requires the resize operation. Place the video on the timeline and move the pointer to any area on the video to work on its aspect ratio values.

Step2Modify the values
At the right top of the screen, you will find the property window. Tap the ‘Modify’ option to alter the aspect ratio values according to your needs. In the pop-up window change the Video format to ‘Custom’ and alter the resolution values based on the required video size. To convert the shape to 16:9, enter the values like 1920 and 1080. For a square type frame, type in the values like 1080 and 1080. Ensure that both the values are the same for a square type video size.
The values you enter nearby the ‘Video’ label carries the size of the video image. Based on the requirement, you can alter them optimally.


Finally, save the changes and witness the resize operation on the video. You can further modify the values if you are not convinced with the acquired shape.
The aspect ratio establishes complete control of the video size. Alter the video size and use the files on any platform without any hesitation on its compatibility.
For Win 7 or later (64-bit)
For macOS 10.12 or later
Why Can’t I change the aspect ratio of my video?
There are scenarios you may encounter while changing the aspect ratio of your videos. You can refer below to the common issues that require a better fix to overcome the irregular reframing activities.
Problem: Even after changing the resolution values to 1440 X 1080 using the final cut pro app, the video frame covers the widescreen without modifying the size concerning the assigned values.
Solution 1: In this situation, you must fix the default spatial fit settings to fill the format in the final cut pro app. When you import the videos for editing, automatically the video would have taken this fit option. Before working on the aspect ratio values, modify the fit to fill settings so that you can crop the unwanted areas in the video frames precisely.
Solution 2: Another alternate solution to overcome the above problem is that you must disclose the Video inspector in your Final Cut Pro application. Then, in the ‘Anamorphic Override’ settings change the value to Standard instead of the none or widescreen mode. By altering this value, you can get the desired outcomes without any hesitation.
When you struggle to change the aspect ratio in your videos using the Final Cut Pro app, you must look for alternative solutions to fix them.
What is the common aspect ratio of videos?
The allowable aspect ratio for the videos and images differs with the social media platforms. In the case of the Facebook cover photo, the image size varies with desktop and mobile view. You can go for a horizontal frame with an aspect ratio of 16:9. Here, the width is wider than height.
For Twitter and Facebook posts, set the aspect ratio for the media files to 1200 x 675 pixels. In other terms 16:9, again it looks more or like a horizontal frame. In the YouTube platform, the permitted channel art size is 2560 x 1440 and the thumbnail is 1280 x 720.
The Instagram and Pinterest pins opt for square type video frames like 1200 X 1200 pixels or 500 X 500 pixels. The latter value holds good to set profile pictures for your account. The YouTube channel icon must be 800 X 800 in a square frame to enhance visibility.

The Instagram posts allow the tallest media files like 1080 X 1350. The Snapchat and TikTok go with 1080 X 1920 values. You can find the long Pinterest carrying posts measuring 1000 X 2100. Though this platform does not recommend this size, still the posts are successfully uploaded in this dimension flawlessly.
It is highly recommended to follow the above-discussed guidelines to post the favorite videos on the relevant social media platform without witnessing any compatibility issues. These are the common aspect ratio dimensions supported by the respective platforms. While posting the media files in this environment, you must abide by its standards to get rid of unwanted uploading issues. In certain digital spaces, you may not know the reason for the failure in uploading the image or videos. In those scenarios, read the guidelines provided by that platform and modify the media file dimension according to those values and then try uploading it again. Most video upload failure happens due to the incompatibility of the media file sizes. Watch the dimensions before posting or uploading any media files in the online space.
Most social media platform allows both landscape and portrait video sizes optimally. You can switch to any size format as per your comfort. When you upload larger images or videos either you will receive an error message or it forces you to crop the content to fit perfectly with their guidelines. To overcome such a situation, you can check out the permittable file size before uploading the media files into its environment.
Conclusion
Therefore, you had a better understanding of how to change the aspect ratio using the Final Cut Pro program. You can follow the above-discussed instructions and carry out the task as per your needs.
A short synopsis of the common media file sizes permitted on social media platforms has been listed out in this article and these enlightening facts help you to get rid of file size compatibility issues. Overcome the challenges in modifying the rigid file sizes of the videos using the forceful altering options. Connect with this article to discover exciting performances of the Final Cut Pro tool and its potential utilization in editing a media file. Stay tuned for jaw-dropping information on the video edition functionalities of the incredible application Final Cut Pro.
Wondershare Filmora
Do magic with Filmora. Try it now.
Try It Free Try It Free Try It Free Learn More >

Most of you must be wondering what is the purpose of changing the aspect ratio of a video. The aspect ratio is the size of the frame occupied by the video during the play mode. In other words, you can refer to it as the shape of the image concerning its width and height. There are surplus ways to change the size of the images but you must search for optimal tools to establish this task. While modifying the width and height values, make a note of the image resolution. You must resize the images without affecting the resolution and quality of the video. Making changes in one image parameter should not affect the other attributes.
The Final Cut Pro app helps to carry out this task professionally without any issues. This video editor works on every detail of the video and implements respective changes on the image size retaining the quality of the file. Quickly scroll down for more details on the efficient utilization of the Final Cut Pro app in modifying the aspect ratio of the video.
In this article
01 How to change the aspect ratio in the Final Cut Pro?
02 Why Can’t I change the aspect ratio of my video?
03 What is the common aspect ratio of videos?
How to change the aspect ratio in the Final Cut Pro?
The Final Cut Pro app is an exclusive program that edits videos professionally. The easy interface encourages the newbie to work on it without any hesitation. This app comprises essential and advanced controls to bring a great impact on the videos as per your requirements. It is enough if you make the right click to accomplish the desired effect on the video. Here, you will learn how to modify the aspect ratio in your video to resize the media file without affecting its quality.
There is a need to reshape the video frame for various reasons. If you want to upload any videos on a social media website, the platform supports only restricted aspect ratio video size. In those scenarios, you must learn to reshape your memorable captures without distorting the crucial factors in the video files. Watch the steps below carefully to study the change in aspect ratio attributes in the videos.
Step1Install the application
Download the Final Cut Pro app and install it in your system. Then, launch the tool and upload the desired video that requires the resize operation. Place the video on the timeline and move the pointer to any area on the video to work on its aspect ratio values.
Step2Modify the values
At the right top of the screen, you will find the property window. Tap the ‘Modify’ option to alter the aspect ratio values according to your needs. In the pop-up window change the Video format to ‘Custom’ and alter the resolution values based on the required video size. To convert the shape to 16:9, enter the values like 1920 and 1080. For a square type frame, type in the values like 1080 and 1080. Ensure that both the values are the same for a square type video size.
The values you enter nearby the ‘Video’ label carries the size of the video image. Based on the requirement, you can alter them optimally.
Finally, save the changes and witness the resize operation on the video. You can further modify the values if you are not convinced with the acquired shape.
The aspect ratio establishes complete control of the video size. Alter the video size and use the files on any platform without any hesitation on its compatibility.
For Win 7 or later (64-bit)
For macOS 10.12 or later
Why Can’t I change the aspect ratio of my video?
There are scenarios you may encounter while changing the aspect ratio of your videos. You can refer below to the common issues that require a better fix to overcome the irregular reframing activities.
Problem: Even after changing the resolution values to 1440 X 1080 using the final cut pro app, the video frame covers the widescreen without modifying the size concerning the assigned values.
Solution 1: In this situation, you must fix the default spatial fit settings to fill the format in the final cut pro app. When you import the videos for editing, automatically the video would have taken this fit option. Before working on the aspect ratio values, modify the fit to fill settings so that you can crop the unwanted areas in the video frames precisely.
Solution 2: Another alternate solution to overcome the above problem is that you must disclose the Video inspector in your Final Cut Pro application. Then, in the ‘Anamorphic Override’ settings change the value to Standard instead of the none or widescreen mode. By altering this value, you can get the desired outcomes without any hesitation.
When you struggle to change the aspect ratio in your videos using the Final Cut Pro app, you must look for alternative solutions to fix them.
What is the common aspect ratio of videos?
The allowable aspect ratio for the videos and images differs with the social media platforms. In the case of the Facebook cover photo, the image size varies with desktop and mobile view. You can go for a horizontal frame with an aspect ratio of 16:9. Here, the width is wider than height.
For Twitter and Facebook posts, set the aspect ratio for the media files to 1200 x 675 pixels. In other terms 16:9, again it looks more or like a horizontal frame. In the YouTube platform, the permitted channel art size is 2560 x 1440 and the thumbnail is 1280 x 720.
The Instagram and Pinterest pins opt for square type video frames like 1200 X 1200 pixels or 500 X 500 pixels. The latter value holds good to set profile pictures for your account. The YouTube channel icon must be 800 X 800 in a square frame to enhance visibility.
The Instagram posts allow the tallest media files like 1080 X 1350. The Snapchat and TikTok go with 1080 X 1920 values. You can find the long Pinterest carrying posts measuring 1000 X 2100. Though this platform does not recommend this size, still the posts are successfully uploaded in this dimension flawlessly.
It is highly recommended to follow the above-discussed guidelines to post the favorite videos on the relevant social media platform without witnessing any compatibility issues. These are the common aspect ratio dimensions supported by the respective platforms. While posting the media files in this environment, you must abide by its standards to get rid of unwanted uploading issues. In certain digital spaces, you may not know the reason for the failure in uploading the image or videos. In those scenarios, read the guidelines provided by that platform and modify the media file dimension according to those values and then try uploading it again. Most video upload failure happens due to the incompatibility of the media file sizes. Watch the dimensions before posting or uploading any media files in the online space.
Most social media platform allows both landscape and portrait video sizes optimally. You can switch to any size format as per your comfort. When you upload larger images or videos either you will receive an error message or it forces you to crop the content to fit perfectly with their guidelines. To overcome such a situation, you can check out the permittable file size before uploading the media files into its environment.
Conclusion
Therefore, you had a better understanding of how to change the aspect ratio using the Final Cut Pro program. You can follow the above-discussed instructions and carry out the task as per your needs.
A short synopsis of the common media file sizes permitted on social media platforms has been listed out in this article and these enlightening facts help you to get rid of file size compatibility issues. Overcome the challenges in modifying the rigid file sizes of the videos using the forceful altering options. Connect with this article to discover exciting performances of the Final Cut Pro tool and its potential utilization in editing a media file. Stay tuned for jaw-dropping information on the video edition functionalities of the incredible application Final Cut Pro.
Wondershare Filmora
Do magic with Filmora. Try it now.
Try It Free Try It Free Try It Free Learn More >
Many Photographers, Museums and Cultural Institutions Are Choosing to Forfeit Their Rights and to Publish Public Domain Images. So, in This Article, We Are Going to Take You Through the Ten Best Publi
10 Best Public Domain Image Websites

Liza Brown
Mar 27, 2024• Proven solutions
Finding an image you like on the Internet doesn’t take long, since almost every website you can stumble upon, contains at least one picture. This doesn’t mean that you can just download any photo and use it in your blog, online marketing campaign or for any other purpose. Moreover, stock image websites like Getty Images or iStock let you purchase the right to use a photo commercially. As a reaction to an expanding stock image industry, many photographers, museums and cultural institutions are choosing to forfeit their rights and to publish public domain images. So, in this article, we are going to take you through the ten best public domain image websites where you can download pictures for free.
What Are Public Domain Images?
By definition, public domain images are photos, vectors or clip art that are available to anyone because their copyright has either expired or they never had a copyright owner. Consequently, anyone can use these images for both commercial or private projects without having to purchase the rights to do so. An image can enter a public domain under the following circumstances:
- Scientists, educators or artists can use the Creative Commons Zero (CC0) license to dedicate their images to the public domain
- A picture’s copyright is no longer in effect
- A photo was never the subject to copyright
It is of utmost importance to check if an image is within the public domain before you use it publicly in order to avoid potential legal complications.
How and Where to Find Public Domain Images?
A simple google search will reveal hundreds of websites that let you download public domain and royalty-free images. Which source you’re going to use depends on the type of image you’re looking for, since some websites are dedicated only to photography, while others feature impressive collections of public domain images of artworks. In addition, you’ll only want to download public domain images from the websites that offer information about the author because using a public domain image without crediting its author is strictly prohibited.
Best Websites for Downloading Public Domain Images
We’ve searched the Internet and we utilized our results to compile a collection of the most reliable websites that grant its users access to vast numbers of public domain images. Let’s take a look at some of the best websites that let you download public domain images.
1. Pexels

Graphic designers and all other creatives in constant need of a fresh supply of public domain images don’t need a special introduction to Pexels. The stock image platform is dedicated to photography and video, so you can’t use it to search for vectors or clip art. Even so, you can use Pexles to search for public domain images based on a particular keyword or browse through its collection of free images and discover photos spontaneously. Clicking on the Popular Searches tab will enable you to see the images from Light, Nature or Animals and it will shorten the amount of time you have to spend looking for a photo you want to download.
Pros:
- Neatly organized website
- Free and easy sign-up
- Offers a huge selection of free public domain images and videos according to the CC0 license
- Hand-picked High quality Images
Cons:
- Some categories should contain more images
- Optimizing the search terms can be difficult
2. Pixabay

Besides offering an impressive collection of royalty-free photos, Pixabay also lets you search for public domain vectors, illustrations, and videos. The website hosts more than a million high-resolution photos and videos you can download for free. To make things even better, becoming a member of the Pixabay’s community and creating an account on this platform won’t take more than a few minutes of your time. Pixabay also offers advanced search tools that enable you to combine searches, search for the author of an image or group search terms. In addition, you can also browse through the photographers that contribute their images to the platform on a regular basis.
Pros:
- Powerful search tools and various filters
- Huge collection of public domain images
Cons
- Customer support could be better
3. Wikimedia Commons

This is probably the largest website on the Internet where you can download public domain images. There are more than 49 million images, illustrations, vector graphics and videos available that can be downloaded for free. Some media files on Wikimedia Commons have certain restrictions, but these restrictions are mostly related to image citations, which means that you can use them only if you credit the author. Such a huge selection of media files can be overwhelming for the newcomers to the Wikimedia Commons platform, but once you grow accustomed to the website’s interface discovering images becomes a straightforward process.
Pros:
- All images are available in high resolution
- Nearly all images can be used without any restrictions
Cons:
- Getting used to the website’s interface takes time
- The number of search results can be overwhelming
4. Flickr Commons

For more than a decade Flickr has been a popular online destination for photographers in need of a platform that enables them to present their work. The Flickr Commons is a project that unites more than a hundred institutions in an effort to create a library of public domain images. The project makes available a stunning amount of historical photographs and it grants you access to highly esteemed collections of photographs. Flick Commons is perfectly suited for researchers and scholars in need of public domain photos, they can use in their essays or research papers.
Pros:
- Unlimited access to historical photos
- Extends the knowledge available to the general public
Cons:
- Doesn’t offer videos or illustrations
- Search results are poorly organized
5. Unsplash

With a library that contains over 800,000 photos, Unsplash is easily one of the largest websites that offer public domain images. All pictures on this platform are organized into different categories, which makes finding a photo you want to use in a commercial or non-commercial project a relatively simple process. Alternatively, you can insert a keyword into a search bar and Unsplash will show you the results within seconds. However, the images you can find on this platform are similar to those you can purchase on stock photography websites, although some of them have an artistic touch that is hard to find on the majority of stock photos.
Pros:
- Excellent source of high-resolution photos
- Quick and easy search
Cons:
- Unsplash is dedicated solely to photography
- Limited amount of available public domain images
6. From Old Books
In case you are searching for images from old books you should look no further. This is a private collection of 2,600 images that are hard to find anywhere else on the Internet. You can browse through woodcuts, old texts or old holiday images, which makes this platform an excellent choice for anyone interested in rare images that were featured in old books. All pictures you can find on the From Old Books website are free to use on non-commercial projects, but you must pay a small fee if you want to download a high-resolution image you can use on a commercial project.
- Images are organized into categories
- Access to rare images
Cons
- Some images are not free
- Rudimentary website design
7. Morguefile

Morguefile is a website that offers stock footage to its users, but some of the images can’t be downloaded for free. That’s why you must click on the Free Photos tab before you start searching for public domain images on this website. The website hosts nearly 400.000 photos, videos, and vector graphics, but you must make sure that a file you want to download is within the public domain before you download it. The only downside is that the images aren’t organized into categories which can make finding the images you’re searching for more difficult than it needs to be.
Pros:
- Creating an account on Morguefile is free
- All free photos can be used on commercial projects
Cons:
- Images can be organized better
- Fewer free images than on other public domain image websites
8. Public Domain Archive
As the website’s name indicates, this is an archive of public domain images you can download for free and use in commercial contexts. All photos are organized into categories like abstract, free stock photos, people or wood which makes the search simpler. However, these categories don’t contain more than a few hundred photos and some of them offer as few as five pictures you can download. All photos are in high resolution and ready for professional use. The download process can be completed effortlessly in just a few quick steps. New images are added on a weekly basis.
Pros:
- Professional quality of images
- All images are free
Cons:
- A limited selection of photos
- Doesn’t offer vector graphics
9. NYPL Digital Gallery

NYPL Digital Gallery is an excellent resource for anyone who is not interested in stock photography. The New Your Public Library has made hundreds of thousands of historical images available to the public and you can use it to browse through items, collections or divisions. Before you enter a keyword you should click on the search only public domain materials tick box to ensure that the search results are going to display only images that can be used without restrictions. Additionally, the NYPL Digital Gallery lets you browse through its collection of digital books while its collections of photographs include the work of some of the highly esteemed American photographers.
Pros
- Public domain images are available in different resolutions
- Offers valuable research materials
Cons
- Some images are subject to copyright
- Only aimed at scholars and researchers
10. Viintage
Viintage is a gold mine for graphic designers as it grants them access to hundreds of vintage posters, book covers, and images. However, the amount of public domain images this website offers is limited and if you want to download the images from the collections of works created by famous artists from the late 19th and early 20th centuries you must purchase the premium version of Viintage. The website lacks some basic search options as it only allows you to type in the search term into the search bar. The images are not organized into categories which further complicates the process of finding a public domain image you’re looking for.
Pros:
- Offers a collection of rare vintage public domain images
- A great resource for graphic designers
Cons:
- Most images on Viintage can’t be downloaded for free
- Search tools are far from perfect
You may also like: Best Image Hosting Sites >>
How to Cite Public Domain Images Properly?
If you’re planning on using a public domain image in a blog or on your website, you must cite the source from which you acquired a particular image. The image citations should include the following information:
- The title of the image
- Author’s name
- Information about the institution at which an image is kept
- The source from which you acquired an image
In case you don’t have access to all of these information or if the information is simply not available you should include all details about a public domain image you have the access to. Furthermore, there are several styles of image citations that depend on the source from which an image was acquired.
Conclusion
Spending large sums of money on images you can use in commercial or private projects is not always necessary. The public domain images are widely available and they can be used in a broad range of contexts. Which website that lets you download public domain images do you like to use the most? Leave a comment and share your opinions with us.
Dont worry when you forget the syntax of an HTML element, like and iframe, a link, a table, an image or anything else. Visit HTML CheatSheet and generate the code you need.
Liza Brown
Liza Brown is a writer and a lover of all things video.
Follow @Liza Brown
Liza Brown
Mar 27, 2024• Proven solutions
Finding an image you like on the Internet doesn’t take long, since almost every website you can stumble upon, contains at least one picture. This doesn’t mean that you can just download any photo and use it in your blog, online marketing campaign or for any other purpose. Moreover, stock image websites like Getty Images or iStock let you purchase the right to use a photo commercially. As a reaction to an expanding stock image industry, many photographers, museums and cultural institutions are choosing to forfeit their rights and to publish public domain images. So, in this article, we are going to take you through the ten best public domain image websites where you can download pictures for free.
What Are Public Domain Images?
By definition, public domain images are photos, vectors or clip art that are available to anyone because their copyright has either expired or they never had a copyright owner. Consequently, anyone can use these images for both commercial or private projects without having to purchase the rights to do so. An image can enter a public domain under the following circumstances:
- Scientists, educators or artists can use the Creative Commons Zero (CC0) license to dedicate their images to the public domain
- A picture’s copyright is no longer in effect
- A photo was never the subject to copyright
It is of utmost importance to check if an image is within the public domain before you use it publicly in order to avoid potential legal complications.
How and Where to Find Public Domain Images?
A simple google search will reveal hundreds of websites that let you download public domain and royalty-free images. Which source you’re going to use depends on the type of image you’re looking for, since some websites are dedicated only to photography, while others feature impressive collections of public domain images of artworks. In addition, you’ll only want to download public domain images from the websites that offer information about the author because using a public domain image without crediting its author is strictly prohibited.
Best Websites for Downloading Public Domain Images
We’ve searched the Internet and we utilized our results to compile a collection of the most reliable websites that grant its users access to vast numbers of public domain images. Let’s take a look at some of the best websites that let you download public domain images.
1. Pexels
Graphic designers and all other creatives in constant need of a fresh supply of public domain images don’t need a special introduction to Pexels. The stock image platform is dedicated to photography and video, so you can’t use it to search for vectors or clip art. Even so, you can use Pexles to search for public domain images based on a particular keyword or browse through its collection of free images and discover photos spontaneously. Clicking on the Popular Searches tab will enable you to see the images from Light, Nature or Animals and it will shorten the amount of time you have to spend looking for a photo you want to download.
Pros:
- Neatly organized website
- Free and easy sign-up
- Offers a huge selection of free public domain images and videos according to the CC0 license
- Hand-picked High quality Images
Cons:
- Some categories should contain more images
- Optimizing the search terms can be difficult
2. Pixabay
Besides offering an impressive collection of royalty-free photos, Pixabay also lets you search for public domain vectors, illustrations, and videos. The website hosts more than a million high-resolution photos and videos you can download for free. To make things even better, becoming a member of the Pixabay’s community and creating an account on this platform won’t take more than a few minutes of your time. Pixabay also offers advanced search tools that enable you to combine searches, search for the author of an image or group search terms. In addition, you can also browse through the photographers that contribute their images to the platform on a regular basis.
Pros:
- Powerful search tools and various filters
- Huge collection of public domain images
Cons
- Customer support could be better
3. Wikimedia Commons
This is probably the largest website on the Internet where you can download public domain images. There are more than 49 million images, illustrations, vector graphics and videos available that can be downloaded for free. Some media files on Wikimedia Commons have certain restrictions, but these restrictions are mostly related to image citations, which means that you can use them only if you credit the author. Such a huge selection of media files can be overwhelming for the newcomers to the Wikimedia Commons platform, but once you grow accustomed to the website’s interface discovering images becomes a straightforward process.
Pros:
- All images are available in high resolution
- Nearly all images can be used without any restrictions
Cons:
- Getting used to the website’s interface takes time
- The number of search results can be overwhelming
4. Flickr Commons
For more than a decade Flickr has been a popular online destination for photographers in need of a platform that enables them to present their work. The Flickr Commons is a project that unites more than a hundred institutions in an effort to create a library of public domain images. The project makes available a stunning amount of historical photographs and it grants you access to highly esteemed collections of photographs. Flick Commons is perfectly suited for researchers and scholars in need of public domain photos, they can use in their essays or research papers.
Pros:
- Unlimited access to historical photos
- Extends the knowledge available to the general public
Cons:
- Doesn’t offer videos or illustrations
- Search results are poorly organized
5. Unsplash
With a library that contains over 800,000 photos, Unsplash is easily one of the largest websites that offer public domain images. All pictures on this platform are organized into different categories, which makes finding a photo you want to use in a commercial or non-commercial project a relatively simple process. Alternatively, you can insert a keyword into a search bar and Unsplash will show you the results within seconds. However, the images you can find on this platform are similar to those you can purchase on stock photography websites, although some of them have an artistic touch that is hard to find on the majority of stock photos.
Pros:
- Excellent source of high-resolution photos
- Quick and easy search
Cons:
- Unsplash is dedicated solely to photography
- Limited amount of available public domain images
6. From Old Books
In case you are searching for images from old books you should look no further. This is a private collection of 2,600 images that are hard to find anywhere else on the Internet. You can browse through woodcuts, old texts or old holiday images, which makes this platform an excellent choice for anyone interested in rare images that were featured in old books. All pictures you can find on the From Old Books website are free to use on non-commercial projects, but you must pay a small fee if you want to download a high-resolution image you can use on a commercial project.
- Images are organized into categories
- Access to rare images
Cons
- Some images are not free
- Rudimentary website design
7. Morguefile
Morguefile is a website that offers stock footage to its users, but some of the images can’t be downloaded for free. That’s why you must click on the Free Photos tab before you start searching for public domain images on this website. The website hosts nearly 400.000 photos, videos, and vector graphics, but you must make sure that a file you want to download is within the public domain before you download it. The only downside is that the images aren’t organized into categories which can make finding the images you’re searching for more difficult than it needs to be.
Pros:
- Creating an account on Morguefile is free
- All free photos can be used on commercial projects
Cons:
- Images can be organized better
- Fewer free images than on other public domain image websites
8. Public Domain Archive
As the website’s name indicates, this is an archive of public domain images you can download for free and use in commercial contexts. All photos are organized into categories like abstract, free stock photos, people or wood which makes the search simpler. However, these categories don’t contain more than a few hundred photos and some of them offer as few as five pictures you can download. All photos are in high resolution and ready for professional use. The download process can be completed effortlessly in just a few quick steps. New images are added on a weekly basis.
Pros:
- Professional quality of images
- All images are free
Cons:
- A limited selection of photos
- Doesn’t offer vector graphics
9. NYPL Digital Gallery
NYPL Digital Gallery is an excellent resource for anyone who is not interested in stock photography. The New Your Public Library has made hundreds of thousands of historical images available to the public and you can use it to browse through items, collections or divisions. Before you enter a keyword you should click on the search only public domain materials tick box to ensure that the search results are going to display only images that can be used without restrictions. Additionally, the NYPL Digital Gallery lets you browse through its collection of digital books while its collections of photographs include the work of some of the highly esteemed American photographers.
Pros
- Public domain images are available in different resolutions
- Offers valuable research materials
Cons
- Some images are subject to copyright
- Only aimed at scholars and researchers
10. Viintage
Viintage is a gold mine for graphic designers as it grants them access to hundreds of vintage posters, book covers, and images. However, the amount of public domain images this website offers is limited and if you want to download the images from the collections of works created by famous artists from the late 19th and early 20th centuries you must purchase the premium version of Viintage. The website lacks some basic search options as it only allows you to type in the search term into the search bar. The images are not organized into categories which further complicates the process of finding a public domain image you’re looking for.
Pros:
- Offers a collection of rare vintage public domain images
- A great resource for graphic designers
Cons:
- Most images on Viintage can’t be downloaded for free
- Search tools are far from perfect
You may also like: Best Image Hosting Sites >>
How to Cite Public Domain Images Properly?
If you’re planning on using a public domain image in a blog or on your website, you must cite the source from which you acquired a particular image. The image citations should include the following information:
- The title of the image
- Author’s name
- Information about the institution at which an image is kept
- The source from which you acquired an image
In case you don’t have access to all of these information or if the information is simply not available you should include all details about a public domain image you have the access to. Furthermore, there are several styles of image citations that depend on the source from which an image was acquired.
Conclusion
Spending large sums of money on images you can use in commercial or private projects is not always necessary. The public domain images are widely available and they can be used in a broad range of contexts. Which website that lets you download public domain images do you like to use the most? Leave a comment and share your opinions with us.
Dont worry when you forget the syntax of an HTML element, like and iframe, a link, a table, an image or anything else. Visit HTML CheatSheet and generate the code you need.
Liza Brown
Liza Brown is a writer and a lover of all things video.
Follow @Liza Brown
Seamless Video Editing Across Platforms: 35 Best Software Options for a Smooth Workflow
Best Video Editors for Windows/Mac/iOS/Android/Linux [All in One]

Ollie Mattison
Mar 27, 2024• Proven solutions
Now, videos are getting increasingly important for you to present your thoughts and feeling on Instagram, YouTube, or Facebook.
But how to make your video looks professional, creative, stunning and deserved to share? A free video editing software can do you a favor.
So, Which is the best video editor available in the market?
If you are not quite certain about the video editing software you should use to edit your videos, you’ve come to the right place. Because we are going to take you through the best video editors including free versions.
Newcomers to the world of the video editing as well as seasoned professionals can use this guide to find the video editing software that will help them produce better visual content.
Let’s dive in and explore all aspects worth considering before you decide which software is best for you. And you can click the Filter button at the left side in this article to find the best video editing software for you.
- Part I: Best Video Editor for PC/Mac/Linux
- Part II: Best Video Editing Software Online
- Part III: Best Video Editor APP for iOS/Android
We spent about a month for researching and testing all popular video making software in the market and now collect 35 best video editors for you. This list of film makers can be used on Windows, Mac OS, iOS, Android, and Linux. Besides, some of them are online video editors you can use directly.
Now, let’s filter through the list to find the best video editor for you. Check it out :
| No. | Product Name | Supported OS | Price | Best for | Overview | Download Link |
|---|---|---|---|---|---|---|
| 1 | Wondershare Filmora | Windows 7/8/10, Mac OS, Android, iOS | Free trial; $79.99 perpetual, $49.99/year | Beginners, Semi-Pros | 4.9 | Download |
| 2 | Windows Movie Maker | Windows7/8/10 | Free | Beginners | 4.1 | Download |
| 3 | iMovie | Mac OS, iOS | Free | Beginners | 4.3 | Download |
| 4 | Final Cut Pro | Mac OS | 30 days free trial; $299.99 | Professionals | 4.4 | Download |
| 5 | Wondershare Filmii | Windows 7/8/10 | Free trial; $9.99 | Beginners | 4.3 | Download |
| 6 | Lightworks | Windows 7/8/10, Mac OS, Linux | Free trial; $437.99 | Professionals | 4.2 | Download |
| 7 | ShotCut | Windows 7/8/10, Mac OS, Linux | Free Open Source Video Editor | Semi-Pros | 3.9 | Download |
| 8 | HitFilm Express | Windows, Mac OS | Free | Semi-Pros | 4.1 | Download |
| 9 | Blender | Windows 7/8/10, Mac OS, Linux | Free; Fund $6/mo for support | Professionals | 3.8 | Download |
| 10 | Avidemux | Windows 7/8/10, Mac OS, Linux | Free | Beginners | 3.5 | Download |
| 11 | VideoPad Video Editor | Windows, Mac OSX, iOS, Kindle | Free | Beginners | 3.9 | Download |
| 12 | OpenShot | Windows 7/8/10, Mac OS, Linux | Free Open Source Video Editor | Beginners | 3.8 | Download |
| 13 | Kdenlive | Windows 7/8/10, Mac OS, Linux | Free | Semi-pros | 4.1 | Download |
| 14 | Adobe Premiere Pro | Windows 7/8/10, Mac OS | 7 days free trial; $20.99/mo; $33.99 /mo | Professionals | 4.5 | Download |
| 15 | Magix Vegas Pro | Windows 7/8/10, Mac OS | $399-$799 | Professionals | 4.2 | Download |
| 16 | Adobe Premiere Elements | Windows 7/8/10, Mac OS | $99.99 | Semi-pros | 4.7 | Download |
| 17 | CyberLink PowerDirector | Windows 7/8/10, Mac OS | $69,99 - $129,99 | Semi-pros | 4.5 | Download |
| 18 | Magix Movie Video Easy | Windows only | Free trial; $49,99 | Semi-pros | 3.6 | Download |
| 19 | Magix Video Pro | Windows 10 | Free trial; $79.99 | Beginners | 4.1 | Download |
| 20 | Media | Online | Free | Beginners | 4.75 | Check |
| 21 | YouTube | Online | Free | Beginners | 4.8 | Check |
| 22 | Online Video Cutter | Online | Free | Beginners | 3.6 | Check |
| 23 | Movie Maker Online | Online | Free | Beginners | 3.7 | Check |
| 24 | ClipChamp | Online | 14 day free trial; $7/mo | Beginners | 4.1 | Check |
| 25 | WeVideo | Online | Free trial; $11.99-$79.99 | Beginners | 4.4 | Check |
| 26 | Kizoa | Online | Freemium | Beginners | 3.8 | Check |
| 27 | Wideo | Online | Freemium | Beginners | 4.3 | Check |
| 28 | Filmora | iOS, Android | Freemium | Beginners | 4.1 | Download |
| 29 | Vlogit | iOS, Android | Free | Beginners | 3.6 | Download |
| 30 | VideoShop | iOS, Android | Freemium | Beginners | 4.8 | Download |
| 31 | Filmmaker Pro | iOS | Freemium; $5.99/mo | Semi-pros | 4.6 | Download |
| 32 | KineMaster | iOS, Android | Freemium | Semi-pros | 4.4 | Download |
| 33 | LumaFusion | iOS | $29.99 | Semi-pros | 4.8 | Download |
| 34 | Vizzywig 2019 | iOS | $79.99 | Semi-pros | 4.1 | Download |
| 35 | PowerDirector | iOS, Android | Freemium | Beginners | 4.5 | Download |
Part I: Best Video Editing Software for Windows/Mac/Linux
1. Wondershare Filmora
Platform: Windows, Mac, Android, iOS
Price: Free trial; $79.99 perpetual, $49.99/year
Level: Beginners
Even though it is widely considered as one of the premium entry-level video editing software options, Wondershare Filmora also offers advanced editing tools. The software product comes with detailed learning resources and provides support to its users who have little editing experience. The wide range of file formats and remarkably diverse Export options make Filmora an interesting choice for those who are just entering the world of video editing, but also for more experienced editors.
Features: Filmora’s rich effect library contains over a thousand modern special effects from niches such as gaming, blockbuster or tutorial, and new effects are added every month. The Action Cam tool is designed to make merging footage shot on action cameras easy and quick. Filmora supports a wide range of file formats including AVI, MP4 or MKV, so you don’t have to worry if your footage was shot in 4K or HD because you can easily edit it with this software.
Advantages:
A large number of professional video editing features Filmora offers as well as its modernly designed interface makes it one of the best options for amateur video creators.
Limitations:
You can use all the features in the free trial version, but have to pay to remove the watermark.
Lear more about Wondershare Filmora here: Filmora Official YouTube Channel
2. Windows Movie Maker
Platform: Windows
Price: Free
Level: Beginners

This is probably one of the oldest if not the oldest video editing software for PCs. Microsoft has announced that Windows Movie Maker will no longer be available for download. This software can still be found online, although not on Microsoft’s website, and currently, there are two different versions of Windows Movie Maker available. Even the least experienced video editors can master each of the Movie Maker versions easily.
Features: The classic video editing software is equipped with all the tools you’ll need for basic editing tasks like trimming, changing the video playback speed or rotating videos. It even features a Video Stabilization option that can be useful if you’d like to stabilize a video and remove the distracting camera shakes. Windows Movie Maker lets you add text effects to your video, insert Transitions between two takes, perform basic audio editing or record a screen.
Advantages:
Free, meets your basic editing demands
Limitations:
Service discontinued
No support for modern file formats
Lacks color correction tools, visual effects or any other advanced video editing options.
Check how to use Windows Movie Maker here: Windows Movie Maker User Guide
3. iMovie
Platform: Mac OS, iOS
Price: Free
Level: Beginners

As the Apple’s version of the Windows Movie Maker, iMovie has a similar status of a classic video editor that is at its best when used for simple video editing tasks. The video editor can also be used on an iPhone or an iPad if you want to edit your videos on the go. Learning your way around iMovie won’t take much of your time since all of its features are easy to use.
Features: Editing 4K videos or making credits or titles are just a few among many options provided by iMovie. Adding transitions, applying split-screen effects or creating PIP videos doesn’t require you to be a skilled video editor, because all of these options are easily accessible and they can be used in any project you are working on.
The iMovie’s audio editing options are equally impressive since the software enables you to add music, use built-in sound effects and record voiceovers. The video editor supports most of the popular file formats.
Advantages:
Free, and comes bundled with your Mac
Intuitive interface
Limitations:
This classic video editor for Apple’s devices doesn’t offer advanced video editing options such as motion tracking or keyframe marking.
Check how to use Windows Movie Maker here: iMovie User Guide
4. Final Cut Pro
Platform: macOS
Price: Paid, $299
Level: Professionals

Final Cut Pro is probably one of the highest praised video editing software ever created. It has been used to edit cinematic masterpieces such as ‘What happened Miss Simone’ or ‘The Girl With a Dragon Tattoo’, which speaks volumes about the software’s capability. Final Cut Pro’s Magnetic Timeline 2 is one of the kind, and it makes organizing large amounts of video and audio files look easy. Although the software’s price may seem discouraging, those who invested in it never had to use another video editor.
Features: A brief look at the list of Final Cut Pro’s video editing tools will leave you wondering if there is anything this software can’t do. Besides basic video editing features, the video editor is also equipped with 360 degrees VR video editing option, Multicam editing, and advanced color grading tools. Final Cut Pro allows its users to add as many audio tracks to the timeline as they want, thus enabling them to create impeccable soundtracks for their videos.
Advantages: Working with large numbers of video files is simplified by the software’s timeline, while options such as 3D titles or VR contribute to the strong impression this editor leaves on all of its users.
Limitations: Final Cut Pro has some lingering glitches that still haven’t been fixed, and its audio editing tool set lacks some important pieces.
If you are new to video editing and you will need a video maker that is tailored for beginners. In such case, you can read this article to get: Best Free Video Editing Software for Beginners >> They are really very easy to use. You can make a stunning video less than an hour.
5. Wondershare Filmii
Platform: Windows
Price: Free, Paid versions
Level: Beginners
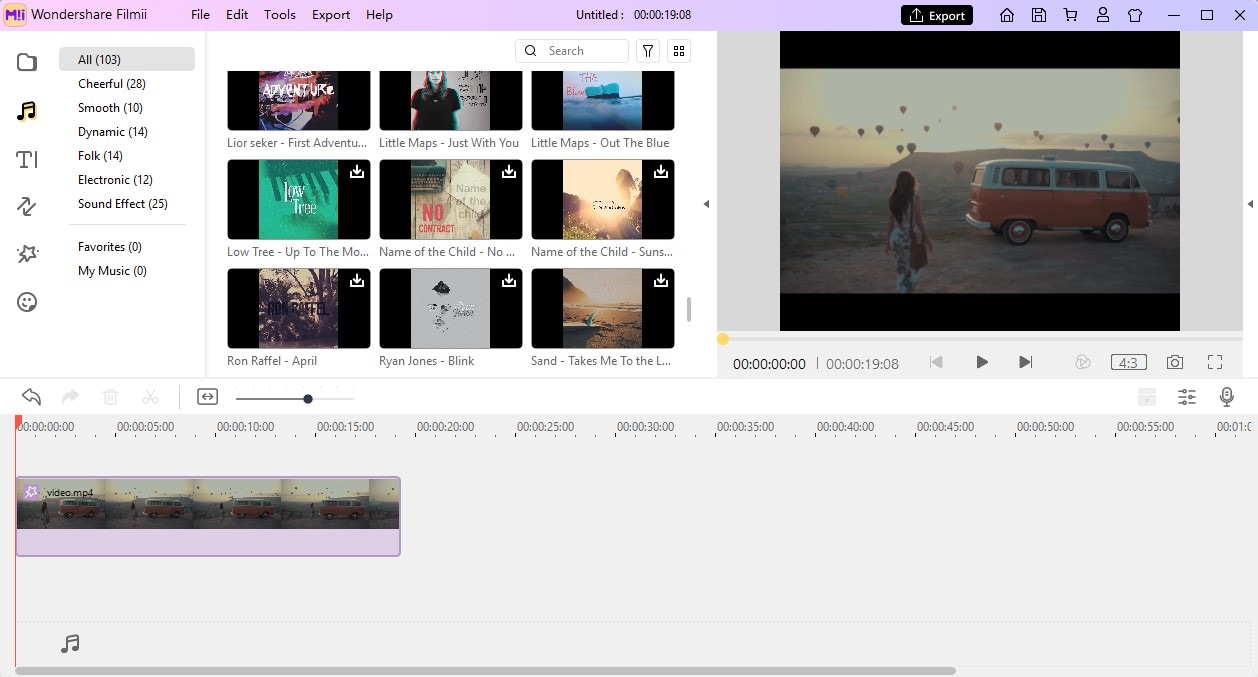
This delicate video editing software is one of the best video editors for newbies. The free version of the software offers a lot of powerful video editing tools, but in order to get rid of the watermnark, you have to pay 9.99$ for its monthly plan. One of the advantages of Filmii is that it has a variety of video templates that can help beginners edit amazing videos with ease due to its auto-create functionality. Besides, its audio editing or creative tools are equally impressive.
6. Lightworks
Platform: Windows, macOS, Linux
Price: Free, Paid versions: $437.99
Level: Professionals

Lightworks is one of the best video editing software on this list with a long history in the movie-making business. The free version of the software is available, but it has limited export options. A $25 monthly subscription is required in order to gain access to all of the software’s features. Although it may be a somewhat pricey option, purchasing Lightworks is a profitable investment that may help you improve the quality of your videos.
Features: Both free and paid versions of this video editing suite offer support for wide range of video file formats. This can be very useful for video editors who often work on projects shot on different cameras. Multi-cam editing feature enables the software’s users to work with footage shot from separate angles, using more than just one camera. The videos edited with the free version of the software can only be exported to an MPEG4 file format with the maximum size of 1280X 790 pixels, and they must be uploaded to YouTube directly from the editor.
Advantages: Royalty-free media and a remarkable VFX panel make Lightworks a tempting option for professional and amateur video editors alike.
Limitations: The export options on the free version of the software are extremely limited and the software doesn’t provide much support for inexperienced users.
7. ShotCut
Platform: Windows, macOS, Linux
Price: Free
Level: Semi-Pros
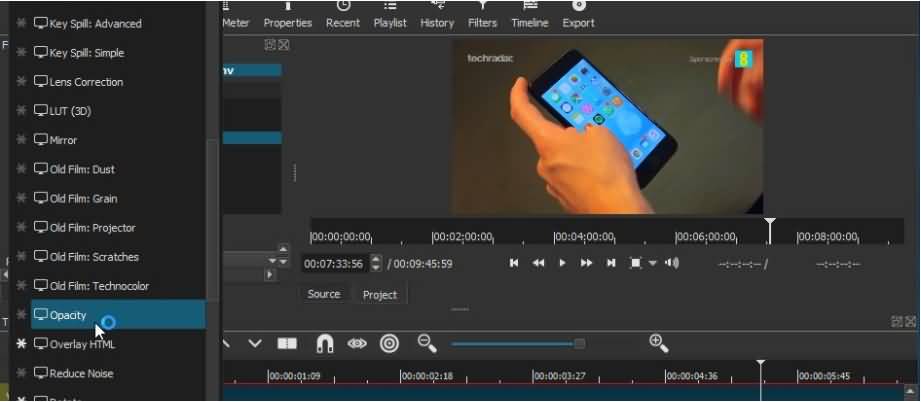
If you need a video editing software just to piece together a few clips you recorded on the family vacation, then ShotCut may be a bit overwhelming choice for such a task. This open-source software is equipped with a rich collection of audio and video editing features, while it also offers support for nearly all video file formats. It is best suited for users in need of powerful video editing software who don’t want to spend a fortune on purchasing a professional editing suite.
Features: Screen capturing, webcam video recording or audio capturing options are all made available by ShotCut. The software’s video and audio editing features surpass all expectations and allow the software’s users to have complete creative control over their projects. Features such as Chroma Key, Crop or Blur are accompanied by a number of amazing video effects that can be used to enhance the colors in a video. Using ShotCut requires you to just download the software and run its executable file, which means that you don’t have to go through the installation process in order to start editing with this software.
Advantages: 4K videos, as well as numerous other video and audio file formats, are supported by this open-source video editing software. To make things even better ShotCut grants you access to fully customizable filters.
Limitations: The software doesn’t feature preset export profiles, and the transitions it offers are a bit scarce.
8. HitFilm Express
Platform: Windows, macOS
Price: Free
Level: Semi-Pros

This cross-platform video editor ranks among best video editing software products currently available on the market. Its secret lies in uniting visual effect compositing and video editing options under the same roof. HitFilm Express is aimed at users with an enviable amount of video editing experience, since inexperienced video editors may find the software’s interface difficult to navigate. This video editing suite offers a lot of video editing tools as well as visual and audio effect, that can be easily used to improve the quality of your videos.
Features: The rare combination of VFX compositing and video editing makes HitFilm Express unique, while its motion design and tracking options offer support for more complex video editing actions. The software supports 2D and 3D effects compositing, as well as 4K and 360-degree videos.
HitFilm Express’ titling options are at the basic level, while its Export options are alarmingly narrow. This free editing software doesn’t provide too many options for color adjustments, but its audio editing features can be used to create a video with a superior soundtrack.
Advantages: The software offers a wide spectrum of transitions and video effects and it supports most popular video file formats. HitFilm Express lets you use semi-professional video editing tools for free.
Limitations: In order to export a video from the software you must share a link on a social media platform and then download the file. People who are not familiar with the video editing process may find using HitFilm Express difficult.
9. Blender
Platform: Windows, macOS, Linux
Price: Free
Level: Professionals

Blender started out as an open-source project and over the years animators, scientists, VFX artists and numerous other people have participated in developing this 3D creation suite. The software can be used for modeling, animation, video editing or compositing, to mention only a few of its many purposes. Editing video footage isn’t Blender’s strong suit, but its video editing features are powerful enough to enable you to perform basic editing tasks. However, this doesn’t mean you can’t use this software to create videos that grab the viewer’s attention.
Features: Cutting or trimming videos, adjusting the video’s playback speed or adding keyframes to a video clip is an easy process in Blender. The software’s true strength lies in its animation, 3D modeling or motion tracking features. The latest version of Blender is equipped with a motion tracking option that allows you to import the footage into the software directly from a camera. You can utilize this feature to mask areas of the shot and see the movement on camera in a 3D environment.
Advantages: Blender’s price and its powerful features make it an interesting choice as your primary video editing software.
Limitations: You must have in-depth knowledge of animation, compositing, and 3D techniques in order to be able to use Blender.
10. Avidemux
Platform: Windows, macOS, Linux
Price: Free
Level: Beginners

This simple video editing software has all the tools you’ll ever need to quickly polish your videos. Its audio and video effects can be utilized to make your videos look and sound professionally, but Avidemux doesn’t offer much more than these basic video editing options.
The software provides support for most of popular video file formats, but its export options are far from perfect. Avidemux doesn’t feature visual effects or transitions, which significantly limits its video editing capabilities.
Features: Newcomers to the video editing world will love the software’s interface, because of its simplicity. The Transform feature allows you to fade in and fade out shots, crop or rotate video clips and even add logos to your videos. Blur or Sharpen effects enable users to enhance their videos, while contrast, brightness, saturation or hue values can be adjusted to make the colors in the video look more vivid. Avidemux also features the Subtitle option, but the software can only add hardcoded subtitles to videos.
Advantages: Solves all your basic video editing problems, and lets you have fun while editing videos. Avidemux also has solid encoding options and its interface is user-friendly.
Limitations: There are no video effects or transitions, which narrows down the software’s video editing options.
11. VideoPad Video Editor
Platform: Windows, macOS
Price: Free
Level: Beginners
VideoPad is one of the best entry-level cross-platform software products you can use for easy video editing tasks. The free version of the software is available to both Mac and PC users, although the Windows version limits the video exporting options to just two file formats. The VideoPad’s interface doesn’t take much time to get used to, and it perfectly adjusted to the needs of inexperienced video editors. Paid versions of the software are available to advanced editors who want to use VideoPad for more than just basic video editing.
Features: The list of video editing features VideoPad provides includes several pleasant surprises. The 4K video support, as well as 360-video editing features, are aimed at GoPro owners who want a quick and easy way to process their footage. The visual effects this free video editing software provides are impressive, while the Chroma Key option enables its users to create green screen videos. Even though VideoPad allows its users to edit audio files, its audio editing features are fairly modest.
Advantages: Learning how to use VideoPad is simplified by its intuitively designed interface.
Limitations: There are no advanced video editing options like multi-cam editing and motion tracking and certain features become unavailable when using the free version of the software over a longer period of time.
Download link: If you download the trial version instead of the free non-commercial home edition, or do not find a specific link to it on the website, you can trydownloading it from this link , or contact tech support , and they will send you a direct link.
12. OpenShot
Platform: Window, macOS, Linux
Price: Free
Level: Beginners

This award-winning open-source video editor offers a wide range of video editing tools that span from trimming and slicing to Slow Motion and Time effects. OpenShot is an excellent software for training and learning new video editing tricks, but it is best avoided if you are working on a large project. The software’s basic video editing features make it an excellent choice for users who only want to perform simple edits without having to waste too much time.
Features: OpenShot lets you add unlimited video and audio tracks to your projects, but its file management capabilities are far from impressive. The software allows you to trim or arrange the video files in any way you want, and it also provides a lot of different Transitions that can be used to make the videos look smoother. The collection of video and audio effects allows users to try out different solutions for the scenes in their video clips. OpenShot features a Vector Title Editor that can assist you in creating perfect opening titles or end credits.
Advantages: The interface of this open-source video editing software is designed to assist its users through every step of the video editing process. OpenShot is a great choice for all video editors who want to save money and use a powerful video editing software at the same time.
Limitations: More complex video editing options such as Rotoscoping, are not available. You may have to install add-ons if the OS you are using doesn’t meet the software’s system requirements.
13. Kdenlive
Platform: Windows, macOS, Linux
Price: Free
Level: Semi-pros

Almost two decades ago, this open-source project was started by Jason Wood in order to develop a video editing software for Linux OS. Over the years, a small team of developers has created Windows and MacOS versions of the editor that now have a loyal fan base. Even though the software’s features make it a reliable choice for more complex projects, Kdnelive can also be used to perform simple edits. This video editing software combines the simplicity of entry-level video editors with advanced video editing tools frequently used by experienced professionals.
Features: The functionality of this video editor will surprise even the greatest of skeptics. The software’s timeline lets you to add as many videos and audio files to your project as you want, making it a perfect tool for large-scale projects. The visual effects and transitions enable users to manipulate the footage in any way they see fit, while the extremely powerful analysis tools such as histograms, waveforms or vectorscopes enable them to monitor all the adjustments they make on their footage.
Advantages: Kdnlive provides support for nearly all input file formats that can be added easily to the software’s multitrack timeline. The free open-source add-ons can extend the video editor’s capability and thus enable you to perform a wider range of video editing actions.
Limitations: Even though the software provides the screencast recording option, it doesn’t feature the PIP effect. Multi frame-rate editing isn’t possible and software’s updates can last for hours.
14. Adobe Premiere Pro
Platform: Windows, macOS
Price: Paid, $19.99 per month
Level: Professionals

There are very few video editing suites that can offer as much to its users as Adobe Premiere Pro can. It is probably one of the best video editors ever created, as it has been setting the industry standards for a long time. High-end professionals frequently use Adobe Premiere Pro on their projects, while aspiring filmmakers strive to learn every option this unique video editor has to offer. The much-famed software isn’t the best choice for video editors who are just learning the basics of the trade, although it supplies a staggering amount of tutorials and learning materials.
Features: With each new version of Adobe Premiere Pro the list of the software’s features becomes longer. Its timeline is famous for its ease of use because it enables you to add as much new audio or video tracks as your project requires. This is arguably one of the best color correction software packages on the market, while its color grading features are no less impressive. Adobe Premiere Pro provides support for a wide range of video file formats including 4K, HDR, and 360 VR videos.
Advantages: Perfect for collaborative projects that involve large teams of experienced professionals. The software is at its best when used with other Adobe’s products that enable you to develop projects beyond the boundaries set by the Adobe Premiere Pro’s limitations.
Limitations: You cannot purchase the lifetime license to use this video editing software, and paying monthly subscriptions may be hard on the budget of some of its potential users.
15. Magix Vegas Pro
Platform: Windows
**Price:**Paid: $399
Level: Professionals

Successful independent artists, film producers, and all other film and video enthusiasts can only benefit from purchasing this video editing suite. The software belonged to Sony Creative Software for much of its history, but on May 20. 2016 the company sold it to Magix. Previously known as Vegas Pro or just Vegas, this video editing software is widely accepted as one of the best professional video editing tools ever created. There is virtually no video editing task that cannot be completed in Magix Vegas Pro video editing software.
Features: This video editor is designed to provide support to its users from the beginning until the very end of the video editing process. Magix Vegas Pro recognizes almost all video file formats, even those captured with professional RED or ARRI Alexa cameras. You can use this software to edit 3D or 4K videos, while the Multicamera-Editing feature lets you switch between any number of video sources with a single mouse click. Effects such as Automatic Crossfades allow you to create transitions between shots effortlessly.
Advantages: The seemingly unlimited amount of learning resources makes editing with Magix Vegas Pro a lot easier and it enables less experienced video editors to learn new tricks.
Limitations: There aren’t as many visual effects as you would hope for and the software’s interface isn’t aesthetically pleasing, but it is very functional.
16. Adobe Premiere Elements
Platform: Windows, macOS
**Price:**Paid: $99.99
Level: Semi-pros

Although it is often regarded as a simplified version of Premiere Pro, this video editing suite offers enough video editing tools to edit videos at the semi-professional level. Adobe Premiere Elements contains automated versions of Premiere Pro’s features and in this manner it enables its users to utilize professional video editing tools on their prosumer level projects. Even though this Adobe’s software product lacks the power of professional video editing software packages, it still offers enough video editing tools for the production of nicely polished and well-rounded videos.
Features: Adobe Premiere Elements recognizes all popular video file formats, and it offers support for 4K content. In addition to its remarkable file format compatibility, the video editor also features 3D editing and face detection options that can be very useful when working on more complex video projects. The haze-removal effect is extremely efficient at reducing the fog or cigarette smoke in a shot, while the motion titles let you create visually impressive opening titles or end credits. The Adobe Premiere Elements has performed exceptionally well when rendering large video files.
Advantages: The software’s Guided mode provides support to its users and helps them learn how to perform all video editing actions. The asset management tool offers assistance with the organization of large amounts of video and audio files.
Limitations: When compared to other video editors in this guide Adobe Premiere Elements’ device and social media optimization features seem to be in short supply.
17. CyberLink PowerDirector
Platform: Windows, macOS
**Price:**Free trial, Paid version: $69,99 - $129,99
Level: Semi-pros
This is probably one of the best and most popular video editing software packages aimed at amateur and semi-professional users. There are several versions of the software available, and each of them contains a different amount of options and video editing tools. Even with somewhat reduced capability, the least expensive version of the editor supports 360-degree as well as VR options for posting on social media such as Vimeo, Facebook or YouTube. CyberLink PowerDirector isn’t a professional video editing software, but it still offers a lot of extraordinary options that can take you a step closer to producing a professional video.
Features: The 360-degree video editing options are probably the first thing that catches the eye when you look at the list of features the software provides, but its true power lies in its color tools. LUTs, HDR effects or Split Toning options are just the tip of the iceberg since PowerDirector offers countless tools for fine-tuning of the colors in your videos. Animated PIP effects and video collages make this video editing software a perfect choice for the production of tutorials and all other types of online videos.
Advantages: The audio editing options provided by CyberLink PowerDirector are nothing short of amazing since they enable the software’s users to manipulate the audio files in any way they see fit.
Limitations: Motion tracking and color lookup features are not always reliable. The software is a bit overpriced when compared with similar video editing suits.
18. Magix Movie Video Easy
Platform: Windows
Price: Free trial, Paid version: $49,99
Level: Semi-pros

This video editor is a great choice for people who have never edited a video before and who want to learn how to perform basic video editing tasks. Video Easy’s intuitive user interface can be mastered by anyone with enough determination to edit videos with this software on a constant basis. Features this editor offers may not be as impressive as to ones provided by professional video editing suites, but they are powerful enough to produce clean edits that give your videos a professional look.
Features: If you choose to make Magix Movie Video Easy your primary video editing software, you will never have to worry about what type of camera you used to record your videos since the software is compatible with all standard camcorders, digital cameras, and Smartphones. The rich collection of transitions and effects, as well as the intro and outro animations, can all be used to create amazing videos. You can export videos to DVDs, Blu-Ray discs or YouTube directly from the software.
Advantages: If you are looking for a video editor that will enable you to add music to your videos, trim or cut videos quickly and choose from hundreds of effects, then you should look no further because Magix Movie Video Easy provides all of these options, and much more.
Limitations: Doesn’t perform well when used for demanding video editing tasks.
19. Magix Video Pro
Platform: Windows, macOS
Price: Free trial, Paid version: $62,99
Level: Beginners

Magix has been the largest European video editing software manufacturer for more than two decades. Its software products may not enjoy the fame of Adobe’s video editing software packages, but this doesn’t mean that a video editor such as Magix Video Pro cannot be used for the production of professional-looking videos. Besides offering basic video editing tools this video editor also features advanced video editing options such as Stop Motion animation or 360-degree video editing. Magix Video Pro is often labeled as ‘one of the best video editing programs out there’.
Features: Audio editing features that come with this video editor include an audio mixer that enables you to reduce noise levels, control the low, mid and high sounds or simply equalize the sound volume across the entire project. The video editing tools supplied by the Magix Video Pro are as impressive as its audio editing options. Lens correction features, Split screen videos or 360-degree video editing options reveal only a fraction of the software’s capabilities. Magix Video Pro delivers professional video editing features to consumer-level users.
Advantages: The software allows you to place any type of media file on its timeline and use it in your project.
Limitations: The effects library installation process can be time-consuming, although it is well worth the wait.
Part II: Best Video Making Editors Online
20. YouTube
Platform: Online
Price: Free
Level: Beginners

The world’s largest video sharing platform also offers basic video editing services. Although Google has discontinued its built-in video editor, it still allows tts users to trim or rotate videos, apply filters or even create time-lapse and slow-motion videos on line. Brightness, contrast or saturation levels can be altered if you want to enhance the colors in your videos. Audio editing features are limited because the platform only allows you to add a single audio file to a project you’re working on. However, some of the most important video editing features like adding the text or creating titles are not available.
Advantages: Allows you to polish your videos before posting them on YouTube for free.
Cons: This online video editor lacks some basic video editing tools such as transitions or audio controls.
21. Online Video Cutter
Platform: Online
Price: Free
Level: Beginners
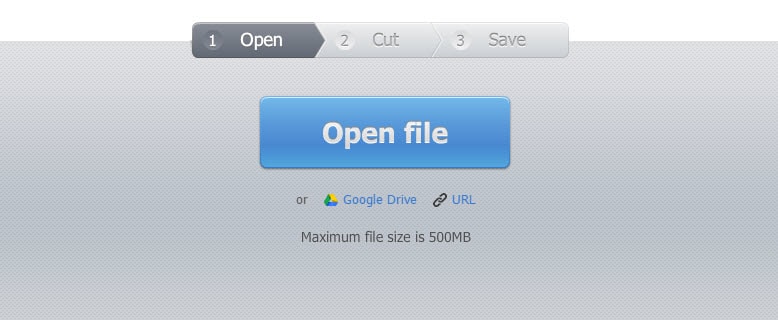
If you were looking for a web app that contains all the tools required to cut a small video file, then Online Video Cutter is one of your best options. You won’t even have to create an account before you start the video editing process. The videos you upload to this online editor can’t exceed the 500 MB size limit. Besides cutting their videos, users of this editor can also rotate or trim their footage for free. Online Video Cutter provides support for nearly all video file formats, so you don’t have to worry about the file format in which your video was captured.
Advantages: Offers a quick way to trim videos online and it is exceptionally easy to use.
Limitations: Lacks even the most basic video editing features other than cutting, trimming and rotating videos.
22. Movie Maker Online
Platform: Online
Price: Free
Level: Beginners

This free online editing tool lets you process videos without even registering or creating an account. You can add videos, photos, text, and music into a single project and mix them together into an awesome video. The platform grants you access to its rich filter library, and it also allows you to add text overlays, fade audio and video files or create smooth transitions between shots. Movie Maker Online features its own collection of royalty free music and photos you can use to make your videos look and sound better. The webpage’s design is a little odd, and it may take some time to get used to it.
Advantages: The app offers a lot of different video editing tools and it allows you to perform all basic video editing actions online.
Limitations: Movie Maker Online is funded by ads, and requires you to disable your AdBlock app before you can start editing a video.
23. ClipChamp
Platform: Online
Price: Free trial, Paid: $7 per month
Level: Beginners

ClipChamp lets you upload videos you already recorded or capture new footage using your computer’s webcam. The free version of this web app allows you to export in 1080p video files, but you can’t produce more than five videos in a single month. Both versions of the online video editor require you to create an account, and the videos exported from the free version of the app don’t have a watermark. ClipChamp provides numerous video editing tools, including transition, color adjustments or cropping. The exporting process doesn’t last too long and you can choose whether you want to share the video on social media or download it to your computer.
Advantages: Makes creating webcam videos as well as editing preexisting footage look easy while providing excellent export options.
Limitations: The free version of ClipChamp allows you export only five videos in a month.
24. WeVideo
Platform: Online
Price: Freemium
Level: Beginners
The capabilities of WeVideo online video editor surpass the basic level of video editing. The platform offers support for iOS and Android devices as well as desktop computers. Producing square or horizontal videos, creating motion titles or publishing videos in 720p HD resolution are just a few amazing options this online video editor provides. The paid versions of the web app are best suited for skilled video editing professionals or large teams that are working on demanding projects. WeVideo’s free version doesn’t allow its users to publish more than 30 minutes of video content each month and each exported video contains a watermark.
Advantages: Produces videos with great picture quality and offers tons of advanced video editing options.
Limitations: Creating an account is mandatory even for video editors who want to use the free version of WeVideo.
25. Kizoa
Platform: Online
Price: Freemium
Level: Beginners

Kizoa offers a broad spectrum of transitions, visual effects, animation and text effects to its users for free. The video editing platform is frequently used to create goofy short videos that can be easily shared on Facebook or Twitter. The app allows you to add photos to your video projects and it grants you access to an incredibly rich royalty free music collection. However, you will have to create an account on Kizoa in order to be able to export the videos you created. The editor’s timeline is rudimentary, but still functional enough to enable users to combine audio, video, and photo files.
Advantages: Kizoa is a powerful tool for the creation of entertaining social media videos.
Limitations: You must create an account in order to be able to export your projects, and the online video editor doesn’t feature any advanced video editing options.
26. Wideo
Platform: Online
Price: Freemium
Level: Beginners
All video enthusiasts can use Wideo platform to edit their videos, regardless of their skill level. In addition to amazing video editing options, this online video editor also features animations that can be used to create professional presentations. All video content uploaded to Wideo is stored on the cloud, and pricing plans for professionals include unlimited storage space. The Basic version of the editor allows for just ten downloads in a month and it doesn’t let its users upload videos to YouTube. Even though this video editor is easy to use, it is better suited for skilled professionals than it is for inexperienced video editors.
Advantages: Even the Basic pricing plan enables users to export HD videos, while Professional and Enterprise pricing plans include the Full HD export option.
Limitations: Limited audio editing options significantly reduce the capabilities of this online video editing platform.
Read More to Get: 10 Best Free Online Video Editors With No Watermark >>
Part III: Best Video APP for iOS/Android
27. Filmora
Platform: iOS, Andoird
Price: Freemium
Level: Beginners
You can edit your videos with Filmora in just three simple steps. All you have to do is choose the videos and photos from your phone’s gallery, Instagram or Facebook account, select a theme, insert transitions or add a song and share the video directly from the app on social media or to your email address. Besides the powerful video editing features, this app for iOS and Android devices also allows you to set your video’s aspect ratio to Square 1:1 if you would like to share the clip on Instagram or Cinema 16:9 if the video is shared to YouTube.
Advantages: Supports HD export options and provides a diverse set of video editing options.
Limitations: The app can’t perform advanced video editing tasks.
28. Vlogit
Platform: iOS, Android
Price: Free
Level: Beginners
The Wondershare’s video editing app for Android and iOS devices is designed to offer assistance to YouTubers and Vloggers who want to edit their videos directly from their Smartphones. Vlogit is equipped with video editing tools that enable you to cut, trim or rotate videos, while its sound editing features include recording voiceovers, adding sound effects or choosing the music you want to use as a soundtrack to your video. The app lets you combine photos and videos within the same project, and it also enables you to create customized openers from animated templates. The videos created and exported with the Vlogit app don’t contain watermarks.
Advantages: Offers powerful video editing features to YouTubers and Vloggers who want to edit their videos from their Smartphones for free.
Limitations: The list of visual effects the app provides could be longer.
29. VideoShop
Platform: iOS, Android
Price: Freemium
Level: Beginners

The extensive list of features VideoShop app offers makes it one of the best options for novice video editors who want to quickly create visually impressive videos. This video editing app allows you to work with multiple video files or merge them into a single video. The animated titles enable users of the VideoShop app to create professional-looking intros for their videos, while the transitions feature allows them to seamlessly piece together all shots featured in a project. Tilt-Shift and Stop Motion options are also available to video editors who want to make their videos look more professional.
Advantages: Fun and easy to use video editing app that lets you manipulate footage in any way you want.
Limitations: VideoShop contains ads, and the app’s version for iOS devices only supports videos recorded with iPhones and iPads.
30. Filmmaker Pro
Platform: iOS
Price: Freemium, $5,99 monthly subscription
Level: Semi-pros

iPhone videographers who need access to semi-professional video editing tools will certainly enjoy using this app. Filmmaker Pro offers support for 4K footage filmed on the latest models of iPhone and it enables its users to add an unlimited number of text overlays, video clips, voiceovers or audio tracks to the app’s timeline. The video editor grants you access to over 30 filters, video grading features, as well as Chroma Key and Ken Burns effects. In addition to impressive video and audio editing features, Filmmaker Pro’s users can also record videos with a camera that lets them adjust settings manually directly from the app, although this option must be paid for.
Advantages: Text overlays, audio editing features and the ability to select the aspect ratio for each video you edit with this app, make it one of the best video editing options for iOS devices.
Limitations: Nearly all of the app’s best features must be purchased.
31. KineMaster
Platform: iOS, Android
Price: Freemium, contains adds
Level: Semi-pros
This cross-platform video editor is one of the premier options for mobile video editing on both iOS and Android devices. KineMaster is currently the only app that enables Android Smartphone owners to add as many layers of videos, photos, and text to their projects as they want. However, it only supports a limited number of video file formats, which means that the app shouldn’t be used to edit videos that weren’t recorded on an iPhone or Android phone. KineMaster provides a wide range of video exporting options and allows you to share videos on popular social media networks.
Pros: Above average video and audio editing features.
Limitations: Offers a lot of options mobile video editors seldom use.
32. LumaFusion
Platform: iOS
Price: Paid, $29.99
Level: Semi-pros
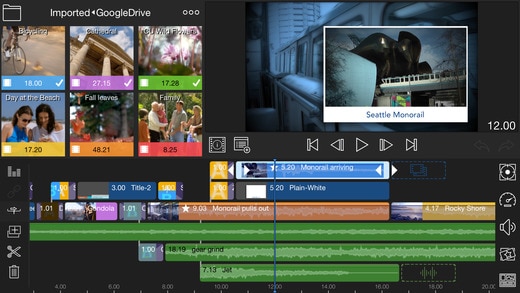
Creating neatly organized projects with LumaFusion is a simple task because the app features a powerful Project Manager that lets you sort files or select aspect ratios for your videos. In addition, the Media Library lets you import all types of files from a cloud storage or drag and drop media from other apps. Producing slow-motion videos that have 120 or 240fps or creating green screen videos using the Chroma Key effect is easy with LumaFusion. The app’s audio editing features are as impressive as its video editing tools since they provide the complete control over the audio files to the video editor’s users.
Advantages: Color correction options, LUTs or numerous visual effects are all part of the reason why LumaFusion is one of the best apps for mobile video editing.
Limitations: Only available for iOS devices.
33. Vizzywig 2019 4K Video Editor
Platform: iOS
Price: Paid, $79.99
Level: Semi-pros

This award-winning app for iOS devices provides all the tools a skilled video editor could desire. Its features include support for 4K videos, wide selection of aspect ratios as well as stylish intros, end credits, and titles. Besides offering professional video editing tools, Vizzywig also features Multi-Camera recording options that can capture videos in 8K resolution. In addition, the app is capable of producing videos that have eight times more pixels than the Apple’s Facetime HD Camera. The non-linear timeline lets you arrange video clips in any way you see fit, and allows you to add multiple media files to each project you are working on.
Advantages: Lets you control the focus and exposure manually and produce videos with stunning picture quality.
Limitations: Single platform compatibility and a high price narrow down the number of the app’s potential users.
34. PowerDirector
Platform: Android
Price: Freemium, contains ads and in-app purchases
Level: Beginners
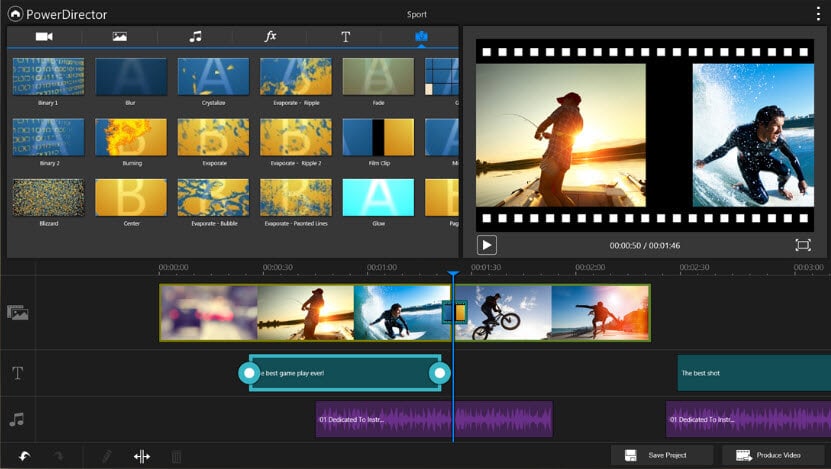
Unlike the Adobe’s app for mobile video editing, PowerDirector lives up to all expectations. This user-friendly app lets you create reverse, 4K, or green screen videos. To make things even better, you can easily apply visual and audio effects or add voiceovers to your projects. In addition to the video editor, the PowerDirector app is also equipped with a powerful photo editor that lets you manipulate images in a professional manner. You can use almost any type of video or audio file in this app because it provides support for all commonly used file formats.
Advantages: PowerDirector is designed to help its users polish their video quickly and effortlessly.
Limitations: Videos in 1080p and 4K resolutions can only be exported after you’ve made an in-app purchase.
Ooops…It looks like there isn’t any tool that matches your demand. Please give it another try.
Which Video Editor Do You Think Is Best for You?
Thank you to read this so far. It’s a long but the most comprehensive reviews ever for all hot video editing software compatible with Windows, Mac, iOS, Android and Linux, as well as online video editors. I hope you find the tools that you like.
If you want to get quick selections without too much reading, here is my recommendation:
- Best video editor for Windows and Mac to download: Filmora
- Best video editing software for Linux to download: Lightworks
- Best video editor for Android, iOS to download: Filmora , VideoShop
- Best online video editor to use: WeVideo
If you still can’t find a one Or we missed one of the tools you think which deserves to be listed above?
Either way, let us know by leaving a comment below.
Ollie Mattison
Ollie Mattison is a writer and a lover of all things video.
Follow @Ollie Mattison
Ollie Mattison
Mar 27, 2024• Proven solutions
Now, videos are getting increasingly important for you to present your thoughts and feeling on Instagram, YouTube, or Facebook.
But how to make your video looks professional, creative, stunning and deserved to share? A free video editing software can do you a favor.
So, Which is the best video editor available in the market?
If you are not quite certain about the video editing software you should use to edit your videos, you’ve come to the right place. Because we are going to take you through the best video editors including free versions.
Newcomers to the world of the video editing as well as seasoned professionals can use this guide to find the video editing software that will help them produce better visual content.
Let’s dive in and explore all aspects worth considering before you decide which software is best for you. And you can click the Filter button at the left side in this article to find the best video editing software for you.
- Part I: Best Video Editor for PC/Mac/Linux
- Part II: Best Video Editing Software Online
- Part III: Best Video Editor APP for iOS/Android
We spent about a month for researching and testing all popular video making software in the market and now collect 35 best video editors for you. This list of film makers can be used on Windows, Mac OS, iOS, Android, and Linux. Besides, some of them are online video editors you can use directly.
Now, let’s filter through the list to find the best video editor for you. Check it out :
| No. | Product Name | Supported OS | Price | Best for | Overview | Download Link |
|---|---|---|---|---|---|---|
| 1 | Wondershare Filmora | Windows 7/8/10, Mac OS, Android, iOS | Free trial; $79.99 perpetual, $49.99/year | Beginners, Semi-Pros | 4.9 | Download |
| 2 | Windows Movie Maker | Windows7/8/10 | Free | Beginners | 4.1 | Download |
| 3 | iMovie | Mac OS, iOS | Free | Beginners | 4.3 | Download |
| 4 | Final Cut Pro | Mac OS | 30 days free trial; $299.99 | Professionals | 4.4 | Download |
| 5 | Wondershare Filmii | Windows 7/8/10 | Free trial; $9.99 | Beginners | 4.3 | Download |
| 6 | Lightworks | Windows 7/8/10, Mac OS, Linux | Free trial; $437.99 | Professionals | 4.2 | Download |
| 7 | ShotCut | Windows 7/8/10, Mac OS, Linux | Free Open Source Video Editor | Semi-Pros | 3.9 | Download |
| 8 | HitFilm Express | Windows, Mac OS | Free | Semi-Pros | 4.1 | Download |
| 9 | Blender | Windows 7/8/10, Mac OS, Linux | Free; Fund $6/mo for support | Professionals | 3.8 | Download |
| 10 | Avidemux | Windows 7/8/10, Mac OS, Linux | Free | Beginners | 3.5 | Download |
| 11 | VideoPad Video Editor | Windows, Mac OSX, iOS, Kindle | Free | Beginners | 3.9 | Download |
| 12 | OpenShot | Windows 7/8/10, Mac OS, Linux | Free Open Source Video Editor | Beginners | 3.8 | Download |
| 13 | Kdenlive | Windows 7/8/10, Mac OS, Linux | Free | Semi-pros | 4.1 | Download |
| 14 | Adobe Premiere Pro | Windows 7/8/10, Mac OS | 7 days free trial; $20.99/mo; $33.99 /mo | Professionals | 4.5 | Download |
| 15 | Magix Vegas Pro | Windows 7/8/10, Mac OS | $399-$799 | Professionals | 4.2 | Download |
| 16 | Adobe Premiere Elements | Windows 7/8/10, Mac OS | $99.99 | Semi-pros | 4.7 | Download |
| 17 | CyberLink PowerDirector | Windows 7/8/10, Mac OS | $69,99 - $129,99 | Semi-pros | 4.5 | Download |
| 18 | Magix Movie Video Easy | Windows only | Free trial; $49,99 | Semi-pros | 3.6 | Download |
| 19 | Magix Video Pro | Windows 10 | Free trial; $79.99 | Beginners | 4.1 | Download |
| 20 | Media | Online | Free | Beginners | 4.75 | Check |
| 21 | YouTube | Online | Free | Beginners | 4.8 | Check |
| 22 | Online Video Cutter | Online | Free | Beginners | 3.6 | Check |
| 23 | Movie Maker Online | Online | Free | Beginners | 3.7 | Check |
| 24 | ClipChamp | Online | 14 day free trial; $7/mo | Beginners | 4.1 | Check |
| 25 | WeVideo | Online | Free trial; $11.99-$79.99 | Beginners | 4.4 | Check |
| 26 | Kizoa | Online | Freemium | Beginners | 3.8 | Check |
| 27 | Wideo | Online | Freemium | Beginners | 4.3 | Check |
| 28 | Filmora | iOS, Android | Freemium | Beginners | 4.1 | Download |
| 29 | Vlogit | iOS, Android | Free | Beginners | 3.6 | Download |
| 30 | VideoShop | iOS, Android | Freemium | Beginners | 4.8 | Download |
| 31 | Filmmaker Pro | iOS | Freemium; $5.99/mo | Semi-pros | 4.6 | Download |
| 32 | KineMaster | iOS, Android | Freemium | Semi-pros | 4.4 | Download |
| 33 | LumaFusion | iOS | $29.99 | Semi-pros | 4.8 | Download |
| 34 | Vizzywig 2019 | iOS | $79.99 | Semi-pros | 4.1 | Download |
| 35 | PowerDirector | iOS, Android | Freemium | Beginners | 4.5 | Download |
Part I: Best Video Editing Software for Windows/Mac/Linux
1. Wondershare Filmora
Platform: Windows, Mac, Android, iOS
Price: Free trial; $79.99 perpetual, $49.99/year
Level: Beginners
Even though it is widely considered as one of the premium entry-level video editing software options, Wondershare Filmora also offers advanced editing tools. The software product comes with detailed learning resources and provides support to its users who have little editing experience. The wide range of file formats and remarkably diverse Export options make Filmora an interesting choice for those who are just entering the world of video editing, but also for more experienced editors.
Features: Filmora’s rich effect library contains over a thousand modern special effects from niches such as gaming, blockbuster or tutorial, and new effects are added every month. The Action Cam tool is designed to make merging footage shot on action cameras easy and quick. Filmora supports a wide range of file formats including AVI, MP4 or MKV, so you don’t have to worry if your footage was shot in 4K or HD because you can easily edit it with this software.
Advantages:
A large number of professional video editing features Filmora offers as well as its modernly designed interface makes it one of the best options for amateur video creators.
Limitations:
You can use all the features in the free trial version, but have to pay to remove the watermark.
Lear more about Wondershare Filmora here: Filmora Official YouTube Channel
2. Windows Movie Maker
Platform: Windows
Price: Free
Level: Beginners
This is probably one of the oldest if not the oldest video editing software for PCs. Microsoft has announced that Windows Movie Maker will no longer be available for download. This software can still be found online, although not on Microsoft’s website, and currently, there are two different versions of Windows Movie Maker available. Even the least experienced video editors can master each of the Movie Maker versions easily.
Features: The classic video editing software is equipped with all the tools you’ll need for basic editing tasks like trimming, changing the video playback speed or rotating videos. It even features a Video Stabilization option that can be useful if you’d like to stabilize a video and remove the distracting camera shakes. Windows Movie Maker lets you add text effects to your video, insert Transitions between two takes, perform basic audio editing or record a screen.
Advantages:
Free, meets your basic editing demands
Limitations:
Service discontinued
No support for modern file formats
Lacks color correction tools, visual effects or any other advanced video editing options.
Check how to use Windows Movie Maker here: Windows Movie Maker User Guide
3. iMovie
Platform: Mac OS, iOS
Price: Free
Level: Beginners
As the Apple’s version of the Windows Movie Maker, iMovie has a similar status of a classic video editor that is at its best when used for simple video editing tasks. The video editor can also be used on an iPhone or an iPad if you want to edit your videos on the go. Learning your way around iMovie won’t take much of your time since all of its features are easy to use.
Features: Editing 4K videos or making credits or titles are just a few among many options provided by iMovie. Adding transitions, applying split-screen effects or creating PIP videos doesn’t require you to be a skilled video editor, because all of these options are easily accessible and they can be used in any project you are working on.
The iMovie’s audio editing options are equally impressive since the software enables you to add music, use built-in sound effects and record voiceovers. The video editor supports most of the popular file formats.
Advantages:
Free, and comes bundled with your Mac
Intuitive interface
Limitations:
This classic video editor for Apple’s devices doesn’t offer advanced video editing options such as motion tracking or keyframe marking.
Check how to use Windows Movie Maker here: iMovie User Guide
4. Final Cut Pro
Platform: macOS
Price: Paid, $299
Level: Professionals
Final Cut Pro is probably one of the highest praised video editing software ever created. It has been used to edit cinematic masterpieces such as ‘What happened Miss Simone’ or ‘The Girl With a Dragon Tattoo’, which speaks volumes about the software’s capability. Final Cut Pro’s Magnetic Timeline 2 is one of the kind, and it makes organizing large amounts of video and audio files look easy. Although the software’s price may seem discouraging, those who invested in it never had to use another video editor.
Features: A brief look at the list of Final Cut Pro’s video editing tools will leave you wondering if there is anything this software can’t do. Besides basic video editing features, the video editor is also equipped with 360 degrees VR video editing option, Multicam editing, and advanced color grading tools. Final Cut Pro allows its users to add as many audio tracks to the timeline as they want, thus enabling them to create impeccable soundtracks for their videos.
Advantages: Working with large numbers of video files is simplified by the software’s timeline, while options such as 3D titles or VR contribute to the strong impression this editor leaves on all of its users.
Limitations: Final Cut Pro has some lingering glitches that still haven’t been fixed, and its audio editing tool set lacks some important pieces.
If you are new to video editing and you will need a video maker that is tailored for beginners. In such case, you can read this article to get: Best Free Video Editing Software for Beginners >> They are really very easy to use. You can make a stunning video less than an hour.
5. Wondershare Filmii
Platform: Windows
Price: Free, Paid versions
Level: Beginners
This delicate video editing software is one of the best video editors for newbies. The free version of the software offers a lot of powerful video editing tools, but in order to get rid of the watermnark, you have to pay 9.99$ for its monthly plan. One of the advantages of Filmii is that it has a variety of video templates that can help beginners edit amazing videos with ease due to its auto-create functionality. Besides, its audio editing or creative tools are equally impressive.
6. Lightworks
Platform: Windows, macOS, Linux
Price: Free, Paid versions: $437.99
Level: Professionals
Lightworks is one of the best video editing software on this list with a long history in the movie-making business. The free version of the software is available, but it has limited export options. A $25 monthly subscription is required in order to gain access to all of the software’s features. Although it may be a somewhat pricey option, purchasing Lightworks is a profitable investment that may help you improve the quality of your videos.
Features: Both free and paid versions of this video editing suite offer support for wide range of video file formats. This can be very useful for video editors who often work on projects shot on different cameras. Multi-cam editing feature enables the software’s users to work with footage shot from separate angles, using more than just one camera. The videos edited with the free version of the software can only be exported to an MPEG4 file format with the maximum size of 1280X 790 pixels, and they must be uploaded to YouTube directly from the editor.
Advantages: Royalty-free media and a remarkable VFX panel make Lightworks a tempting option for professional and amateur video editors alike.
Limitations: The export options on the free version of the software are extremely limited and the software doesn’t provide much support for inexperienced users.
7. ShotCut
Platform: Windows, macOS, Linux
Price: Free
Level: Semi-Pros
If you need a video editing software just to piece together a few clips you recorded on the family vacation, then ShotCut may be a bit overwhelming choice for such a task. This open-source software is equipped with a rich collection of audio and video editing features, while it also offers support for nearly all video file formats. It is best suited for users in need of powerful video editing software who don’t want to spend a fortune on purchasing a professional editing suite.
Features: Screen capturing, webcam video recording or audio capturing options are all made available by ShotCut. The software’s video and audio editing features surpass all expectations and allow the software’s users to have complete creative control over their projects. Features such as Chroma Key, Crop or Blur are accompanied by a number of amazing video effects that can be used to enhance the colors in a video. Using ShotCut requires you to just download the software and run its executable file, which means that you don’t have to go through the installation process in order to start editing with this software.
Advantages: 4K videos, as well as numerous other video and audio file formats, are supported by this open-source video editing software. To make things even better ShotCut grants you access to fully customizable filters.
Limitations: The software doesn’t feature preset export profiles, and the transitions it offers are a bit scarce.
8. HitFilm Express
Platform: Windows, macOS
Price: Free
Level: Semi-Pros
This cross-platform video editor ranks among best video editing software products currently available on the market. Its secret lies in uniting visual effect compositing and video editing options under the same roof. HitFilm Express is aimed at users with an enviable amount of video editing experience, since inexperienced video editors may find the software’s interface difficult to navigate. This video editing suite offers a lot of video editing tools as well as visual and audio effect, that can be easily used to improve the quality of your videos.
Features: The rare combination of VFX compositing and video editing makes HitFilm Express unique, while its motion design and tracking options offer support for more complex video editing actions. The software supports 2D and 3D effects compositing, as well as 4K and 360-degree videos.
HitFilm Express’ titling options are at the basic level, while its Export options are alarmingly narrow. This free editing software doesn’t provide too many options for color adjustments, but its audio editing features can be used to create a video with a superior soundtrack.
Advantages: The software offers a wide spectrum of transitions and video effects and it supports most popular video file formats. HitFilm Express lets you use semi-professional video editing tools for free.
Limitations: In order to export a video from the software you must share a link on a social media platform and then download the file. People who are not familiar with the video editing process may find using HitFilm Express difficult.
9. Blender
Platform: Windows, macOS, Linux
Price: Free
Level: Professionals
Blender started out as an open-source project and over the years animators, scientists, VFX artists and numerous other people have participated in developing this 3D creation suite. The software can be used for modeling, animation, video editing or compositing, to mention only a few of its many purposes. Editing video footage isn’t Blender’s strong suit, but its video editing features are powerful enough to enable you to perform basic editing tasks. However, this doesn’t mean you can’t use this software to create videos that grab the viewer’s attention.
Features: Cutting or trimming videos, adjusting the video’s playback speed or adding keyframes to a video clip is an easy process in Blender. The software’s true strength lies in its animation, 3D modeling or motion tracking features. The latest version of Blender is equipped with a motion tracking option that allows you to import the footage into the software directly from a camera. You can utilize this feature to mask areas of the shot and see the movement on camera in a 3D environment.
Advantages: Blender’s price and its powerful features make it an interesting choice as your primary video editing software.
Limitations: You must have in-depth knowledge of animation, compositing, and 3D techniques in order to be able to use Blender.
10. Avidemux
Platform: Windows, macOS, Linux
Price: Free
Level: Beginners
This simple video editing software has all the tools you’ll ever need to quickly polish your videos. Its audio and video effects can be utilized to make your videos look and sound professionally, but Avidemux doesn’t offer much more than these basic video editing options.
The software provides support for most of popular video file formats, but its export options are far from perfect. Avidemux doesn’t feature visual effects or transitions, which significantly limits its video editing capabilities.
Features: Newcomers to the video editing world will love the software’s interface, because of its simplicity. The Transform feature allows you to fade in and fade out shots, crop or rotate video clips and even add logos to your videos. Blur or Sharpen effects enable users to enhance their videos, while contrast, brightness, saturation or hue values can be adjusted to make the colors in the video look more vivid. Avidemux also features the Subtitle option, but the software can only add hardcoded subtitles to videos.
Advantages: Solves all your basic video editing problems, and lets you have fun while editing videos. Avidemux also has solid encoding options and its interface is user-friendly.
Limitations: There are no video effects or transitions, which narrows down the software’s video editing options.
11. VideoPad Video Editor
Platform: Windows, macOS
Price: Free
Level: Beginners
VideoPad is one of the best entry-level cross-platform software products you can use for easy video editing tasks. The free version of the software is available to both Mac and PC users, although the Windows version limits the video exporting options to just two file formats. The VideoPad’s interface doesn’t take much time to get used to, and it perfectly adjusted to the needs of inexperienced video editors. Paid versions of the software are available to advanced editors who want to use VideoPad for more than just basic video editing.
Features: The list of video editing features VideoPad provides includes several pleasant surprises. The 4K video support, as well as 360-video editing features, are aimed at GoPro owners who want a quick and easy way to process their footage. The visual effects this free video editing software provides are impressive, while the Chroma Key option enables its users to create green screen videos. Even though VideoPad allows its users to edit audio files, its audio editing features are fairly modest.
Advantages: Learning how to use VideoPad is simplified by its intuitively designed interface.
Limitations: There are no advanced video editing options like multi-cam editing and motion tracking and certain features become unavailable when using the free version of the software over a longer period of time.
Download link: If you download the trial version instead of the free non-commercial home edition, or do not find a specific link to it on the website, you can trydownloading it from this link , or contact tech support , and they will send you a direct link.
12. OpenShot
Platform: Window, macOS, Linux
Price: Free
Level: Beginners
This award-winning open-source video editor offers a wide range of video editing tools that span from trimming and slicing to Slow Motion and Time effects. OpenShot is an excellent software for training and learning new video editing tricks, but it is best avoided if you are working on a large project. The software’s basic video editing features make it an excellent choice for users who only want to perform simple edits without having to waste too much time.
Features: OpenShot lets you add unlimited video and audio tracks to your projects, but its file management capabilities are far from impressive. The software allows you to trim or arrange the video files in any way you want, and it also provides a lot of different Transitions that can be used to make the videos look smoother. The collection of video and audio effects allows users to try out different solutions for the scenes in their video clips. OpenShot features a Vector Title Editor that can assist you in creating perfect opening titles or end credits.
Advantages: The interface of this open-source video editing software is designed to assist its users through every step of the video editing process. OpenShot is a great choice for all video editors who want to save money and use a powerful video editing software at the same time.
Limitations: More complex video editing options such as Rotoscoping, are not available. You may have to install add-ons if the OS you are using doesn’t meet the software’s system requirements.
13. Kdenlive
Platform: Windows, macOS, Linux
Price: Free
Level: Semi-pros
Almost two decades ago, this open-source project was started by Jason Wood in order to develop a video editing software for Linux OS. Over the years, a small team of developers has created Windows and MacOS versions of the editor that now have a loyal fan base. Even though the software’s features make it a reliable choice for more complex projects, Kdnelive can also be used to perform simple edits. This video editing software combines the simplicity of entry-level video editors with advanced video editing tools frequently used by experienced professionals.
Features: The functionality of this video editor will surprise even the greatest of skeptics. The software’s timeline lets you to add as many videos and audio files to your project as you want, making it a perfect tool for large-scale projects. The visual effects and transitions enable users to manipulate the footage in any way they see fit, while the extremely powerful analysis tools such as histograms, waveforms or vectorscopes enable them to monitor all the adjustments they make on their footage.
Advantages: Kdnlive provides support for nearly all input file formats that can be added easily to the software’s multitrack timeline. The free open-source add-ons can extend the video editor’s capability and thus enable you to perform a wider range of video editing actions.
Limitations: Even though the software provides the screencast recording option, it doesn’t feature the PIP effect. Multi frame-rate editing isn’t possible and software’s updates can last for hours.
14. Adobe Premiere Pro
Platform: Windows, macOS
Price: Paid, $19.99 per month
Level: Professionals
There are very few video editing suites that can offer as much to its users as Adobe Premiere Pro can. It is probably one of the best video editors ever created, as it has been setting the industry standards for a long time. High-end professionals frequently use Adobe Premiere Pro on their projects, while aspiring filmmakers strive to learn every option this unique video editor has to offer. The much-famed software isn’t the best choice for video editors who are just learning the basics of the trade, although it supplies a staggering amount of tutorials and learning materials.
Features: With each new version of Adobe Premiere Pro the list of the software’s features becomes longer. Its timeline is famous for its ease of use because it enables you to add as much new audio or video tracks as your project requires. This is arguably one of the best color correction software packages on the market, while its color grading features are no less impressive. Adobe Premiere Pro provides support for a wide range of video file formats including 4K, HDR, and 360 VR videos.
Advantages: Perfect for collaborative projects that involve large teams of experienced professionals. The software is at its best when used with other Adobe’s products that enable you to develop projects beyond the boundaries set by the Adobe Premiere Pro’s limitations.
Limitations: You cannot purchase the lifetime license to use this video editing software, and paying monthly subscriptions may be hard on the budget of some of its potential users.
15. Magix Vegas Pro
Platform: Windows
**Price:**Paid: $399
Level: Professionals
Successful independent artists, film producers, and all other film and video enthusiasts can only benefit from purchasing this video editing suite. The software belonged to Sony Creative Software for much of its history, but on May 20. 2016 the company sold it to Magix. Previously known as Vegas Pro or just Vegas, this video editing software is widely accepted as one of the best professional video editing tools ever created. There is virtually no video editing task that cannot be completed in Magix Vegas Pro video editing software.
Features: This video editor is designed to provide support to its users from the beginning until the very end of the video editing process. Magix Vegas Pro recognizes almost all video file formats, even those captured with professional RED or ARRI Alexa cameras. You can use this software to edit 3D or 4K videos, while the Multicamera-Editing feature lets you switch between any number of video sources with a single mouse click. Effects such as Automatic Crossfades allow you to create transitions between shots effortlessly.
Advantages: The seemingly unlimited amount of learning resources makes editing with Magix Vegas Pro a lot easier and it enables less experienced video editors to learn new tricks.
Limitations: There aren’t as many visual effects as you would hope for and the software’s interface isn’t aesthetically pleasing, but it is very functional.
16. Adobe Premiere Elements
Platform: Windows, macOS
**Price:**Paid: $99.99
Level: Semi-pros
Although it is often regarded as a simplified version of Premiere Pro, this video editing suite offers enough video editing tools to edit videos at the semi-professional level. Adobe Premiere Elements contains automated versions of Premiere Pro’s features and in this manner it enables its users to utilize professional video editing tools on their prosumer level projects. Even though this Adobe’s software product lacks the power of professional video editing software packages, it still offers enough video editing tools for the production of nicely polished and well-rounded videos.
Features: Adobe Premiere Elements recognizes all popular video file formats, and it offers support for 4K content. In addition to its remarkable file format compatibility, the video editor also features 3D editing and face detection options that can be very useful when working on more complex video projects. The haze-removal effect is extremely efficient at reducing the fog or cigarette smoke in a shot, while the motion titles let you create visually impressive opening titles or end credits. The Adobe Premiere Elements has performed exceptionally well when rendering large video files.
Advantages: The software’s Guided mode provides support to its users and helps them learn how to perform all video editing actions. The asset management tool offers assistance with the organization of large amounts of video and audio files.
Limitations: When compared to other video editors in this guide Adobe Premiere Elements’ device and social media optimization features seem to be in short supply.
17. CyberLink PowerDirector
Platform: Windows, macOS
**Price:**Free trial, Paid version: $69,99 - $129,99
Level: Semi-pros
This is probably one of the best and most popular video editing software packages aimed at amateur and semi-professional users. There are several versions of the software available, and each of them contains a different amount of options and video editing tools. Even with somewhat reduced capability, the least expensive version of the editor supports 360-degree as well as VR options for posting on social media such as Vimeo, Facebook or YouTube. CyberLink PowerDirector isn’t a professional video editing software, but it still offers a lot of extraordinary options that can take you a step closer to producing a professional video.
Features: The 360-degree video editing options are probably the first thing that catches the eye when you look at the list of features the software provides, but its true power lies in its color tools. LUTs, HDR effects or Split Toning options are just the tip of the iceberg since PowerDirector offers countless tools for fine-tuning of the colors in your videos. Animated PIP effects and video collages make this video editing software a perfect choice for the production of tutorials and all other types of online videos.
Advantages: The audio editing options provided by CyberLink PowerDirector are nothing short of amazing since they enable the software’s users to manipulate the audio files in any way they see fit.
Limitations: Motion tracking and color lookup features are not always reliable. The software is a bit overpriced when compared with similar video editing suits.
18. Magix Movie Video Easy
Platform: Windows
Price: Free trial, Paid version: $49,99
Level: Semi-pros
This video editor is a great choice for people who have never edited a video before and who want to learn how to perform basic video editing tasks. Video Easy’s intuitive user interface can be mastered by anyone with enough determination to edit videos with this software on a constant basis. Features this editor offers may not be as impressive as to ones provided by professional video editing suites, but they are powerful enough to produce clean edits that give your videos a professional look.
Features: If you choose to make Magix Movie Video Easy your primary video editing software, you will never have to worry about what type of camera you used to record your videos since the software is compatible with all standard camcorders, digital cameras, and Smartphones. The rich collection of transitions and effects, as well as the intro and outro animations, can all be used to create amazing videos. You can export videos to DVDs, Blu-Ray discs or YouTube directly from the software.
Advantages: If you are looking for a video editor that will enable you to add music to your videos, trim or cut videos quickly and choose from hundreds of effects, then you should look no further because Magix Movie Video Easy provides all of these options, and much more.
Limitations: Doesn’t perform well when used for demanding video editing tasks.
19. Magix Video Pro
Platform: Windows, macOS
Price: Free trial, Paid version: $62,99
Level: Beginners
Magix has been the largest European video editing software manufacturer for more than two decades. Its software products may not enjoy the fame of Adobe’s video editing software packages, but this doesn’t mean that a video editor such as Magix Video Pro cannot be used for the production of professional-looking videos. Besides offering basic video editing tools this video editor also features advanced video editing options such as Stop Motion animation or 360-degree video editing. Magix Video Pro is often labeled as ‘one of the best video editing programs out there’.
Features: Audio editing features that come with this video editor include an audio mixer that enables you to reduce noise levels, control the low, mid and high sounds or simply equalize the sound volume across the entire project. The video editing tools supplied by the Magix Video Pro are as impressive as its audio editing options. Lens correction features, Split screen videos or 360-degree video editing options reveal only a fraction of the software’s capabilities. Magix Video Pro delivers professional video editing features to consumer-level users.
Advantages: The software allows you to place any type of media file on its timeline and use it in your project.
Limitations: The effects library installation process can be time-consuming, although it is well worth the wait.
Part II: Best Video Making Editors Online
20. YouTube
Platform: Online
Price: Free
Level: Beginners
The world’s largest video sharing platform also offers basic video editing services. Although Google has discontinued its built-in video editor, it still allows tts users to trim or rotate videos, apply filters or even create time-lapse and slow-motion videos on line. Brightness, contrast or saturation levels can be altered if you want to enhance the colors in your videos. Audio editing features are limited because the platform only allows you to add a single audio file to a project you’re working on. However, some of the most important video editing features like adding the text or creating titles are not available.
Advantages: Allows you to polish your videos before posting them on YouTube for free.
Cons: This online video editor lacks some basic video editing tools such as transitions or audio controls.
21. Online Video Cutter
Platform: Online
Price: Free
Level: Beginners
If you were looking for a web app that contains all the tools required to cut a small video file, then Online Video Cutter is one of your best options. You won’t even have to create an account before you start the video editing process. The videos you upload to this online editor can’t exceed the 500 MB size limit. Besides cutting their videos, users of this editor can also rotate or trim their footage for free. Online Video Cutter provides support for nearly all video file formats, so you don’t have to worry about the file format in which your video was captured.
Advantages: Offers a quick way to trim videos online and it is exceptionally easy to use.
Limitations: Lacks even the most basic video editing features other than cutting, trimming and rotating videos.
22. Movie Maker Online
Platform: Online
Price: Free
Level: Beginners
This free online editing tool lets you process videos without even registering or creating an account. You can add videos, photos, text, and music into a single project and mix them together into an awesome video. The platform grants you access to its rich filter library, and it also allows you to add text overlays, fade audio and video files or create smooth transitions between shots. Movie Maker Online features its own collection of royalty free music and photos you can use to make your videos look and sound better. The webpage’s design is a little odd, and it may take some time to get used to it.
Advantages: The app offers a lot of different video editing tools and it allows you to perform all basic video editing actions online.
Limitations: Movie Maker Online is funded by ads, and requires you to disable your AdBlock app before you can start editing a video.
23. ClipChamp
Platform: Online
Price: Free trial, Paid: $7 per month
Level: Beginners
ClipChamp lets you upload videos you already recorded or capture new footage using your computer’s webcam. The free version of this web app allows you to export in 1080p video files, but you can’t produce more than five videos in a single month. Both versions of the online video editor require you to create an account, and the videos exported from the free version of the app don’t have a watermark. ClipChamp provides numerous video editing tools, including transition, color adjustments or cropping. The exporting process doesn’t last too long and you can choose whether you want to share the video on social media or download it to your computer.
Advantages: Makes creating webcam videos as well as editing preexisting footage look easy while providing excellent export options.
Limitations: The free version of ClipChamp allows you export only five videos in a month.
24. WeVideo
Platform: Online
Price: Freemium
Level: Beginners
The capabilities of WeVideo online video editor surpass the basic level of video editing. The platform offers support for iOS and Android devices as well as desktop computers. Producing square or horizontal videos, creating motion titles or publishing videos in 720p HD resolution are just a few amazing options this online video editor provides. The paid versions of the web app are best suited for skilled video editing professionals or large teams that are working on demanding projects. WeVideo’s free version doesn’t allow its users to publish more than 30 minutes of video content each month and each exported video contains a watermark.
Advantages: Produces videos with great picture quality and offers tons of advanced video editing options.
Limitations: Creating an account is mandatory even for video editors who want to use the free version of WeVideo.
25. Kizoa
Platform: Online
Price: Freemium
Level: Beginners
Kizoa offers a broad spectrum of transitions, visual effects, animation and text effects to its users for free. The video editing platform is frequently used to create goofy short videos that can be easily shared on Facebook or Twitter. The app allows you to add photos to your video projects and it grants you access to an incredibly rich royalty free music collection. However, you will have to create an account on Kizoa in order to be able to export the videos you created. The editor’s timeline is rudimentary, but still functional enough to enable users to combine audio, video, and photo files.
Advantages: Kizoa is a powerful tool for the creation of entertaining social media videos.
Limitations: You must create an account in order to be able to export your projects, and the online video editor doesn’t feature any advanced video editing options.
26. Wideo
Platform: Online
Price: Freemium
Level: Beginners
All video enthusiasts can use Wideo platform to edit their videos, regardless of their skill level. In addition to amazing video editing options, this online video editor also features animations that can be used to create professional presentations. All video content uploaded to Wideo is stored on the cloud, and pricing plans for professionals include unlimited storage space. The Basic version of the editor allows for just ten downloads in a month and it doesn’t let its users upload videos to YouTube. Even though this video editor is easy to use, it is better suited for skilled professionals than it is for inexperienced video editors.
Advantages: Even the Basic pricing plan enables users to export HD videos, while Professional and Enterprise pricing plans include the Full HD export option.
Limitations: Limited audio editing options significantly reduce the capabilities of this online video editing platform.
Read More to Get: 10 Best Free Online Video Editors With No Watermark >>
Part III: Best Video APP for iOS/Android
27. Filmora
Platform: iOS, Andoird
Price: Freemium
Level: Beginners
You can edit your videos with Filmora in just three simple steps. All you have to do is choose the videos and photos from your phone’s gallery, Instagram or Facebook account, select a theme, insert transitions or add a song and share the video directly from the app on social media or to your email address. Besides the powerful video editing features, this app for iOS and Android devices also allows you to set your video’s aspect ratio to Square 1:1 if you would like to share the clip on Instagram or Cinema 16:9 if the video is shared to YouTube.
Advantages: Supports HD export options and provides a diverse set of video editing options.
Limitations: The app can’t perform advanced video editing tasks.
28. Vlogit
Platform: iOS, Android
Price: Free
Level: Beginners
The Wondershare’s video editing app for Android and iOS devices is designed to offer assistance to YouTubers and Vloggers who want to edit their videos directly from their Smartphones. Vlogit is equipped with video editing tools that enable you to cut, trim or rotate videos, while its sound editing features include recording voiceovers, adding sound effects or choosing the music you want to use as a soundtrack to your video. The app lets you combine photos and videos within the same project, and it also enables you to create customized openers from animated templates. The videos created and exported with the Vlogit app don’t contain watermarks.
Advantages: Offers powerful video editing features to YouTubers and Vloggers who want to edit their videos from their Smartphones for free.
Limitations: The list of visual effects the app provides could be longer.
29. VideoShop
Platform: iOS, Android
Price: Freemium
Level: Beginners
The extensive list of features VideoShop app offers makes it one of the best options for novice video editors who want to quickly create visually impressive videos. This video editing app allows you to work with multiple video files or merge them into a single video. The animated titles enable users of the VideoShop app to create professional-looking intros for their videos, while the transitions feature allows them to seamlessly piece together all shots featured in a project. Tilt-Shift and Stop Motion options are also available to video editors who want to make their videos look more professional.
Advantages: Fun and easy to use video editing app that lets you manipulate footage in any way you want.
Limitations: VideoShop contains ads, and the app’s version for iOS devices only supports videos recorded with iPhones and iPads.
30. Filmmaker Pro
Platform: iOS
Price: Freemium, $5,99 monthly subscription
Level: Semi-pros
iPhone videographers who need access to semi-professional video editing tools will certainly enjoy using this app. Filmmaker Pro offers support for 4K footage filmed on the latest models of iPhone and it enables its users to add an unlimited number of text overlays, video clips, voiceovers or audio tracks to the app’s timeline. The video editor grants you access to over 30 filters, video grading features, as well as Chroma Key and Ken Burns effects. In addition to impressive video and audio editing features, Filmmaker Pro’s users can also record videos with a camera that lets them adjust settings manually directly from the app, although this option must be paid for.
Advantages: Text overlays, audio editing features and the ability to select the aspect ratio for each video you edit with this app, make it one of the best video editing options for iOS devices.
Limitations: Nearly all of the app’s best features must be purchased.
31. KineMaster
Platform: iOS, Android
Price: Freemium, contains adds
Level: Semi-pros
This cross-platform video editor is one of the premier options for mobile video editing on both iOS and Android devices. KineMaster is currently the only app that enables Android Smartphone owners to add as many layers of videos, photos, and text to their projects as they want. However, it only supports a limited number of video file formats, which means that the app shouldn’t be used to edit videos that weren’t recorded on an iPhone or Android phone. KineMaster provides a wide range of video exporting options and allows you to share videos on popular social media networks.
Pros: Above average video and audio editing features.
Limitations: Offers a lot of options mobile video editors seldom use.
32. LumaFusion
Platform: iOS
Price: Paid, $29.99
Level: Semi-pros
Creating neatly organized projects with LumaFusion is a simple task because the app features a powerful Project Manager that lets you sort files or select aspect ratios for your videos. In addition, the Media Library lets you import all types of files from a cloud storage or drag and drop media from other apps. Producing slow-motion videos that have 120 or 240fps or creating green screen videos using the Chroma Key effect is easy with LumaFusion. The app’s audio editing features are as impressive as its video editing tools since they provide the complete control over the audio files to the video editor’s users.
Advantages: Color correction options, LUTs or numerous visual effects are all part of the reason why LumaFusion is one of the best apps for mobile video editing.
Limitations: Only available for iOS devices.
33. Vizzywig 2019 4K Video Editor
Platform: iOS
Price: Paid, $79.99
Level: Semi-pros
This award-winning app for iOS devices provides all the tools a skilled video editor could desire. Its features include support for 4K videos, wide selection of aspect ratios as well as stylish intros, end credits, and titles. Besides offering professional video editing tools, Vizzywig also features Multi-Camera recording options that can capture videos in 8K resolution. In addition, the app is capable of producing videos that have eight times more pixels than the Apple’s Facetime HD Camera. The non-linear timeline lets you arrange video clips in any way you see fit, and allows you to add multiple media files to each project you are working on.
Advantages: Lets you control the focus and exposure manually and produce videos with stunning picture quality.
Limitations: Single platform compatibility and a high price narrow down the number of the app’s potential users.
34. PowerDirector
Platform: Android
Price: Freemium, contains ads and in-app purchases
Level: Beginners
Unlike the Adobe’s app for mobile video editing, PowerDirector lives up to all expectations. This user-friendly app lets you create reverse, 4K, or green screen videos. To make things even better, you can easily apply visual and audio effects or add voiceovers to your projects. In addition to the video editor, the PowerDirector app is also equipped with a powerful photo editor that lets you manipulate images in a professional manner. You can use almost any type of video or audio file in this app because it provides support for all commonly used file formats.
Advantages: PowerDirector is designed to help its users polish their video quickly and effortlessly.
Limitations: Videos in 1080p and 4K resolutions can only be exported after you’ve made an in-app purchase.
Ooops…It looks like there isn’t any tool that matches your demand. Please give it another try.
Which Video Editor Do You Think Is Best for You?
Thank you to read this so far. It’s a long but the most comprehensive reviews ever for all hot video editing software compatible with Windows, Mac, iOS, Android and Linux, as well as online video editors. I hope you find the tools that you like.
If you want to get quick selections without too much reading, here is my recommendation:
- Best video editor for Windows and Mac to download: Filmora
- Best video editing software for Linux to download: Lightworks
- Best video editor for Android, iOS to download: Filmora , VideoShop
- Best online video editor to use: WeVideo
If you still can’t find a one Or we missed one of the tools you think which deserves to be listed above?
Either way, let us know by leaving a comment below.
Ollie Mattison
Ollie Mattison is a writer and a lover of all things video.
Follow @Ollie Mattison
Also read:
- New 2024 Approved Unleash Your Creativity Top 3D Video Making Software
- Updated 2024 Approved One-Stop Video Editor Shop Best Solutions for Windows, Mac, Mobile, and Linux
- Updated Best 3D Animation Software Free Trials and Paid Versions for 2024
- Updated Smooth Operator 3 Techniques to Stabilize Footage in AE for 2024
- Updated Get Ready to Create 10 Must-Try Online Waveform Generators for 2024
- Updated The Ultimate List of Video Brightness Editors Online, Desktop, and Mobile for 2024
- New Ditch Final Cut Pro X? Here Are 10 Alternative Video Editors for 2024
- New 2024 Approved Cutting It Down A Step-by-Step Guide to Trimming Videos on Kapwing
- New In 2024, GoPro Video Editing for Dummies A Free and Easy-to-Follow Guide
- New Not Sure How to Install LumaFusion on an M1-Based Mac? Find Out Here. Also, Find the Best Alternatives to LumaFusion for Mac for 2024
- New The Ultimate List 14 Free Video Editors with No Watermark for 2024
- Updated In 2024, Top Android Apps for Smoother Video Recording
- Updated 2024 Approved The Ultimate Guide to Gaming Intro Software for PC and Mac
- New Unlock Your Chromebooks Potential How to Install Linux for 2024
- New 2024 Approved The Ultimate Chromebook Video Editors Guide Using Windows and Mac Apps
- Updated 2024 Approved How to Change Video Speed in QuickTime Player on Your Computer
- Updated 2024 Approved Convert YouTube Videos Like a Pro Top MP3 Converter Tools and Techniques
- 2024 Approved PowerDirector vs The Rest Top Alternative Video Editors for Mobile
- Updated In 2024, VHS on the Go Best Mobile Apps for Vintage Video Lovers
- In 2024, Video Invitation Apps That Will Make Your Event Unforgettable
- New Slow Down Time Free Slow Motion Video Editing with Filmora
- Updated In 2024, Make Unforgettable Video Invites with These Mobile Apps
- New Aspect Ratio Changer 8 Online Tools You Need to Know for 2024
- New In 2024, The Comprehensive Guide to Wav Conversion Tips and Tricks
- New Automate Your Transcriptions How to Turn Speech Into Text for 2024
- Updated 2024 Approved Compute and Correct Image Dimensions
- New 2024 Approved If You Want to Know the Best Apps to Animate Text on Your Phone, Check It Out
- 2024 Approved WhatsApp Video Status Creator Tools Free and Paid Reviews
- Updated In 2024, Online Video Promotion Experts
- New 2024 Approved No Watermark, No Problem Free and Paid Solutions for Filmora
- Updated 2024 Approved From Video to MP3 How to Download Instagram Audio Files
- New 2024 Approved Stop Motion on Demand Cloud Software Solutions, Guides, and Options
- Mac Equivalent of Windows Movie Maker Top 5 Options Reviewed for 2024
- Updated 2024 Approved React, Record, Edit Top Apps for Creating Viral Content
- Updated 5 Fantastic Free Online Video Editors Like iMovie (Updated 2023) for 2024
- The 5 Best Video Editors for AVCHD Files for 2024
- Updated 2024 Approved Official 100 Valid Wondershare Filmora Coupon Code Up to 54 OFF
- In 2024, What Does Jailbreaking Apple iPhone 6 Plus i Do? Get Answers here
- How to Change Google Play Location On Oppo A1x 5G | Dr.fone
- A Detailed Guide on Faking Your Location in Mozilla Firefox On Xiaomi 14 Pro | Dr.fone
- In 2024, Fake the Location to Get Around the MLB Blackouts on Samsung Galaxy F14 5G | Dr.fone
- In 2024, Android to Apple How To Transfer Photos From Oppo A59 5G to iPad Easily | Dr.fone
- 2024 Approved From Video to Pure Audio Bliss A Step-by-Step Quality Preservation Guide
- How to Unlock Nubia Z50 Ultra Phone without PIN
- In 2024, Universal Unlock Pattern for Vivo Y77t
- In 2024, Complete Guide on Unlocking Apple iPhone 11 with a Broken Screen? | Dr.fone
- In 2024, iSpoofer is not working On Vivo S17t? Fixed | Dr.fone
- In 2024, 5 Ways to Move Contacts From Motorola Moto G73 5G to iPhone (13/14/15) | Dr.fone
- Updated Translate Any Hindi Video Into English With AI
- 3 Easy Ways to Factory Reset a Locked Apple iPhone 8 Without iTunes | Dr.fone
- How to Samsung Galaxy S21 FE 5G (2023) Get Deleted Pictures Back with Ease and Safety?
- In 2024, How to Transfer/Sync Notes from Apple iPhone 7 to iPad | Dr.fone
- 10 Free Location Spoofers to Fake GPS Location on your Poco X6 | Dr.fone
- Fix Unfortunately Settings Has Stopped on Realme Narzo N53 Quickly | Dr.fone
- In 2024, 10 Great Apps to Turn Funny Animated Images Into Comics
- Simple ways to get lost videos back from Galaxy F34 5G
- Bring Your Ideas to Life Best Stop Motion Apps for iOS and Android for 2024
- In 2024, 5 Ways to Transfer Music from Oppo Find X7 Ultra to Other Android Devices Easily | Dr.fone
- 2024 Approved Top Free Video Repeater Software for Windows and Mac
- Recover iPhone 13 Pro Max Data From iOS iTunes | Dr.fone
- How To Restore a Bricked Google Pixel 7a Back to Operation | Dr.fone
- In 2024, New Multiple Ways How To Remove iCloud Activation Lock From your Apple iPhone 15 Pro
- Top 7 Phone Number Locators To Track Lava Yuva 2 Location | Dr.fone
- In 2024, How to Mirror PC to Apple iPhone 6 Plus? | Dr.fone
- In 2024, How to Reset Gmail Password on Vivo Y28 5G Devices
- Full Guide to Fix iToolab AnyGO Not Working On Oppo A1 5G | Dr.fone
- In 2024, Will Pokémon Go Ban the Account if You Use PGSharp On Xiaomi 13 Ultra | Dr.fone
- Updated Adobe After Effects Review for 2024
- Updated How To Create Animated Clipart in PowerPoint for 2024
- New Add Flesh to Your Video Content Before Posting Them for Your Audience to See Using Meme Texts. Use the Tutorial Guide Shared in This Post
- Ultimate Guide to Free PPTP VPN For Beginners On Vivo V29 Pro | Dr.fone
- In 2024, All About Apple iPhone 14 Pro Unlock Chip You Need to Know
- Remove the Lock Screen Fingerprint Of Your Poco C55
- Title: New In 2024, Expert-Recommended Video Lighting Fixers
- Author: Morgan
- Created at : 2024-04-28 05:20:06
- Updated at : 2024-04-29 05:20:06
- Link: https://ai-video-tools.techidaily.com/new-in-2024-expert-recommended-video-lighting-fixers/
- License: This work is licensed under CC BY-NC-SA 4.0.
