
:max_bytes(150000):strip_icc():format(webp)/GettyImages-664800650-4349941504c24712b81975694798236b.jpg)
New Get the Most Out of VLC Enabling Slow Motion Playback for 2024
Get the Most Out of VLC: Enabling Slow Motion Playback
While the files of the most common formats like MP4, WAV, etc. may look identical, they might be compiled using varied codecs which may or may not support any random player that you install on your PC. The reason why VLC media player is used by the majority of users worldwide is the versatility in the codecs that it supports natively.
Furthermore, the app is available for almost every platform, i.e., Windows, Mac, Linux, iOS, and Android, and is absolutely free to download and use.
With that said, the following sections explain how to manage the playback speed of a video while using VLC media player to add a slow motion effect to video. Here you will learn how to play slow motion on VLC on Windows, Mac, and iOS/Android, and also how to set the default speed for the app so that every time a video is played, the speed remains according to your preference.
In this article
01 How to Play Video in Slow Motion Effects on Windows with VLC?
02 How to Play Slow Motion Effects on Mac with VLC?
03 How to Control Playback Speed in VLC Media Player on Android and iOS?
04 How to Set up the Default Playback Speed on VLC?
Part 1: How to Play Video in Slow Motion Effects on Windows with VLC?
VLC is one of the best media players to play videos in slow motion . You can follow the instructions that are given below to learn how to play a video in slow motion in VLC on a Windows PC:
Step 1: Start Video Playback
Launch VLC on your Windows computer (a Windows 11 PC is used here for illustrations), click Media from the menu bar at the top, click Open File from the menu, and locate and open a video that you want to watch in slow motion. If VLC is your default media player, simply double-clicking the clip automatically opens the file in the app.

Step 2: Reduce the Playback Speed (In Decrements of 0.10x)
Once the playback begins, press the Spacebar on the keyboard to pause the video. Next, go to the Playback menu from the top, go to Speed, and click Slower (fine) once. This will reduce the speed to 0.90x. Clicking Slower (fine) again will further slow down the video to 0.80x speed. You can repeat this process until you reduce the speed to your desired level. Press Spacebar again to resume the playback in slow motion.
Note: The lowest speed that you can go to using this process is 0.03x.

Step 3: Reduce the Playback Speed (In Decrements in Percentage)
Pause the playback and go to Playback > Speed as explained in the previous step. From the list that comes up, click Slower (the last option). This will reduce the speed to 0.67x. Click Slower again and the speed will further go down to 0.50x. You can repeat this process until you reach your desired playback speed. Press Spacebar to resume the playback in slow motion. With this method, you can reduce the speed to as low as 0.02x.
Note: You can click Normal from the Speed submenu to play the video at normal speed.

Step 4: Using the Shortcut Keys (Optional)
You can press the left square bracket ‘[‘ on your keyboard to reduce the speed in decrements of 0.10x. To get back to the normal speed, press the equals to ‘=’ key. Likewise, pressing the right square bracket ‘]’ increases the speed by 0.10x.
Note: As it is with the Slower (fine) and Slower options, you can use Faster (fine) to add 0.10x increments to the speed, and Faster to increase percentage-wise. Also, if Faster (fine) is clicked repeatedly or its shortcut key is used multiple times, the speed can be increased up to 31.25x. On the other hand, by using the Faster option repeatedly, the speed can be increased to more than 100x.
Part 2: How to Play Slow Motion Effects on Mac with VLC?
The process of slowing down the video playback in VLC on a Mac computer is almost identical to that in Windows. You can learn how to get this done by following the steps that are given below:
Step 1: Open and Pause the Video
Locate and right-click the video that you want to play in slow motion, go to Open With from the context menu, and click VLC from the submenu. Once the clip opens, click the Pause button from the bottom as explained in the previous section.
Step 2: Reduce the Playback Speed
Click Playback from the menu bar at the top, and drag the Playback Speed slider to the left to reduce the speed of the video.

Step 3: Resume the Playback
Click anywhere on the screen to close the Playback menu, and then click the Play button from the bottom to resume the video playback in slow motion.
Part 3: How to Control Playback Speed in VLC Media Player on Android and iOS?
Although the playback speed of a video on both Android and iOS devices can be controlled with a slider, the location where the controller is placed on the two platforms varies, and so does the process of reaching there. Both the methods are explained below for your convenience:
Play Video in Slow Motion on Android with VLC
Step 1: Pause the Playback
Launch VLC on your Android phone (Samsung Galaxy Note 10+ is used here for illustrations), locate and open the video in VLC, tap anywhere on the screen, and tap the Pause button from the bottom to pause the playback.
Step 2: Set a Slower Playback Speed
Tap the More icon from the bottom-right corner, tap Playback speed from the menu that appears, and drag the slider that is present at the bottom to the left to reduce the speed. Alternatively, you can also repeatedly tap the down arrow that is present at the right of the slider to slow down the speed in the decrements of 0.05x.

Step 3: Resume the Playback
Tap anywhere on the screen, and when the Playback speed slider disappears, tap the screen one more time. Now, tap the Play icon from the bottom to resume the video playback.
Play Video in Slow Motion on iPhone with VLC
Step 1: Pause the Playback
Assuming that you have already added the video to the VLC library by connecting it to iTunes, launch the app on your iOS device (iPhone 13 Pro Max is used here for illustrations). Tap the video that you want to play in slow motion, and then tap the Pause icon from the bottom.
Step 2: Reduce the Playback Speed
Tap anywhere on the screen, and tap the Clock icon from the lower-left corner. Next, drag the Playback speed slider to the left to reduce the playback speed.

Step 3: Resume the Playback
Right after decreasing the speed, tap the Play icon from the bottom to resume the playback. If the controllers disappear, you can tap anywhere on the screen again, and then tap the Play icon.
Part 4: How to Set up the Default Playback Speed on VLC?
The processes of setting up default playback speed on different platforms and devices vary. For your convenience, all of them are explained below:
Set up Default Playback Speed in VLC on Windows
- Go to Tools > Preferences in VLC media player, and then click the All button from the Show settings section at the bottom.
- Select Input / Codecs from the left pane of the Advanced Preferences box, and then specify your preferred speed in the Playback speed field that is present under the Playback control section on the right window
- Click Save to save the changes

Set up Default Playback Speed in VLC on Mac
- Launch VLC, and go to VLC media player from the menu bar, and then click Preferences; and then click Show All from the bottom of the Preferences box to display all preferences setting options;

- Click the Input / Codecs from the left pane, and then define your preferred speed in the Playback speed field under the Playback control section in the right window, and then click Save to save the changes.

How to Change VLC Media Player Default Speed on Android
Note: At the time of this writing, the Android version of VLC doesn’t allow you to set a global default playback speed. However, you can set it on a per video basis. This means that every time that video is played, the playback speed will remain what you set for it. You must do this for each video in your VLC library individually.
- Launch VLC, and then tap More from the bottom-right corner; next, tap SETTINGS from the upper-left area;
- Tap Video from the Extra settings section, and then check the Save Playback Speed box

How to Change VLC Media Player Default Speed on iOS and iPhone
- Tap Settings from the Home screen, and then scroll down and tap VLC
- Tap Default playback speed from the GENERIC section, and then tap to select a playback speed from the available list to set it as the default.

Conclusion
It is pretty convenient to reduce the playback speed in VLC media player regardless of the platform or device you are using. While the processes of getting the job might be different, the principle behind it remains the same. When on Windows, the playback speed can be decreased to 0.02x and can be increased to more than 100x. This facility is not available on Mac, iOS, or Android platforms. Also, if you want, you can set the default playback speed for the videos so that every time a clip is played, the pace remains what you specified as default.
02 How to Play Slow Motion Effects on Mac with VLC?
03 How to Control Playback Speed in VLC Media Player on Android and iOS?
04 How to Set up the Default Playback Speed on VLC?
Part 1: How to Play Video in Slow Motion Effects on Windows with VLC?
VLC is one of the best media players to play videos in slow motion . You can follow the instructions that are given below to learn how to play a video in slow motion in VLC on a Windows PC:
Step 1: Start Video Playback
Launch VLC on your Windows computer (a Windows 11 PC is used here for illustrations), click Media from the menu bar at the top, click Open File from the menu, and locate and open a video that you want to watch in slow motion. If VLC is your default media player, simply double-clicking the clip automatically opens the file in the app.
Step 2: Reduce the Playback Speed (In Decrements of 0.10x)
Once the playback begins, press the Spacebar on the keyboard to pause the video. Next, go to the Playback menu from the top, go to Speed, and click Slower (fine) once. This will reduce the speed to 0.90x. Clicking Slower (fine) again will further slow down the video to 0.80x speed. You can repeat this process until you reduce the speed to your desired level. Press Spacebar again to resume the playback in slow motion.
Note: The lowest speed that you can go to using this process is 0.03x.
Step 3: Reduce the Playback Speed (In Decrements in Percentage)
Pause the playback and go to Playback > Speed as explained in the previous step. From the list that comes up, click Slower (the last option). This will reduce the speed to 0.67x. Click Slower again and the speed will further go down to 0.50x. You can repeat this process until you reach your desired playback speed. Press Spacebar to resume the playback in slow motion. With this method, you can reduce the speed to as low as 0.02x.
Note: You can click Normal from the Speed submenu to play the video at normal speed.
Step 4: Using the Shortcut Keys (Optional)
You can press the left square bracket ‘[‘ on your keyboard to reduce the speed in decrements of 0.10x. To get back to the normal speed, press the equals to ‘=’ key. Likewise, pressing the right square bracket ‘]’ increases the speed by 0.10x.
Note: As it is with the Slower (fine) and Slower options, you can use Faster (fine) to add 0.10x increments to the speed, and Faster to increase percentage-wise. Also, if Faster (fine) is clicked repeatedly or its shortcut key is used multiple times, the speed can be increased up to 31.25x. On the other hand, by using the Faster option repeatedly, the speed can be increased to more than 100x.
Part 2: How to Play Slow Motion Effects on Mac with VLC?
The process of slowing down the video playback in VLC on a Mac computer is almost identical to that in Windows. You can learn how to get this done by following the steps that are given below:
Step 1: Open and Pause the Video
Locate and right-click the video that you want to play in slow motion, go to Open With from the context menu, and click VLC from the submenu. Once the clip opens, click the Pause button from the bottom as explained in the previous section.
Step 2: Reduce the Playback Speed
Click Playback from the menu bar at the top, and drag the Playback Speed slider to the left to reduce the speed of the video.
Step 3: Resume the Playback
Click anywhere on the screen to close the Playback menu, and then click the Play button from the bottom to resume the video playback in slow motion.
Part 3: How to Control Playback Speed in VLC Media Player on Android and iOS?
Although the playback speed of a video on both Android and iOS devices can be controlled with a slider, the location where the controller is placed on the two platforms varies, and so does the process of reaching there. Both the methods are explained below for your convenience:
Play Video in Slow Motion on Android with VLC
Step 1: Pause the Playback
Launch VLC on your Android phone (Samsung Galaxy Note 10+ is used here for illustrations), locate and open the video in VLC, tap anywhere on the screen, and tap the Pause button from the bottom to pause the playback.
Step 2: Set a Slower Playback Speed
Tap the More icon from the bottom-right corner, tap Playback speed from the menu that appears, and drag the slider that is present at the bottom to the left to reduce the speed. Alternatively, you can also repeatedly tap the down arrow that is present at the right of the slider to slow down the speed in the decrements of 0.05x.
Step 3: Resume the Playback
Tap anywhere on the screen, and when the Playback speed slider disappears, tap the screen one more time. Now, tap the Play icon from the bottom to resume the video playback.
Play Video in Slow Motion on iPhone with VLC
Step 1: Pause the Playback
Assuming that you have already added the video to the VLC library by connecting it to iTunes, launch the app on your iOS device (iPhone 13 Pro Max is used here for illustrations). Tap the video that you want to play in slow motion, and then tap the Pause icon from the bottom.
Step 2: Reduce the Playback Speed
Tap anywhere on the screen, and tap the Clock icon from the lower-left corner. Next, drag the Playback speed slider to the left to reduce the playback speed.
Step 3: Resume the Playback
Right after decreasing the speed, tap the Play icon from the bottom to resume the playback. If the controllers disappear, you can tap anywhere on the screen again, and then tap the Play icon.
Part 4: How to Set up the Default Playback Speed on VLC?
The processes of setting up default playback speed on different platforms and devices vary. For your convenience, all of them are explained below:
Set up Default Playback Speed in VLC on Windows
- Go to Tools > Preferences in VLC media player, and then click the All button from the Show settings section at the bottom.
- Select Input / Codecs from the left pane of the Advanced Preferences box, and then specify your preferred speed in the Playback speed field that is present under the Playback control section on the right window
- Click Save to save the changes
Set up Default Playback Speed in VLC on Mac
- Launch VLC, and go to VLC media player from the menu bar, and then click Preferences; and then click Show All from the bottom of the Preferences box to display all preferences setting options;
- Click the Input / Codecs from the left pane, and then define your preferred speed in the Playback speed field under the Playback control section in the right window, and then click Save to save the changes.
How to Change VLC Media Player Default Speed on Android
Note: At the time of this writing, the Android version of VLC doesn’t allow you to set a global default playback speed. However, you can set it on a per video basis. This means that every time that video is played, the playback speed will remain what you set for it. You must do this for each video in your VLC library individually.
- Launch VLC, and then tap More from the bottom-right corner; next, tap SETTINGS from the upper-left area;
- Tap Video from the Extra settings section, and then check the Save Playback Speed box
How to Change VLC Media Player Default Speed on iOS and iPhone
- Tap Settings from the Home screen, and then scroll down and tap VLC
- Tap Default playback speed from the GENERIC section, and then tap to select a playback speed from the available list to set it as the default.
Conclusion
It is pretty convenient to reduce the playback speed in VLC media player regardless of the platform or device you are using. While the processes of getting the job might be different, the principle behind it remains the same. When on Windows, the playback speed can be decreased to 0.02x and can be increased to more than 100x. This facility is not available on Mac, iOS, or Android platforms. Also, if you want, you can set the default playback speed for the videos so that every time a clip is played, the pace remains what you specified as default.
Vegas Pro for Mac Not Working? Try These 10 Alternative Video Editors
For creating high-grade dynamic videos, simply shooting or recording a clip is not enough. Finding the best Sony Ve gas alternatives for Mac is essential since the software mainly targets Windows users.
Thanks to developers, there are many free and paid options to start your video editing journey on a Mac. Let’s first have a look at alternative software you could consider.
- Lightworks
- Wondershare Filmora
- Adobe Premiere Pro
- HitFilm Express
- Kdenlive
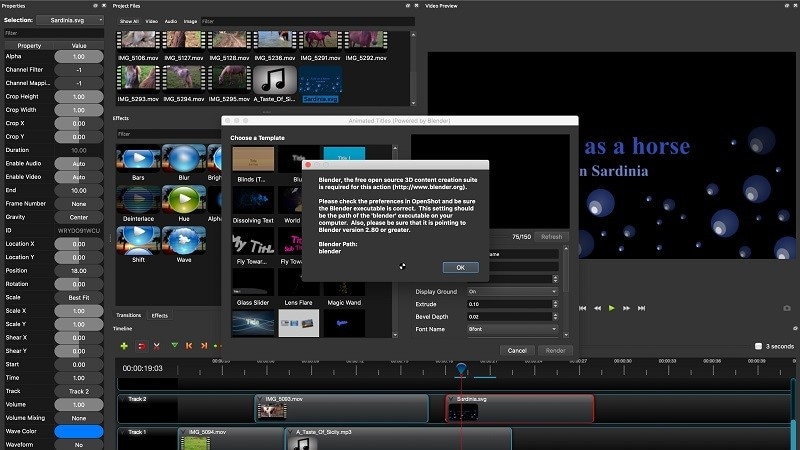
- OpenShot
- Blender
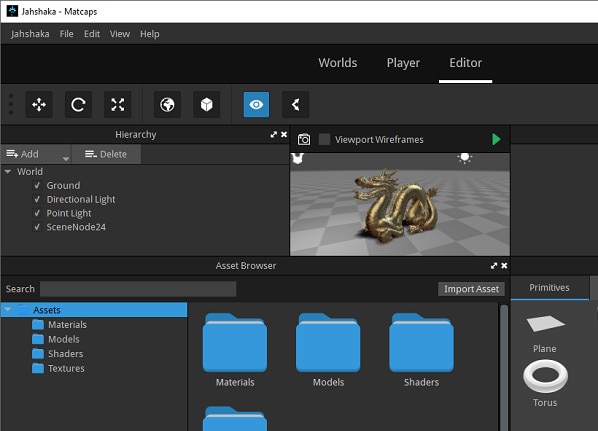
- Jahshaka
- Final Cut Pro
- Cyberlink PowerDirector 365
- What are the limitations when using Sony Vegas (Vegas Pro) on Mac?
- Hot FAQs about Vegas Pro Alternatives
Part 1: Sony Vegas Pro Alternatives & Competitors Overview
Here is a list of the top 10 tools we found after research. For an easier understanding, the following are the essential points of difference between alternative video editing software types for Sony Vegas Pro in a tabular form.
| Software | Supported OS | Price | Editor’s Verdict |
|---|---|---|---|
| Lightworks | Windows, Mac, Linux | Create-$9.99/month, Pro-$23.99/month | Medium-Difficult |
| Wondershare Filmora | Windows, Mac | Annual-$49.99, Perpetual-$79.99 | Easy |
| Adobe Premiere Pro | Windows, Mac | $20.99/month | Easy-Medium |
| HitFilm Express | Windows, Mac | Free | Easy |
| Kdenlive | Windows, Mac, Linux | Free | Medium-Difficult |
| OpenShot | Windows, Mac, Linux, OsX | Free | Medium-Difficult |
| Blender | Windows, Mac, Linux | Free | Easy |
| Jahshaka | Windows, Linux, OsX | Free | Easy-Medium |
| Final Cut Pro | Mac | Lifetime-$299.99 | Easy-Medium |
| Cyberlink PowerDirector 365 | Windows, Mac | Lifetime-$52.50 | Easy-Medium |
Part 2: Top 10 Sony Vegas (Vegas Pro) Alternatives & Competitors
Now that you know the primary differences between the Sony Vegas Pro alternatives. Are you find anything you like? Let’s move on to more details for your further consideration.
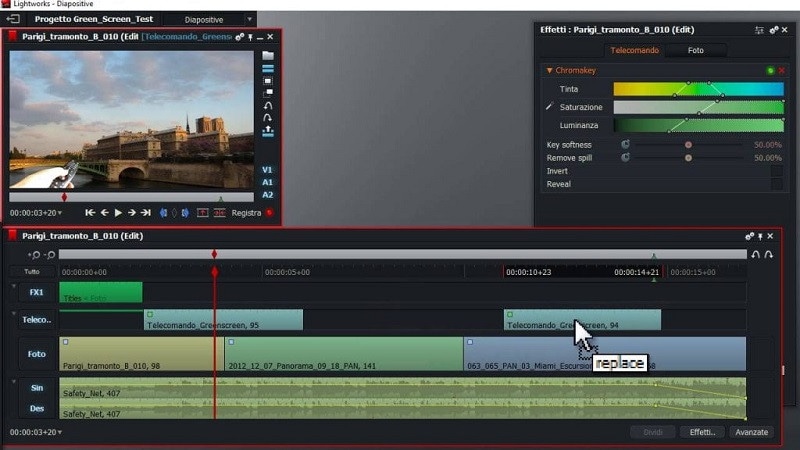
1. Lightworks
With Lightworks, using the independent timeline codec, format, and resolution alteration in videos is extremely simple. In addition, you can use the multi-cam editing feature for real-time, high-quality editing work. Moreover, drag and drop elements into videos for optimized video editing work, including pre-existing Storyboard points.
Main Features:
- Industry-grade features like QC, transcoding, and automated transfer are available.
- Edit files at different FPS limits and use three-point editing for recording/source files.
- Insert files and overwrite on a new project, replace, backfill, and fit to fill your video clips.
- Attach Storyboard tiles and match-frame clips/sub-clips easily.
Pros
- Flexible functionality and speedy transfers
- Edit files with professional movie-like quality
- Auto Sync feature for automatic timeline re-syncing is available
Cons
- Direct X is only available on the Windows version
- TotalFX plugin is not available for free- you have to upgrade to use them
OS Compatibility: Windows , Mac , Linux
Best For: Editing experts creating visually animated and professional-looking short videos can work with Lightworks.
What users say:
For professional-level video editing work, Lightworks brings a lot of resources and elements to users. According to reviews , people who have tried it have experienced better video editing functionality with these resources.
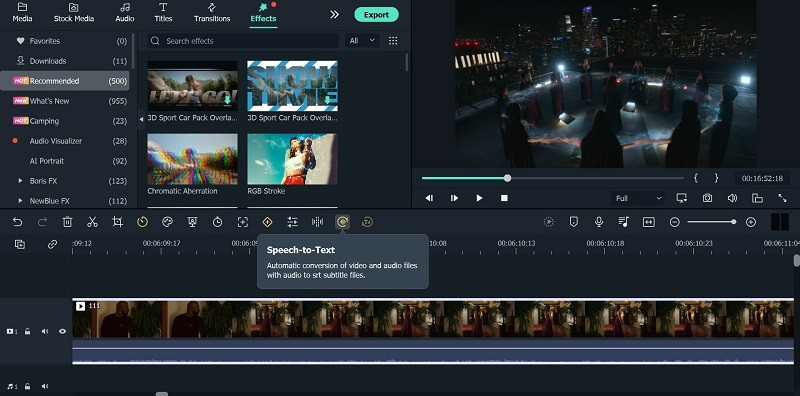
2. Wondershare Filmora
The top Vegas Pro alternative that both Windows and Mac users can opt for is Filmora. The software has advanced AI-incorporated editing functions for automated editing work, including preset effects from FX plugins. Besides that, you can easily add pre-set transitions, audio clips, text, images, and more.
Beginners find it simple to navigate through its interface and can opt for the Instant Mode function for automatic video edits .
Free Download For Win 7 or later(64-bit)
Free Download For macOS 10.14 or later

For a better idea of how this works, you should check out this tutorial video: https://filmora.wondershare.com/get-creative/make-a-video-quickly.html
Main Features:
- Instant Mode is available for automatic video/audio project editing out of 6 shorter clips.
- Support Advanced editing tools like Chroma Key and AI Portrait.
- Record voiceover, apply speech-to-text/text-to-speech functions, and more audio editing features.
- OpenFX plugins like BorisFX and NewBlue FX for a better list of pre-set effects.
Pros
- Simple to use and navigate on the editor timeline, especially with drag-and-drop support
- Output your editing files in different video/audio formats
- Quickly share the file on Vimeo or YouTube, besides downloading it on the local hard drive
Cons
- Free trial users cannot bring their Instant Mode-created videos into the editor timeline
- 4K support only with selected MKV, MOV, M4V (for Mac), and MP4 codecs
OS Compatibility: Windows , Mac
G2 Rating: 4.4 out of 5
Best For: All types of users like educators, students, homeowners, businesses, and video editors for comprehensive video editing tools and uses.
What users say:
Filmora is extremely simple to use, with advanced features available for top-level video editing work. Users mention in reviews how they have benefitted from the simple functionality and dynamic AI-based features available here for video editing.
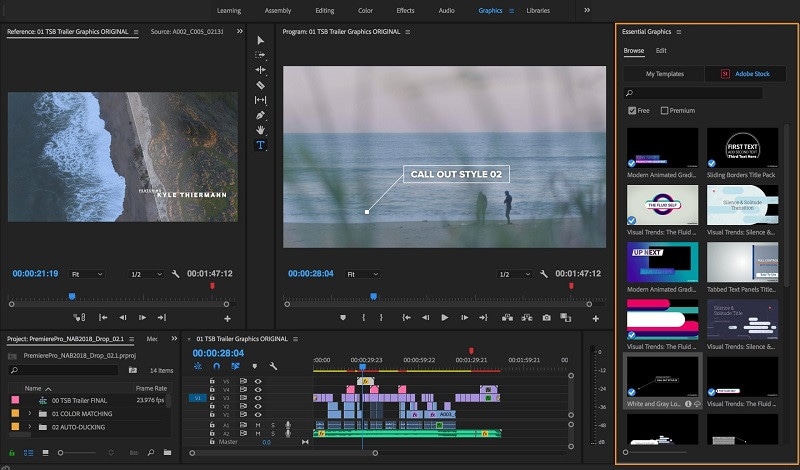
3. Adobe Premiere Pro
If you are looking for high-quality programs like Sony Vegas, Adobe Premiere Pro is a reliable choice. This editing software allows you to easily create, delete, and move big video projects. Moreover, you can work on multiple files simultaneously and use shortcuts for faster editing work.
Preset filters and editing features are also available here, especially if they choose the Adobe Creative Cloud option.
Main Features:
- Multiple pre-set transitions and effects are available for quick thematic changes.
- Add graphics, titles, and captions.
- Color grading and correction tools are available.
- It is possible to add keyframing and animation elements.
Pros
- Opting for group plans for video editing practice and learning using Adobe Premiere Pro is possible
- Aligns audio with videos instantly during editing
- Utilize Quick Export functionality for video files in some taps
Cons
- Windows High Contrast Mode is supported but to a limited extent, like with menus and title bars
- HDR workflows can only be handled on the Windows version with DisplayHDR 400 support
OS Compatibility: Windows , Mac
G2 Rating: 4.5 out of 5
Best For: Professional editors and trainers can use the various plans under Adobe Premiere Pro for video/audio editing.
What users say:
Advertisers and videographers enjoy high-grade video editing features and like the simple effects and interface quality. The motion graphics support in Adobe Premiere Pro is high-grade as well.
4. HitFilm Express
A capable Sony Vegas free alternative that you should check out is HitFilm Express. With this, you can expect many prepared designs for quick video edits. Additionally, you can manually customize the video files you are working on with high-grade personalization features available in the timeline.

Main Features:
- Pre-set customizable designs are available.
- Built-in sound effects and soundtracks are usable for free.
- Cache renders in timelines are optimized.
- The New Grade Clips feature allows users to apply varying effects to many video clips.
Pros
- Stable process of switching between timelines with an active orbit tool
- Easy to switch between 2D/3D timelines while using the text tool
- Simple to use for an unlimited period
Cons
- Does not work on older versions than Windows 10 and macOS 10.14
- Users cannot integrate this with Vegas Pro like before
OS Compatibility: Windows , Mac
TechRadar Rating: 4.5 out of 5
Best For: This software is a high-quality video editor for custom video editing work, fit for beginners and professionals alike.
What users say:
HitFilm Express is easy to use and efficient in the market for professional-level editing. The tutorial is available here for quick learning about the steps, and expandable features are well-admired by users.
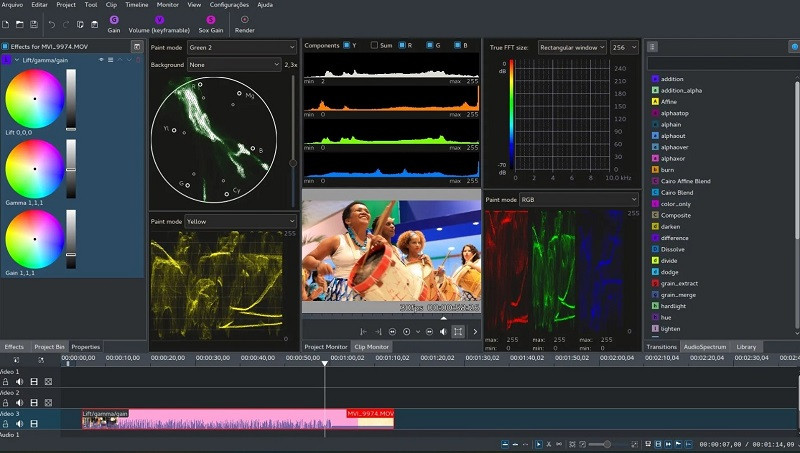
5. Kdenlive
A high-quality Sony Vegas open-source variety that you should seriously consider is Kdenlive. The video editor comes with MLT framework support and holds many tools for optimizing video editing.
To simplify, you can arrange and adjust various video/audio tracks and mute or lock specific ones as needed. Add everything from filters, texts, and transitions using this editor for high-grade video projects.
Main Features:
- Get an automatic backup of your video project while you are editing it.
- Use proxy editing to create low-resolution source clip copies and render them later on computers.
- Multiple video/audio scopes are available for monitoring projects like vectorscope, waveform, and RDB Parade.
- Many transition and effect choices to use.
Pros
- Flexibility with themes to add with multiple options
- Pre-render specific timeline parts for preview
- Effects are simple to use with keyframing quality
Cons
- Complex for completely non-technical users to adapt to
- Only supports 64-bit versions in regards to Windows-based compatibility
Trustpilot Rating: 3.7 out of 5
Best For: High-level editing experts who need strong video editing and monitoring features in an open-source platform.
What users say:
Kdenlive, as an open-source video editing software, assures quick and straightforward usability with projects. Per reviews , users like the ability to make simple video edits without bugs in this editor and quickly export finished projects.
6. OpenShot
OpenShot is a high-quality cross-platform video editor that you can use on different devices for quick but dynamic video project edits. Use keyframing ability here to adjust the animated elements you add to the file.
Moreover, cut the videos with simple steps and add many audio tracks/background videos/watermarks in layers. Also, get several video effects to optimize the video look easily.
Main Features:
- Adjust video speed in reverse motion, fast forward, and slow motion.
- Render effects and 3D animated elements into the video project.
- Get title templates and edit them as needed.
- Visualize the background audio beats with waveform support.
Pros
- Very user-friendly interface with a simple navigation guarantee
- Supports more than 70 languages that you can translate as well using LaunchPad
- Drag-and-drop functionality is supported for adding images, audio, and videos into the OpenShot editor timeline
Cons
- Some bug issues can occur
- Slightly complex learning curve
OS Compatibility: Windows , Linux , OsX
G2 Rating: 4.4 out of 5
Best For: Professional-level video editing experts can opt for this cross-platform free software for high-quality video creations.
What users say:
The OpenShot software is suitable for high-quality video editing across different devices and operating systems. Users like the lack of automated watermarks on all videos, its simple dashboard, and its multi-track editing ability, all available for free.
7. Blender
Blender is free video editing software like Sony Vegas that users can use for video editing, but it is also effective for game development with animations. Indeed, you can create and render dynamic-looking scenes with features like Cycles.
Furthermore, the software has a rich modelling toolset with solutions like curves and sculpting tools.

Main Features:
- Completely customization-friendly UI, shortcuts, and window layout here.
- Customization and scripting are possible to do with this software due to the Python API support.
- Supports access and integration of many pipeline tools for projects.
- Comes with advanced simulation-based features available in MantaFlow and Bullet libraries.
Pros
- Basic and advanced tools for quick video edits
- Strong composition and masking ability with object-based motion tracking benefits
- Easily create short animations with Blender
Cons
- Data under the standalone games created here fall under GPL conditions
- Strict licensing rules are applicable here
OS Compatibility: Windows , Mac , Linux
G2 Rating: 4.5 out of 5
Best For: Game developers and videographers for companies can use this open-source platform for creation and editing.
What users say:
Blender is a capable software for animation-based editing, with high-quality game-based features and interactive elements that make editing simple. As per reviews , users like the simple animation-based tools and fast rendering it offers.
8. Jahshaka
Users of Jahshaka can experience an inclusive, collaborative environment for metaverse-level editing work. This free editing software, like Sony Vegas, focuses mainly on VR-based editing functions and comes with powerful tools for project management and content creation.
Take the help of other team members to collaborate on dynamic virtual world building, editing, and publishing.
Main Features:
- Compatible player for different desktop and mobile devices.
- Create diversified worlds and scenes with one comprehensive platform.
- Immersive software 3D video development.
- Access to pre-built content and libraries of scenes and assets
Pros
- Easily share and distribute your virtual projects
- Deliver final projects offline and online
- An interactive multi-user engine is available
Cons
- Usable for a niche audience and does not include standard video editing tools
- Jahshaka V2 legacy support is no longer active
OS Compatibility: Windows , Linux , OsX
SourceForge Rating: 4.4 out of 5
Best For: Professional video editors who want a collaborative experience in VR-based development and publishing.
What users say:
Jahshaka is a suitable program for optimized VR-based editing with many preset features and themes to choose from. Most users enjoy the new features and worlds and can work with them efficiently.
9. Final Cut Pro
One of the top Sony Vegas alternatives Mac users can safely turn to is Final Cut Pro, which has powerful modern video editing features. With this software, you will access Cinematic Mode, which you can use to create stylish and thematic video scenes.
Similarly, the Object Tracker features utilize ML technology to automatically detect objects and faces in moving videos. It can align effects and titles accurately with the graphical elements in videos.

Main Features:
- Object Tracker feature for using color correction and adding texts into moving videos.
- Accelerated functional for motion tracking with Apple Neural Engine.
- Add high-quality effects and titles into videos with Cinematic Mode support.
- Preset audio tracks and royalty-free sound effects are available for editing.
Pros
- Handle color grading for optimized scene quality
- Adjust the field depth and focus depth in clips
- Share projects across iOS and macOS platforms
Cons
- Not valid for Windows users
- Relatively high cost to avail the paid version with all advanced features
OS Compatibility: Mac
TrustRadius Rating: 4.8 out of 5
Best For: Professional video editors, students, and filmmakers who want to create cinematic-quality video projects.
What users say:
Final Cut Pro is an efficient Mac-based video editing tool with easy sharing and editing capabilities, rich effects/transitions options, and fast rendering ability. Customers enjoy the intuitive non-linear editor, easy accessibility to social media platforms for file exporting, and live scrubbing, as noted in one review .
10. Cyberlink PowerDirector 365
Another Sony Vegas mac alternative for Windows you should give a try is PowerDirector 365 from Cyberlink. This software removes or compiles video clips and uses masking features like image/custom masks.
Preset special effects, blending modes, and sound effects are available here for quick editing. Additionally, the AI-powered Motion Tracking traces objects in clips and adds graphics, animations, and text quickly in line with it.

Main Features:
- You can create and remove videos with masking features.
- Drag and drop the pre-set effects and texts into videos.
- Adjust video clips with tools for border, gradation, and shadowing.
- Multiple animations, callouts, graphics, and stickers to add to videos.
Pros
- Use green screen functionality for quick background removal or editing
- Automatic audio mastering and mixing functionality are available
- Keyframing benefits for customized animations like scaling and positioning
Cons
- Dolby Digital-centric audio codec is not available for users
- Users can try features like Room Echo Removal and NVIDIA A/V Denoise only on Windows 11
OS Compatibility: Windows
TechRadar Rating: 4.5 out of 5
Best For: Professional videographers and regular users who want a Windows-based video editing software for standard video clip editing.
What users say:
Cyberlink PowerDirector is a powerful video editor with standard editing functions many users have tried and benefited from. According to customers , the program has high-quality video and audio editing benefits for presentations, with additional effects/splitting/cropping features.
Part 3: What are the limitations when using Sony Vegas (Vegas Pro) on Mac?
Yes, with the given Sony Vegas alternatives, Mac and Windows users can benefit heavily. But why is it important to try for a replacement when Sony Vegas Pro is relatively efficient software?
To know the answer, you should take the time to understand its limitations, which do exist.
It only works for Windows users
The Sony Vegas Pro software is not available for Mac or other operating systems besides Windows. In addition, it’ll be really complex and time-consuming, even if you opt for virtual machine software or handle dual booting techniques to configure the software on your Mac or Linux.
You need to invest in other hardware
Sony Vegas Pro does do not work within one comprehensive platform like other capable video editing software types, like Wondershare Filmora . You have to acquire a powerful PC and tools to operate it separately. The software works very slowly on older devices.
Not incredibly unique
The functions of Sony Vegas Pro match somewhat with other options in the market. So, users would not expect much value in purchasing this software’s plans that they want to upgrade from their previous system, but on the other hand, the available features are mostly standard-level in functionality as well.
Hot FAQs about Vegas Pro Alternatives
After knowing these details, many users still have specific common queries about opting for a Sony Vegas Pro alternatively. So these are some common FAQs about this- answered.
1. Can Sony Vegas be used on a Mac?
No, it is impossible to directly use Sony Vegas on macOS devices since it does not support it. Instead, you have to separately use a dual boot strategy or virtual machine software to activate the video editor on Mac devices, but the process for that is complex.
2. Is Wondershare Filmora or Vegas Pro better?
Wondershare Filmora and Vegas Pro are top-level options in video and audio editing projects with professional-level editing accuracy. However, Filmora has a cohesive ecosystem with rich AI and standard functions and comes with Mac/Windows support. So, in that sense, Filmora is comparatively a better choice.
Final Words
In place of Sony Vegas Pro, any of these options would also give you a great user experience. Out of them, Filmora is one that we will recommend due to its multi-faceted benefits and features for Mac and Windows users. Ultimately, make your decision based on your particular needs.
Free Download For Win 7 or later(64-bit)
Free Download For macOS 10.14 or later
Part 1: Sony Vegas Pro Alternatives & Competitors Overview
Here is a list of the top 10 tools we found after research. For an easier understanding, the following are the essential points of difference between alternative video editing software types for Sony Vegas Pro in a tabular form.
| Software | Supported OS | Price | Editor’s Verdict |
|---|---|---|---|
| Lightworks | Windows, Mac, Linux | Create-$9.99/month, Pro-$23.99/month | Medium-Difficult |
| Wondershare Filmora | Windows, Mac | Annual-$49.99, Perpetual-$79.99 | Easy |
| Adobe Premiere Pro | Windows, Mac | $20.99/month | Easy-Medium |
| HitFilm Express | Windows, Mac | Free | Easy |
| Kdenlive | Windows, Mac, Linux | Free | Medium-Difficult |
| OpenShot | Windows, Mac, Linux, OsX | Free | Medium-Difficult |
| Blender | Windows, Mac, Linux | Free | Easy |
| Jahshaka | Windows, Linux, OsX | Free | Easy-Medium |
| Final Cut Pro | Mac | Lifetime-$299.99 | Easy-Medium |
| Cyberlink PowerDirector 365 | Windows, Mac | Lifetime-$52.50 | Easy-Medium |
Part 2: Top 10 Sony Vegas (Vegas Pro) Alternatives & Competitors
Now that you know the primary differences between the Sony Vegas Pro alternatives. Are you find anything you like? Let’s move on to more details for your further consideration.
1. Lightworks
With Lightworks, using the independent timeline codec, format, and resolution alteration in videos is extremely simple. In addition, you can use the multi-cam editing feature for real-time, high-quality editing work. Moreover, drag and drop elements into videos for optimized video editing work, including pre-existing Storyboard points.
Main Features:
- Industry-grade features like QC, transcoding, and automated transfer are available.
- Edit files at different FPS limits and use three-point editing for recording/source files.
- Insert files and overwrite on a new project, replace, backfill, and fit to fill your video clips.
- Attach Storyboard tiles and match-frame clips/sub-clips easily.
Pros
- Flexible functionality and speedy transfers
- Edit files with professional movie-like quality
- Auto Sync feature for automatic timeline re-syncing is available
Cons
- Direct X is only available on the Windows version
- TotalFX plugin is not available for free- you have to upgrade to use them
OS Compatibility: Windows , Mac , Linux
Best For: Editing experts creating visually animated and professional-looking short videos can work with Lightworks.
What users say:
For professional-level video editing work, Lightworks brings a lot of resources and elements to users. According to reviews , people who have tried it have experienced better video editing functionality with these resources.
2. Wondershare Filmora
The top Vegas Pro alternative that both Windows and Mac users can opt for is Filmora. The software has advanced AI-incorporated editing functions for automated editing work, including preset effects from FX plugins. Besides that, you can easily add pre-set transitions, audio clips, text, images, and more.
Beginners find it simple to navigate through its interface and can opt for the Instant Mode function for automatic video edits .
Free Download For Win 7 or later(64-bit)
Free Download For macOS 10.14 or later
For a better idea of how this works, you should check out this tutorial video: https://filmora.wondershare.com/get-creative/make-a-video-quickly.html
Main Features:
- Instant Mode is available for automatic video/audio project editing out of 6 shorter clips.
- Support Advanced editing tools like Chroma Key and AI Portrait.
- Record voiceover, apply speech-to-text/text-to-speech functions, and more audio editing features.
- OpenFX plugins like BorisFX and NewBlue FX for a better list of pre-set effects.
Pros
- Simple to use and navigate on the editor timeline, especially with drag-and-drop support
- Output your editing files in different video/audio formats
- Quickly share the file on Vimeo or YouTube, besides downloading it on the local hard drive
Cons
- Free trial users cannot bring their Instant Mode-created videos into the editor timeline
- 4K support only with selected MKV, MOV, M4V (for Mac), and MP4 codecs
OS Compatibility: Windows , Mac
G2 Rating: 4.4 out of 5
Best For: All types of users like educators, students, homeowners, businesses, and video editors for comprehensive video editing tools and uses.
What users say:
Filmora is extremely simple to use, with advanced features available for top-level video editing work. Users mention in reviews how they have benefitted from the simple functionality and dynamic AI-based features available here for video editing.
3. Adobe Premiere Pro
If you are looking for high-quality programs like Sony Vegas, Adobe Premiere Pro is a reliable choice. This editing software allows you to easily create, delete, and move big video projects. Moreover, you can work on multiple files simultaneously and use shortcuts for faster editing work.
Preset filters and editing features are also available here, especially if they choose the Adobe Creative Cloud option.
Main Features:
- Multiple pre-set transitions and effects are available for quick thematic changes.
- Add graphics, titles, and captions.
- Color grading and correction tools are available.
- It is possible to add keyframing and animation elements.
Pros
- Opting for group plans for video editing practice and learning using Adobe Premiere Pro is possible
- Aligns audio with videos instantly during editing
- Utilize Quick Export functionality for video files in some taps
Cons
- Windows High Contrast Mode is supported but to a limited extent, like with menus and title bars
- HDR workflows can only be handled on the Windows version with DisplayHDR 400 support
OS Compatibility: Windows , Mac
G2 Rating: 4.5 out of 5
Best For: Professional editors and trainers can use the various plans under Adobe Premiere Pro for video/audio editing.
What users say:
Advertisers and videographers enjoy high-grade video editing features and like the simple effects and interface quality. The motion graphics support in Adobe Premiere Pro is high-grade as well.
4. HitFilm Express
A capable Sony Vegas free alternative that you should check out is HitFilm Express. With this, you can expect many prepared designs for quick video edits. Additionally, you can manually customize the video files you are working on with high-grade personalization features available in the timeline.
Main Features:
- Pre-set customizable designs are available.
- Built-in sound effects and soundtracks are usable for free.
- Cache renders in timelines are optimized.
- The New Grade Clips feature allows users to apply varying effects to many video clips.
Pros
- Stable process of switching between timelines with an active orbit tool
- Easy to switch between 2D/3D timelines while using the text tool
- Simple to use for an unlimited period
Cons
- Does not work on older versions than Windows 10 and macOS 10.14
- Users cannot integrate this with Vegas Pro like before
OS Compatibility: Windows , Mac
TechRadar Rating: 4.5 out of 5
Best For: This software is a high-quality video editor for custom video editing work, fit for beginners and professionals alike.
What users say:
HitFilm Express is easy to use and efficient in the market for professional-level editing. The tutorial is available here for quick learning about the steps, and expandable features are well-admired by users.
5. Kdenlive
A high-quality Sony Vegas open-source variety that you should seriously consider is Kdenlive. The video editor comes with MLT framework support and holds many tools for optimizing video editing.
To simplify, you can arrange and adjust various video/audio tracks and mute or lock specific ones as needed. Add everything from filters, texts, and transitions using this editor for high-grade video projects.
Main Features:
- Get an automatic backup of your video project while you are editing it.
- Use proxy editing to create low-resolution source clip copies and render them later on computers.
- Multiple video/audio scopes are available for monitoring projects like vectorscope, waveform, and RDB Parade.
- Many transition and effect choices to use.
Pros
- Flexibility with themes to add with multiple options
- Pre-render specific timeline parts for preview
- Effects are simple to use with keyframing quality
Cons
- Complex for completely non-technical users to adapt to
- Only supports 64-bit versions in regards to Windows-based compatibility
Trustpilot Rating: 3.7 out of 5
Best For: High-level editing experts who need strong video editing and monitoring features in an open-source platform.
What users say:
Kdenlive, as an open-source video editing software, assures quick and straightforward usability with projects. Per reviews , users like the ability to make simple video edits without bugs in this editor and quickly export finished projects.
6. OpenShot
OpenShot is a high-quality cross-platform video editor that you can use on different devices for quick but dynamic video project edits. Use keyframing ability here to adjust the animated elements you add to the file.
Moreover, cut the videos with simple steps and add many audio tracks/background videos/watermarks in layers. Also, get several video effects to optimize the video look easily.
Main Features:
- Adjust video speed in reverse motion, fast forward, and slow motion.
- Render effects and 3D animated elements into the video project.
- Get title templates and edit them as needed.
- Visualize the background audio beats with waveform support.
Pros
- Very user-friendly interface with a simple navigation guarantee
- Supports more than 70 languages that you can translate as well using LaunchPad
- Drag-and-drop functionality is supported for adding images, audio, and videos into the OpenShot editor timeline
Cons
- Some bug issues can occur
- Slightly complex learning curve
OS Compatibility: Windows , Linux , OsX
G2 Rating: 4.4 out of 5
Best For: Professional-level video editing experts can opt for this cross-platform free software for high-quality video creations.
What users say:
The OpenShot software is suitable for high-quality video editing across different devices and operating systems. Users like the lack of automated watermarks on all videos, its simple dashboard, and its multi-track editing ability, all available for free.
7. Blender
Blender is free video editing software like Sony Vegas that users can use for video editing, but it is also effective for game development with animations. Indeed, you can create and render dynamic-looking scenes with features like Cycles.
Furthermore, the software has a rich modelling toolset with solutions like curves and sculpting tools.
Main Features:
- Completely customization-friendly UI, shortcuts, and window layout here.
- Customization and scripting are possible to do with this software due to the Python API support.
- Supports access and integration of many pipeline tools for projects.
- Comes with advanced simulation-based features available in MantaFlow and Bullet libraries.
Pros
- Basic and advanced tools for quick video edits
- Strong composition and masking ability with object-based motion tracking benefits
- Easily create short animations with Blender
Cons
- Data under the standalone games created here fall under GPL conditions
- Strict licensing rules are applicable here
OS Compatibility: Windows , Mac , Linux
G2 Rating: 4.5 out of 5
Best For: Game developers and videographers for companies can use this open-source platform for creation and editing.
What users say:
Blender is a capable software for animation-based editing, with high-quality game-based features and interactive elements that make editing simple. As per reviews , users like the simple animation-based tools and fast rendering it offers.
8. Jahshaka
Users of Jahshaka can experience an inclusive, collaborative environment for metaverse-level editing work. This free editing software, like Sony Vegas, focuses mainly on VR-based editing functions and comes with powerful tools for project management and content creation.
Take the help of other team members to collaborate on dynamic virtual world building, editing, and publishing.
Main Features:
- Compatible player for different desktop and mobile devices.
- Create diversified worlds and scenes with one comprehensive platform.
- Immersive software 3D video development.
- Access to pre-built content and libraries of scenes and assets
Pros
- Easily share and distribute your virtual projects
- Deliver final projects offline and online
- An interactive multi-user engine is available
Cons
- Usable for a niche audience and does not include standard video editing tools
- Jahshaka V2 legacy support is no longer active
OS Compatibility: Windows , Linux , OsX
SourceForge Rating: 4.4 out of 5
Best For: Professional video editors who want a collaborative experience in VR-based development and publishing.
What users say:
Jahshaka is a suitable program for optimized VR-based editing with many preset features and themes to choose from. Most users enjoy the new features and worlds and can work with them efficiently.
9. Final Cut Pro
One of the top Sony Vegas alternatives Mac users can safely turn to is Final Cut Pro, which has powerful modern video editing features. With this software, you will access Cinematic Mode, which you can use to create stylish and thematic video scenes.
Similarly, the Object Tracker features utilize ML technology to automatically detect objects and faces in moving videos. It can align effects and titles accurately with the graphical elements in videos.
Main Features:
- Object Tracker feature for using color correction and adding texts into moving videos.
- Accelerated functional for motion tracking with Apple Neural Engine.
- Add high-quality effects and titles into videos with Cinematic Mode support.
- Preset audio tracks and royalty-free sound effects are available for editing.
Pros
- Handle color grading for optimized scene quality
- Adjust the field depth and focus depth in clips
- Share projects across iOS and macOS platforms
Cons
- Not valid for Windows users
- Relatively high cost to avail the paid version with all advanced features
OS Compatibility: Mac
TrustRadius Rating: 4.8 out of 5
Best For: Professional video editors, students, and filmmakers who want to create cinematic-quality video projects.
What users say:
Final Cut Pro is an efficient Mac-based video editing tool with easy sharing and editing capabilities, rich effects/transitions options, and fast rendering ability. Customers enjoy the intuitive non-linear editor, easy accessibility to social media platforms for file exporting, and live scrubbing, as noted in one review .
10. Cyberlink PowerDirector 365
Another Sony Vegas mac alternative for Windows you should give a try is PowerDirector 365 from Cyberlink. This software removes or compiles video clips and uses masking features like image/custom masks.
Preset special effects, blending modes, and sound effects are available here for quick editing. Additionally, the AI-powered Motion Tracking traces objects in clips and adds graphics, animations, and text quickly in line with it.
Main Features:
- You can create and remove videos with masking features.
- Drag and drop the pre-set effects and texts into videos.
- Adjust video clips with tools for border, gradation, and shadowing.
- Multiple animations, callouts, graphics, and stickers to add to videos.
Pros
- Use green screen functionality for quick background removal or editing
- Automatic audio mastering and mixing functionality are available
- Keyframing benefits for customized animations like scaling and positioning
Cons
- Dolby Digital-centric audio codec is not available for users
- Users can try features like Room Echo Removal and NVIDIA A/V Denoise only on Windows 11
OS Compatibility: Windows
TechRadar Rating: 4.5 out of 5
Best For: Professional videographers and regular users who want a Windows-based video editing software for standard video clip editing.
What users say:
Cyberlink PowerDirector is a powerful video editor with standard editing functions many users have tried and benefited from. According to customers , the program has high-quality video and audio editing benefits for presentations, with additional effects/splitting/cropping features.
Part 3: What are the limitations when using Sony Vegas (Vegas Pro) on Mac?
Yes, with the given Sony Vegas alternatives, Mac and Windows users can benefit heavily. But why is it important to try for a replacement when Sony Vegas Pro is relatively efficient software?
To know the answer, you should take the time to understand its limitations, which do exist.
It only works for Windows users
The Sony Vegas Pro software is not available for Mac or other operating systems besides Windows. In addition, it’ll be really complex and time-consuming, even if you opt for virtual machine software or handle dual booting techniques to configure the software on your Mac or Linux.
You need to invest in other hardware
Sony Vegas Pro does do not work within one comprehensive platform like other capable video editing software types, like Wondershare Filmora . You have to acquire a powerful PC and tools to operate it separately. The software works very slowly on older devices.
Not incredibly unique
The functions of Sony Vegas Pro match somewhat with other options in the market. So, users would not expect much value in purchasing this software’s plans that they want to upgrade from their previous system, but on the other hand, the available features are mostly standard-level in functionality as well.
Hot FAQs about Vegas Pro Alternatives
After knowing these details, many users still have specific common queries about opting for a Sony Vegas Pro alternatively. So these are some common FAQs about this- answered.
1. Can Sony Vegas be used on a Mac?
No, it is impossible to directly use Sony Vegas on macOS devices since it does not support it. Instead, you have to separately use a dual boot strategy or virtual machine software to activate the video editor on Mac devices, but the process for that is complex.
2. Is Wondershare Filmora or Vegas Pro better?
Wondershare Filmora and Vegas Pro are top-level options in video and audio editing projects with professional-level editing accuracy. However, Filmora has a cohesive ecosystem with rich AI and standard functions and comes with Mac/Windows support. So, in that sense, Filmora is comparatively a better choice.
Final Words
In place of Sony Vegas Pro, any of these options would also give you a great user experience. Out of them, Filmora is one that we will recommend due to its multi-faceted benefits and features for Mac and Windows users. Ultimately, make your decision based on your particular needs.
Free Download For Win 7 or later(64-bit)
Free Download For macOS 10.14 or later
Expert- The Best 4K/8K Video Editing Programs
3 Best 4K/8K Video Editing Software in 2024

Max Wales
Mar 27, 2024• Proven solutions
Red, Panavision Sony or Sharp are some of the leaders on the 8K camera market, but the footage these cameras capture isn’t compatible with all video editing apps for Macs and PCs. Currently, there are only a handful of 8K video editors you can use to process footage captured in 8K resolution professionally.
Even so, 8K video files can be edited with some powerful video editing software . In this article, we are going to take you through some of the best 8K video editing software products on the market and help you select the app that can cater to all of your video editing needs.
3 Best 4K/8K Video Editing Software Products
Editing the footage recorded in 8K resolution at the professional level requires much more than a versatile video editing app. A computer’s processing power, having sufficient storage space, and a monitor that can display 8K videos accurately are all factors that can simplify and facilitate the video editing process. So let’s that a look at some of the best 8K video editing apps film and TV industry professionals can use to process the footage captured in 8K resolution.
1. Wondershare Filmora - for 4K video editing
It doesn’t support 8k video yet, but mostly for 4K video editing, it’s your best choice. The latest version of Filmora video editor is the stripped back, simpler option for video editors who do not want the complexity, advanced features and extra cost of the professional video editing software. It features an interface that has been created for ease of use, but there is also the option to select between Expert or Quick editing modes, depending upon your skill level and needs.

Cool effects include the particularly interesting Hollywood style effects, sound effects and stunning templates. Other interesting and new features include the Green Screen and Scene Detection options. The software can also automatically fix the footage with lighting or color issues which can result in a much more polished end result.
The newly added Action Cam Tool allows you to merge, cut and edit 4k videos shot by your action cameras, smartphones or other 4k cameras in minutes. You can have a try it. It’s free trial.
For Win 7 or later (64-bit)
 Secure Download
For macOS 10.14 or later
Secure Download
2. Adobe Premiere Pro - for 8K video editing
Price: $20,99 per month as a single app
Compatibility: macOS, Windows
Importing and editing 8K footage with Adobe Premiere Pro CC 2019 isn’t any different than editing videos captured in lower resolutions. However, this video editing software for Mac and PC computers doesn’t let you choose the 8K resolution from its Export window. That is why you must adjust a project’s resolution from the Sequence Settings window before you actually start manipulating the footage.
So if you change the Editing mode to Custom and you set the resolution of a sequence to 7680 x 4320, Adobe Premiere Pro will allow you to export your video in the 8K resolution.
Keep in mind that you must also change the codec to from the Export Settings window in order to get the maximum video quality. Optionally, you can experiment with different export settings depending on the type of project you’re working on and the quality of the output file you would like to create.
Despite the fact that the process of creating 8K videos with Adobe Premiere Pro is a bit technical, this 8K video editing software is still one of the best options you can find on the market. Moreover, the video editing tools you’ll have at your disposal if you choose to edit your 8K videos with this video editing app are going to enable you to produce professional-looking videos.
\
3. Final Cut Pro X - for 8K video editing
Price: $299,99
Compatibility: macOS
The latest update of Final Cut Pro X that was released a little over a month ago has brought significant changes for different versions of the macOS. The 8K video editor’s improved capability to process ProRes files has enabled editors to play up to 16 streams of 4K ProRes files at the same time, while the Metal-based engine accelerates the rendering process and real-time effects.
Besides, you can now play up to three streams of 8K ProRes raw videos captured with RED and other professional cameras. These improvements enable you to import, process and export 8K videos much faster than ever before, which is the reason why Final Cut Pro X is currently one of the best, if not the best 8K video editing software for Mac computers.
You should keep in mind that you are going to need at least 8 GB and preferably more of RAM and lots of storage space if you are planning on editing 8K footage with Final Cut Pro X on a constant basis. Using proxies can make the process of editing 8K video files much faster, but you are still going to need a hard-drive where you can keep all of your high-resolution materials.
Looking for video editing software to edit 4K videos? Check our picks of the best 4K video editing software.
Conclusion
Even though most of non-linear video editing apps offer support for 8K video editing, only a few of them are powerful enough to grant you complete creative freedom over your 8K video projects. That’s why you must make sure that 8K video editing software you are considering offers all the tools you are going to need to process 8K footage effortlessly.
You can hardly go wrong if you choose to edit your videos with any of the 8K video editors we featured in this article. Which 8K video editing software are you going to use to edit your videos? Leave a comment and share your opinions with us.
Max Wales
Max Wales is a writer and a lover of all things video.
Follow @Max Wales
Max Wales
Mar 27, 2024• Proven solutions
Red, Panavision Sony or Sharp are some of the leaders on the 8K camera market, but the footage these cameras capture isn’t compatible with all video editing apps for Macs and PCs. Currently, there are only a handful of 8K video editors you can use to process footage captured in 8K resolution professionally.
Even so, 8K video files can be edited with some powerful video editing software . In this article, we are going to take you through some of the best 8K video editing software products on the market and help you select the app that can cater to all of your video editing needs.
3 Best 4K/8K Video Editing Software Products
Editing the footage recorded in 8K resolution at the professional level requires much more than a versatile video editing app. A computer’s processing power, having sufficient storage space, and a monitor that can display 8K videos accurately are all factors that can simplify and facilitate the video editing process. So let’s that a look at some of the best 8K video editing apps film and TV industry professionals can use to process the footage captured in 8K resolution.
1. Wondershare Filmora - for 4K video editing
It doesn’t support 8k video yet, but mostly for 4K video editing, it’s your best choice. The latest version of Filmora video editor is the stripped back, simpler option for video editors who do not want the complexity, advanced features and extra cost of the professional video editing software. It features an interface that has been created for ease of use, but there is also the option to select between Expert or Quick editing modes, depending upon your skill level and needs.
Cool effects include the particularly interesting Hollywood style effects, sound effects and stunning templates. Other interesting and new features include the Green Screen and Scene Detection options. The software can also automatically fix the footage with lighting or color issues which can result in a much more polished end result.
The newly added Action Cam Tool allows you to merge, cut and edit 4k videos shot by your action cameras, smartphones or other 4k cameras in minutes. You can have a try it. It’s free trial.
For Win 7 or later (64-bit)
Secure Download
For macOS 10.14 or later
Secure Download
2. Adobe Premiere Pro - for 8K video editing
Price: $20,99 per month as a single app
Compatibility: macOS, Windows
Importing and editing 8K footage with Adobe Premiere Pro CC 2019 isn’t any different than editing videos captured in lower resolutions. However, this video editing software for Mac and PC computers doesn’t let you choose the 8K resolution from its Export window. That is why you must adjust a project’s resolution from the Sequence Settings window before you actually start manipulating the footage.
So if you change the Editing mode to Custom and you set the resolution of a sequence to 7680 x 4320, Adobe Premiere Pro will allow you to export your video in the 8K resolution.
Keep in mind that you must also change the codec to from the Export Settings window in order to get the maximum video quality. Optionally, you can experiment with different export settings depending on the type of project you’re working on and the quality of the output file you would like to create.
Despite the fact that the process of creating 8K videos with Adobe Premiere Pro is a bit technical, this 8K video editing software is still one of the best options you can find on the market. Moreover, the video editing tools you’ll have at your disposal if you choose to edit your 8K videos with this video editing app are going to enable you to produce professional-looking videos.
\
3. Final Cut Pro X - for 8K video editing
Price: $299,99
Compatibility: macOS
The latest update of Final Cut Pro X that was released a little over a month ago has brought significant changes for different versions of the macOS. The 8K video editor’s improved capability to process ProRes files has enabled editors to play up to 16 streams of 4K ProRes files at the same time, while the Metal-based engine accelerates the rendering process and real-time effects.
Besides, you can now play up to three streams of 8K ProRes raw videos captured with RED and other professional cameras. These improvements enable you to import, process and export 8K videos much faster than ever before, which is the reason why Final Cut Pro X is currently one of the best, if not the best 8K video editing software for Mac computers.
You should keep in mind that you are going to need at least 8 GB and preferably more of RAM and lots of storage space if you are planning on editing 8K footage with Final Cut Pro X on a constant basis. Using proxies can make the process of editing 8K video files much faster, but you are still going to need a hard-drive where you can keep all of your high-resolution materials.
Looking for video editing software to edit 4K videos? Check our picks of the best 4K video editing software.
Conclusion
Even though most of non-linear video editing apps offer support for 8K video editing, only a few of them are powerful enough to grant you complete creative freedom over your 8K video projects. That’s why you must make sure that 8K video editing software you are considering offers all the tools you are going to need to process 8K footage effortlessly.
You can hardly go wrong if you choose to edit your videos with any of the 8K video editors we featured in this article. Which 8K video editing software are you going to use to edit your videos? Leave a comment and share your opinions with us.
Max Wales
Max Wales is a writer and a lover of all things video.
Follow @Max Wales
Filmora Watermark Removal: Free and Paid Methods
How to Remove Filmora Watermark

Richard Bennett
Mar 27, 2024• Proven solutions
When it comes to video editing, Filmora is your best bet. It is a great software that content creators and YouTube vloggers trust the most for making their videos look more pleasing. With Filmora, you can trim, cut, combine, add eye-catching effects, and perform many other functions.
However, there appears to be a Filmora watermark on editing videos in the free version. And, the only way to remove it is by subscribing to the paid version.
But, here, we will teach you how to remove the Filmora watermark without even subscribing. Let’s dive in.
Part 1: How to Remove Filmora Watermark for Free 2024?
1. Remove Watermark from Video with Filmora
Most of the professional creators have already bought the premium version of Filmora to enjoy all the features. But they must have tried the trial version of Filmora at some point in their journey.
If you are a newbie in the video editing world and don’t know how to get a free trial version of Filmora without a watermark, follow the steps below to get rid of the watermark after editing.
For Win 7 or later (64-bit)
Secure Download
For macOS 10.12 or later
Secure Download
Note: The method mentioned in this part may not be available on some Filmora versions. If you find it doesn’t work, please contact us.
Step 1: Open the Previous Project
Launch the Filmora application on your PC or Mac, here I’m using Windows as an example. In the start interface, you will see the recent project library, click any of them to open the previous project with a watermark.
For Win 7 or later (64-bit)
Secure Download
For macOS 10.12 or later
Secure Download

Note: If your video has a Filmora watermark, you should open the project to remove the watermark. Importing the video to Filmora again won’t remove the watermark.
Step 2: Log in WSID Account
Since you have signed up for the WSID and redeemed the free access to Filmora, it’s time to sign in to your account on Filmora. Now click on the Log into Wondershare ID from the Help menu. If you are running Filmora V10.5.5 and later versions, you can click the Login button on the upper right corner directly. Next, enter your email under the Email tab and then press the Next option. After that, enter your password under the Password tab and click on the Login option.

Step 3: Export Video
After activating your trial version, you can enjoy the features of the premium version of Filmora. If you don’t want to edit anymore in this project, click the Export button. You can now export the video.

Note: If you have moved or deleted some files for this video project, you may need to locate the missing files again. Click the Locate Selected button to import the missing files.
To improve your video editing and create a more stunning video, you can use the package Filmora & Filmstock video templates”, click the image below to see how to make your storytelling more engaging.
2. Remove Watermark from Video with Apowersoft
Apowersoft comes with different features to make your videos look awesome. It’s a free online tool that serves multiple purposes. Contrarily, you can also download the app on your PC to work without the internet. So, for example, you can record screens, convert videos, and do a lot of valuable stuff. Apowersoft also allows you to remove watermarks from video.
So, if you want to remove the watermark online with Apowersoft, go to the website and click on the blue area. Upload the video and select the watermarked area. The removal process will begin shortly.

However, make sure that your video file has one of the following supported formats, including MP4, FLV, MKV, MOV, WEBM, WMV, 3GP, ASF, AVI, MPG, MPEG, and TS. And in case you find any complications uploading the video online, click on the “Download App” button to install Apowersoft in your system. Doing so will help you work smoothly.
![]()
A cross-platform for making videos anywhere for all creators

Why your video editing isn’t good enough? How about some creative inspo?
- 100 Million+ Users
- 150+ Countries and Regions
- 4 Million+ Social Media Followers
- 5 Million+ Stock Media for Use
* Secure Download

Part 2: Where to Buy Filmora to Remove Watermark?
In the above parts, we have discussed the methods to remove the Filmora watermark for free via earning points to redeem the free access. However, free trials always come with a specific number of limitations. Since you are a content creator, you want to use all the features to make your content look more attractive and pleasing. For that, you have to purchase Wondershare Filmora.
For Win 7 or later (64-bit)
Secure Download
For macOS 10.12 or later
Secure Download
Although if you are not aware of how to remove the Filmora watermark by purchasing, then we have got you covered. We have listed a stepwise technique you can follow to purchase the premium version of Filmora.
Step 1: Click on Purchase
Launch Filmora on your PC and log into your WSID by click on the Login button. If you have not purchased the subscription, you will see the Purchase option in the top right corner. Click on it to buy the full version.
Step 2: Select the Suitable Plan
A window with three different plans offered by the developers will appear. Select the plan that seems suitable and fitting to you and click on the Buy Now option below that plan.
Annual Plan: Buy Filmora for US$49.99 for 1 year including $9.99 for Filmstock Standard Assets and $5.99 for AI portrait add-on per month. You can un-check the later ones to buy Filmora only at the cost of USD 49.99/year.
Perpetual Plan: Get Filmora for US$ 79.99 (one-time fee) including $9.99 for Filmstock Standard Assets and $5.99 for AI portrait add-on per month. You can un-check the later ones to buy Filmora Perpetual only at the cost of USD 79.99.

Step 3: Fill the Form
After selecting the plan, a form will appear, which requires logging in to your WSID. In the left panel, you will see the product you have chosen, select your payment method and fill the form with the correct information. After filling the form, click on the Security Checkout button.

After purchasing the Filmora plan, go to Filmora again and refresh your account information. And then you will the Purchase button is gone, and there will be no watermark after exporting the video from Filmora.
Conclusion
Although a free version of Wondershare Filmora Video Editor has several valuable features, it comes with multiple limitations, such as a watermark. You can avoid those watermarks for free and also by purchasing the premium version. But most people do not know how they can remove the watermarks. To help them, we came up with three different stepwise methods to remove the Filmora watermark. Choose the technique that seems suitable to you and start editing!
Richard Bennett
Richard Bennett is a writer and a lover of all things video.
Follow @Richard Bennett
Richard Bennett
Mar 27, 2024• Proven solutions
When it comes to video editing, Filmora is your best bet. It is a great software that content creators and YouTube vloggers trust the most for making their videos look more pleasing. With Filmora, you can trim, cut, combine, add eye-catching effects, and perform many other functions.
However, there appears to be a Filmora watermark on editing videos in the free version. And, the only way to remove it is by subscribing to the paid version.
But, here, we will teach you how to remove the Filmora watermark without even subscribing. Let’s dive in.
Part 1: How to Remove Filmora Watermark for Free 2024?
1. Remove Watermark from Video with Filmora
Most of the professional creators have already bought the premium version of Filmora to enjoy all the features. But they must have tried the trial version of Filmora at some point in their journey.
If you are a newbie in the video editing world and don’t know how to get a free trial version of Filmora without a watermark, follow the steps below to get rid of the watermark after editing.
For Win 7 or later (64-bit)
Secure Download
For macOS 10.12 or later
Secure Download
Note: The method mentioned in this part may not be available on some Filmora versions. If you find it doesn’t work, please contact us.
Step 1: Open the Previous Project
Launch the Filmora application on your PC or Mac, here I’m using Windows as an example. In the start interface, you will see the recent project library, click any of them to open the previous project with a watermark.
For Win 7 or later (64-bit)
Secure Download
For macOS 10.12 or later
Secure Download
Note: If your video has a Filmora watermark, you should open the project to remove the watermark. Importing the video to Filmora again won’t remove the watermark.
Step 2: Log in WSID Account
Since you have signed up for the WSID and redeemed the free access to Filmora, it’s time to sign in to your account on Filmora. Now click on the Log into Wondershare ID from the Help menu. If you are running Filmora V10.5.5 and later versions, you can click the Login button on the upper right corner directly. Next, enter your email under the Email tab and then press the Next option. After that, enter your password under the Password tab and click on the Login option.
Step 3: Export Video
After activating your trial version, you can enjoy the features of the premium version of Filmora. If you don’t want to edit anymore in this project, click the Export button. You can now export the video.
Note: If you have moved or deleted some files for this video project, you may need to locate the missing files again. Click the Locate Selected button to import the missing files.
To improve your video editing and create a more stunning video, you can use the package Filmora & Filmstock video templates”, click the image below to see how to make your storytelling more engaging.
2. Remove Watermark from Video with Apowersoft
Apowersoft comes with different features to make your videos look awesome. It’s a free online tool that serves multiple purposes. Contrarily, you can also download the app on your PC to work without the internet. So, for example, you can record screens, convert videos, and do a lot of valuable stuff. Apowersoft also allows you to remove watermarks from video.
So, if you want to remove the watermark online with Apowersoft, go to the website and click on the blue area. Upload the video and select the watermarked area. The removal process will begin shortly.
However, make sure that your video file has one of the following supported formats, including MP4, FLV, MKV, MOV, WEBM, WMV, 3GP, ASF, AVI, MPG, MPEG, and TS. And in case you find any complications uploading the video online, click on the “Download App” button to install Apowersoft in your system. Doing so will help you work smoothly.
![]()
A cross-platform for making videos anywhere for all creators
Why your video editing isn’t good enough? How about some creative inspo?
- 100 Million+ Users
- 150+ Countries and Regions
- 4 Million+ Social Media Followers
- 5 Million+ Stock Media for Use
* Secure Download
Part 2: Where to Buy Filmora to Remove Watermark?
In the above parts, we have discussed the methods to remove the Filmora watermark for free via earning points to redeem the free access. However, free trials always come with a specific number of limitations. Since you are a content creator, you want to use all the features to make your content look more attractive and pleasing. For that, you have to purchase Wondershare Filmora.
For Win 7 or later (64-bit)
Secure Download
For macOS 10.12 or later
Secure Download
Although if you are not aware of how to remove the Filmora watermark by purchasing, then we have got you covered. We have listed a stepwise technique you can follow to purchase the premium version of Filmora.
Step 1: Click on Purchase
Launch Filmora on your PC and log into your WSID by click on the Login button. If you have not purchased the subscription, you will see the Purchase option in the top right corner. Click on it to buy the full version.
Step 2: Select the Suitable Plan
A window with three different plans offered by the developers will appear. Select the plan that seems suitable and fitting to you and click on the Buy Now option below that plan.
Annual Plan: Buy Filmora for US$49.99 for 1 year including $9.99 for Filmstock Standard Assets and $5.99 for AI portrait add-on per month. You can un-check the later ones to buy Filmora only at the cost of USD 49.99/year.
Perpetual Plan: Get Filmora for US$ 79.99 (one-time fee) including $9.99 for Filmstock Standard Assets and $5.99 for AI portrait add-on per month. You can un-check the later ones to buy Filmora Perpetual only at the cost of USD 79.99.
Step 3: Fill the Form
After selecting the plan, a form will appear, which requires logging in to your WSID. In the left panel, you will see the product you have chosen, select your payment method and fill the form with the correct information. After filling the form, click on the Security Checkout button.
After purchasing the Filmora plan, go to Filmora again and refresh your account information. And then you will the Purchase button is gone, and there will be no watermark after exporting the video from Filmora.
Conclusion
Although a free version of Wondershare Filmora Video Editor has several valuable features, it comes with multiple limitations, such as a watermark. You can avoid those watermarks for free and also by purchasing the premium version. But most people do not know how they can remove the watermarks. To help them, we came up with three different stepwise methods to remove the Filmora watermark. Choose the technique that seems suitable to you and start editing!
Richard Bennett
Richard Bennett is a writer and a lover of all things video.
Follow @Richard Bennett
Also read:
- Updated VN Video Editor Review The Good, the Bad, and the Ugly
- Updated Get Your FCPX Flow Back A Comprehensive Reset and Troubleshooting Guide for 2024
- New In 2024, Top Video Merger Software Options Easy and Efficient
- 2024 Approved The Ultimate Guide 10 Best Video Players with Slow Motion
- Updated 2024 Approved The Top Tier Best 4K/8K Video Editing Software for Professionals
- Updated No-Cost Video Merging The Top Online Solutions for 2024
- New In 2024, Converting MP3 to MP4? Dont Forget These Crucial Steps
- Updated In 2024, Top Criteria for Evaluating Video to Audio Conversion Tools
- Updated In 2024, Elevate Your Storytelling How to Add Professional 3D Effects to Your Windows Videos
- 2024 Approved Motion Blur Magic Unlocking the Power of Final Cut Pro
- New The Art of Attention-Grabbing Thumbnails A YouTube Creators Handbook
- Updated In 2024, Transforming Words Into Audio Proven MP3 Conversion Strategies
- New In 2024, S Most Popular Video Editing Software for Mac Users
- New In 2024, How to Convert WebM to MP3 Top 10 Converter Options
- New 2024 Approved Bring Your Vision to Life WeVideos User-Friendly Video Maker
- Updated In 2024, S Ultimate Video Editors for Adding Music and Sound Effects
- Updated The AIFF Converter Showdown Comparing the Best Options
- New In 2024, Vertical Video Victory Tips for Seamless Social Media Sharing
- Updated Shaky No More Best Free Video Stabilizer Apps for Android Users
- 2024 Approved The Professionals Choice for Mac Adobe Premiere Pro Video Editor
- New 2024 Approved Best WMV Splitter Software Free and Easy to Use
- New In 2024, Transform Photos Into Videos with These Top Makers
- Updated VN Video Editor APK Download Is It the Best Video Editor?
- New In 2024, Create Professional Bokeh The Best Mobile Editing Apps
- Updated Unleash Your Creativity A Guide to Stop Motion Animation Tools and Techniques
- New The Ultimate List 10 Best Free AVI Joiner Software for Windows and Mac for 2024
- New In 2024, Say Goodbye to Windows Movie Maker Top Mac Equivalents
- Updated Get Pro-Level Video Quality 5 Free Android Stabilizer Apps for 2024
- How to Unlock iCloud Activation Lock and iCloud Account From Apple iPhone SE (2022)?
- In 2024, Does Airplane Mode Turn off GPS Location On Vivo S17e? | Dr.fone
- How To Unlock The Apple iPhone 12 SIM Lock 4 Easy Methods
- In 2024, Ultimate guide to get the meltan box pokemon go For Honor 70 Lite 5G | Dr.fone
- In 2024, How to Hide/Fake Snapchat Location on Your Nubia Red Magic 8S Pro | Dr.fone
- In 2024, 9 Best Free Android Monitoring Apps to Monitor Phone Remotely For your Realme 12 Pro+ 5G | Dr.fone
- In 2024, Does Airplane Mode Turn off GPS Location On Motorola Razr 40? | Dr.fone
- Possible solutions to restore deleted contacts from Edge+ (2023).
- How to restore wiped call history on Infinix Hot 40i?
- How to Unlock iPhone 6s Passcode without iTunes without Knowing Passcode?
- Updated 2024 Approved Tips to Make Cinematic Color Grading
- How to Share Location in Messenger On OnePlus Nord N30 SE? | Dr.fone
- In 2024, How to Sign Out of Apple ID From iPhone 8 without Password?
- In 2024, What Is a SIM Network Unlock PIN? Get Your Oppo Reno 8T 5G Phone Network-Ready
- A Guide to Effective Video Marketing for 2024
- In 2024, How To Use Special Features - Virtual Location On Samsung Galaxy M34 5G? | Dr.fone
- Solutions to restore deleted files from Nokia C12 Plus
- 3 Effective Ways to Unlock iCloud Account Without Password On Apple iPhone 12 Pro Max
- In 2024, 3 Effective Ways to Unlock iCloud Account Without Password From iPhone 15 Pro Max
- In 2024, How to Cast Poco M6 5G Screen to PC Using WiFi | Dr.fone
- In 2024, Why is iPogo not working On Lava Blaze Pro 5G? Fixed | Dr.fone
- In 2024, How to Unlock Apple ID Activation Lock From Apple iPhone 15?
- The Complete Guide to Samsung FRP Bypass Everything You Need to Know
- Title: New Get the Most Out of VLC Enabling Slow Motion Playback for 2024
- Author: Morgan
- Created at : 2024-04-28 05:24:08
- Updated at : 2024-04-29 05:24:08
- Link: https://ai-video-tools.techidaily.com/new-get-the-most-out-of-vlc-enabling-slow-motion-playback-for-2024/
- License: This work is licensed under CC BY-NC-SA 4.0.
