
:max_bytes(150000):strip_icc():format(webp)/SetaLiveWallpaperinWindows11-b8ca3913592d4a5790808131bf8f34e1.jpg)
New 2024 Approved Trim Your Videos for Free 10 Best Online Editors
Trim Your Videos for Free: 10 Best Online Editors
10+ Best Free Online Video Trimmers to Edit Videos Quickly

Benjamin Arango
Mar 27, 2024• Proven solutions
Thanks to strong Internet connections, faster processing technology, and Cloud computing, there are now hundreds of free online video trimmer websites.
Yet, it is difficult to figure out which is the best and which is the worst. Some are just awful, and others are a little suspicious and/or malicious.
If you are struggling to figure out which online video trimmer is for you, then here is a list of the 10+ best free online video trimmers.
Why Free Online Video Trimmers?
Why would anybody use free “Online” video trimmers when there are so many good offline (downloadable) trimmers a person can use? Windows even has its own installed video trimmer. Simply right click your video, navigate to “Open With” and then click on “Photos.” At the top right of the GUI is an icon called “Edit & Create.” Click it and it takes you to the editing function where you may trim your video.
The sad part is that the pre-installed video editor for Windows is just like the one for Mac. It is slow to process, it is very basic, and it doesn’t allow you to edit frame-by-frame. As a result, most people prefer a free online video trimmer as opposed to a pre-installed tool or third-party video trimmer app.
10+ Best Free Online Video Trimmers
There are many reasons why online trimmers are preferred. Many times, the sorts of video trimmers one downloads are full of malware, bloatware, and ransomware. Even the ones that claim to be clean have suspicious obvious security holes.
Another common reason is that many online trimmers allow trimming and conversions in formats, file types, and resolutions that downloadable programs do not. Also, even the world’s best free downloadable video trimmer Blender.org , is so viciously complicated that one would need weeks of tutorials just to figure out how to use it.
In many cases, the simplest and most straight-forwards answer is to use an online trimmer. To quickly upload, trim, convert, maybe add effects, and then download. It is quicker, easier, and often runs a smaller risk of security breaches, ID theft, and malware problems.
So in this part, I review the 10+ best online video trimmers that are easy to use for beginners and those who just need a few of cuts. Among them on the top is video cutter from Wondershare.
1. Wondershare Filmora Online Video Trimmer

The WonderShare Filmora program is littered with features you can use if you are willing to download its program and use it on your device. It has a free version that you can download, but what most people do not know is that it has a video trimmer online.
The free online video trimmer allows you to upload a video, and then edit it within your web browser. Once your video is uploaded, you are able to edit and trim it in minutes. You may also change the output format. You may set the video trim using the manual tool that allows you to look at your video as it plays. Or, you may use the start and end function and simply enter the starting position and finishing position.
Exporting and downloading is very easy, and there is no obligation to buy one of their other tools. The odd thing is that most people do not know this service is even available. Most people think that the website is simply full of editing tools. Most are unaware there are any free online tools.
Just like many users known, Wondershare has a desktop video editor for Windows and Mac that is very easy and simple to use, named Filmora. it’s very powerful for beginners. You can download it for free now.


3. Online Video Cutter

The name may be a little uninspired, but the video cutter is not a bad online tool. It is nestled in between a series of other simple online tools such as a voice recorder, file converter and so forth. You do not need to download this tool. You start by clicking the “Open File” button.
Pick the video you wish to trim, and then wait for it to upload. It takes a while to upload your video because the servers are not great. Once the video is uploaded, you are able to use the simple tools the website has to offer in order to trim your video.
There is a bit of advertising on the website, but mostly the web master is hoping for donations to keep the website running. Since the website doesn’t make much money, it cannot afford to pay for better bandwidth or better servers, which is why it sometimes takes quite a while to upload, trim, and then download. But, it is free, so it is difficult to complain.
4. YouTube Creator Studio

Contrary to popular opinion, the YouTube video trimmer tools are pretty poor quality. But, they ride high on this list because of their amazing server speeds and storage capacity. There are plenty of video editors that will cut out if you try to upload larger files, but the YouTube Creator Studio will not.
YouTube has billions of dollars behind it because it is owned by Google. A common problem with online video trimmers is that they take too long to upload and download. That is still a problem with the YouTube system, but it is still one of the fastest uploading and downloading video tools on the Internet.
Another problem with other online trimmers is that it is difficult to upload large videos. Many online trimmers will freeze or crash, which means all the uploading was for nothing. But, the YouTube system will not crash or freeze. You simply leave your computer alone, and eventually it will upload your file (even large files). For these reasons, the YouTube Creator Studios tool rides pretty high up this list.
5. Video Toolbox

The Video Toolbox system sits on a very cheaply made website that is pretty darn ugly. But, this tool reaches the number four position because it is rather more advanced than one has come to expect from a free video trimmer and editor.
The tool is free, and it can process video files of up to 1500MB, which is not a massive amount, but it is about the size of three episodes of the Simpsons. This tool can convert your video files to a wide range of other file types. You may also alter the bit rate, audio codec, video codex, frame rate, sample rate and channels.
This tool also comes with online features that allow you to re-download your previous videos, see your recent file outputs, and delete your log files. It is also able to pull items from your videos such as meta data, subtitle files, and so forth. Plus, the tool allows you to merge videos and crop videos with just a few clicks.
6. WeVideo Editor

The WeVideo tool is an online editor. It is a video trimmer windows compatible program that will run off of your Edge web browser. The tool is pretty easy to use, it is fairly fast and flexible. The sad part is that this tool offers a series of seemingly perfect tool functions, but it asks for money for them.
For example, the video trimmer is free, but the green-screen tool is not. They always ask you to turn your free account into a paid account, which is very annoying. Yet, this tool reaches number five on this list because the GUI for the video trimmer is great, and the level of support for this system is pretty good too.
7. Wincreator Video Cutter

This video editor is another video trimmer free service. The GUI is pretty ugly, but it is the sort of simple tool that gets to the point and gets there pretty quickly. The biggest downside is that the free video trimmer will only accept up to 50MB of data. This is not very much. It is the sort of amount you may upload to Instagram.
The tool is very lightweight, which means the pages are less likely to crash or freeze. It also means that the editor loads quickly and doesn’t lag as you use it. If other editors were this simple, then far fewer people would feel the need to download video trimming software.
8. Kizoa
This is a fully featured multi-faceted tool for editing videos. It offers a great deal of functions that allow you to trim your videos and edit them in a variety of ways. The sad part is that this tool is very well presented on the website, but most of the tools are locked behind a paywall. They nag users to pay their one-time fee, or to join their premium membership.
If you are looking to trim your videos, then this is a good place for uploading and trimming 4K videos. It also allows you to share videos, and if you pay, then you can store RAW videos. The online movie editor and movie maker allow you to trim your videos frame-by-frame. This is perfect for people who need precision when they are trimming their videos. It is also the sort of tool that more advanced users may enjoy.
9. Aconvert Video Cutter

This is possibly one of the simplest tools on this list, which is good in most cases, but some may need a little more in order to do a good job. There is however a function that offers a little more flexibility than other tools. Once your video is uploaded, you can choose a different output file from over ten different file types.
You can specify which part of the video you wish to cut prior to uploading. This saves a lot of processing time when the video is uploaded, which is probably going to suit people who have a lot of small videos to cut and who do not want to wait around for the website to respond. You are able to upload up to 200MB, which is not great, but it is also not terrible. It is around the size of four music videos, or a mobile-episode of a US sitcom.
10. Clip Champ

This tool has a very user-friendly interface. It has the sort of simple interface that beats out websites like SnapChat, WhatsApp and so forth. The website that hosts the tool says that you do not need experience to use their editing tools, and that is probably true. The biggest downside to this tool, and the reason it sits on the number nine spot, is that they will not let you use the tool without signing in.
It may not seem like such a big deal to have to sign into an account, but it is just for marketing purposes. It also allows them to sell you other services that they offer. If you are only looking to trim your videos, then there are far simpler ways to do it through the online trimmers listed in this article.
If you are looking for more of an online editor, then maybe you should consider the Clip Champ. Suffice it to say that this is not the best tool for quick and simple video trims because there are other tools listed on this article that are much faster.
11. Kapwing

This is a great tool with a fairly simple interface. You can see your videos as you trim them. And, you can edit your videos, gone their settings, add text, and so forth. Yet, it is only their simplest functions that are for free. The trimming function is free, but many of the editing tools are not.
This would not normally be a problem, but this website is always dangling its other products and its prices in front of you. If you are just looking to trim a file, then the adverts for their services can become annoying. The tool renders and works well on web browsers, so it may be of interest to people who are willing to pay for semi-professional editing tools.
Conclusion - Which Suits You the Best?
There are tools on this article for most types of trimming jobs. There are tools that will quickly upload and process your smaller videos, which is suitable for people making social media videos. Then, there are tools that will take a large and bulky file, and are good for people who are very conscious about the file output and video quality.
It is a pity that some of these tools ask for money to use their other editing services. But, if you want to trim your videos for free, then all of these tools on this article will help you.
If this article helped you, then feel free to share our 10 best free online video trimmers article on social media. Let your friends know which free online video trimmer you like the best.
Benjamin Arango
Benjamin Arango is a writer and a lover of all things video.
Follow @Benjamin Arango
Benjamin Arango
Mar 27, 2024• Proven solutions
Thanks to strong Internet connections, faster processing technology, and Cloud computing, there are now hundreds of free online video trimmer websites.
Yet, it is difficult to figure out which is the best and which is the worst. Some are just awful, and others are a little suspicious and/or malicious.
If you are struggling to figure out which online video trimmer is for you, then here is a list of the 10+ best free online video trimmers.
Why Free Online Video Trimmers?
Why would anybody use free “Online” video trimmers when there are so many good offline (downloadable) trimmers a person can use? Windows even has its own installed video trimmer. Simply right click your video, navigate to “Open With” and then click on “Photos.” At the top right of the GUI is an icon called “Edit & Create.” Click it and it takes you to the editing function where you may trim your video.
The sad part is that the pre-installed video editor for Windows is just like the one for Mac. It is slow to process, it is very basic, and it doesn’t allow you to edit frame-by-frame. As a result, most people prefer a free online video trimmer as opposed to a pre-installed tool or third-party video trimmer app.
10+ Best Free Online Video Trimmers
There are many reasons why online trimmers are preferred. Many times, the sorts of video trimmers one downloads are full of malware, bloatware, and ransomware. Even the ones that claim to be clean have suspicious obvious security holes.
Another common reason is that many online trimmers allow trimming and conversions in formats, file types, and resolutions that downloadable programs do not. Also, even the world’s best free downloadable video trimmer Blender.org , is so viciously complicated that one would need weeks of tutorials just to figure out how to use it.
In many cases, the simplest and most straight-forwards answer is to use an online trimmer. To quickly upload, trim, convert, maybe add effects, and then download. It is quicker, easier, and often runs a smaller risk of security breaches, ID theft, and malware problems.
So in this part, I review the 10+ best online video trimmers that are easy to use for beginners and those who just need a few of cuts. Among them on the top is video cutter from Wondershare.
1. Wondershare Filmora Online Video Trimmer
The WonderShare Filmora program is littered with features you can use if you are willing to download its program and use it on your device. It has a free version that you can download, but what most people do not know is that it has a video trimmer online.
The free online video trimmer allows you to upload a video, and then edit it within your web browser. Once your video is uploaded, you are able to edit and trim it in minutes. You may also change the output format. You may set the video trim using the manual tool that allows you to look at your video as it plays. Or, you may use the start and end function and simply enter the starting position and finishing position.
Exporting and downloading is very easy, and there is no obligation to buy one of their other tools. The odd thing is that most people do not know this service is even available. Most people think that the website is simply full of editing tools. Most are unaware there are any free online tools.
Just like many users known, Wondershare has a desktop video editor for Windows and Mac that is very easy and simple to use, named Filmora. it’s very powerful for beginners. You can download it for free now.
3. Online Video Cutter
The name may be a little uninspired, but the video cutter is not a bad online tool. It is nestled in between a series of other simple online tools such as a voice recorder, file converter and so forth. You do not need to download this tool. You start by clicking the “Open File” button.
Pick the video you wish to trim, and then wait for it to upload. It takes a while to upload your video because the servers are not great. Once the video is uploaded, you are able to use the simple tools the website has to offer in order to trim your video.
There is a bit of advertising on the website, but mostly the web master is hoping for donations to keep the website running. Since the website doesn’t make much money, it cannot afford to pay for better bandwidth or better servers, which is why it sometimes takes quite a while to upload, trim, and then download. But, it is free, so it is difficult to complain.
4. YouTube Creator Studio
Contrary to popular opinion, the YouTube video trimmer tools are pretty poor quality. But, they ride high on this list because of their amazing server speeds and storage capacity. There are plenty of video editors that will cut out if you try to upload larger files, but the YouTube Creator Studio will not.
YouTube has billions of dollars behind it because it is owned by Google. A common problem with online video trimmers is that they take too long to upload and download. That is still a problem with the YouTube system, but it is still one of the fastest uploading and downloading video tools on the Internet.
Another problem with other online trimmers is that it is difficult to upload large videos. Many online trimmers will freeze or crash, which means all the uploading was for nothing. But, the YouTube system will not crash or freeze. You simply leave your computer alone, and eventually it will upload your file (even large files). For these reasons, the YouTube Creator Studios tool rides pretty high up this list.
5. Video Toolbox
The Video Toolbox system sits on a very cheaply made website that is pretty darn ugly. But, this tool reaches the number four position because it is rather more advanced than one has come to expect from a free video trimmer and editor.
The tool is free, and it can process video files of up to 1500MB, which is not a massive amount, but it is about the size of three episodes of the Simpsons. This tool can convert your video files to a wide range of other file types. You may also alter the bit rate, audio codec, video codex, frame rate, sample rate and channels.
This tool also comes with online features that allow you to re-download your previous videos, see your recent file outputs, and delete your log files. It is also able to pull items from your videos such as meta data, subtitle files, and so forth. Plus, the tool allows you to merge videos and crop videos with just a few clicks.
6. WeVideo Editor
The WeVideo tool is an online editor. It is a video trimmer windows compatible program that will run off of your Edge web browser. The tool is pretty easy to use, it is fairly fast and flexible. The sad part is that this tool offers a series of seemingly perfect tool functions, but it asks for money for them.
For example, the video trimmer is free, but the green-screen tool is not. They always ask you to turn your free account into a paid account, which is very annoying. Yet, this tool reaches number five on this list because the GUI for the video trimmer is great, and the level of support for this system is pretty good too.
7. Wincreator Video Cutter
This video editor is another video trimmer free service. The GUI is pretty ugly, but it is the sort of simple tool that gets to the point and gets there pretty quickly. The biggest downside is that the free video trimmer will only accept up to 50MB of data. This is not very much. It is the sort of amount you may upload to Instagram.
The tool is very lightweight, which means the pages are less likely to crash or freeze. It also means that the editor loads quickly and doesn’t lag as you use it. If other editors were this simple, then far fewer people would feel the need to download video trimming software.
8. Kizoa
This is a fully featured multi-faceted tool for editing videos. It offers a great deal of functions that allow you to trim your videos and edit them in a variety of ways. The sad part is that this tool is very well presented on the website, but most of the tools are locked behind a paywall. They nag users to pay their one-time fee, or to join their premium membership.
If you are looking to trim your videos, then this is a good place for uploading and trimming 4K videos. It also allows you to share videos, and if you pay, then you can store RAW videos. The online movie editor and movie maker allow you to trim your videos frame-by-frame. This is perfect for people who need precision when they are trimming their videos. It is also the sort of tool that more advanced users may enjoy.
9. Aconvert Video Cutter
This is possibly one of the simplest tools on this list, which is good in most cases, but some may need a little more in order to do a good job. There is however a function that offers a little more flexibility than other tools. Once your video is uploaded, you can choose a different output file from over ten different file types.
You can specify which part of the video you wish to cut prior to uploading. This saves a lot of processing time when the video is uploaded, which is probably going to suit people who have a lot of small videos to cut and who do not want to wait around for the website to respond. You are able to upload up to 200MB, which is not great, but it is also not terrible. It is around the size of four music videos, or a mobile-episode of a US sitcom.
10. Clip Champ
This tool has a very user-friendly interface. It has the sort of simple interface that beats out websites like SnapChat, WhatsApp and so forth. The website that hosts the tool says that you do not need experience to use their editing tools, and that is probably true. The biggest downside to this tool, and the reason it sits on the number nine spot, is that they will not let you use the tool without signing in.
It may not seem like such a big deal to have to sign into an account, but it is just for marketing purposes. It also allows them to sell you other services that they offer. If you are only looking to trim your videos, then there are far simpler ways to do it through the online trimmers listed in this article.
If you are looking for more of an online editor, then maybe you should consider the Clip Champ. Suffice it to say that this is not the best tool for quick and simple video trims because there are other tools listed on this article that are much faster.
11. Kapwing
This is a great tool with a fairly simple interface. You can see your videos as you trim them. And, you can edit your videos, gone their settings, add text, and so forth. Yet, it is only their simplest functions that are for free. The trimming function is free, but many of the editing tools are not.
This would not normally be a problem, but this website is always dangling its other products and its prices in front of you. If you are just looking to trim a file, then the adverts for their services can become annoying. The tool renders and works well on web browsers, so it may be of interest to people who are willing to pay for semi-professional editing tools.
Conclusion - Which Suits You the Best?
There are tools on this article for most types of trimming jobs. There are tools that will quickly upload and process your smaller videos, which is suitable for people making social media videos. Then, there are tools that will take a large and bulky file, and are good for people who are very conscious about the file output and video quality.
It is a pity that some of these tools ask for money to use their other editing services. But, if you want to trim your videos for free, then all of these tools on this article will help you.
If this article helped you, then feel free to share our 10 best free online video trimmers article on social media. Let your friends know which free online video trimmer you like the best.
Benjamin Arango
Benjamin Arango is a writer and a lover of all things video.
Follow @Benjamin Arango
Free and Fabulous: 20 Adobe Premiere Intro Templates
Top 20 Adobe Premiere Title/Intro Templates [Free Download]
Benjamin Arango
Mar 29, 2024• Proven solutions
One of the things that can make your output stand out from the crowd is the titles. Many people think creating eye-catching title effects is beyond them, but with Premiere Pro, you really couldn’t be more wrong.
As Premiere Pro doesn’t have built-in templates, the ability to import free Premiere Pro templates is a must. Anyone need to find a custom title style that suits the project and looks professional and carries impact.
The great thing is that there are many of these resources that are offered entirely free! If you don’t know how to add text/title to Adobe Premiere, here are steps to add text resources .
In this article, we will share with you 20 Free to download Title Templates for Premiere Pro.
- Part1: Top 15 Free Adobe Premiere Pro Title Templates
- Part2: Best 5 Premiere Pro Intro Templates Free Download
- Part3: How to Import and Customize Title Templates in Premiere
You may also like: 10 Free Star Wars Fonts to Make Your Video Amazing
Part 1: Top 15 Free Adobe Premiere Title Templates
Adding the finishing touches to a project, like creating the opening titles or end credits, is often not at the top of anyone’s priority list during the video editing process.
Nonetheless, making a unique opening sequence along with impressive animations in Adobe Premiere Pro can be a time-consuming endeavor, so instead of spending countless hours on producing a perfect combination of text and images, you can just download a title template from the Internet.
1 Premier Pro
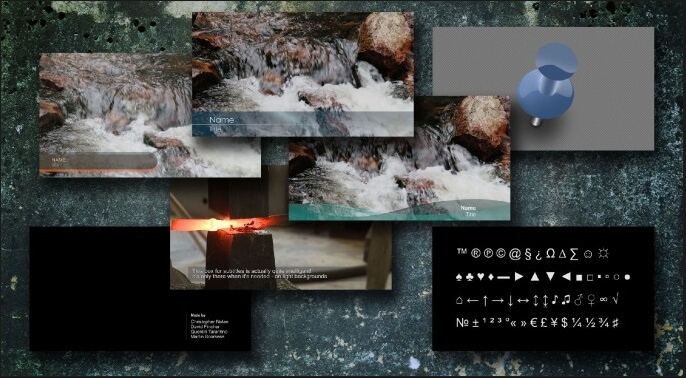
Jarle Leirpoll runs this site, and it is a treasure trove of information, help, and advice on Premiere from a man who wrote the book (literally, it’s for sale on the site!) on Premiere.
His first title collection is consisting of 8 templates, including Lower Thirds templates, end credit template, and some special characters. However, it well worth a look around the site as there is plenty more free stuff including presets, and a whole range of tips and tricks to help with your editing.
Features:
- Free Premiere Pro templates to download
- Easy to import the title template to Premiere
- 100% ready to use
In case that you’re just a beginner of video editing software, you can start with Wondershare Filmora (Latest Filmora version 11) to add text to videos, which is powerful but easy-to-use for green hands. Download the Wondershare Filmora below.
There are hundreds of Text and Titles presets available in Filmora, which allows you to add titles, subtitles, scrolling end credits, lower 3d, and openers with ease. You can also apply some animation effects to the selected title presets.
Check the video below to find out how to add text to video with Wondershare Filmora.
Besides the built-in title presets, Wondershare Filmora (Latest Filmora version X) also provides more title templates in Filmstock , which offers lots of special effects templates.
Currently, there are Title Expansion Set, business title set, wedding title set, and lower third expansion set to download. Check the video below to watch the Title Expansion set templates.
Download Mac Version ](https://tools.techidaily.com/wondershare/filmora/download/ )
Learn more details about How to Add Text to Video with Filmora.
2 Richard Harrington
This is another site that offers templates for download but is also a great place to visit for ideas and information. Richard approaches Premiere from a photographer’s viewpoint, and so has a slightly different view on many topics that are well worth reading.
He has links to a sizable number of templates on Richard Harrington covering a range of styles and subjects, including DVD menus, animated text, and high-quality models. Still, his blog is updated regularly and often includes free downloads.
Features:
- Supports Adobe Premiere intro templates to use
- It includes various templates and presets on Windows and Mac
- More than title templates also has DVD menus and animated text
3 ProVideoCoalition
Another all-encompassing site has a huge amount of information and knowledge to be gained. The templates are just part of the story. They are available on Pro Video Coalition and include numerous files and even some free video content showing their implementation.
Also on this page are links to some other sites offering free content or advice on various aspects of Premiere, making it well worth a visit and definitely worth its place in this top 10.
Of particular interest on this site is the regularly updated news which focuses on the latest hardware and software announcements.
Features:
- Supports lower thirds for Adobe Premiere
- You can customize the Premiere Pro intro template free download
- You can create graphic elements
4 Coremelt
This is a commercial site that offers a wide variety of high-quality plugins and templates for several video editing platforms. However, we are on the lookout for that fabulous price of free here, so a little digging finds this page , here you will find ten templates from one of their best selling products offered entirely free.
All templates are quality professionally produced products and worth the visit alone. For anyone who is looking to take their editing output to the professional level, the commercial products on offer here are well worth a look, high quality, and a reasonable cost.
Features:
- It includes 3D text and motion graphics templates
- Free and safe download the Premiere template

5 Bestproaction
Another commercial site. This one has a range of free templates and presets to download for Premiere. Fourteen open items altogether can be downloaded. This site at least deserves a browse through their catalog after a download. The emphasis here is on low cost but high quality, useful templates, and plugins to suit any project.
Even for those of us with a limited budget, there may be something that catches the eye. It is an excellent site for browsing when looking for inspiration.
Features:
- Offers multimedia products like free Premiere Pro text, title templates
- Includes professional Premiere Pro template for videographers
- You can create graphic elements

6 FXFactory
This is another commercial site that has a smattering of very high-quality free downloads on offer, including a beautiful template for the original Star Wars movie style scrolling titles.
Again, it is worth browsing the catalog when you are on the site, but all the free products can be found here .
FX Factory has also created some great video tutorials on a variety of aspects of video production that are well worth a view when you are at the site.
Features:
- Free Premiere Pro effects templates to download
- Includes a step by step Premiere Pro tutorial
7 Creative Impatience
A fantastic site full of information, tips, and opinion on all aspects of video production, it’s a great place to spend some time, with the bonus of a bunch of free downloads for Premiere.
Of particular note are the tutorials, an excellent source of information and tricks that you may not have seen before, with their YouTube channel being a great source of free guidance for editors of any sort of experience.
Features:
- Apart from free Premiere Pro templates, you can also find blogs
- Easy steps to make Premiere Pro templates
- Safe and clean to use. All real
8Filmimpact
A commercial site is offering some great products at competitive prices. At first glance, this may not seem to be a useful place for our search for the free stuff.
However, all the products do have a free trial download, and as a bonus, the trial for pack one includes four free to use templates. They are quality products too, and well worth a look.

9 Style4Type
Style4Type is an exciting site regularly updated with new free templates as well as offering technical advice and having further templates available as commercial products.
And to the side is even a free download for a PDF file that walks you through installing and using the templates within Premiere once you have them.
There are already a lot of free templates on offer covering a wide variety of styles, but they are added to with regularity, so it is a site to bookmark for the future.
Features:
- Free title templates to use including texture templates
- Professional tools to better your video

10 Premiere Beat
Lots of information on this site as its been running for a decade, it is a website that imparts a wealth of knowledge along the way on not just video editing but music.
The pack includes 21 Premiere title templates to use. Another site that you will want to visit again and again.
Features:
- High-quality Premiere Pro templates to download
- A large number of Premiere templates to use
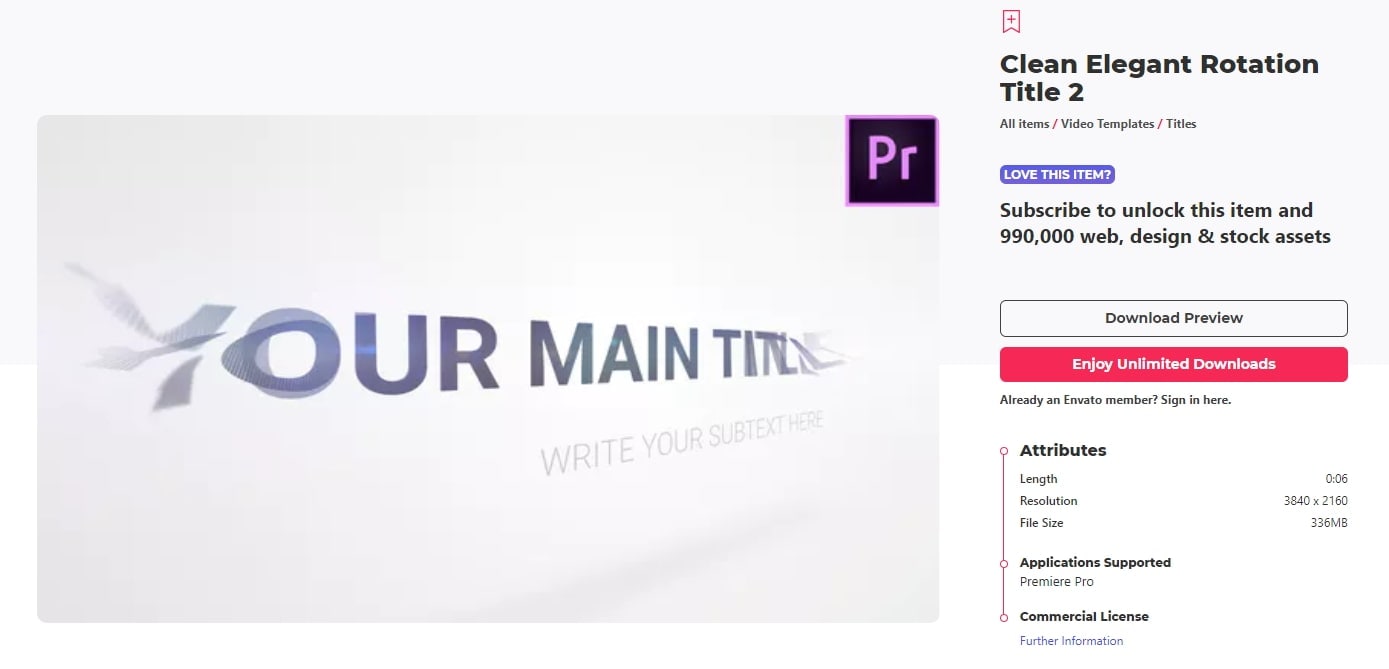
11 Clean Elegant Rotation Title
It is a clean title template without unnecessary parts. If you like simple titles, this one is best for you. You can customize in Premiere easily with a few clicks. For beginners, it also includes free tutorials to use.
Features:
- Simple and clean Premiere title templates
- Customizable in Premiere
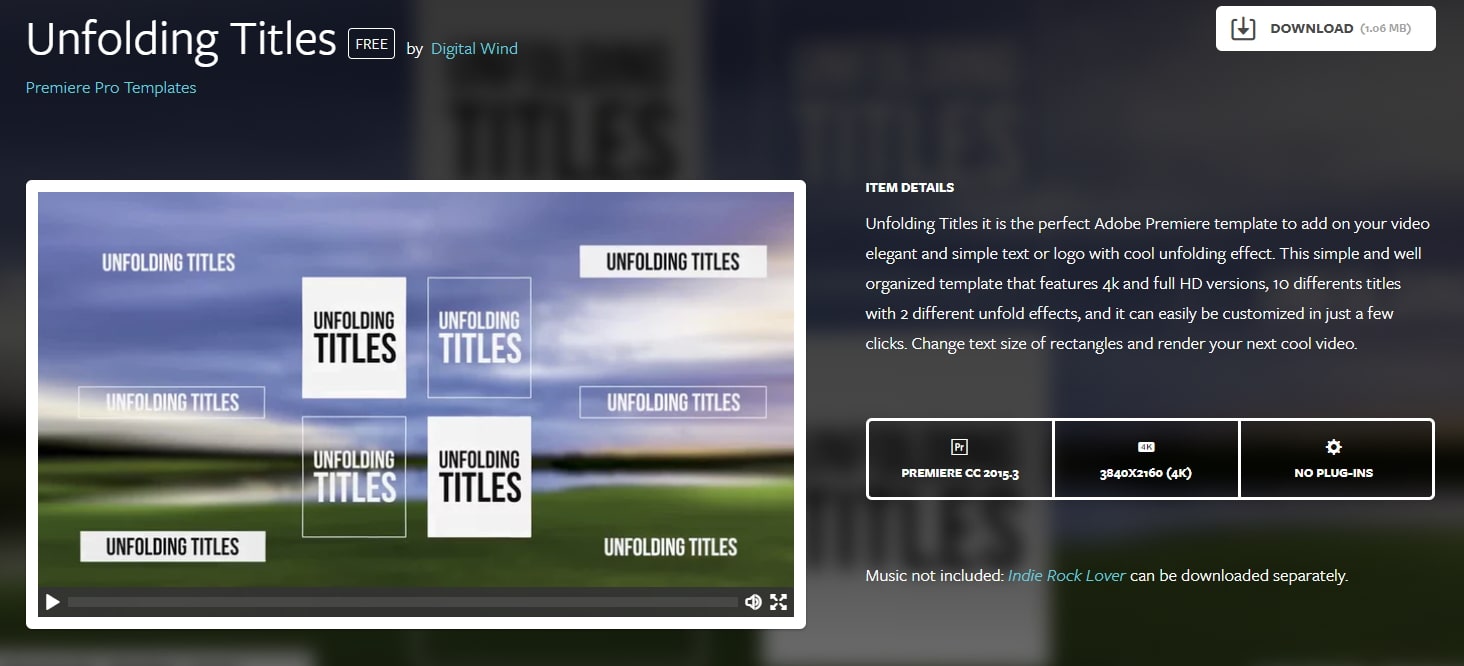
12 Unfolding Titles
It is a clean title template with an unfolding effect. Each text has two unfolding effects, which are convenient to use with customization. It supports 4K and HD versions. In this pack, it wons 10 title formats. After importing Premiere, you can also change text size.
Features:
- 20 unfolding title effects
- Supports rendering your video
13 Orange83
These are five modern title packs for Premiere. With it, you don’t need to use After Effects as you can import them to edit. The best part is you can include your logo and other stuff you like.
Features:
- Include 5 title packs
- Modern and clean titles
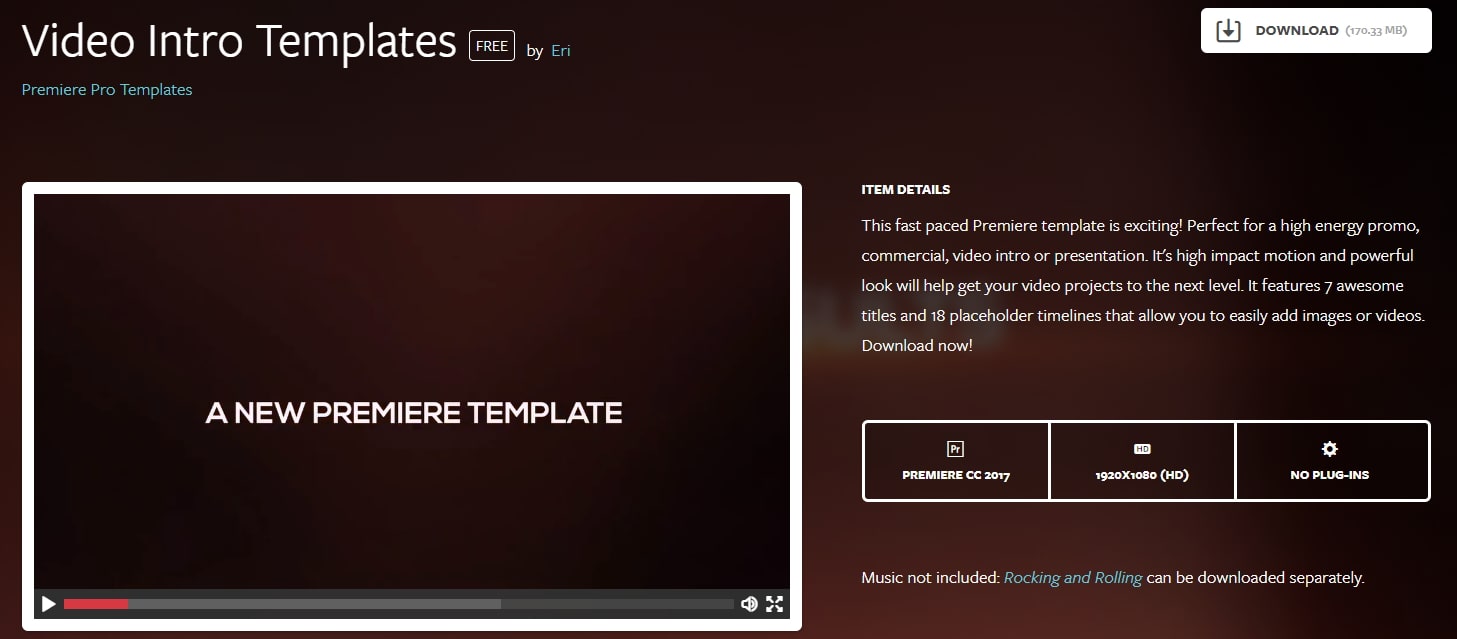
14 Video Intro Templates - Premiere Pro intro template free download
It is a free download Premiere Pro intro template that you can add to your video. It is highly recommended to use promotion and commercial video.
This intro template can be adjusted after you import it to Premiere Pro. This Premiere Pro intro template is HD, so you don’t need to worry about the whole video quality.
Features:
- 1920X1080 (HD) is supported
- This intro template doesn’t include built-in music
15 Elegant Promo - another Premiere Pro intro template free to use
It is intro template for Premiere Pro is modern and free to use. The whole style is young and energetic, which will give viewers a fresh new feeling. It includes 12 images and 26 text layers, and all of them are free to download.
You can use it for your presentation, promotional video, and product video. Besides, it doesn’t require a plug in to use this intro template in Premiere Pro.
Features:
- It includes animated intro elements.
- Use an HD intro template to make a popular video.

These are free templates, and they are enough to get anyone up and running with a new project. As said before, with the commercial enterprises that offer freebies, it’s always worth checking out their paid for output as well, you may not be in the market for it right now, but something may stick for a later time.
Part 2: Bonus: Best 5 Premiere Pro Intro Templates Free Download
Even though all websites we featured in this article offer some free intro templates for Adobe Premiere Pro. However, it is still a much better solution to buy a subscription plan on a platform if you are working on a large number of projects each month.
Let’s see which websites you can use to download the intro and title templates for Premiere Pro.
16. Motion Array
In addition to an impressive library of intro templates, Motion Array offers presets, sound effects, royalty-free music, and stock footage.
Furthermore, you can choose the software version to make sure that the templates you download can be used with the version of Adobe Premiere Pro you have installed on your computer.
The website provides you with powerful search tools, so you can select the resolution of the template, up to 8K, or choose which types of templates are going to be displayed.
Using the free subscription plan can limit your options since you’ll only be able to download free templates, and your upload storage will be limited to just 1GB.
The Pro subscription plan that can be purchased for $54 per month will grant you access to an almost endless selection of title templates as well as a huge selection of plugins for Adobe Premiere Pro.

17. Cinecom – Simple Intro for Premiere Pro
It is a designer pack that features ten pre-animated lower-thirds intro templates. You can change the duration of the font and color of the text in each template, and you can choose if you want to download a 1080 or the 4K version of the designer pack.
The templates are compatible with CS6, CC2013, CC2014, and CC2016 versions of the Premiere Pro. The Simple Titles pack can be easily installed, as you just have to drag and drop it into the software.
However, before you can download these title templates, you have to subscribe to Cinecom’s mailing list.
Even though this can be a bit inconvenient, it is very well worth the trouble since you’ll be able to transform or build upon the intro templates and use them freely in all videos you edit in Adobe Premiere Pro.
18. EnvatoElements
You can find much more than intro templates on the EnvatoElements platform since you can choose from 740.000 items you can use for anything from creating a WordPress website to preparing your next business presentation.
The Video Templates category alone features over 4000 items, including Logo Stings or Infographics assets.
There are nearly one hundred available intro templates for Adobe Premiere Pro, but downloading any of them requires you to create an account and purchase a subscription plan.
Prices start from $16.50 per month, and packages include virtually unlimited access to stock photos and videos, video templates, and much more. The EnvatoElements platform also offers assets that can be used with Final Cut Pro, Adobe After Effects or Apple Motion.

19. Videohive
Videohive is a part of the Envato Market platform that also features Web Themes and Templates, Code, Audio, or Graphic sections. It is free to use, but only a limited amount of assets can be downloaded for free.
To download an item, you must purchase it, and prices can range from $16 to $50 for a single title template.
Videohive is also a great source of title templates for Adobe After Effects, as it offers more than 5000 titles and intros that are compatible with this software.
Furthermore, you can download presets for both Premiere Pro and After Effects that can be used to create stop-motion animations, perform color correction, or make the footage look like it was captured with a VHS camera.

20. RocketStock
This option is best suited for video editors who want to create their intros because RocketStok’s Cinematic Style Library extends the scope of options provided by Premiere Pro.
Downloading all fonts except Helvetica Neue is free, but you must check which fonts you can use in commercial projects. You will have no trouble installing the fonts since you can just double-click on the font and follow the on-screen instructions.
Once you’ve installed all the fonts from the library, you can use them to replace the software’s default library. You just have to click on the Replace Style Library option that can be accessed from Premiere Pro’s Title Style tab.
If you don’t feel comfortable creating your titles or if you simply don’t have the time to create your own titles, the Free Cinematic Style Library is not the best choice for you.
On the other hand, Premiere Pro’s users who don’t often use title templates can benefit from downloading RocketStock’s intro library.

Part 3: How to Import and Customize Title Templates in Premiere
If you download the template, all the title templates support customization. You can change its size, font, color, and add 3D effects.
It is easy to import and use it to touch up your video. Check out the steps below to know how to import title templates quickly.
- Install the title template. Choose one template you like and download it to your PC. Remember to unzip it before importing it. Now install them.
- Import the title template. You just need to go to click Effects at the top. Then at right, you will find Presets in the effects section.
- Right-click on presets, and choose Import Presets. If the title template format is .mogrt, you need to open it in Essential Graphics Panel. At the bottom right corner, click the plus icon to import the title template and install it.
- Customize the title template. Once the title template is imported, drag it to the timeline. Click the Editing tab. Here you can customize colors, text, opacities, and positions. There are more options for you to explore.
- You can also copy and paste the title template to another place in the timeline. If you change one place of the pasted template, the original one will remain the same.
Note: each version of Premiere’s interface will look different, but the workflow is similar.
Conclusion
Using title templates can help you achieve a certain visual style faster, so you don’t have to spend a lot of time looking for a perfect background or animating the text.
The Internet provides almost unlimited video editing resources, but not all of these resources can be acquired for free.
Which website you will choose as a source of fresh title templates depends on how often you work on new projects in Adobe Premiere Pro.
If you want to make professional video editing and tired of Premiere, try Filmora! It includes various titles templates to use.
You can sync audio automatically, use detailed color correction to make your title and video like a movie. Download it now (FREE)!
Benjamin Arango
Benjamin Arango is a writer and a lover of all things video.
Follow @Benjamin Arango
Benjamin Arango
Mar 29, 2024• Proven solutions
One of the things that can make your output stand out from the crowd is the titles. Many people think creating eye-catching title effects is beyond them, but with Premiere Pro, you really couldn’t be more wrong.
As Premiere Pro doesn’t have built-in templates, the ability to import free Premiere Pro templates is a must. Anyone need to find a custom title style that suits the project and looks professional and carries impact.
The great thing is that there are many of these resources that are offered entirely free! If you don’t know how to add text/title to Adobe Premiere, here are steps to add text resources .
In this article, we will share with you 20 Free to download Title Templates for Premiere Pro.
- Part1: Top 15 Free Adobe Premiere Pro Title Templates
- Part2: Best 5 Premiere Pro Intro Templates Free Download
- Part3: How to Import and Customize Title Templates in Premiere
You may also like: 10 Free Star Wars Fonts to Make Your Video Amazing
Part 1: Top 15 Free Adobe Premiere Title Templates
Adding the finishing touches to a project, like creating the opening titles or end credits, is often not at the top of anyone’s priority list during the video editing process.
Nonetheless, making a unique opening sequence along with impressive animations in Adobe Premiere Pro can be a time-consuming endeavor, so instead of spending countless hours on producing a perfect combination of text and images, you can just download a title template from the Internet.
1 Premier Pro
Jarle Leirpoll runs this site, and it is a treasure trove of information, help, and advice on Premiere from a man who wrote the book (literally, it’s for sale on the site!) on Premiere.
His first title collection is consisting of 8 templates, including Lower Thirds templates, end credit template, and some special characters. However, it well worth a look around the site as there is plenty more free stuff including presets, and a whole range of tips and tricks to help with your editing.
Features:
- Free Premiere Pro templates to download
- Easy to import the title template to Premiere
- 100% ready to use
In case that you’re just a beginner of video editing software, you can start with Wondershare Filmora (Latest Filmora version 11) to add text to videos, which is powerful but easy-to-use for green hands. Download the Wondershare Filmora below.
There are hundreds of Text and Titles presets available in Filmora, which allows you to add titles, subtitles, scrolling end credits, lower 3d, and openers with ease. You can also apply some animation effects to the selected title presets.
Check the video below to find out how to add text to video with Wondershare Filmora.
Besides the built-in title presets, Wondershare Filmora (Latest Filmora version X) also provides more title templates in Filmstock , which offers lots of special effects templates.
Currently, there are Title Expansion Set, business title set, wedding title set, and lower third expansion set to download. Check the video below to watch the Title Expansion set templates.
Download Mac Version ](https://tools.techidaily.com/wondershare/filmora/download/ )
Learn more details about How to Add Text to Video with Filmora.
2 Richard Harrington
This is another site that offers templates for download but is also a great place to visit for ideas and information. Richard approaches Premiere from a photographer’s viewpoint, and so has a slightly different view on many topics that are well worth reading.
He has links to a sizable number of templates on Richard Harrington covering a range of styles and subjects, including DVD menus, animated text, and high-quality models. Still, his blog is updated regularly and often includes free downloads.
Features:
- Supports Adobe Premiere intro templates to use
- It includes various templates and presets on Windows and Mac
- More than title templates also has DVD menus and animated text
3 ProVideoCoalition
Another all-encompassing site has a huge amount of information and knowledge to be gained. The templates are just part of the story. They are available on Pro Video Coalition and include numerous files and even some free video content showing their implementation.
Also on this page are links to some other sites offering free content or advice on various aspects of Premiere, making it well worth a visit and definitely worth its place in this top 10.
Of particular interest on this site is the regularly updated news which focuses on the latest hardware and software announcements.
Features:
- Supports lower thirds for Adobe Premiere
- You can customize the Premiere Pro intro template free download
- You can create graphic elements
4 Coremelt
This is a commercial site that offers a wide variety of high-quality plugins and templates for several video editing platforms. However, we are on the lookout for that fabulous price of free here, so a little digging finds this page , here you will find ten templates from one of their best selling products offered entirely free.
All templates are quality professionally produced products and worth the visit alone. For anyone who is looking to take their editing output to the professional level, the commercial products on offer here are well worth a look, high quality, and a reasonable cost.
Features:
- It includes 3D text and motion graphics templates
- Free and safe download the Premiere template
5 Bestproaction
Another commercial site. This one has a range of free templates and presets to download for Premiere. Fourteen open items altogether can be downloaded. This site at least deserves a browse through their catalog after a download. The emphasis here is on low cost but high quality, useful templates, and plugins to suit any project.
Even for those of us with a limited budget, there may be something that catches the eye. It is an excellent site for browsing when looking for inspiration.
Features:
- Offers multimedia products like free Premiere Pro text, title templates
- Includes professional Premiere Pro template for videographers
- You can create graphic elements
6 FXFactory
This is another commercial site that has a smattering of very high-quality free downloads on offer, including a beautiful template for the original Star Wars movie style scrolling titles.
Again, it is worth browsing the catalog when you are on the site, but all the free products can be found here .
FX Factory has also created some great video tutorials on a variety of aspects of video production that are well worth a view when you are at the site.
Features:
- Free Premiere Pro effects templates to download
- Includes a step by step Premiere Pro tutorial
7 Creative Impatience
A fantastic site full of information, tips, and opinion on all aspects of video production, it’s a great place to spend some time, with the bonus of a bunch of free downloads for Premiere.
Of particular note are the tutorials, an excellent source of information and tricks that you may not have seen before, with their YouTube channel being a great source of free guidance for editors of any sort of experience.
Features:
- Apart from free Premiere Pro templates, you can also find blogs
- Easy steps to make Premiere Pro templates
- Safe and clean to use. All real
8Filmimpact
A commercial site is offering some great products at competitive prices. At first glance, this may not seem to be a useful place for our search for the free stuff.
However, all the products do have a free trial download, and as a bonus, the trial for pack one includes four free to use templates. They are quality products too, and well worth a look.
9 Style4Type
Style4Type is an exciting site regularly updated with new free templates as well as offering technical advice and having further templates available as commercial products.
And to the side is even a free download for a PDF file that walks you through installing and using the templates within Premiere once you have them.
There are already a lot of free templates on offer covering a wide variety of styles, but they are added to with regularity, so it is a site to bookmark for the future.
Features:
- Free title templates to use including texture templates
- Professional tools to better your video
10 Premiere Beat
Lots of information on this site as its been running for a decade, it is a website that imparts a wealth of knowledge along the way on not just video editing but music.
The pack includes 21 Premiere title templates to use. Another site that you will want to visit again and again.
Features:
- High-quality Premiere Pro templates to download
- A large number of Premiere templates to use
11 Clean Elegant Rotation Title
It is a clean title template without unnecessary parts. If you like simple titles, this one is best for you. You can customize in Premiere easily with a few clicks. For beginners, it also includes free tutorials to use.
Features:
- Simple and clean Premiere title templates
- Customizable in Premiere
12 Unfolding Titles
It is a clean title template with an unfolding effect. Each text has two unfolding effects, which are convenient to use with customization. It supports 4K and HD versions. In this pack, it wons 10 title formats. After importing Premiere, you can also change text size.
Features:
- 20 unfolding title effects
- Supports rendering your video
13 Orange83
These are five modern title packs for Premiere. With it, you don’t need to use After Effects as you can import them to edit. The best part is you can include your logo and other stuff you like.
Features:
- Include 5 title packs
- Modern and clean titles
14 Video Intro Templates - Premiere Pro intro template free download
It is a free download Premiere Pro intro template that you can add to your video. It is highly recommended to use promotion and commercial video.
This intro template can be adjusted after you import it to Premiere Pro. This Premiere Pro intro template is HD, so you don’t need to worry about the whole video quality.
Features:
- 1920X1080 (HD) is supported
- This intro template doesn’t include built-in music
15 Elegant Promo - another Premiere Pro intro template free to use
It is intro template for Premiere Pro is modern and free to use. The whole style is young and energetic, which will give viewers a fresh new feeling. It includes 12 images and 26 text layers, and all of them are free to download.
You can use it for your presentation, promotional video, and product video. Besides, it doesn’t require a plug in to use this intro template in Premiere Pro.
Features:
- It includes animated intro elements.
- Use an HD intro template to make a popular video.
These are free templates, and they are enough to get anyone up and running with a new project. As said before, with the commercial enterprises that offer freebies, it’s always worth checking out their paid for output as well, you may not be in the market for it right now, but something may stick for a later time.
Part 2: Bonus: Best 5 Premiere Pro Intro Templates Free Download
Even though all websites we featured in this article offer some free intro templates for Adobe Premiere Pro. However, it is still a much better solution to buy a subscription plan on a platform if you are working on a large number of projects each month.
Let’s see which websites you can use to download the intro and title templates for Premiere Pro.
16. Motion Array
In addition to an impressive library of intro templates, Motion Array offers presets, sound effects, royalty-free music, and stock footage.
Furthermore, you can choose the software version to make sure that the templates you download can be used with the version of Adobe Premiere Pro you have installed on your computer.
The website provides you with powerful search tools, so you can select the resolution of the template, up to 8K, or choose which types of templates are going to be displayed.
Using the free subscription plan can limit your options since you’ll only be able to download free templates, and your upload storage will be limited to just 1GB.
The Pro subscription plan that can be purchased for $54 per month will grant you access to an almost endless selection of title templates as well as a huge selection of plugins for Adobe Premiere Pro.
17. Cinecom – Simple Intro for Premiere Pro
It is a designer pack that features ten pre-animated lower-thirds intro templates. You can change the duration of the font and color of the text in each template, and you can choose if you want to download a 1080 or the 4K version of the designer pack.
The templates are compatible with CS6, CC2013, CC2014, and CC2016 versions of the Premiere Pro. The Simple Titles pack can be easily installed, as you just have to drag and drop it into the software.
However, before you can download these title templates, you have to subscribe to Cinecom’s mailing list.
Even though this can be a bit inconvenient, it is very well worth the trouble since you’ll be able to transform or build upon the intro templates and use them freely in all videos you edit in Adobe Premiere Pro.
18. EnvatoElements
You can find much more than intro templates on the EnvatoElements platform since you can choose from 740.000 items you can use for anything from creating a WordPress website to preparing your next business presentation.
The Video Templates category alone features over 4000 items, including Logo Stings or Infographics assets.
There are nearly one hundred available intro templates for Adobe Premiere Pro, but downloading any of them requires you to create an account and purchase a subscription plan.
Prices start from $16.50 per month, and packages include virtually unlimited access to stock photos and videos, video templates, and much more. The EnvatoElements platform also offers assets that can be used with Final Cut Pro, Adobe After Effects or Apple Motion.
19. Videohive
Videohive is a part of the Envato Market platform that also features Web Themes and Templates, Code, Audio, or Graphic sections. It is free to use, but only a limited amount of assets can be downloaded for free.
To download an item, you must purchase it, and prices can range from $16 to $50 for a single title template.
Videohive is also a great source of title templates for Adobe After Effects, as it offers more than 5000 titles and intros that are compatible with this software.
Furthermore, you can download presets for both Premiere Pro and After Effects that can be used to create stop-motion animations, perform color correction, or make the footage look like it was captured with a VHS camera.
20. RocketStock
This option is best suited for video editors who want to create their intros because RocketStok’s Cinematic Style Library extends the scope of options provided by Premiere Pro.
Downloading all fonts except Helvetica Neue is free, but you must check which fonts you can use in commercial projects. You will have no trouble installing the fonts since you can just double-click on the font and follow the on-screen instructions.
Once you’ve installed all the fonts from the library, you can use them to replace the software’s default library. You just have to click on the Replace Style Library option that can be accessed from Premiere Pro’s Title Style tab.
If you don’t feel comfortable creating your titles or if you simply don’t have the time to create your own titles, the Free Cinematic Style Library is not the best choice for you.
On the other hand, Premiere Pro’s users who don’t often use title templates can benefit from downloading RocketStock’s intro library.
Part 3: How to Import and Customize Title Templates in Premiere
If you download the template, all the title templates support customization. You can change its size, font, color, and add 3D effects.
It is easy to import and use it to touch up your video. Check out the steps below to know how to import title templates quickly.
- Install the title template. Choose one template you like and download it to your PC. Remember to unzip it before importing it. Now install them.
- Import the title template. You just need to go to click Effects at the top. Then at right, you will find Presets in the effects section.
- Right-click on presets, and choose Import Presets. If the title template format is .mogrt, you need to open it in Essential Graphics Panel. At the bottom right corner, click the plus icon to import the title template and install it.
- Customize the title template. Once the title template is imported, drag it to the timeline. Click the Editing tab. Here you can customize colors, text, opacities, and positions. There are more options for you to explore.
- You can also copy and paste the title template to another place in the timeline. If you change one place of the pasted template, the original one will remain the same.
Note: each version of Premiere’s interface will look different, but the workflow is similar.
Conclusion
Using title templates can help you achieve a certain visual style faster, so you don’t have to spend a lot of time looking for a perfect background or animating the text.
The Internet provides almost unlimited video editing resources, but not all of these resources can be acquired for free.
Which website you will choose as a source of fresh title templates depends on how often you work on new projects in Adobe Premiere Pro.
If you want to make professional video editing and tired of Premiere, try Filmora! It includes various titles templates to use.
You can sync audio automatically, use detailed color correction to make your title and video like a movie. Download it now (FREE)!
Benjamin Arango
Benjamin Arango is a writer and a lover of all things video.
Follow @Benjamin Arango
Shrink Your Videos: 5 Top-Rated Free Compression Apps for iOS
5 Best Free Video Compressor Apps That Reduce Video Sizes on iPhone and iPad

Ollie Mattison
Mar 27, 2024• Proven solutions
Capturing full HD or 4K footage with your iPad or iPhone is a straightforward process, but sharing that footage through messaging apps or social media can be a bit more complicated.
The size of video files recorded in 4K resolution is often measured in gigabytes and you have to compress them in order to share them with your friends.
We’ve selected the five best free video compressor apps for iPhones and iPads that will enable you to shrink your videos in minutes and post them on social networks or send them through email and messaging apps.
So, let’s take a look at how you can reduce the size of your videos using free video compressing apps for iOS.
5 Best Video Compressor Apps for iOS that Reduce Video Size
Shrinking a video’s size is easy, even after you record a video clip. Each of the free video compressor apps we included in our top five list allows you to reduce a video’s size quickly before sharing it on social media or sending it to your friends. Read on if you would like to find out more about the best free video compressor apps for iPhones and iPads.
1. Compress Videos & Resize Videos
Price: Free, but contains in-app purchases
With this free video compressor app, you won’t have to worry about the quality of the videos you’re resizing, because it preserves the video’s quality even when videos are shrunk by more than 80%. In this manner, the Compress Videos & Resize Video app can help you free up space on your iPhone or iPad.

How to reduce video size with Compress Videos & Resize Videos?
To start reducing a video’s size you just have to open the app and select all videos, recently added or any other available categories.
After tapping on a particular category, you can proceed to select one or more video clips you would like to reduce. The app is going to display the videos that are stored on your phone or in your iCloud Photo Library and show you the exact size of each video.
Once you’ve selected the videos you’d like to shrink, you should click on the Next button and proceed to the Compression Settings window. Afterward, you can simply change the Frame Rate and Video Dimensions settings by dragging the sliders to the left or to the right. When ready, tap on the Compress button and the Compress Videos & Resize Video app will shrink your videos and save to the Compressed Videos album.
2. Video Compress – Shrink Vids
Price: Free, but offers in-app purchases

You can reduce the size of videos recorded in 4K, Full HD or HD resolution in just a few simple steps. The app lets you resize one or more videos at the same time and choose the resolution of the output video. The only downside is that you must make in-app purchases to remove ads or unlock access to all of the app’s features.
How to compress video with Video Compress – Shrink Vids?
Once you installed this free compressor app for iOS on your device, you should launch it and tap on the + icon to import the video you want to compress into the app. Grant the app permission to access the Photos app and head over to the folder in which the videos you want shrink are stored.
After selecting the videos, you should tap on the Choose Preset button and select one of the available presets. Optionally, you can adjust the bitrate or preview how the videos look before and after the compression. Tap on the Continue button when you are ready and then select the destination album to which the resized videos are going to be exported. After the video compression process is completed the app will ask you if you want to delete the original video files and only keep their resized versions.
3. Video Slimmer App
Price: Free or $2,99 for Pro

Video Slimmer is much more than a simple video compressor app for iOS, as it lets its users trim, rotate or merge videos. The app’s batch processing capabilities are remarkable since you can export resized videos from Video Slimmer quickly. You can free up to 80% of your iPhone’s or iPad’s storage space by compressing videos you store on your iOS-based device.
How to compress videos with Video Slimmer App?
Shrinking multiple videos with Video Slimmer won’t take too much of your time, although the duration of the compression process depends on the size of the video clips. Click on the + icon after you launch the app, in order to select the videos from the camera roll.
Tap on the Gear icon located in the lower right corner of the screen if you would like to adjust the Video Quality and Video Size settings. In addition, the Video Slimmer App lets you choose if you want to delete the original videos from your device after the compression or add a copy of the video to the Photo Library.
Head back to the app’s main menu and tap on the Slim Now button to start compressing the videos you selected. After reducing the size of your videos you can share them on social media or send them to your friends much faster than the original high-resolution files.
4. Video Compress – Reduce Movie Size – Shrink Video
Price: Free

If you are looking for a simple and efficient free video compressor app for iPhone and iPad then Video Compress may be the right choice for you. Its interface is intuitive so you won’t need much time to get used to it even if you never compressed a video before.
How to compress video with it?
All you have to do to start compressing a video is to launch the app and select the videos you’d like to shrink from the Camera Roll. Afterward, you will be taken to the Compress window where you can see the Target Size and the percentage to which the video is going to be compressed. The only limiting factor are the output file formats because the app only allows you to save shrunk videos as MPEG-4 and QuickTime files.
All the compressed videos can be easily shared on social media or sent through email and messaging apps directly from Video Compress.
5. Video Compressor – Shrink Videos
Price: Free, but offers in-app purchases

Video Compressor app makes shrinking videos look easy because it offers a number of presets that let you choose how much you want to reduce the size of a video. Besides saving time this free video compressor for iPhones and iPads can create more storage space on your device.
How to shrink video size with this app?
Identifying large video files on your camera roll won’t take too much time since the app displays the size of all videos. Besides compressing videos, the Video Compressor app also lets you shrink photos you store on your iPhone or iPad.
Select a video you want to compress, by simply tapping on it, and then choose a preset resolution to which that video clip is going to be compressed. Optionally, you can change the Bitrate before tapping on the Compression button.
After the video compression process is over you can organize the shrunk videos effortlessly, however, you must purchase the Pro version of the app if you want to have access to all of the tools Video Compressor has to offer.
Is there any iPhone free video compressor with editor built in?
Editing a video before you share it on social media can help you get rid of unwanted parts and make the colors more vivid. iMovie is an excellent choice if you would like to trim a video or add filters and effects to it and reduce the video size. What’s more, you can use this iOS-native video editing app to reduce the size of the original video files.
Once you complete all video editing tasks you should exit the app’s Edit window by tapping done and then tap on the Share/Save Video option. iMovie offers a variety of output video file formats, so you can choose if you want to save your video in 360p, 540p, HD or 4K resolution. After you pick a preferred output resolution the iMovie is going to add the video to the Photo Library.
Bonus: How to reduce video size on iPhone & iPad when recording?
All recent iPhone and iPad models support recording in a broad spectrum of video resolutions. If you would like to decrease the resolution at which your device captures videos you should head to the Settings menu and tap on the Camera option.

Select Record Video from the Camera menu and then choose the new resolution for your videos. The default resolution is set at 1080p at 30fps, but you can easily reduce it to 720p at 30fps if you want to create videos that don’t take too much storage space.
The Record Slo-Mo option lets you choose between 720p HD at 120fps or 720p HD at 240 fps which allows you to preserve storage space while recording high-quality slow-motion videos.
Conclusion
Videos recorded with iPhones and iPads can be huge in size, and sending them or uploading them to the Internet can be a time-consuming process. Installing a free video compressing app for iOS can be a good idea if you record videos with your iPhone or iPad often. Each of the free video compressor apps we included in this article can shrink videos quickly and efficiently. Which free video compressor app are you going to choose? Leave a comment and let us know.
| Supported iOS | Supported format | User rating | |
|---|---|---|---|
| Video Slimmer | iOS 8.0 or later | MP4, MOV, AVI… | 3.7 |
| Video Compress - Shrink Vids | iOS 10.3 or later | MP4, MOV, AVI | 4.6 |
| iMovie | iOS 10.3 or later | MP4, MOV, AVI, QuickTime… | 3.9 |
| Compress Videos & Resize Video | iOS 8.0 or later | MPEG-4 and QuickTime | 4.6 |
| Video Compressor-Shrink videos | iOS 8.0 or later | MP4, MOV, AVI | 4.7 |
| Video Compress - Reduce Movie Size, Shrink Video | iOS 8.0 or later | MP4, MOV, AVI | 4.6 |
Ollie Mattison
Ollie Mattison is a writer and a lover of all things video.
Follow @Ollie Mattison
Ollie Mattison
Mar 27, 2024• Proven solutions
Capturing full HD or 4K footage with your iPad or iPhone is a straightforward process, but sharing that footage through messaging apps or social media can be a bit more complicated.
The size of video files recorded in 4K resolution is often measured in gigabytes and you have to compress them in order to share them with your friends.
We’ve selected the five best free video compressor apps for iPhones and iPads that will enable you to shrink your videos in minutes and post them on social networks or send them through email and messaging apps.
So, let’s take a look at how you can reduce the size of your videos using free video compressing apps for iOS.
5 Best Video Compressor Apps for iOS that Reduce Video Size
Shrinking a video’s size is easy, even after you record a video clip. Each of the free video compressor apps we included in our top five list allows you to reduce a video’s size quickly before sharing it on social media or sending it to your friends. Read on if you would like to find out more about the best free video compressor apps for iPhones and iPads.
1. Compress Videos & Resize Videos
Price: Free, but contains in-app purchases
With this free video compressor app, you won’t have to worry about the quality of the videos you’re resizing, because it preserves the video’s quality even when videos are shrunk by more than 80%. In this manner, the Compress Videos & Resize Video app can help you free up space on your iPhone or iPad.
How to reduce video size with Compress Videos & Resize Videos?
To start reducing a video’s size you just have to open the app and select all videos, recently added or any other available categories.
After tapping on a particular category, you can proceed to select one or more video clips you would like to reduce. The app is going to display the videos that are stored on your phone or in your iCloud Photo Library and show you the exact size of each video.
Once you’ve selected the videos you’d like to shrink, you should click on the Next button and proceed to the Compression Settings window. Afterward, you can simply change the Frame Rate and Video Dimensions settings by dragging the sliders to the left or to the right. When ready, tap on the Compress button and the Compress Videos & Resize Video app will shrink your videos and save to the Compressed Videos album.
2. Video Compress – Shrink Vids
Price: Free, but offers in-app purchases
You can reduce the size of videos recorded in 4K, Full HD or HD resolution in just a few simple steps. The app lets you resize one or more videos at the same time and choose the resolution of the output video. The only downside is that you must make in-app purchases to remove ads or unlock access to all of the app’s features.
How to compress video with Video Compress – Shrink Vids?
Once you installed this free compressor app for iOS on your device, you should launch it and tap on the + icon to import the video you want to compress into the app. Grant the app permission to access the Photos app and head over to the folder in which the videos you want shrink are stored.
After selecting the videos, you should tap on the Choose Preset button and select one of the available presets. Optionally, you can adjust the bitrate or preview how the videos look before and after the compression. Tap on the Continue button when you are ready and then select the destination album to which the resized videos are going to be exported. After the video compression process is completed the app will ask you if you want to delete the original video files and only keep their resized versions.
3. Video Slimmer App
Price: Free or $2,99 for Pro
Video Slimmer is much more than a simple video compressor app for iOS, as it lets its users trim, rotate or merge videos. The app’s batch processing capabilities are remarkable since you can export resized videos from Video Slimmer quickly. You can free up to 80% of your iPhone’s or iPad’s storage space by compressing videos you store on your iOS-based device.
How to compress videos with Video Slimmer App?
Shrinking multiple videos with Video Slimmer won’t take too much of your time, although the duration of the compression process depends on the size of the video clips. Click on the + icon after you launch the app, in order to select the videos from the camera roll.
Tap on the Gear icon located in the lower right corner of the screen if you would like to adjust the Video Quality and Video Size settings. In addition, the Video Slimmer App lets you choose if you want to delete the original videos from your device after the compression or add a copy of the video to the Photo Library.
Head back to the app’s main menu and tap on the Slim Now button to start compressing the videos you selected. After reducing the size of your videos you can share them on social media or send them to your friends much faster than the original high-resolution files.
4. Video Compress – Reduce Movie Size – Shrink Video
Price: Free
If you are looking for a simple and efficient free video compressor app for iPhone and iPad then Video Compress may be the right choice for you. Its interface is intuitive so you won’t need much time to get used to it even if you never compressed a video before.
How to compress video with it?
All you have to do to start compressing a video is to launch the app and select the videos you’d like to shrink from the Camera Roll. Afterward, you will be taken to the Compress window where you can see the Target Size and the percentage to which the video is going to be compressed. The only limiting factor are the output file formats because the app only allows you to save shrunk videos as MPEG-4 and QuickTime files.
All the compressed videos can be easily shared on social media or sent through email and messaging apps directly from Video Compress.
5. Video Compressor – Shrink Videos
Price: Free, but offers in-app purchases
Video Compressor app makes shrinking videos look easy because it offers a number of presets that let you choose how much you want to reduce the size of a video. Besides saving time this free video compressor for iPhones and iPads can create more storage space on your device.
How to shrink video size with this app?
Identifying large video files on your camera roll won’t take too much time since the app displays the size of all videos. Besides compressing videos, the Video Compressor app also lets you shrink photos you store on your iPhone or iPad.
Select a video you want to compress, by simply tapping on it, and then choose a preset resolution to which that video clip is going to be compressed. Optionally, you can change the Bitrate before tapping on the Compression button.
After the video compression process is over you can organize the shrunk videos effortlessly, however, you must purchase the Pro version of the app if you want to have access to all of the tools Video Compressor has to offer.
Is there any iPhone free video compressor with editor built in?
Editing a video before you share it on social media can help you get rid of unwanted parts and make the colors more vivid. iMovie is an excellent choice if you would like to trim a video or add filters and effects to it and reduce the video size. What’s more, you can use this iOS-native video editing app to reduce the size of the original video files.
Once you complete all video editing tasks you should exit the app’s Edit window by tapping done and then tap on the Share/Save Video option. iMovie offers a variety of output video file formats, so you can choose if you want to save your video in 360p, 540p, HD or 4K resolution. After you pick a preferred output resolution the iMovie is going to add the video to the Photo Library.
Bonus: How to reduce video size on iPhone & iPad when recording?
All recent iPhone and iPad models support recording in a broad spectrum of video resolutions. If you would like to decrease the resolution at which your device captures videos you should head to the Settings menu and tap on the Camera option.
Select Record Video from the Camera menu and then choose the new resolution for your videos. The default resolution is set at 1080p at 30fps, but you can easily reduce it to 720p at 30fps if you want to create videos that don’t take too much storage space.
The Record Slo-Mo option lets you choose between 720p HD at 120fps or 720p HD at 240 fps which allows you to preserve storage space while recording high-quality slow-motion videos.
Conclusion
Videos recorded with iPhones and iPads can be huge in size, and sending them or uploading them to the Internet can be a time-consuming process. Installing a free video compressing app for iOS can be a good idea if you record videos with your iPhone or iPad often. Each of the free video compressor apps we included in this article can shrink videos quickly and efficiently. Which free video compressor app are you going to choose? Leave a comment and let us know.
| Supported iOS | Supported format | User rating | |
|---|---|---|---|
| Video Slimmer | iOS 8.0 or later | MP4, MOV, AVI… | 3.7 |
| Video Compress - Shrink Vids | iOS 10.3 or later | MP4, MOV, AVI | 4.6 |
| iMovie | iOS 10.3 or later | MP4, MOV, AVI, QuickTime… | 3.9 |
| Compress Videos & Resize Video | iOS 8.0 or later | MPEG-4 and QuickTime | 4.6 |
| Video Compressor-Shrink videos | iOS 8.0 or later | MP4, MOV, AVI | 4.7 |
| Video Compress - Reduce Movie Size, Shrink Video | iOS 8.0 or later | MP4, MOV, AVI | 4.6 |
Ollie Mattison
Ollie Mattison is a writer and a lover of all things video.
Follow @Ollie Mattison
The Ultimate List of Video Editors with Smart Reframe Technology
The auto-frame feature is needed to edit the videos professionally. Its purpose is to adjust the video clips so that the action of a scene is never out of the frame even after reformatting the video. Specifically, the quality of your video is not affected, and no frame is lost or damaged when you reformat the video for different aspect ratios.
The smart auto-reframe feature is mainly used for posting videos on social media platforms such as Facebook, Instagram, YouTube, etc. This article provides you with detailed information about the best video editors that are enriched with the smart auto-reframe feature. The method of using these tools is also provided.
Top Video Editors with Auto-Reframe for Smart Crop
Following are some of the best video editors that consist of an auto-reframe feature for smart crop:
1. Wondershare Filmora Video Editor
Supported OS: Windows and macOS
Pricing: Free trial, $ 79.99 for perpetual plan
For Win 7 or later (64-bit)
For macOS 10.12 or later
Wondershare Filmora Video Editor is a powerful and easy video editing software that provides different methods to save and share the video. This software includes GIF support, 4K editing support, and an audio equalizer. You can remove background noise from the video. Its key features also include video stabilization , color tuning, scene detection, advanced text editor and audio mixer,
Wondershare Filmora comes with plenty of smart features, among which auto-reframe is top of the list. It saves your editing time to create or edit a professional video. This feature can detect a moving object in your video and crops it automatically to suit different aspect ratios so you can post it on various platforms. In this way, it enhances the efficiency of your video. To use the auto-reframe feature in Filmora, you can follow the steps below:
Step 1: Install and Launch Software
Download the software and launch it on your devices. From Tools, select Auto Reframe.

Step 2: Import File
Use the drag and drop feature to import the file or click on the Import button for selecting and importing it.

Step 3: Choose Aspect Ratio
To start reframing, select the aspect ratio you need. You can also define the motion speed of the reframed video clip to make it fast or slow or keep the original speed. And then click Analyze to apply changes. Here I will choose 9:16 portrait mode to take the example.
Step 4: Adjust Frame
Filmora will convert the video to the selected aspect ratio automatically. After analyzing, select the frame and adjust its position.

Step 4: Export File
Click the Export button to save the file when you are done with reframing, adjustment, and editing. Share it where you want to.

2. Adobe Premiere Rush
Supported OS: Android, iOS, Windows and macOS
Pricing: Free trial, $9.99 per month
Adobe Premiere Rush is a desktop and mobile video editing app that lets you create innovative videos from your computer or mobile phone. It enables you to control your creations with audio features and graphic templates. It allows you to capture, color-correct, change clip sequence, trim, add color filters, text overlays, and record voiceovers .
The feature of auto-reframe is also available in this software that allows you to adjust your video and do reframing. You can set the frames according to your needs and requirements through the application of Auto Reframe to your video without affecting its quality when uploaded on social media platforms.
Step 1: Download the Software
Download the software on your mobile or computer and launch it.
Step 2: Import a Video
Import a video to the software you want to edit and adjust its frames.
Step 3: Apply Auto Frame
Click Effects panel and then select Auto Reframe, which will automatically keep the most important parts of the shot in the frame, and then the process will be started.
Step 4: Adjust Frames and Add Effects
Click Adjust Frame to adjust frame size according to your needs. To add Pan and Zoom effects or other effects, click Effects, select Motion menu.

Step 4: Adjust and Export
Set the speed of the video and the clip duration, and then export your video when editing is done. Save it to your device and share it.
3. Adobe Premiere Pro
Supported OS: Windows and macOS
Pricing: $20.99 per month (annual plan monthly paid)
Adobe Premiere Pro is a video editing software that is flexible and efficient for professional videos. It consists of powerful creative tools for audio, graphics, and colors. It allows you to create simultaneous projects and use motion graphic templates to enhance your video. This software also provides the feature of VR audio editing, transitions, adding effects, etc.
Adobe has added the smart auto-reframe feature to the software, especially for the broadcasters to optimize their content for different social media platforms. Using the auto-reframe feature, they can edit video in both YouTube’s landscape interface and Instagram’s vertical format.
Step 1: Download and Launch Software
Download the software from its official website, install it and launch it to use.
Step 2: Select the Sequence
Right-click and select the Auto Reframe Sequence option. Click New Item and select Sequence to create a sequence or add an already shot sequence.
Step 3: Apply Auto Reframe Feature
Select Effects and double click Auto Reframe tab to apply its effects. Select Aspect Ratio for reframing the video.

Step 4: Export and Save
Export the file when the auto frame feature is applied. Save it and share it.
4. Final Cut Pro X
Supported OS: Mac OS
Pricing: Free trial, $299.99
Final Cut Pro X was developed by Apple. It is a video editing software that allows you to edit a simple video to a traditional one because it consists of the Object Tracker for adding dynamic text to the video.
You can also add colors to the moving footage. You can apply tracking data to other graphics and text files to enhance your work.
The smart auto-frame feature present in Final Cut Pro X allows you to adjust the aspect ratios of the video file. Smart Conform feature will enable you to Auto Reframe in this Apple’s software where it works on sequences.
Step 1: Download and Install Software
Download Final Cut Pro X from its official website, install and launch it.
Step 2: Create Project
Create a project with the aspect ratio you need, i.e., vertical, landscape, square, etc, and click Smart Conform to apply Auto Reframe, and then set frame size and set the aspect ratio to maximize image quality. In this way, Final Cut Pro will analyze all the clips, focus on the most interesting parts, and automatically conform each clip to fill the entire frame.

Step 3: Add File and Adjust
Add file to the timeline, and you will the video is auto reframed in the Preview window. You can skim through the project to check how the Smart Conform tool did on the rest of the clips.
If you find some frames are out of the edge, you can manually adjust its position with keyframing.
Step 4: Save File
After everything is finely adjusted, export the edited and adjusted video and save it to your device.
5. Kamua
Supported OS: Online tool available for all devices
Pricing: Free
Kamua is a video editing browser-based tool that does not require to be downloaded. It comes with a user-friendly interface that makes it easy to use and understand. You can add subtitles to your video using this tool. It allows you to add filters to your video to make it effective and gain the attention of your followers. Its Ai features let you crop the video efficiently.
You can change the dimensions of the video and aspect ratio from vertical to horizontal using the Auto Reframe feature. In this software, the Auto Reframe feature is enabled by the AutoCrop feature that allows you to resize and reframe your video or the clips that have movement.
Step 1: Visit the Official Website
Open the official website of Kamua to use it for reframing: https://kamua.com/ .
Step 2: Select Aspect Ratio
Open Crop Settings and set the Aspect ratio for your file
Step 3: Apply Feature
Toggle AutoCrop and click Generate AutoCrop Preview. Set the aspect ratio and video dimensions
Step 4: Export File
Export the edited file when you are done with the reframing and resizing step. Save the file and share it to your desired platform.
Note: Since 16 November, 2021, Kamua is part of Jellysmack and the services has been discontinued. If you didn’t register it before, you may can’t use the features mentioned above.
Conclusion
The modern video editing software comes with the feature of smart auto reframing. This feature allows you to upload your video according to the platform where you want to upload it. For example, if you need to upload a video on YouTube, you can set the aspect ratio in the landscape interface. And if you want to upload your video on Instagram, you can set the aspect ratio to vertical format. These tools also allow you to set video dimensions. They not only allow you to edit videos but also the images having motion.
For Win 7 or later (64-bit)
For macOS 10.12 or later
Wondershare Filmora Video Editor is a powerful and easy video editing software that provides different methods to save and share the video. This software includes GIF support, 4K editing support, and an audio equalizer. You can remove background noise from the video. Its key features also include video stabilization , color tuning, scene detection, advanced text editor and audio mixer,
Wondershare Filmora comes with plenty of smart features, among which auto-reframe is top of the list. It saves your editing time to create or edit a professional video. This feature can detect a moving object in your video and crops it automatically to suit different aspect ratios so you can post it on various platforms. In this way, it enhances the efficiency of your video. To use the auto-reframe feature in Filmora, you can follow the steps below:
Step 1: Install and Launch Software
Download the software and launch it on your devices. From Tools, select Auto Reframe.
Step 2: Import File
Use the drag and drop feature to import the file or click on the Import button for selecting and importing it.
Step 3: Choose Aspect Ratio
To start reframing, select the aspect ratio you need. You can also define the motion speed of the reframed video clip to make it fast or slow or keep the original speed. And then click Analyze to apply changes. Here I will choose 9:16 portrait mode to take the example.
Step 4: Adjust Frame
Filmora will convert the video to the selected aspect ratio automatically. After analyzing, select the frame and adjust its position.
Step 4: Export File
Click the Export button to save the file when you are done with reframing, adjustment, and editing. Share it where you want to.
2. Adobe Premiere Rush
Supported OS: Android, iOS, Windows and macOS
Pricing: Free trial, $9.99 per month
Adobe Premiere Rush is a desktop and mobile video editing app that lets you create innovative videos from your computer or mobile phone. It enables you to control your creations with audio features and graphic templates. It allows you to capture, color-correct, change clip sequence, trim, add color filters, text overlays, and record voiceovers .
The feature of auto-reframe is also available in this software that allows you to adjust your video and do reframing. You can set the frames according to your needs and requirements through the application of Auto Reframe to your video without affecting its quality when uploaded on social media platforms.
Step 1: Download the Software
Download the software on your mobile or computer and launch it.
Step 2: Import a Video
Import a video to the software you want to edit and adjust its frames.
Step 3: Apply Auto Frame
Click Effects panel and then select Auto Reframe, which will automatically keep the most important parts of the shot in the frame, and then the process will be started.
Step 4: Adjust Frames and Add Effects
Click Adjust Frame to adjust frame size according to your needs. To add Pan and Zoom effects or other effects, click Effects, select Motion menu.
Step 4: Adjust and Export
Set the speed of the video and the clip duration, and then export your video when editing is done. Save it to your device and share it.
3. Adobe Premiere Pro
Supported OS: Windows and macOS
Pricing: $20.99 per month (annual plan monthly paid)
Adobe Premiere Pro is a video editing software that is flexible and efficient for professional videos. It consists of powerful creative tools for audio, graphics, and colors. It allows you to create simultaneous projects and use motion graphic templates to enhance your video. This software also provides the feature of VR audio editing, transitions, adding effects, etc.
Adobe has added the smart auto-reframe feature to the software, especially for the broadcasters to optimize their content for different social media platforms. Using the auto-reframe feature, they can edit video in both YouTube’s landscape interface and Instagram’s vertical format.
Step 1: Download and Launch Software
Download the software from its official website, install it and launch it to use.
Step 2: Select the Sequence
Right-click and select the Auto Reframe Sequence option. Click New Item and select Sequence to create a sequence or add an already shot sequence.
Step 3: Apply Auto Reframe Feature
Select Effects and double click Auto Reframe tab to apply its effects. Select Aspect Ratio for reframing the video.
Step 4: Export and Save
Export the file when the auto frame feature is applied. Save it and share it.
4. Final Cut Pro X
Supported OS: Mac OS
Pricing: Free trial, $299.99
Final Cut Pro X was developed by Apple. It is a video editing software that allows you to edit a simple video to a traditional one because it consists of the Object Tracker for adding dynamic text to the video.
You can also add colors to the moving footage. You can apply tracking data to other graphics and text files to enhance your work.
The smart auto-frame feature present in Final Cut Pro X allows you to adjust the aspect ratios of the video file. Smart Conform feature will enable you to Auto Reframe in this Apple’s software where it works on sequences.
Step 1: Download and Install Software
Download Final Cut Pro X from its official website, install and launch it.
Step 2: Create Project
Create a project with the aspect ratio you need, i.e., vertical, landscape, square, etc, and click Smart Conform to apply Auto Reframe, and then set frame size and set the aspect ratio to maximize image quality. In this way, Final Cut Pro will analyze all the clips, focus on the most interesting parts, and automatically conform each clip to fill the entire frame.
Step 3: Add File and Adjust
Add file to the timeline, and you will the video is auto reframed in the Preview window. You can skim through the project to check how the Smart Conform tool did on the rest of the clips.
If you find some frames are out of the edge, you can manually adjust its position with keyframing.
Step 4: Save File
After everything is finely adjusted, export the edited and adjusted video and save it to your device.
5. Kamua
Supported OS: Online tool available for all devices
Pricing: Free
Kamua is a video editing browser-based tool that does not require to be downloaded. It comes with a user-friendly interface that makes it easy to use and understand. You can add subtitles to your video using this tool. It allows you to add filters to your video to make it effective and gain the attention of your followers. Its Ai features let you crop the video efficiently.
You can change the dimensions of the video and aspect ratio from vertical to horizontal using the Auto Reframe feature. In this software, the Auto Reframe feature is enabled by the AutoCrop feature that allows you to resize and reframe your video or the clips that have movement.
Step 1: Visit the Official Website
Open the official website of Kamua to use it for reframing: https://kamua.com/ .
Step 2: Select Aspect Ratio
Open Crop Settings and set the Aspect ratio for your file
Step 3: Apply Feature
Toggle AutoCrop and click Generate AutoCrop Preview. Set the aspect ratio and video dimensions
Step 4: Export File
Export the edited file when you are done with the reframing and resizing step. Save the file and share it to your desired platform.
Note: Since 16 November, 2021, Kamua is part of Jellysmack and the services has been discontinued. If you didn’t register it before, you may can’t use the features mentioned above.
Conclusion
The modern video editing software comes with the feature of smart auto reframing. This feature allows you to upload your video according to the platform where you want to upload it. For example, if you need to upload a video on YouTube, you can set the aspect ratio in the landscape interface. And if you want to upload your video on Instagram, you can set the aspect ratio to vertical format. These tools also allow you to set video dimensions. They not only allow you to edit videos but also the images having motion.
Also read:
- Updated In 2024, Mobile Time-Lapse Magic Top Apps for Creatives (2023 Edition)
- 2024 Approved Windows Movie Maker Alternatives 10+ iMovie-Style Video Editors
- Updated 2024 Approved Shaky Videos Be Gone! Top Video Stabilizer Apps for Mobile
- New The 10 Most Talented Music Video Directors You Need to Know for 2024
- New 2024 Approved Smooth Out Your Footage Best Free Video Stabilization Apps
- Updated In 2024, Bring Back the 80S Best VHS Emulator Apps for iPhone and Android
- Updated Optimize Your Online Presence A Guide to Social Media Aspect Ratios for 2024
- New In 2024, 10 Free Android Video Editing Apps Without Watermarks or Subscriptions
- New Cross-Platform Video Editing Made Easy A Chromebook Users Guide for 2024
- New In 2024, Speed Up Your Conversions The Best YouTube to MP4 Converters Revealed
- Updated Speed Up or Slow Down Top GIF Editors Reviewed
- Updated In 2024, Ranking the Best AVCHD Video Editing Software
- 2024 Approved Say Goodbye to Shaky Footage Top Free Video Stabilizers
- Updated In 2024, Digital Drawing Board Converting Videos Into Cartoons with Ease
- Updated Brightness and Contrast Video Editors Compared for 2024
- New In 2024, Best Free Subtitle Editors for Video Creators
- Updated Best Alternative to GoPro Studio to Work with GoPro Footage for 2024
- Updated In 2024, Aspect Ratio Essentials 5 Things You Need to Know
- New Movie Magic Made Easy Upgrade Your Home Videos to Hollywood Quality
- Updated In 2024, From Pixels to Proportions Mastering Aspect Ratio Calculations
- In 2024, Top WhatsApp Status Generator Tools and Apps
- Updated 2024 Approved Steady Shots Ahead The Best Free Online Video Stabilizers
- Updated Elevate Your Photos Top-Rated Vignette Apps for iPhone and Android for 2024
- Updated 2024 Approved The Ultimate Guide to Free MPEG Video Splitters Top 5 Reviews
- New 2024 Approved Video Production on Mac Tips and Tricks
- 2024 Approved Mac VLC Trimmer Effortlessly Cut Videos Without Compromising Quality
- New 2024 Approved Transform Your Videos A Comprehensive Guide to Time Lapses in Final Cut Pro
- Updated Maximizing FCPX Efficiency Troubleshooting Strategies for Editors
- In 2024, The M4R Conversion Handbook Essential Knowledge for Beginners
- Updated Get the Best Picture Amazon Prime Video Aspect Ratio Settings for 2024
- 2024 Approved Trim Videos for Free Top Watermark-Free Editors
- In 2024, Resize Like a Pro The Top Technique for Vertical Video Success
- New In 2024, Jaw-Dropping 4K Videos That Will Leave You Speechless
- New 2024 Approved 6 Best Explainer Video Software
- New Where to Find Filmora Torrent for Free without Any Virus and Risk? In This Article, I Will Show You a 100 Safe and Useful Way to Get the Filmora Free Torrent
- New 2024 Approved MP4 Tag Editor Reviews Top Picks for Windows and Mac Users
- Updated 2024 Approved No-Cost Video Watermark Solutions Our Top 5 Recommendations
- New Final Cut Pro X Troubleshooting Handbook Quick Fixes and Workarounds for 2024
- How To Restore a Bricked Motorola Edge 2023 Back to Operation | Dr.fone
- How to play MOV files on Motorola Edge 40 Pro ?
- Detailed Tutorial to Rotate a Video in Cyberlink PowerDirector for 2024
- How to Bypass Android Lock Screen Using Emergency Call On Poco X6?
- New 2024 Approved Easy Steps to Make a Talking Avatar with AI From Any Photos
- CatchEmAll Celebrate National Pokémon Day with Virtual Location On Oppo Reno 10 Pro+ 5G | Dr.fone
- How To Transfer Data From Apple iPhone 14 Pro To Other iPhone 12 Pro Max devices? | Dr.fone
- The Most Useful Tips for Pokemon Go Ultra League On Samsung Galaxy XCover 7 | Dr.fone
- In 2024, How to Use Pokémon Emerald Master Ball Cheat On OnePlus Ace 2 Pro | Dr.fone
- Remove the Lock Screen Fingerprint Of Your Oppo F25 Pro 5G
- How to Perform Hard Reset on Nokia XR21? | Dr.fone
- How To Change Honor X9b Lock Screen Clock in Seconds
- In 2024, How to Transfer Contacts from Samsung Galaxy F14 5G to Outlook | Dr.fone
- Updated Soundcloud to MP3 Conversion Made Easy Top Tips
- In 2024, Recommended Best Applications for Mirroring Your Tecno Spark Go (2023) Screen | Dr.fone
- In 2024, The Ultimate Guide How to Bypass Swipe Screen to Unlock on Vivo Y27s Device
- Recover Apple iPhone 13 Pro Data From iCloud | Dr.fone
- In 2024, Mastering Android Device Manager The Ultimate Guide to Unlocking Your Realme V30 Device
- Top 5 TikTok Voice Generators You Should Try for 2024
- Complete Review & Guide to Techeligible FRP Bypass and More For Tecno Spark 10C
- In 2024, How to Change/Fake Your Motorola Razr 40 Location on Viber | Dr.fone
- In 2024, How to Cast Nokia 130 Music Screen to PC Using WiFi | Dr.fone
- Bypass Activation Lock On iPhone 12 Pro - 4 Easy Ways
- In 2024, The Best iSpoofer Alternative to Try On Poco C51 | Dr.fone
- Fixes for Apps Keep Crashing on Vivo X90S | Dr.fone
- 5 Easy Ways to Change Location on YouTube TV On Apple iPhone 7 Plus | Dr.fone
- In 2024, Is GSM Flasher ADB Legit? Full Review To Bypass Your Nokia G310 Phone FRP Lock
- Prevent Cross-Site Tracking on Oppo Find X6 Pro and Browser | Dr.fone
- Title: New 2024 Approved Trim Your Videos for Free 10 Best Online Editors
- Author: Morgan
- Created at : 2024-04-28 05:37:43
- Updated at : 2024-04-29 05:37:43
- Link: https://ai-video-tools.techidaily.com/new-2024-approved-trim-your-videos-for-free-10-best-online-editors/
- License: This work is licensed under CC BY-NC-SA 4.0.
