
:max_bytes(150000):strip_icc():format(webp)/GettyImages-541365354-5c8ad42246e0fb00014a9687.jpg)
New 2024 Approved The Sound of Success A Beginners Guide to YouTube Audio Downloads
The Sound of Success: A Beginner’s Guide to YouTube Audio Downloads
The Stunning Guide on YouTube Audio Download
An easy yet powerful editor
Numerous effects to choose from
Detailed tutorials provided by the official channel
Extracting audio from YouTube videos or YouTube audio download is a fairly common practice, and the desire to make the process simpler has inspired the production of countless software and websites.
We’ve framed a stunning guide for YouTube converter video to MP3 format.
Note: We resolutely oppose all forms of copyright-infringing downloads. This tutorial is only for downloading YouTube videos/audio materials from your own channel.
In this article
01 [Something You Need Know Before Downloading Audio from YouTube](#Part 1)
02 [How to Download YouTube Audio](#Part 2)
Part 1 Something You Need to Know Before Downloading Audio from YouTube
Before we proceed on the ultimate procedure for YouTube audio download, we’d like to take you through a set of questions defined below.
01What is an online YouTube music downloader?
A YouTube to MP4 converter online allows downloading music or audio from YouTube’s video format. For example, let’s suppose you are using keepv.id to download music from YouTube. Here, you’re only required to paste the video link and hit the Go tab to see your YouTube videos converting to MP3 format.
02Why use an online YouTube MP3 Downloader?
The answer is simple as you’re involved in any hassle of downloading the software beforehand in an online version of YouTube MP3 downloader. However, you must look for security concerns in online websites as they have malware or other viruses.
03Is it possible to convert YouTube videos to other formats?
You can convert a YouTube video into different formats such as MOV, MPEG, MP4, FLV, and more.
04Is downloading YouTube videos illegal?
It’s not illegal to download YouTube videos but somewhat immoral for personal use.
05Is it safe to use YouTube MP3 Music Downloader?
Yes, the answer is quite partial here; as already discussed, online websites can be scams or injected with viruses, etc. So, research appropriately before using any online source for YouTube audio download.
Part 2 How to Download YouTube Audio
Now, let’s dive into a detailed guide on downloading video YouTube MP3 via different ways, as mentioned below.
01How to Utilize Mp3 Audio YouTube Downloader Feature?
Addoncrop is one of the most famous browser extensions available to download video YouTube MP3. The extension assists in downloading all the YouTube videos without any complexity.
Its interface is also quite intuitive, and you need to follow the steps mentioned below to download and convert YouTube to MP3:

Step 1: Go to addoncrop.com website and search YouTube to MP3 audio converter.
Step 2: Select the option from the search list, and there, you can select the browser name for which you want this extension.
Step 3: To add this to your browser, click the Download button and follow the on-screen instructions to add it.
Step 4: Once installed, go to YouTube and look for the song you want to download.
Step 5: When you click on the song, you will see the ‘Download MP3’ option right above the ‘Subscribe button. Click it.
Step 6: There’s an option to trim the audio and choose among different bitrates. You can choose up to 320Kbps of quality.
Step 7: You can download the song once you have trimmed and chosen the audio quality.
The fantastic part of this extension is that it does not spam with ads or take you to other websites. All in all, its entire procedure is pretty simple.
02Tutorials on Downloading YouTube Audio on Windows for Free
4K YouTube to MP3 Downloader software program specifically designed for extracting audio from YouTube, Vimeo, Facebook, and Flickr freely. It helps in downloading and saving it in different formats, including M4A, MP3, and OGG, without any hassle of ads. We can keep and download a complete playlist to our PC using a 4K YouTube to MP3 downloader.
To download music, follow the below-given steps:
Step 1: Launch 4K YouTube to MP3 Downloader to your system (Windows, Linux, or Mac) .

Step 2: After successfully installing the setup on your computer, open YouTube on your computer.
Step 3: Search for the music video or playlist that you want to save to your computer as shown below:

Step 4: Copy the video URL from the address bar, as you can see in the below snapshot:

Step 5: Now, open 4K YouTube to MP3 downloader on your computer, and it will open, as shown below:

Step 6: Click on ‘Paste URL’ at the top-left corner.
Step 7: The software will recognize and start retrieving the information of the particular pasted URL.
Step 8: If you are downloading a complete playlist, it will ask whether to download the entire playlist or download one. A snapshot is below:

Step 9: Select accordingly and wait for a minute or seconds for the audio to download to your PC:

Step 10: After the successful download, it gets saved to your computer, and you can enjoy it whenever you want.
03Tutorials on Downloading Audio Files from YouTube on Mac for Free
Step 1: Launch 4K Video Downloader.
Step 2: Go to YouTube and find a video, playlist, or channel that you would like to upload into iTunes.
Step 3: Copy the video link from your browser.

Step 4: Click Paste Link in Video Downloader.

Step 5: Select the Extract Audio category, choose M4A format, and click Extract.

Step 6: Once you finish the audio extraction, click the right on the mouse button and choose the Show in folder option. The files directory that downloaded will open.

Step 7: Launch iTunes, go to File > Add to Library tab. Then, locate the folder and select the files.
Alternatively, you may drag and drop the downloaded content to the iTunes window from the folder.
Step 8: That’s it! Now you can enjoy the audio on iTunes on your Mac or transfer YouTube music to your iPhone, iPad, or iPod.
04How to Download Audio from YouTube Using Parallels Toolbox
Parallels Toolbox offers a single robust application that helps you to download your favorite audio online, including YouTube.

Step 1: Open the Parallels Toolbox on your screen’s top toolbar.
Step 2: Click Audio under the Library window to access the dropdown menu.
Step 3: Select Download Audio; a pop-up will appear on the screen with a download icon.
Step 4: Open YouTube, search for the video, and drag the URL to the download pop-up.
Step 5: Once the download finishes, a list of all your downloaded audio content will be there on the Parallels window. Unmark them all, and only tick the audio content you wish to download.
Hit the Download Selected button.
It will automatically save your audio to PC.
Bonus Tip: The Most Recommended Audio Editor-Wondershare Filmora
The Wondershare Filmora Video Editor ‘s latest version has various audio editing features worth considering.
We can add the audio downloaded from YouTube as a background using Filmora audio editor and transform the tone.
Filmora also provides a free music library, you can also split the audio by using the timeline’s playhead, adjust the volume, pitch, or the video’s length or even mute the audio in a particular video clip.
Wondershare Filmora
Get started easily with Filmora’s powerful performance, intuitive interface, and countless effects!
Try It Free Try It Free Try It Free Learn More >

Filmora also helps to add real-time voiceovers by just hitting the record button, and you will also have 3 seconds before the recording begins, and once done, hit the stop button to end it.
There are various other audio editing features that Filmora provides, such as adding and customizing multiple tracks in a clip, fade in and out audio, an audio equalizer for changing frequency, audio speed adjustment, and many more.
Key Takeaways from This Episode
● Some FAQs on YouTube to MP4 Converter Online
● 4 Main tutorials on YouTube audio download
● Bonus tip for the best audio editor to leave you with creativity
Extracting audio from YouTube videos or YouTube audio download is a fairly common practice, and the desire to make the process simpler has inspired the production of countless software and websites.
We’ve framed a stunning guide for YouTube converter video to MP3 format.
Note: We resolutely oppose all forms of copyright-infringing downloads. This tutorial is only for downloading YouTube videos/audio materials from your own channel.
In this article
01 [Something You Need Know Before Downloading Audio from YouTube](#Part 1)
02 [How to Download YouTube Audio](#Part 2)
Part 1 Something You Need to Know Before Downloading Audio from YouTube
Before we proceed on the ultimate procedure for YouTube audio download, we’d like to take you through a set of questions defined below.
01What is an online YouTube music downloader?
A YouTube to MP4 converter online allows downloading music or audio from YouTube’s video format. For example, let’s suppose you are using keepv.id to download music from YouTube. Here, you’re only required to paste the video link and hit the Go tab to see your YouTube videos converting to MP3 format.
02Why use an online YouTube MP3 Downloader?
The answer is simple as you’re involved in any hassle of downloading the software beforehand in an online version of YouTube MP3 downloader. However, you must look for security concerns in online websites as they have malware or other viruses.
03Is it possible to convert YouTube videos to other formats?
You can convert a YouTube video into different formats such as MOV, MPEG, MP4, FLV, and more.
04Is downloading YouTube videos illegal?
It’s not illegal to download YouTube videos but somewhat immoral for personal use.
05Is it safe to use YouTube MP3 Music Downloader?
Yes, the answer is quite partial here; as already discussed, online websites can be scams or injected with viruses, etc. So, research appropriately before using any online source for YouTube audio download.
Part 2 How to Download YouTube Audio
Now, let’s dive into a detailed guide on downloading video YouTube MP3 via different ways, as mentioned below.
01How to Utilize Mp3 Audio YouTube Downloader Feature?
Addoncrop is one of the most famous browser extensions available to download video YouTube MP3. The extension assists in downloading all the YouTube videos without any complexity.
Its interface is also quite intuitive, and you need to follow the steps mentioned below to download and convert YouTube to MP3:
Step 1: Go to addoncrop.com website and search YouTube to MP3 audio converter.
Step 2: Select the option from the search list, and there, you can select the browser name for which you want this extension.
Step 3: To add this to your browser, click the Download button and follow the on-screen instructions to add it.
Step 4: Once installed, go to YouTube and look for the song you want to download.
Step 5: When you click on the song, you will see the ‘Download MP3’ option right above the ‘Subscribe button. Click it.
Step 6: There’s an option to trim the audio and choose among different bitrates. You can choose up to 320Kbps of quality.
Step 7: You can download the song once you have trimmed and chosen the audio quality.
The fantastic part of this extension is that it does not spam with ads or take you to other websites. All in all, its entire procedure is pretty simple.
02Tutorials on Downloading YouTube Audio on Windows for Free
4K YouTube to MP3 Downloader software program specifically designed for extracting audio from YouTube, Vimeo, Facebook, and Flickr freely. It helps in downloading and saving it in different formats, including M4A, MP3, and OGG, without any hassle of ads. We can keep and download a complete playlist to our PC using a 4K YouTube to MP3 downloader.
To download music, follow the below-given steps:
Step 1: Launch 4K YouTube to MP3 Downloader to your system (Windows, Linux, or Mac) .
Step 2: After successfully installing the setup on your computer, open YouTube on your computer.
Step 3: Search for the music video or playlist that you want to save to your computer as shown below:
Step 4: Copy the video URL from the address bar, as you can see in the below snapshot:
Step 5: Now, open 4K YouTube to MP3 downloader on your computer, and it will open, as shown below:
Step 6: Click on ‘Paste URL’ at the top-left corner.
Step 7: The software will recognize and start retrieving the information of the particular pasted URL.
Step 8: If you are downloading a complete playlist, it will ask whether to download the entire playlist or download one. A snapshot is below:
Step 9: Select accordingly and wait for a minute or seconds for the audio to download to your PC:
Step 10: After the successful download, it gets saved to your computer, and you can enjoy it whenever you want.
03Tutorials on Downloading Audio Files from YouTube on Mac for Free
Step 1: Launch 4K Video Downloader.
Step 2: Go to YouTube and find a video, playlist, or channel that you would like to upload into iTunes.
Step 3: Copy the video link from your browser.
Step 4: Click Paste Link in Video Downloader.
Step 5: Select the Extract Audio category, choose M4A format, and click Extract.
Step 6: Once you finish the audio extraction, click the right on the mouse button and choose the Show in folder option. The files directory that downloaded will open.
Step 7: Launch iTunes, go to File > Add to Library tab. Then, locate the folder and select the files.
Alternatively, you may drag and drop the downloaded content to the iTunes window from the folder.
Step 8: That’s it! Now you can enjoy the audio on iTunes on your Mac or transfer YouTube music to your iPhone, iPad, or iPod.
04How to Download Audio from YouTube Using Parallels Toolbox
Parallels Toolbox offers a single robust application that helps you to download your favorite audio online, including YouTube.
Step 1: Open the Parallels Toolbox on your screen’s top toolbar.
Step 2: Click Audio under the Library window to access the dropdown menu.
Step 3: Select Download Audio; a pop-up will appear on the screen with a download icon.
Step 4: Open YouTube, search for the video, and drag the URL to the download pop-up.
Step 5: Once the download finishes, a list of all your downloaded audio content will be there on the Parallels window. Unmark them all, and only tick the audio content you wish to download.
Hit the Download Selected button.
It will automatically save your audio to PC.
Bonus Tip: The Most Recommended Audio Editor-Wondershare Filmora
The Wondershare Filmora Video Editor ‘s latest version has various audio editing features worth considering.
We can add the audio downloaded from YouTube as a background using Filmora audio editor and transform the tone.
Filmora also provides a free music library, you can also split the audio by using the timeline’s playhead, adjust the volume, pitch, or the video’s length or even mute the audio in a particular video clip.
Wondershare Filmora
Get started easily with Filmora’s powerful performance, intuitive interface, and countless effects!
Try It Free Try It Free Try It Free Learn More >
Filmora also helps to add real-time voiceovers by just hitting the record button, and you will also have 3 seconds before the recording begins, and once done, hit the stop button to end it.
There are various other audio editing features that Filmora provides, such as adding and customizing multiple tracks in a clip, fade in and out audio, an audio equalizer for changing frequency, audio speed adjustment, and many more.
Key Takeaways from This Episode
● Some FAQs on YouTube to MP4 Converter Online
● 4 Main tutorials on YouTube audio download
● Bonus tip for the best audio editor to leave you with creativity
Discover the Best Free and Paid Subtitle Editors for Mac
Subtitle Edit for Mac: Download Alternatives

Max Wales
Mar 27, 2024• Proven solutions
Subtitle Edit is a free, open-source subtitle editor that allows users to create, adjust, sync, and translate the subtitle lines seamlessly. But one of the significant drawbacks of Subtitle Edit is that it is available only for Windows users. Nevertheless, it does not mean that Mac users cannot utilize the same function and feature set. There exists some software that is almost similar to Subtitle Edit. And given that there is no option to download Subtitle Edit for Mac users — you can use its alternative and utilize the same features on a macOS environment.
Read on to find the best Subtitle Edit Alternative to download on Mac.
Part 1: Top 3 Subtitle Edit Alternatives
After reviewing the tons of subtitle editors on the internet, we have composed a short but best list of the best alternatives of Subtitle Edit software for Mac users. And if you are used to Subtitle Edit and looking for a software that is likely comparable to mighty Subtitle Edit, you can ignore looking at this software. That said, here’s the list:
1. Aegisub
Free, open-source, and cross-platform program, AegiSub is the best alternative of SubtitleEdit because the software is comparable in most standards to the software. In fact, by comparison, AegiSub is substantial compared to the one in question. Including a built-in real-time video preview option, Aegisub allows users to see the look of the text on the videos while editing them. There are multiple options to edit the subtitles; for instance, you can change the size, font, and language based on preference and set it to video with exact timestamps. And given the fact it is a free platform; it is definitely worth a look regardless of whether you like the software or not. For the most part, if you like Aegisub, you will love Subtitle Edit and will not find it tough to utilize Aegisub to edit the subtitles.

Pros:
- Free of costs — you can donate if you like the program
- Cross-platform — sign in with a single credentials on across all your devices and work anytime, anywhere
- Multiple style, size, and font options
- Built-in video preview to view the added subtitles
Cons:
- Interface needs improvement — instead of downloading the original version, try a version from Github that includes developed and enriched version of the software
Price: Free software; no hidden fees
2. Jubler
Another free software, Jubler, is also a viable alternative to Subtitle Edit. Having all the features same as Subtitle Edit, Jubler has enough functions and capability to stand against it with its head held high. One of the most lovable qualities of Jubler is syncing text to match video features that allow users to sync the text to exact timestamps and avoid problems like latency. But that is not it: Jubler also includes an ‘Audio Wave’ feature to let you target different parts of the video and add subtitles conveniently and easily. In all, if you need a simple Subtitle editor for a Mac — Jubler is worth looking at and trying it out. Still, given that it has limited options when it comes to Formats, collaboration, and conversation options, Jubler stands next to AegiSub in our list of best alternatives of Subtitle Edit for Mac.

Pros:
- Simple and navigable tool for Mac users to edit the subtitles, sync and match to video conveniently
Cons:
- Limited subtitles options available
- No online editor — downloading is must
Price: Free software; no hidden fees
3. Subtitle Workshop
Supporting all the subtitle formats and incorporating all the tools that is ever expected from a subtitle editor, Subtitle Workshop accumulates the finest features into a simple and workable interface that allows users to add subtitles, edit, and sync & match to video easily. For instance, Subtitle Workshop allows you to handle both time and frame-based subtitles and edit them to perfection. The user-friendly, multi-lingual, and customizable interface is another likable trait that you will rarely find in the subtitle-editors realm. Not only this, but you can also utilize functions like Bold, Italics, and underline to add those subtle details and make the transcript look like a professional-edited one.

Pros:
- Numerous customizable tools and functions for automatic timing and text manipulations. For instance, you will find automatic durations, spell checking, smart line adjusting, FPS conversion, search and replace, and many more!
Cons:
- No cross platform supports
Price: Free to use; no hidden fees whatsoever
Part 2: Edit Subtitle and Video with Filmora
If you are looking to edit videos and apply subtitles on a Mac computer, another considerable option is Wondershare’s Filmora. Including multiple edit options, Filmora allows you to add beautiful titles, subtitles, and text to a video or movie conveniently. Including all the features, Filmora allows video-editing novices to edit a video like a professional. The interface is straightforward and utilizing the application to its full extent will not be difficult for anyone, regardless of the fact whether they are experts or just starting out. And although a simple tool, Filmora includes all the powerful tools, including the Chroma Key, to work on a blue-or-green screen, add transitions, effects, and filters to the videos. Plus, you can add up to hundred layers of video and audio and create the most desirable video that tells the story exactly as you want it to.
- If you are looking for a perfect video cum subtitle editor that allows you to add tons of styles, font, and animation features to the text present on the videos, Filmora is worth looking at.
- It is a free-to-use application (premium available), you can try it out if you are looking for something along the lines of a subtitle editor.
- It includes other features to edit the video too and not just sync and match video to text (like the ones mentioned above), Filmora is the app that you need on Mac.


Conclusion
Counting tons of other features Subtitle Edit includes in the program, it is not tough to see why it is one of the most popular subtitle editors in the Windows realm. Nevertheless, the above list of best alternatives that, as you have seen, includes everything that Subtitle Edit offers to the Windows users. If you are a user who is looking for a simple tool - then AegiSub should do the job. For collaboration projects — the Jubler is the best option. And for professional individual subtitle editing - Subtitle Workshop is the way to go.
Max Wales
Max Wales is a writer and a lover of all things video.
Follow @Max Wales
Max Wales
Mar 27, 2024• Proven solutions
Subtitle Edit is a free, open-source subtitle editor that allows users to create, adjust, sync, and translate the subtitle lines seamlessly. But one of the significant drawbacks of Subtitle Edit is that it is available only for Windows users. Nevertheless, it does not mean that Mac users cannot utilize the same function and feature set. There exists some software that is almost similar to Subtitle Edit. And given that there is no option to download Subtitle Edit for Mac users — you can use its alternative and utilize the same features on a macOS environment.
Read on to find the best Subtitle Edit Alternative to download on Mac.
Part 1: Top 3 Subtitle Edit Alternatives
After reviewing the tons of subtitle editors on the internet, we have composed a short but best list of the best alternatives of Subtitle Edit software for Mac users. And if you are used to Subtitle Edit and looking for a software that is likely comparable to mighty Subtitle Edit, you can ignore looking at this software. That said, here’s the list:
1. Aegisub
Free, open-source, and cross-platform program, AegiSub is the best alternative of SubtitleEdit because the software is comparable in most standards to the software. In fact, by comparison, AegiSub is substantial compared to the one in question. Including a built-in real-time video preview option, Aegisub allows users to see the look of the text on the videos while editing them. There are multiple options to edit the subtitles; for instance, you can change the size, font, and language based on preference and set it to video with exact timestamps. And given the fact it is a free platform; it is definitely worth a look regardless of whether you like the software or not. For the most part, if you like Aegisub, you will love Subtitle Edit and will not find it tough to utilize Aegisub to edit the subtitles.
Pros:
- Free of costs — you can donate if you like the program
- Cross-platform — sign in with a single credentials on across all your devices and work anytime, anywhere
- Multiple style, size, and font options
- Built-in video preview to view the added subtitles
Cons:
- Interface needs improvement — instead of downloading the original version, try a version from Github that includes developed and enriched version of the software
Price: Free software; no hidden fees
2. Jubler
Another free software, Jubler, is also a viable alternative to Subtitle Edit. Having all the features same as Subtitle Edit, Jubler has enough functions and capability to stand against it with its head held high. One of the most lovable qualities of Jubler is syncing text to match video features that allow users to sync the text to exact timestamps and avoid problems like latency. But that is not it: Jubler also includes an ‘Audio Wave’ feature to let you target different parts of the video and add subtitles conveniently and easily. In all, if you need a simple Subtitle editor for a Mac — Jubler is worth looking at and trying it out. Still, given that it has limited options when it comes to Formats, collaboration, and conversation options, Jubler stands next to AegiSub in our list of best alternatives of Subtitle Edit for Mac.
Pros:
- Simple and navigable tool for Mac users to edit the subtitles, sync and match to video conveniently
Cons:
- Limited subtitles options available
- No online editor — downloading is must
Price: Free software; no hidden fees
3. Subtitle Workshop
Supporting all the subtitle formats and incorporating all the tools that is ever expected from a subtitle editor, Subtitle Workshop accumulates the finest features into a simple and workable interface that allows users to add subtitles, edit, and sync & match to video easily. For instance, Subtitle Workshop allows you to handle both time and frame-based subtitles and edit them to perfection. The user-friendly, multi-lingual, and customizable interface is another likable trait that you will rarely find in the subtitle-editors realm. Not only this, but you can also utilize functions like Bold, Italics, and underline to add those subtle details and make the transcript look like a professional-edited one.
Pros:
- Numerous customizable tools and functions for automatic timing and text manipulations. For instance, you will find automatic durations, spell checking, smart line adjusting, FPS conversion, search and replace, and many more!
Cons:
- No cross platform supports
Price: Free to use; no hidden fees whatsoever
Part 2: Edit Subtitle and Video with Filmora
If you are looking to edit videos and apply subtitles on a Mac computer, another considerable option is Wondershare’s Filmora. Including multiple edit options, Filmora allows you to add beautiful titles, subtitles, and text to a video or movie conveniently. Including all the features, Filmora allows video-editing novices to edit a video like a professional. The interface is straightforward and utilizing the application to its full extent will not be difficult for anyone, regardless of the fact whether they are experts or just starting out. And although a simple tool, Filmora includes all the powerful tools, including the Chroma Key, to work on a blue-or-green screen, add transitions, effects, and filters to the videos. Plus, you can add up to hundred layers of video and audio and create the most desirable video that tells the story exactly as you want it to.
- If you are looking for a perfect video cum subtitle editor that allows you to add tons of styles, font, and animation features to the text present on the videos, Filmora is worth looking at.
- It is a free-to-use application (premium available), you can try it out if you are looking for something along the lines of a subtitle editor.
- It includes other features to edit the video too and not just sync and match video to text (like the ones mentioned above), Filmora is the app that you need on Mac.
Conclusion
Counting tons of other features Subtitle Edit includes in the program, it is not tough to see why it is one of the most popular subtitle editors in the Windows realm. Nevertheless, the above list of best alternatives that, as you have seen, includes everything that Subtitle Edit offers to the Windows users. If you are a user who is looking for a simple tool - then AegiSub should do the job. For collaboration projects — the Jubler is the best option. And for professional individual subtitle editing - Subtitle Workshop is the way to go.
Max Wales
Max Wales is a writer and a lover of all things video.
Follow @Max Wales
Best Screen Recording Software for Webcam on Windows 10
10 Best Webcam Recording Software for Windows 10

Richard Bennett
Mar 27, 2024• Proven solutions
Which webcam softwarehave you installed on your laptop or desktop? Using the right webcam software to live stream videos, screen record videos, or chat on Skype results in high-quality images, smooth streaming, and high-quality images and videos.
There is a huge number of free webcam software with advanced features yet free for you to download, and use on your PC.
But how would you determine the best webcam software to use?
Before you mounted that webcam on your desktop or laptop, you had a reason. It’s your webcam features and purpose that should guide you to select the right software for the webcam camera.
In this article, we will show you 10 webcam software for Windows in this guide. Included are the most useful factors to consider as you make your choice – complexity of use, free/paid, integrations, editing tools, and more. You will learn:
- Part 1: The Best Webcam & Screen Recorder for Windows and Mac [Video Tutorial]
- Part 2: Top 10 Best Free Webcam Software for Windows
First take a quick look of the 10 best webcam software that is available on your Windows from a video:
For Win 7 or later (64-bit)
 Secure Download
For macOS 10.14 or later
Secure Download
Part 1: The Best Webcam & Screen Recorder for Computer
You need a sound and webcam recorder to record your video tutorials, streaming videos, presentations, or any other type of video. Wondershare Filmora is the software to use. Other than its most admired friendly intuitive interface, it’s simple and easy to use-suitable for both beginners and professionals.
For Win 7 or later (64-bit)
Secure Download
For macOS 10.14 or later
Secure Download
Among the outstanding features, you’ll find in Filmora include,
- Fast-paced recording speed of up to 120 fps
- Adverse professional editing tools that are easy to use
- Simultaneous recording from both webcam and computer screen
- Compatible with 50+ different file formats
- Rich title text and tutorial features
It’s free to download. Have a try now! Join in the Wondershare Video Community and get some inspiration from other Filomora users.
Part 2: Top 10 Best Free Webcam Software for Windows
To help you evaluate which webcam software best suits your needs, I’ve featured the strengths, shortcomings, and support services in each software review.
This is the list of the best free webcam software for Windows 10.
| 1 - Logitech Capture | 2 - CyberLink Youcam |
|---|---|
| 3 - ManyCam | 4 - SplitCam |
| 5 - Bandicam | 6 - NCH - Video Capture Software |
| 7 - YAWCAM | 8 - Windows Camera |
| 9 - Fake Webcam | 10 - IP Camera Viewer |
1. Logitech Capture
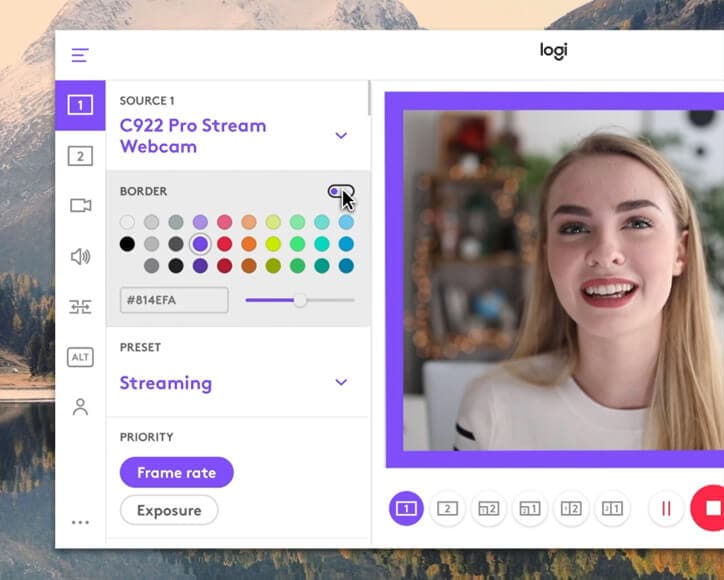
The multiple source recording feature and direct streaming app are the key strengths of this software. According to its mission statement- All-In-One Content Creation- you can use this software to record, edit, customize, and stream to your favorite channel.
Operating systems: Windows 10/8/7
Price: Free
Supported webcams: 1080P PRO STREAM, BRIO STREAM, C920s HD PRO, C922 PRO STREAM
Logitech Capture is among the few free webcam recording software for Windows 10 with studio controls applicable during recording. You can use this feature to adjust your image, create frames, adjust focus and transitions, and enable ChromaKey as you record.
In case you want to create a picture-in-picture presentation, this software allows you to use two webcams simultaneously. With the source switching and the auto-focus features, you can record the best tutorials or guides that show all dimensions and your image.
Pros
- Rich in transitions and effects
- Portrait optimization for mobile devices
- Its Capture app offers direct streaming to YouTube
- You can take passports or still images
Cons
- Limited to YouTube channel
- Account registration is mandatory
2. CyberLink Youcam
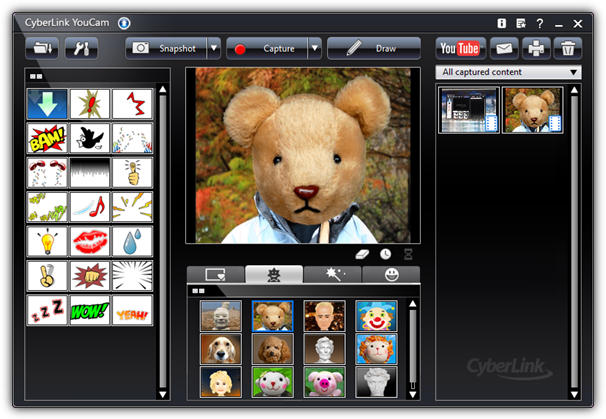
If you are used to video chatting and video recording, then, you’ll have 200+ fun effects to make your real-time videos as interesting as possible. In fact, the seamless app integration feature will keep your live streaming chats without buffering for long.
Operating systems: Windows 10/8/1.8/7
Price: Free/ Paid
Supported file formats: WMV, MP4, AVI
YouCam is the best free webcam software Windows 10 for YouTubers, business professionals, Streamers, home users, and Vloggers. It seamlessly integrates with live streaming media channels like Twitch, Wirecast, OBS Studio, Facebook Live, Xsplit, and YouTube Live.
The YouCam’s AR technology is one of its hidden treasures that will lighten up your skin by applying a natural-looking makeup. If your room is badly light, use the Live Skin Smoothing feature. Just below it is the TrueTheater Enhancement option to help you automatically adjust your facial sharpness and lighting.
Pros
- Hundreds of animated emojis
- Suitable for video conferencing services
- Plenty of interactive colorful particles and distortions
- Availability of face beautification tool
Cons
- Only limited to the Windows operating system
- Very few features for the free plan
3. ManyCam
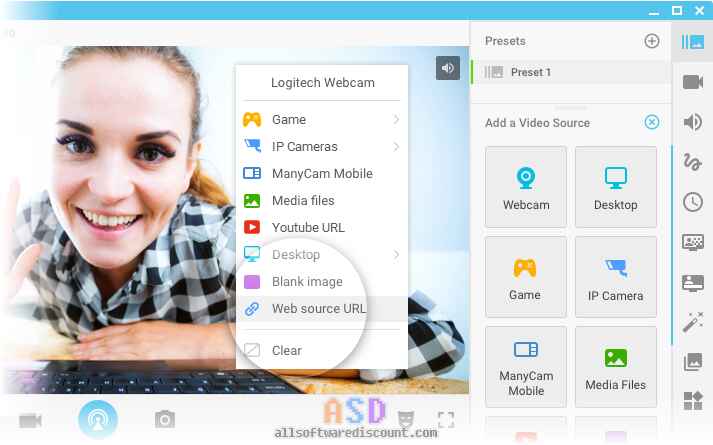
Downloading this webcam software guarantees you smooth streaming and effortless recording of videos. Also, this software will help you during game steaming, online education, mobile live streaming, and live telehealth communication.
Operating systems: Windows 10/8/7 and macOS X
Price: Free /Paid
Supported file formats: MJPEG, IP, MP4, AVI, MPEG, MOV
ManyCam is a free webcam recording software for windows 10 . It’s among the most widely used software internationally-not for many reasons, but because of its friendly intuitive user interface and live streaming tools for lessons and lecturers.
So, if you are a lecturer/teacher, you can use the Software Development Kit (SDK) to integrate the webcam with any online teaching platform. Among the features designed to facilitate better online teaching include the picture in picture, Chroma Key, multiple video sources, and screen sharing.
Pro
- Ability to stream 4K videos
- Real-time camera control settings
- No watermark even on the free plan
- Screencasting and screen recording feature
- Real-time drop and drag effects
Cons
- Expensive business subscription plans
- No Light enhancement features
- Most features are manual as opposed to being automatic
Filmora WebCame & Screen Recorder
Filmora - WebCame & Screen Recorder
• No-time delay to record webcam and screen while live streaming or gaming
• Edit recording video for marketing replay or adding game commentary
• Cross-platform supported - (Windows, Mac, iOS, Android)
Start Webcam & Screen Record Start Webcam & Screen Record Start Webcam & Screen Record Learn More >
4. SplitCam
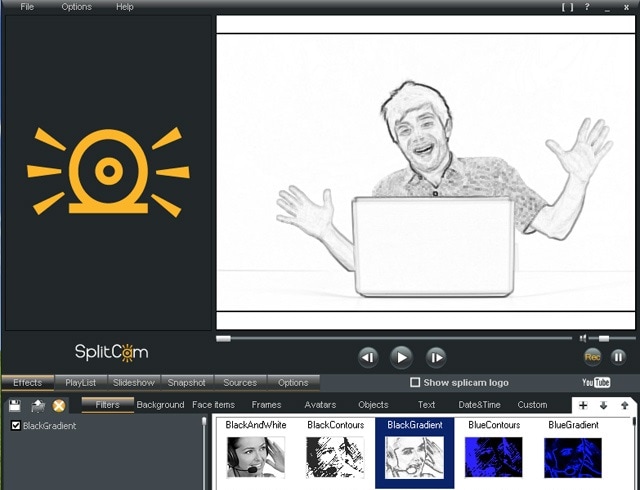
To stream your desktop/laptop screen SplitCam is the most appropriate software. With only the inbuilt virtual webcam, you can share your screen videos to media channels and IMS. Other uses of this software are recording webcam chatting , streaming live videos, and messaging.
Operating systems: Windows 10/8/7
Price: Free
SplitCam is not as popular as the other free webcam software windows 10 like ManyCam and YouCam. This is because it doesn’t integrate with some of the world’s renowned social media platforms- Facebook and Instagram. However, you can use this software to stream, take snapshots, and record videos for YouTube, Skype, Justin.tv, Gtalk, and Windows Live Messenger.
SplitCam is rich in fantastic webcam effects. Haven’t you been surprised to see someone appear to be streaming from the ocean or the Amazon Mountain? This is what you can do with SplitCam. Other cool effects are frames, texts on videos, filters, and facial items like masks and fake face glasses.
Pros
- Open and simple interface
- Integratable with the messaging apps
- Supports a wide range of resolutions ( between 320x180 and 2048x1536)
Cons
- Applicable to a small number of channels
- Supported file formats not defined
5. Bandicam
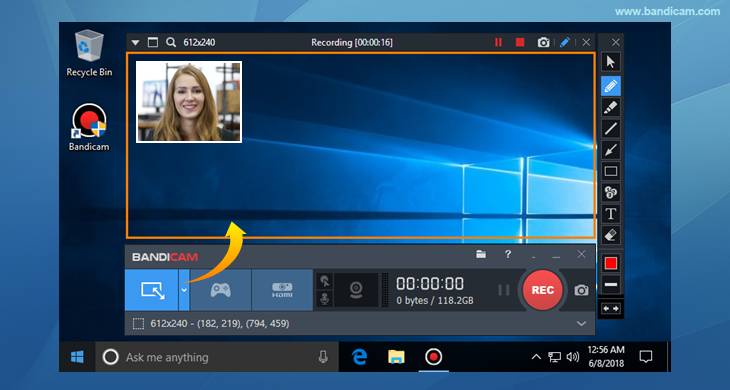
Do you want a recorder for screen recording, recording your gameplay, or capturing videos from devices like smartphones and PlayStation? Look for no other software but BandiCam. You can also merge two or more video files, remove unwanted parts, and select the only part to screen record.
Operating systems: Windows Vista, 10/8/7
Price: Free/paid
Supported file format: AVI, MP4, JPEG, TIF, GIF, PNG
Supported graphics cards: Nvidia NVENC, Nvidia NVENC (),
BandiCam is another HD webcam software Windows 10 with the capability of capturing high compression videos and games on your PC screen videos without compromising the video quality. Don’t forget to record all webinars aired in your niche.
Netflix is becoming more popular each day due to the thrilling videos. With the BandiCam screen recorder, you can record live-streamed videos on Netflix for over 24hrs. These are the tools to edit your recorded video: real-time drawing tool, webcam overlay, sound mixer, and Chroma Key.
Pros
- No hidden features
- Widescreen capture
- Can record 2D/3D videos in HD mode
- Can capture fast-paced videos of up to 144 FPS
Cons
- Not suitable for beginners
- Cannot be used to live stream videos
6. NCH - Video Capture Software

Of all the listed webcam software in this review, this software has the most diverse functions. You can record streaming videos, record your computer screen, record from external devices, and record from a webcam. It’s also perfect for recording audios and simultaneous recording from screen and webcam.
Operating systems: Windows 10, 8, 8.1, 7, XP, Vista 64 bit and Mac OS X 10.5 and above
Price: Free/paid
Supported file formats: MP4, WMV, AVI, MPG, FLV, MOV
Debut Video Capture is the only free webcam recording software for Windows 10 believed to capture or record videos from any external source. It has also preset settings for HD and TV with pre-production enhancement features like color adjustment settings, overlay buttons and frame rate, aspect ratio, and resolution settings.
If you always think of becoming rich, the Express Burn Disc Burner is the tool that will help you make money. Record the most trending videos and use this tool to burn DVDs and CDs.
Pros
- Can record videos for any social media platform
- Supports a wide range of audio and video file formats
- All features are open and easy to use
- Availability of video editing software
Cons
- Only monthly subscriptions for paid plans
- Watermark for the free download
- Difficult to record a full-screen movie
Try Filmora to Smoothly Record WebCame and Screen!
Filmora Web Camera & Screen Recorder can capture any area of the PC screen and webcam. It’s perfect to capture and record while making a live gaming match, marketing promotion, guiding a tour, and more. Plus, you can edit the recording video files in Filmora directly! Worth to have a try!
Start Webcam & Screen Recording Start Webcam & Screen Recording Start Webcam & Screen Recording Learn More >
7. YAWCAM
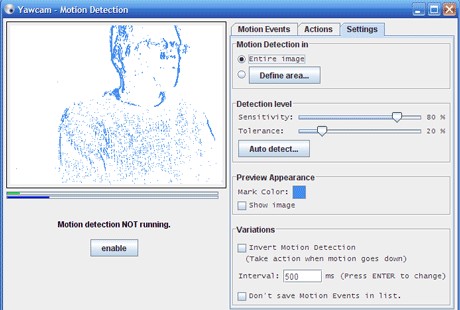
This webcam software can be referred to as the simplest for all beginners with the will to start streaming and recording videos for personal or home use.
Supported file formats: PNG, JPG, MJPEG, GIF, JavaScript
Price: Free
Supported operating systems: Windows 2000/10/8/7/ Vista and XP
YAWCAM is an absolutely free webcam software windows 10. Why is it the simplest software to use? Just download and you will find all features on one page. Simple language commands aligned in a drop-down menu ready to be used with only one click.
Some of the best features include overlay texts and images, scheduler, motion detection, and an inbuilt webserver. For you to use this webcam software, use these supported devices; DirectX compatible webcams, DV-camera, or video capture devices.
Pros
- No watermark
- Easy to use
- Friendly user interface
Cons
- Few transitions and effects
8. Windows Camera
We all trust any app or software by Microsoft over others! If you also do, then you can download Windows Camera and use it to record videos, take snapshots and shoot videos.
Operating system: Windows 10
Price: Free
Supported devices: Xbox One, Windows, mobile
Windows Camera is among the best free webcam software for Windows 10. This is because of the software’s few but easy-to-use and effective features that are expertly designed for PCs and tablets installed with Windows 10.
The automatic photo back combined with the photo-shoot timer makes it perfect for taking selfies and passports. Using the panorama feature, you can take photos of the best scenes and share them on media platforms.
Pros
- Simplicity is its main strength
- Supports resolutions above 1080p
- Good for photographers
Cons
- Has no built-in virtual webcam
- Requires a camera to support 4K videos
9. Fake Webcam

Supported file formats: AVI, MPEG, DVD, VCD, WMV, 3GP, MP4, SVCD, MOV, ASF,
Price: Free /paid
Operating systems: Windows 7/8/10 (32/64 bit)
Fake Webcam is a free webcam software Windows 10 whose name is creatively used to suggest it almost functions like a webcam. This doesn’t fall far from the truth! You can truly use this software to broadcast, add effects and filters, record on full screen, and fake your voice.
To share or stream your photos and videos on Skype, YIM, or Gtalk, using the screen recorder would give the best results. What makes Fake Webcam stand out is the free video converter and the free video toolkit.
Pros
- Free support tools
- Supports all video and audio formats
- Can convert file formats and stream to any channel
- Availability of the screen recorder
- Integratable with almost all instant messengers
Cons
- Major tools not free(Fake Webcam and Screen recorder)
10. IP Camera Viewer
Do you run a supermarket store, mall or you’ve installed security surveillance cameras in your compound? IP Camera Viewer is the most effective webcam software for video monitoring systems.
Supported file formats: JPEG, MPEG-4, MJPEG, and
Price: Free
Operating systems: Windows 10 / 8 / 7 /2012 /Vista and XP
IP Camera Viewer is the most used free webcam recording software for windows 10 as its compatible with almost all IP camera models like Panasonic, Toshiba, Canon, D-Link, Sony, and more the 2000 others. With the capability of viewing and controlling 4 camera feeds at once, you can use this software to monitor your entire compound.
Some of the important advanced IP Camera Viewer functions include listening to webcam audios, adjust image settings, zoom or tilt images, schedule monitoring times, and detect motions.
Pros
- Automatically uploads recorded videos and photos to a server
- Compatible with almost all IP camera models
- Simple and easy to use
Cons
- No inbuilt media player
- Cannot adjust the image or video quality
You may also want to read >>> 10 Best Webcams | A Buyer’s Guide
![]()
A cross-platform for making videos anywhere for all creators

Why your video editing isn’t good enough? How about some creative inspo?
- 100 Million+ Users
- 150+ Countries and Regions
- 4 Million+ Social Media Followers
- 5 Million+ Stock Media for Use
* Secure Download

FAQs about Webcam Software for Windows
1. What is Webcam Software?
A webcam is a video camera that feeds or streams images or video in real-time to or over a computer network. And webcam software enables users to record video or stream video over the Internet.
Webcam software is an application that allows you to capture video from your laptop/desktop webcam and record or stream video over the Internet. You can use them to deliver professional videos, streaming, and online courses easily.
2. Does Windows have built-in webcam software?
Windows 10 has an in-built webcam app called Camera that lets you record videos and take pictures with your webcam. This is definitely better than downloading 3rd party webcam recording software where spyware/malware is rampant.
3. Does a webcam need software?
Yes, if the camera hardware offers depth, low-light support, night vision, etc. If you use any software on the camera, these functions are only available if the driver is installed.
Conclusion
After a keen of all the webcam software above, it’s evident that every developer had an intended purpose. You cannot therefore just randomly wake up and download any without considering its functions, supported devices, file formats, and the auxiliary apps available. All this information is contained herein.
According to some users, there are free webcam software Windows 10 that more often would not show any video images but the audio is absolutely clear. To help your fellow user, what bad experience have you ever had after recording a game using webcam software ? Kindly share your comment or suggestion on our social media platforms.
Richard Bennett
Richard Bennett is a writer and a lover of all things video.
Follow @Richard Bennett
Richard Bennett
Mar 27, 2024• Proven solutions
Which webcam softwarehave you installed on your laptop or desktop? Using the right webcam software to live stream videos, screen record videos, or chat on Skype results in high-quality images, smooth streaming, and high-quality images and videos.
There is a huge number of free webcam software with advanced features yet free for you to download, and use on your PC.
But how would you determine the best webcam software to use?
Before you mounted that webcam on your desktop or laptop, you had a reason. It’s your webcam features and purpose that should guide you to select the right software for the webcam camera.
In this article, we will show you 10 webcam software for Windows in this guide. Included are the most useful factors to consider as you make your choice – complexity of use, free/paid, integrations, editing tools, and more. You will learn:
- Part 1: The Best Webcam & Screen Recorder for Windows and Mac [Video Tutorial]
- Part 2: Top 10 Best Free Webcam Software for Windows
First take a quick look of the 10 best webcam software that is available on your Windows from a video:
For Win 7 or later (64-bit)
Secure Download
For macOS 10.14 or later
Secure Download
Part 1: The Best Webcam & Screen Recorder for Computer
You need a sound and webcam recorder to record your video tutorials, streaming videos, presentations, or any other type of video. Wondershare Filmora is the software to use. Other than its most admired friendly intuitive interface, it’s simple and easy to use-suitable for both beginners and professionals.
For Win 7 or later (64-bit)
Secure Download
For macOS 10.14 or later
Secure Download
Among the outstanding features, you’ll find in Filmora include,
- Fast-paced recording speed of up to 120 fps
- Adverse professional editing tools that are easy to use
- Simultaneous recording from both webcam and computer screen
- Compatible with 50+ different file formats
- Rich title text and tutorial features
It’s free to download. Have a try now! Join in the Wondershare Video Community and get some inspiration from other Filomora users.
Part 2: Top 10 Best Free Webcam Software for Windows
To help you evaluate which webcam software best suits your needs, I’ve featured the strengths, shortcomings, and support services in each software review.
This is the list of the best free webcam software for Windows 10.
| 1 - Logitech Capture | 2 - CyberLink Youcam |
|---|---|
| 3 - ManyCam | 4 - SplitCam |
| 5 - Bandicam | 6 - NCH - Video Capture Software |
| 7 - YAWCAM | 8 - Windows Camera |
| 9 - Fake Webcam | 10 - IP Camera Viewer |
1. Logitech Capture
The multiple source recording feature and direct streaming app are the key strengths of this software. According to its mission statement- All-In-One Content Creation- you can use this software to record, edit, customize, and stream to your favorite channel.
Operating systems: Windows 10/8/7
Price: Free
Supported webcams: 1080P PRO STREAM, BRIO STREAM, C920s HD PRO, C922 PRO STREAM
Logitech Capture is among the few free webcam recording software for Windows 10 with studio controls applicable during recording. You can use this feature to adjust your image, create frames, adjust focus and transitions, and enable ChromaKey as you record.
In case you want to create a picture-in-picture presentation, this software allows you to use two webcams simultaneously. With the source switching and the auto-focus features, you can record the best tutorials or guides that show all dimensions and your image.
Pros
- Rich in transitions and effects
- Portrait optimization for mobile devices
- Its Capture app offers direct streaming to YouTube
- You can take passports or still images
Cons
- Limited to YouTube channel
- Account registration is mandatory
2. CyberLink Youcam
If you are used to video chatting and video recording, then, you’ll have 200+ fun effects to make your real-time videos as interesting as possible. In fact, the seamless app integration feature will keep your live streaming chats without buffering for long.
Operating systems: Windows 10/8/1.8/7
Price: Free/ Paid
Supported file formats: WMV, MP4, AVI
YouCam is the best free webcam software Windows 10 for YouTubers, business professionals, Streamers, home users, and Vloggers. It seamlessly integrates with live streaming media channels like Twitch, Wirecast, OBS Studio, Facebook Live, Xsplit, and YouTube Live.
The YouCam’s AR technology is one of its hidden treasures that will lighten up your skin by applying a natural-looking makeup. If your room is badly light, use the Live Skin Smoothing feature. Just below it is the TrueTheater Enhancement option to help you automatically adjust your facial sharpness and lighting.
Pros
- Hundreds of animated emojis
- Suitable for video conferencing services
- Plenty of interactive colorful particles and distortions
- Availability of face beautification tool
Cons
- Only limited to the Windows operating system
- Very few features for the free plan
3. ManyCam
Downloading this webcam software guarantees you smooth streaming and effortless recording of videos. Also, this software will help you during game steaming, online education, mobile live streaming, and live telehealth communication.
Operating systems: Windows 10/8/7 and macOS X
Price: Free /Paid
Supported file formats: MJPEG, IP, MP4, AVI, MPEG, MOV
ManyCam is a free webcam recording software for windows 10 . It’s among the most widely used software internationally-not for many reasons, but because of its friendly intuitive user interface and live streaming tools for lessons and lecturers.
So, if you are a lecturer/teacher, you can use the Software Development Kit (SDK) to integrate the webcam with any online teaching platform. Among the features designed to facilitate better online teaching include the picture in picture, Chroma Key, multiple video sources, and screen sharing.
Pro
- Ability to stream 4K videos
- Real-time camera control settings
- No watermark even on the free plan
- Screencasting and screen recording feature
- Real-time drop and drag effects
Cons
- Expensive business subscription plans
- No Light enhancement features
- Most features are manual as opposed to being automatic
Filmora WebCame & Screen Recorder
Filmora - WebCame & Screen Recorder
• No-time delay to record webcam and screen while live streaming or gaming
• Edit recording video for marketing replay or adding game commentary
• Cross-platform supported - (Windows, Mac, iOS, Android)
Start Webcam & Screen Record Start Webcam & Screen Record Start Webcam & Screen Record Learn More >
4. SplitCam
To stream your desktop/laptop screen SplitCam is the most appropriate software. With only the inbuilt virtual webcam, you can share your screen videos to media channels and IMS. Other uses of this software are recording webcam chatting , streaming live videos, and messaging.
Operating systems: Windows 10/8/7
Price: Free
SplitCam is not as popular as the other free webcam software windows 10 like ManyCam and YouCam. This is because it doesn’t integrate with some of the world’s renowned social media platforms- Facebook and Instagram. However, you can use this software to stream, take snapshots, and record videos for YouTube, Skype, Justin.tv, Gtalk, and Windows Live Messenger.
SplitCam is rich in fantastic webcam effects. Haven’t you been surprised to see someone appear to be streaming from the ocean or the Amazon Mountain? This is what you can do with SplitCam. Other cool effects are frames, texts on videos, filters, and facial items like masks and fake face glasses.
Pros
- Open and simple interface
- Integratable with the messaging apps
- Supports a wide range of resolutions ( between 320x180 and 2048x1536)
Cons
- Applicable to a small number of channels
- Supported file formats not defined
5. Bandicam
Do you want a recorder for screen recording, recording your gameplay, or capturing videos from devices like smartphones and PlayStation? Look for no other software but BandiCam. You can also merge two or more video files, remove unwanted parts, and select the only part to screen record.
Operating systems: Windows Vista, 10/8/7
Price: Free/paid
Supported file format: AVI, MP4, JPEG, TIF, GIF, PNG
Supported graphics cards: Nvidia NVENC, Nvidia NVENC (),
BandiCam is another HD webcam software Windows 10 with the capability of capturing high compression videos and games on your PC screen videos without compromising the video quality. Don’t forget to record all webinars aired in your niche.
Netflix is becoming more popular each day due to the thrilling videos. With the BandiCam screen recorder, you can record live-streamed videos on Netflix for over 24hrs. These are the tools to edit your recorded video: real-time drawing tool, webcam overlay, sound mixer, and Chroma Key.
Pros
- No hidden features
- Widescreen capture
- Can record 2D/3D videos in HD mode
- Can capture fast-paced videos of up to 144 FPS
Cons
- Not suitable for beginners
- Cannot be used to live stream videos
6. NCH - Video Capture Software
Of all the listed webcam software in this review, this software has the most diverse functions. You can record streaming videos, record your computer screen, record from external devices, and record from a webcam. It’s also perfect for recording audios and simultaneous recording from screen and webcam.
Operating systems: Windows 10, 8, 8.1, 7, XP, Vista 64 bit and Mac OS X 10.5 and above
Price: Free/paid
Supported file formats: MP4, WMV, AVI, MPG, FLV, MOV
Debut Video Capture is the only free webcam recording software for Windows 10 believed to capture or record videos from any external source. It has also preset settings for HD and TV with pre-production enhancement features like color adjustment settings, overlay buttons and frame rate, aspect ratio, and resolution settings.
If you always think of becoming rich, the Express Burn Disc Burner is the tool that will help you make money. Record the most trending videos and use this tool to burn DVDs and CDs.
Pros
- Can record videos for any social media platform
- Supports a wide range of audio and video file formats
- All features are open and easy to use
- Availability of video editing software
Cons
- Only monthly subscriptions for paid plans
- Watermark for the free download
- Difficult to record a full-screen movie
Try Filmora to Smoothly Record WebCame and Screen!
Filmora Web Camera & Screen Recorder can capture any area of the PC screen and webcam. It’s perfect to capture and record while making a live gaming match, marketing promotion, guiding a tour, and more. Plus, you can edit the recording video files in Filmora directly! Worth to have a try!
Start Webcam & Screen Recording Start Webcam & Screen Recording Start Webcam & Screen Recording Learn More >
7. YAWCAM
This webcam software can be referred to as the simplest for all beginners with the will to start streaming and recording videos for personal or home use.
Supported file formats: PNG, JPG, MJPEG, GIF, JavaScript
Price: Free
Supported operating systems: Windows 2000/10/8/7/ Vista and XP
YAWCAM is an absolutely free webcam software windows 10. Why is it the simplest software to use? Just download and you will find all features on one page. Simple language commands aligned in a drop-down menu ready to be used with only one click.
Some of the best features include overlay texts and images, scheduler, motion detection, and an inbuilt webserver. For you to use this webcam software, use these supported devices; DirectX compatible webcams, DV-camera, or video capture devices.
Pros
- No watermark
- Easy to use
- Friendly user interface
Cons
- Few transitions and effects
8. Windows Camera
We all trust any app or software by Microsoft over others! If you also do, then you can download Windows Camera and use it to record videos, take snapshots and shoot videos.
Operating system: Windows 10
Price: Free
Supported devices: Xbox One, Windows, mobile
Windows Camera is among the best free webcam software for Windows 10. This is because of the software’s few but easy-to-use and effective features that are expertly designed for PCs and tablets installed with Windows 10.
The automatic photo back combined with the photo-shoot timer makes it perfect for taking selfies and passports. Using the panorama feature, you can take photos of the best scenes and share them on media platforms.
Pros
- Simplicity is its main strength
- Supports resolutions above 1080p
- Good for photographers
Cons
- Has no built-in virtual webcam
- Requires a camera to support 4K videos
9. Fake Webcam
Supported file formats: AVI, MPEG, DVD, VCD, WMV, 3GP, MP4, SVCD, MOV, ASF,
Price: Free /paid
Operating systems: Windows 7/8/10 (32/64 bit)
Fake Webcam is a free webcam software Windows 10 whose name is creatively used to suggest it almost functions like a webcam. This doesn’t fall far from the truth! You can truly use this software to broadcast, add effects and filters, record on full screen, and fake your voice.
To share or stream your photos and videos on Skype, YIM, or Gtalk, using the screen recorder would give the best results. What makes Fake Webcam stand out is the free video converter and the free video toolkit.
Pros
- Free support tools
- Supports all video and audio formats
- Can convert file formats and stream to any channel
- Availability of the screen recorder
- Integratable with almost all instant messengers
Cons
- Major tools not free(Fake Webcam and Screen recorder)
10. IP Camera Viewer
Do you run a supermarket store, mall or you’ve installed security surveillance cameras in your compound? IP Camera Viewer is the most effective webcam software for video monitoring systems.
Supported file formats: JPEG, MPEG-4, MJPEG, and
Price: Free
Operating systems: Windows 10 / 8 / 7 /2012 /Vista and XP
IP Camera Viewer is the most used free webcam recording software for windows 10 as its compatible with almost all IP camera models like Panasonic, Toshiba, Canon, D-Link, Sony, and more the 2000 others. With the capability of viewing and controlling 4 camera feeds at once, you can use this software to monitor your entire compound.
Some of the important advanced IP Camera Viewer functions include listening to webcam audios, adjust image settings, zoom or tilt images, schedule monitoring times, and detect motions.
Pros
- Automatically uploads recorded videos and photos to a server
- Compatible with almost all IP camera models
- Simple and easy to use
Cons
- No inbuilt media player
- Cannot adjust the image or video quality
You may also want to read >>> 10 Best Webcams | A Buyer’s Guide
![]()
A cross-platform for making videos anywhere for all creators
Why your video editing isn’t good enough? How about some creative inspo?
- 100 Million+ Users
- 150+ Countries and Regions
- 4 Million+ Social Media Followers
- 5 Million+ Stock Media for Use
* Secure Download
FAQs about Webcam Software for Windows
1. What is Webcam Software?
A webcam is a video camera that feeds or streams images or video in real-time to or over a computer network. And webcam software enables users to record video or stream video over the Internet.
Webcam software is an application that allows you to capture video from your laptop/desktop webcam and record or stream video over the Internet. You can use them to deliver professional videos, streaming, and online courses easily.
2. Does Windows have built-in webcam software?
Windows 10 has an in-built webcam app called Camera that lets you record videos and take pictures with your webcam. This is definitely better than downloading 3rd party webcam recording software where spyware/malware is rampant.
3. Does a webcam need software?
Yes, if the camera hardware offers depth, low-light support, night vision, etc. If you use any software on the camera, these functions are only available if the driver is installed.
Conclusion
After a keen of all the webcam software above, it’s evident that every developer had an intended purpose. You cannot therefore just randomly wake up and download any without considering its functions, supported devices, file formats, and the auxiliary apps available. All this information is contained herein.
According to some users, there are free webcam software Windows 10 that more often would not show any video images but the audio is absolutely clear. To help your fellow user, what bad experience have you ever had after recording a game using webcam software ? Kindly share your comment or suggestion on our social media platforms.
Richard Bennett
Richard Bennett is a writer and a lover of all things video.
Follow @Richard Bennett
The Secret’s Out: 5 Fascinating Facts About the 16X9 Ratio Calculator
5 Facts About 16x9 Ratio Calculator You Didn’t Know
An easy yet powerful editor
Numerous effects to choose from
Detailed tutorials provided by the official channel
This article explains major concepts about 16x9 ratio calculator and applies them even if you are a novice.
Read it to conclude the aspect ratio and the type of editing you need for your videos.
In this article
01 [What is Aspect Ratio?](#Part 1)
02 [What’s 16:9 Ratio Calculator?](#Part 2)
03 [Top 16:9 Resolutions](#Part 3)
04 [How to Calculate 16:9 Aspect Ratios?](#Part 4)
05 [How to Use Aspect Ratio Calculator?](#Part 5)
06 [How to Shift Through Aspect Ratio You Prefer in Filmora?](#Part 6)
Part 1 What is aspect ratio?
Aspect ratio is the proportionality ratio that relates between the width and height of the image. When you set your television screen, you often see something like 16:9 in the aspect ratio. These numbers are not related to the quality of the images whatsoever. They mean that the screen’s width will be almost twice as high as its height.
However, most television screens have an aspect ratio that looks like a square. The same does not apply to most cinema screens found in a hall. Thanks to the electricians who made those screens to be rectangular. That makes sure that you don’t miss out on any movie clip because of the low aspect ratio.
Initially, the aspect ratio mainly got restricted to Mathematical aspects like geometry. With time, the term got introduced in the films where it was used to relate the width and height of various images on screens, hence the16*9 aspect ratio calculator.
Usually, the aspect ratio refers to the long side concerning the shorter side of the shape. For example, it can be represented by two unknowns, x: y. The values do not mean much because numbers can substitute them.
Perhaps you have encountered these common aspect ratios: IMAX (1.43:1), Academy Film standard (1.43:1), and the famous golden video with an aspect ratio of 1.6180:1.
Having adequate knowledge about aspect ratios is of great importance. You will have to use an aspect ratio calculator when you want to resize your image to fit the specific location without cutting some sections.
Part 2 What is the 16:9 aspect ratio calculator?
The most significant similarity is the aspect ratio of 16:9. The 16:9 ratio dates back to 2009, when the ratio introduced was declared to be used globally. To prove it, take a minute and check the aspect ratios of your television screen or smartphone. Also, confirm the next time you go to the cinema to watch a movie.
You can take a beautiful photo with a nice image before posting on social media because of the 16:9 aspect ratio. Nowadays, this aspect ratio is a part of most screens and cameras. Even the HD videos always get recorded in the international format ratio.
The16 * 9 aspect ratiocalculator will help you operate correctly for high-quality images. It also helps in the conversion of inches to centimeters and vice versa. For a digital device, pixels are the most common units of images.
Part 3 Top 16:9 resolutions
These are the most common resolutions that are available. The units are in pixels, in descending order.
● 15360×8640 (16K UHD)
● 7680 × 4320 (8K UHD)
● 5120 × 2880 (5K)
● 3840 × 2160 (4K UHD)
● 3200 × 1800 (QHD+)
● 2560 × 1440 (QHD)
● 1920 × 1080 (Full HD)
● 1600 × 900 (HD+)
● 1366 × 768 (WXGA)
● 1280 × 720 (HD)
● 960 × 540 (qHD)
● 854 × 480 (FWVGA)
● 640 × 360 (nHD)
Part 4 How to calculate the 16:9 Aspect ratio?
First, let’s look at the correct pronunciation of the ratio. You can either say it as 16 by 9 or 16 × 9. It implies 16 units of the longest side for each shortest side. It could also mean 32 by 18 or higher values which can still simplify to 16:9. We can also represent the ratio differently when simplified. In this case, a decimal point separates the ratios. For example, 16:9 is represented as 1.78:1 after being simplified.
Earlier screens and monitors produced old ratios like the 4:3. After the recognition of the 16:9 ratios, have made replacements for them. The16*9 ratio calculatoris also the most common. Have you heard of 720p HD, 1080p HD, and others? All of them are still under the 16:9 ratios but expressed differently. For example, a screen of 1920 × 1080p. Check it out here: 2920/1080 equals 16:9.
First, here’s the formula that we will use in this section.
Width (W) /Height (H) = 1.778
Dividing the width and height gives you 1.778, which is still an aspect ratio of 16:9.
1.778 is a constant in the formula that you can use interchangeably to determine the width or height. Here is a couple of examples to illustrate this.
Example 1:
Ben’s video measures 32 panels wide. Find the number of panels he needs to build a 26:9 display.
W/H = 16/9
32/H = 16/9
H =32 × 9/16
H = 18
Therefore, Ben will need 18 panels to install the display unit.
Example 2
Nancy decides to design an image for a post in the ratio 16:9. If it has 720 pixels, calculate the width of the image needed.
W/H = 19/6
W/720 = 19/6
W = 730 × 19/6
Nancy will need 1280 pixels for her image.
Part 5 How to use an aspect ratio calculator?
These calculations may be easy when you’re used to them. Not interested in many calculations? Use the online aspect ratio calculator instead. That will make it easier and save on time. You will only need to have the width and height of the image that if needed. The 16 *9 ratio calculator will give the remaining distance.
Using the calculator is the most preferred method because it is very precise. Supposing you don’t have any idea about the width or height of your image, just key in the aspect ratio and wait for an instant answer. The aspect ratio will still give the same answer, but the calculator is convenient.
The better part, this calculator provides calculations for landscape and portrait orientation for images. Follow these steps to use the calculator:
Step 1: Go to https://insaneimpact.com/aspect-ratio-calculator/
Step 2: Enter units of width and height in the respective tabs provided and instantly get your aspect ratio.

Part 6 How to shift through aspect ratio you prefer in Filmora?
As you edit videos, adjust them to ensure they fit in an email as an attachment. That will help you upload them easily after you have used some video editing tools. This article elaborates more by using Wondershare Filmora.
Here’s why we recommend Wondershare Filmora Video Editor
The obvious reason is many features that will help you edit the video like a pro. For instance, you can resize, zoom and highlight the best parts of the video. These are some features of Wondershare Filmora’s video editing capabilities.
● Effortlessly resize the sizes of videos and aspect ratios
● Cropping the video to highlight an object
● Addition of effects and more videos
● Uploading edited videos online
● Supports diverse operating systems for smartphones and desktops
Navigating Through Various Aspect Ratios Using Wondershare Filmora

Wondershare Filmora - Best Video Editor for Mac/Windows
5,481,435 people have downloaded it.
Build unique custom animations without breaking a sweat.
Focus on creating epic stories and leave the details to Filmora’s auto features.
Start a creative adventure with drag & drop effects and endless possibilities.
Filmora simplifies advanced features to save you time and effort.
Filmora cuts out repetition so you can move on to your next creative breakthrough.
Different social media platforms will only allow users to upload videos of specified sizes. Therefore, it is imperative to know the right size for your videos. Let me take you through ways of changing an aspect ratio for the image to have the required height and width.
Step 1: Select your projects’ aspect ratio.

Upon opening Wondershare Filmora, a window will pop up on the screen to allow you to select the aspect ratio. There are three options to choose widescreen, standard, and portrait with aspect ratios of 16:9, 4:3, and 1.1, respectively. select the one that you require and click “New Project.”
Step 2: Set the new aspect ratio for the project

Go to File, choose a new project, and then aspect ratio in the editing panel. Please select the one you wish to use and alter it according to your desired format. For instance, you can select a video of 16:9 and reduce it to 1:1.
Step 3: Save the video

Select “Export” to export the video and save it in different formats in the Format tab. Do you feel like playing the video on your phone or any other device? Please move to the device tab and ply it on your smartphone or transfer it into a DVD drive format.
Filmora also provides more advanced features for video editing like rotating, cropping, and scaling. You can also match the colors on your videos, include animations, add effects, track the sounds and even record some background sounds for the video to look good. Go ahead and download for a free trial below to start editing your videos!
Key Takeaways from This Episode
● 1 – A detailed overview of the aspect ratio and aspect ratio calculator.
● 2 – Understanding how to calculate aspect ratios manually and through an aspect ratio calculator.
● 3 – Navigation through different aspect ratios via the wonderful editor, i.e., Wondershare Filmora.
● Finally, a16×9 aspect ratio calculatoris simple to use, provided you follow the steps given. However, an online calculator will make your videos fit in the equipped area. Use Wondershare Filmora for easy editing and changing of the aspect ratio. It is a pro image and video editor and the easiest to use. Start with its trial version by downloading it for free.
This article explains major concepts about 16x9 ratio calculator and applies them even if you are a novice.
Read it to conclude the aspect ratio and the type of editing you need for your videos.
In this article
01 [What is Aspect Ratio?](#Part 1)
02 [What’s 16:9 Ratio Calculator?](#Part 2)
03 [Top 16:9 Resolutions](#Part 3)
04 [How to Calculate 16:9 Aspect Ratios?](#Part 4)
05 [How to Use Aspect Ratio Calculator?](#Part 5)
06 [How to Shift Through Aspect Ratio You Prefer in Filmora?](#Part 6)
Part 1 What is aspect ratio?
Aspect ratio is the proportionality ratio that relates between the width and height of the image. When you set your television screen, you often see something like 16:9 in the aspect ratio. These numbers are not related to the quality of the images whatsoever. They mean that the screen’s width will be almost twice as high as its height.
However, most television screens have an aspect ratio that looks like a square. The same does not apply to most cinema screens found in a hall. Thanks to the electricians who made those screens to be rectangular. That makes sure that you don’t miss out on any movie clip because of the low aspect ratio.
Initially, the aspect ratio mainly got restricted to Mathematical aspects like geometry. With time, the term got introduced in the films where it was used to relate the width and height of various images on screens, hence the16*9 aspect ratio calculator.
Usually, the aspect ratio refers to the long side concerning the shorter side of the shape. For example, it can be represented by two unknowns, x: y. The values do not mean much because numbers can substitute them.
Perhaps you have encountered these common aspect ratios: IMAX (1.43:1), Academy Film standard (1.43:1), and the famous golden video with an aspect ratio of 1.6180:1.
Having adequate knowledge about aspect ratios is of great importance. You will have to use an aspect ratio calculator when you want to resize your image to fit the specific location without cutting some sections.
Part 2 What is the 16:9 aspect ratio calculator?
The most significant similarity is the aspect ratio of 16:9. The 16:9 ratio dates back to 2009, when the ratio introduced was declared to be used globally. To prove it, take a minute and check the aspect ratios of your television screen or smartphone. Also, confirm the next time you go to the cinema to watch a movie.
You can take a beautiful photo with a nice image before posting on social media because of the 16:9 aspect ratio. Nowadays, this aspect ratio is a part of most screens and cameras. Even the HD videos always get recorded in the international format ratio.
The16 * 9 aspect ratiocalculator will help you operate correctly for high-quality images. It also helps in the conversion of inches to centimeters and vice versa. For a digital device, pixels are the most common units of images.
Part 3 Top 16:9 resolutions
These are the most common resolutions that are available. The units are in pixels, in descending order.
● 15360×8640 (16K UHD)
● 7680 × 4320 (8K UHD)
● 5120 × 2880 (5K)
● 3840 × 2160 (4K UHD)
● 3200 × 1800 (QHD+)
● 2560 × 1440 (QHD)
● 1920 × 1080 (Full HD)
● 1600 × 900 (HD+)
● 1366 × 768 (WXGA)
● 1280 × 720 (HD)
● 960 × 540 (qHD)
● 854 × 480 (FWVGA)
● 640 × 360 (nHD)
Part 4 How to calculate the 16:9 Aspect ratio?
First, let’s look at the correct pronunciation of the ratio. You can either say it as 16 by 9 or 16 × 9. It implies 16 units of the longest side for each shortest side. It could also mean 32 by 18 or higher values which can still simplify to 16:9. We can also represent the ratio differently when simplified. In this case, a decimal point separates the ratios. For example, 16:9 is represented as 1.78:1 after being simplified.
Earlier screens and monitors produced old ratios like the 4:3. After the recognition of the 16:9 ratios, have made replacements for them. The16*9 ratio calculatoris also the most common. Have you heard of 720p HD, 1080p HD, and others? All of them are still under the 16:9 ratios but expressed differently. For example, a screen of 1920 × 1080p. Check it out here: 2920/1080 equals 16:9.
First, here’s the formula that we will use in this section.
Width (W) /Height (H) = 1.778
Dividing the width and height gives you 1.778, which is still an aspect ratio of 16:9.
1.778 is a constant in the formula that you can use interchangeably to determine the width or height. Here is a couple of examples to illustrate this.
Example 1:
Ben’s video measures 32 panels wide. Find the number of panels he needs to build a 26:9 display.
W/H = 16/9
32/H = 16/9
H =32 × 9/16
H = 18
Therefore, Ben will need 18 panels to install the display unit.
Example 2
Nancy decides to design an image for a post in the ratio 16:9. If it has 720 pixels, calculate the width of the image needed.
W/H = 19/6
W/720 = 19/6
W = 730 × 19/6
Nancy will need 1280 pixels for her image.
Part 5 How to use an aspect ratio calculator?
These calculations may be easy when you’re used to them. Not interested in many calculations? Use the online aspect ratio calculator instead. That will make it easier and save on time. You will only need to have the width and height of the image that if needed. The 16 *9 ratio calculator will give the remaining distance.
Using the calculator is the most preferred method because it is very precise. Supposing you don’t have any idea about the width or height of your image, just key in the aspect ratio and wait for an instant answer. The aspect ratio will still give the same answer, but the calculator is convenient.
The better part, this calculator provides calculations for landscape and portrait orientation for images. Follow these steps to use the calculator:
Step 1: Go to https://insaneimpact.com/aspect-ratio-calculator/
Step 2: Enter units of width and height in the respective tabs provided and instantly get your aspect ratio.
Part 6 How to shift through aspect ratio you prefer in Filmora?
As you edit videos, adjust them to ensure they fit in an email as an attachment. That will help you upload them easily after you have used some video editing tools. This article elaborates more by using Wondershare Filmora.
Here’s why we recommend Wondershare Filmora Video Editor
The obvious reason is many features that will help you edit the video like a pro. For instance, you can resize, zoom and highlight the best parts of the video. These are some features of Wondershare Filmora’s video editing capabilities.
● Effortlessly resize the sizes of videos and aspect ratios
● Cropping the video to highlight an object
● Addition of effects and more videos
● Uploading edited videos online
● Supports diverse operating systems for smartphones and desktops
Navigating Through Various Aspect Ratios Using Wondershare Filmora
Wondershare Filmora - Best Video Editor for Mac/Windows
5,481,435 people have downloaded it.
Build unique custom animations without breaking a sweat.
Focus on creating epic stories and leave the details to Filmora’s auto features.
Start a creative adventure with drag & drop effects and endless possibilities.
Filmora simplifies advanced features to save you time and effort.
Filmora cuts out repetition so you can move on to your next creative breakthrough.
Different social media platforms will only allow users to upload videos of specified sizes. Therefore, it is imperative to know the right size for your videos. Let me take you through ways of changing an aspect ratio for the image to have the required height and width.
Step 1: Select your projects’ aspect ratio.
Upon opening Wondershare Filmora, a window will pop up on the screen to allow you to select the aspect ratio. There are three options to choose widescreen, standard, and portrait with aspect ratios of 16:9, 4:3, and 1.1, respectively. select the one that you require and click “New Project.”
Step 2: Set the new aspect ratio for the project
Go to File, choose a new project, and then aspect ratio in the editing panel. Please select the one you wish to use and alter it according to your desired format. For instance, you can select a video of 16:9 and reduce it to 1:1.
Step 3: Save the video
Select “Export” to export the video and save it in different formats in the Format tab. Do you feel like playing the video on your phone or any other device? Please move to the device tab and ply it on your smartphone or transfer it into a DVD drive format.
Filmora also provides more advanced features for video editing like rotating, cropping, and scaling. You can also match the colors on your videos, include animations, add effects, track the sounds and even record some background sounds for the video to look good. Go ahead and download for a free trial below to start editing your videos!
Key Takeaways from This Episode
● 1 – A detailed overview of the aspect ratio and aspect ratio calculator.
● 2 – Understanding how to calculate aspect ratios manually and through an aspect ratio calculator.
● 3 – Navigation through different aspect ratios via the wonderful editor, i.e., Wondershare Filmora.
● Finally, a16×9 aspect ratio calculatoris simple to use, provided you follow the steps given. However, an online calculator will make your videos fit in the equipped area. Use Wondershare Filmora for easy editing and changing of the aspect ratio. It is a pro image and video editor and the easiest to use. Start with its trial version by downloading it for free.
Also read:
- Updated Top-Rated Video Creation Tools for Windows 10
- Updated Web-Based Video Editors with Music and Sound Effects for 2024
- Updated In 2024, Effortless Video Editing How to Split and Merge Clips in Windows Live Movie Maker
- New 2024 Approved PowerDirector Competitors Best Video Editors for Android & iOS
- Unleash Your Creativity 10 Best Vegas Pro Alternatives for Mac (Free & Paid) for 2024
- New 2024 Approved AVS Video Editor for Mac Video Editing Tool for Mac
- Unleash Creativity Best Animation Software for Students and Teachers for 2024
- Updated The Ultimate Guide to Facebook Video Cover Size and Resolution
- Updated In 2024, Create Stunning Split Screens Top Video Apps for iPhone and Android
- 2024 Approved The Ultimate Guide to Saving YouTube Audio Files
- New 2024 Approved Mac Video Editing Essentials Best Software Options
- New 2024 Approved The Ultimate Guide to Video Resumes Best Makers and Templates
- Subtitle Your Videos for Free 10 Best Online Captioning Tools for 2024
- New Create Engaging WhatsApp Videos with These Tools for 2024
- Updated 2024 Approved The Ultimate Guide to Converting YouTube Videos to MP3 Expert Reviews
- New In 2024, The Complete Guide to Video Editors 35 Options for Windows, Mac, and More
- New Time Warp Unlocking Freeze Frames and Slow Motion in FCPX
- Updated Transform Your Videos Best Mobile Editing Apps for iPhone and Android
- New In 2024, Smartphone Video Editing Made Easy Top Apps for iPhone and Android
- New 2024 Approved Troubleshooting FCPX A Step-by-Step Reset Guide
- Updated Make Your Videos Epic How to Add Slow Motion in Windows Live Movie Maker
- Updated In 2024, Instant Image Resizing 9 Best Online Ratio Adjustment Tools
- New Stop Motion Made Easy Cloud-Based Solutions, Tutorials, and Alternative Tools for 2024
- New 2024 Approved Break Free From Windows 10 Photos Discover the Best Image Editing Software
- Updated In 2024, Trim Your Videos for Free 10 Best Online Tools
- New Convert with Ease The Top 12 Audio Converters You Need for 2024
- 2024 Approved The Funniest Video Dubbing Apps You Need to Try
- Top 10 Fixes for Phone Keep Disconnecting from Wi-Fi On Itel A60 | Dr.fone
- Delete Gmail Account With/Without Password On Honor Magic5 Ultimate
- Guide on How To Remove Apple ID From iPhone 11 Pro
- Updated What Is an AI Headshot Generator for 2024
- New Cross-Platform Video Editing Mastery Using Chromebook with Windows and Mac Apps
- Unleash Your Creativity Adobe Premiere Pro for Mac Professionals
- In 2024, How to Remove Activation Lock On the Apple iPhone 14 Plus Without Previous Owner?
- In 2024, iPhone SE Asking for Passcode after iOS 17/14 Update, What to Do? | Dr.fone
- In 2024, Ultimate Guide to Catch the Regional-Located Pokemon For Samsung Galaxy A15 5G | Dr.fone
- In 2024, How to Fake Snapchat Location on Samsung Galaxy XCover 7 | Dr.fone
- In 2024, Network Locked SIM Card Inserted On Your Oppo Find X7 Phone? Unlock It Now
- How to Reset OnePlus Ace 2V without Losing Data | Dr.fone
- Title: New 2024 Approved The Sound of Success A Beginners Guide to YouTube Audio Downloads
- Author: Morgan
- Created at : 2024-04-28 05:33:35
- Updated at : 2024-04-29 05:33:35
- Link: https://ai-video-tools.techidaily.com/new-2024-approved-the-sound-of-success-a-beginners-guide-to-youtube-audio-downloads/
- License: This work is licensed under CC BY-NC-SA 4.0.
