
:max_bytes(150000):strip_icc():format(webp)/airpodbatterylevelonandroid-15c1db7e9fac43248d130a42540c12a6.jpg)
New 2024 Approved The Best of the Best Top Premiere Pro Transition Effects
The Best of the Best: Top Premiere Pro Transition Effects
Premiere Pro Transitions: List of 10 Best Transition Plugins

Benjamin Arango
Mar 27, 2024• Proven solutions
There is no doubt to say that Premiere Pro is leading the market these days with its feature rich platform and interactive user interface. This production and editing software tool contains amazing video transition effects.
If you want to spend some time to develop classic professional looking movies at home then Premiere Pro transition can help you with great results.
The article below contains complete details about the 10 best Premiere Pro transitions you can use, and how to apply transitions to video in Premiere Pro. Keep reading to get best assistance.
You may also like: How to Add Text and Title in Adobe Premiere Pro
Part 1: 10 Best Premiere Pro Transition to Download
Although, Premiere Pro contains so many transition effects in its library but still if you need more transitions. Adobe Premiere Pro allows so many transitions to work effectively on its platform. Some of the best free ones are discussed as below:
1. FilmImpact
FilmImpact.net contains 4 transitions in its downloadable free pack whereas 6 demos are available with its paid version. Although, most of the Premiere Pro users love to create excellent effects with stock transitions like Film Dissolve etc. but still if you need something more intricate and eye-catching then these 4 free transitions from FilmImpact.net are useful for you. This plugin helps users to find best solution within their host application so it is good to apply this attractive effect in your videos.

2. Coremelt
The great news for crazy video makers is that Coremelt Free contains 44 transition effects for Premiere Pro users. Some of the most common are: Filmic transitions, light effects, instant montage presets and 10 text presets. This wide set of transitions can make your dreams come true within very less time on your favorite editing tool itself.

3. Motion Array
It possesses so many interactive tools for editing photos and videos instantly. The wide range of transition effects available on Motion Array allows users to develop their customized videos with ease. You can simply drag and drop transitions from this plugin and see amazing results on your clips.

4. Orange83 Smooth Transition
Just like its name, it includes 10 presets to use including smooth slide, spin, wipe, whipe and zoom. You can drag them to your videos that you want to edit. You can also edit these transitions to make it better and fit your videos well.
5. Transition Designer Free Wipe
This Premiere pro transitions are some common transition styles you can use. However, it may make your videos look excellent if you can use the best Premiere Pro transitions properly. Just import the plug ins to start adding transitions.
6. Glitch & Distortion Presets for Premiere Pro
These are 5 free glitch and distortion preset for Premiere. You just need to drag and drop the transition onto clips to create the effects. Its compatibility is 100%, so you don’t need to worry about the premiere effects. It is completely free to use.
7. Travel Film Transition Pack
This pack includes 4 versions of the travel film transitions to use, including Luma Fade, Quick Zoom w/ Motion Blur, Smooth Spin W/ Motion Blur and Smooth Warp Transition. You can use it to make transitions better.
8. Video Hive
It has more than 100 Premiere Pro transitions to use. They are 100% ready to use. After importing, you can also easily edit them, like chaning color, size and font. If you like it, just have a try.

9. Smooth Spin Blur Rotation Transition
This Premiere Pro transition is offered by Justin Odisho. He is a YouTuber with huge fans, so the quality of this transition is high. If you want to edit your YouTube video or vlog, this spin transition is a surefire as it’s interesting and fun to use.

10. Slice Transitions
This slice transition is in simple and clean style. It is full HD with high quality effects. Basically, you just need to drag and drop to your video to start adding it in Premiere Pro. Besides, you can preview it easily to see if you like it or not.

Part 2: How to use transitions in Premiere Pro
Now, is there any Premiere transition you like? If you have picked one, now let’s to add it to Premiere Pro. Here are few easy to follow steps for your Premiere Pro transition effects.
Step 1: Go to Effects panel
Go to Premiere Pro interface and select Effects panel from available options. Now from the available transition folders, pick the one that suits your project editing needs. The types of numbers of transitions available in effects panel will depend upon the version of Premiere Pro that you have installed in your system. Some of the most common transition effects are listed below:
- Zoom: Zoom transition helps to work on a selected potion of screen and it brings scene in or out in a selected proportion from whole screen.
- Slide: In this sliding motion type transition effect, one scene floats over another.
- Wipe: This one is quite interesting where one shot complete replaces the selected another shot while travelling from one portion of the frame to another.
- Iris: The iris transition effect is a newer one where an artificial effect is created to reflect the actual opening and closing motion of camera iris during shooting.
- 3D Motion: Such type of transition effects tries to manipulate selected clips in the space. For instance, if you apply flip over transition in this 3D motion category then one clip will simply flip over screen in such a manner that secondary clip below it gets revealed in appealing manner.
- Dissolve: In this type of transition effect, one scene completely melds into another scene. You can describe such type of blends with terms like fade out and fade in from or to a bank image.
Effects folders usually contain stylistically similar kind of transitions, but the result different appearances are on screen.

Step 2: Add transition to Premiere Pro
Now click on your desired transition and hold for a while; drag it on the video that you want to edit in the clip panel. Drop your selected transition in the specified position of the video clip bar. These transitions can be easily placed at starting position of lip, between overlapping portion of video clips as well as at end of the clip.

Step 3: Make adjustment
Now click on the left and right edges of transition and then drag them to make extended or shortened as per need. Note that, every transition use to have default time length so you can adjust their positions accordingly.

Check this video tutorial to know more details:
Conclusion
If you are tired of using Adobe Premiere, why not choose Wondershare Filmora ? It is a professional video editing software that can power up your story. It is easy to use compared with Premiere. You will have more control over video transitions. Auto color correction and automatic audio sync can help you save a lot of time. So, if you want to experience a new way to edit video, just download Wondershare Filmora now!
Benjamin Arango
Benjamin Arango is a writer and a lover of all things video.
Follow @Benjamin Arango
Benjamin Arango
Mar 27, 2024• Proven solutions
There is no doubt to say that Premiere Pro is leading the market these days with its feature rich platform and interactive user interface. This production and editing software tool contains amazing video transition effects.
If you want to spend some time to develop classic professional looking movies at home then Premiere Pro transition can help you with great results.
The article below contains complete details about the 10 best Premiere Pro transitions you can use, and how to apply transitions to video in Premiere Pro. Keep reading to get best assistance.
You may also like: How to Add Text and Title in Adobe Premiere Pro
Part 1: 10 Best Premiere Pro Transition to Download
Although, Premiere Pro contains so many transition effects in its library but still if you need more transitions. Adobe Premiere Pro allows so many transitions to work effectively on its platform. Some of the best free ones are discussed as below:
1. FilmImpact
FilmImpact.net contains 4 transitions in its downloadable free pack whereas 6 demos are available with its paid version. Although, most of the Premiere Pro users love to create excellent effects with stock transitions like Film Dissolve etc. but still if you need something more intricate and eye-catching then these 4 free transitions from FilmImpact.net are useful for you. This plugin helps users to find best solution within their host application so it is good to apply this attractive effect in your videos.
2. Coremelt
The great news for crazy video makers is that Coremelt Free contains 44 transition effects for Premiere Pro users. Some of the most common are: Filmic transitions, light effects, instant montage presets and 10 text presets. This wide set of transitions can make your dreams come true within very less time on your favorite editing tool itself.
3. Motion Array
It possesses so many interactive tools for editing photos and videos instantly. The wide range of transition effects available on Motion Array allows users to develop their customized videos with ease. You can simply drag and drop transitions from this plugin and see amazing results on your clips.
4. Orange83 Smooth Transition
Just like its name, it includes 10 presets to use including smooth slide, spin, wipe, whipe and zoom. You can drag them to your videos that you want to edit. You can also edit these transitions to make it better and fit your videos well.
5. Transition Designer Free Wipe
This Premiere pro transitions are some common transition styles you can use. However, it may make your videos look excellent if you can use the best Premiere Pro transitions properly. Just import the plug ins to start adding transitions.
6. Glitch & Distortion Presets for Premiere Pro
These are 5 free glitch and distortion preset for Premiere. You just need to drag and drop the transition onto clips to create the effects. Its compatibility is 100%, so you don’t need to worry about the premiere effects. It is completely free to use.
7. Travel Film Transition Pack
This pack includes 4 versions of the travel film transitions to use, including Luma Fade, Quick Zoom w/ Motion Blur, Smooth Spin W/ Motion Blur and Smooth Warp Transition. You can use it to make transitions better.
8. Video Hive
It has more than 100 Premiere Pro transitions to use. They are 100% ready to use. After importing, you can also easily edit them, like chaning color, size and font. If you like it, just have a try.
9. Smooth Spin Blur Rotation Transition
This Premiere Pro transition is offered by Justin Odisho. He is a YouTuber with huge fans, so the quality of this transition is high. If you want to edit your YouTube video or vlog, this spin transition is a surefire as it’s interesting and fun to use.
10. Slice Transitions
This slice transition is in simple and clean style. It is full HD with high quality effects. Basically, you just need to drag and drop to your video to start adding it in Premiere Pro. Besides, you can preview it easily to see if you like it or not.
Part 2: How to use transitions in Premiere Pro
Now, is there any Premiere transition you like? If you have picked one, now let’s to add it to Premiere Pro. Here are few easy to follow steps for your Premiere Pro transition effects.
Step 1: Go to Effects panel
Go to Premiere Pro interface and select Effects panel from available options. Now from the available transition folders, pick the one that suits your project editing needs. The types of numbers of transitions available in effects panel will depend upon the version of Premiere Pro that you have installed in your system. Some of the most common transition effects are listed below:
- Zoom: Zoom transition helps to work on a selected potion of screen and it brings scene in or out in a selected proportion from whole screen.
- Slide: In this sliding motion type transition effect, one scene floats over another.
- Wipe: This one is quite interesting where one shot complete replaces the selected another shot while travelling from one portion of the frame to another.
- Iris: The iris transition effect is a newer one where an artificial effect is created to reflect the actual opening and closing motion of camera iris during shooting.
- 3D Motion: Such type of transition effects tries to manipulate selected clips in the space. For instance, if you apply flip over transition in this 3D motion category then one clip will simply flip over screen in such a manner that secondary clip below it gets revealed in appealing manner.
- Dissolve: In this type of transition effect, one scene completely melds into another scene. You can describe such type of blends with terms like fade out and fade in from or to a bank image.
Effects folders usually contain stylistically similar kind of transitions, but the result different appearances are on screen.
Step 2: Add transition to Premiere Pro
Now click on your desired transition and hold for a while; drag it on the video that you want to edit in the clip panel. Drop your selected transition in the specified position of the video clip bar. These transitions can be easily placed at starting position of lip, between overlapping portion of video clips as well as at end of the clip.
Step 3: Make adjustment
Now click on the left and right edges of transition and then drag them to make extended or shortened as per need. Note that, every transition use to have default time length so you can adjust their positions accordingly.
Check this video tutorial to know more details:
Conclusion
If you are tired of using Adobe Premiere, why not choose Wondershare Filmora ? It is a professional video editing software that can power up your story. It is easy to use compared with Premiere. You will have more control over video transitions. Auto color correction and automatic audio sync can help you save a lot of time. So, if you want to experience a new way to edit video, just download Wondershare Filmora now!
Benjamin Arango
Benjamin Arango is a writer and a lover of all things video.
Follow @Benjamin Arango
Transform Your Photos Into Videos with These 10 Online Tools
10+ Best Image to Video Makers Online [Free & Paid]

Ollie Mattison
Mar 27, 2024• Proven solutions
Over the course of the last couple of decades, the rapid development of Smartphones and digital cameras has made taking photos simpler than ever before. As a result, we all have much more photos stored on our computers and phones than we could possibly publish on our social media accounts.
Creating a short video from the photos you’ve taken can be a great way to share all of your favorite moments from your journey abroad or your child’s birthday with your friends. Moreover, you don’t have to be a skilled video editor to create a video from photos, because there are a lot of online images to video makers that enable you to create a new video in just a few easy steps.
So, in this article, we are going to take you through ten best free and paid online images to video makers you can use to create social media videos your friends are going to love watching.
Recommended: Turn Images to Video with Wondershare Filmora
As shown above, Filmora is an easy-to-use video editing software to create professional look videos, you can totally use this tool to create a video from images with text and titles , filters, transitions, overlays, elements, and effects, and share the video on YouTube or Vimeo directly or save in different formats.
Besides, you can import images to make a video in different aspect ratios, whether landscape or portrait, without any concerns about the black bar issue . In Filmora X, you can set up Crop to Fit or blur the background.
(p.s. Noticing worthy, this program is totally free-to-use, which would be a great option for users who just like to create a slideshow once in a while.)


10+ Best Free and Paid Online Image to Video Makers
Despite the fact that online images to video makers aren’t as powerful as photo and video editing software products such as Filmora, you can still use this online image-to-video maker to create videos effortlessly. However, in order to save time you should prepare all the material you want to use in your video in advance so that you can just upload it to the platform of your choosing and have the video ready in a couple of minutes. Let’s have a look at the image to video makers you can use to create captivating social media videos.
2. Image to Video
Price: Free

This website offers a bunch of different tools you can utilize to produce videos from your photos, trim videos or add 3D transitions between shots. Keep in mind that the maximum number of photos you can use in a single video is limited to thirty. Once you arrive on the home page of this platform you just have to upload the photos and rearrange them in any way you want.
You can also add, text, music, or your company’s logo to the video and then just follow the on-screen instructions to complete the process. You can preview the video after the platform generates it, and decide whether you want to download it or start from the beginning in case you didn’t like the result.
3. Kapwing: Image to Video Tool
Price: Free, Paid to Remove watermark

This online video editing platform enables its users to perform a number of basic video editing actions like trimming videos, adding text to them or resizing them. The Image to Video tool can be quite useful if you are looking for a quick way to convert an image to a video and then select an aspect ratio that fits the requirements of the social network to which you would like to upload that video.
4. Picovico: Instant Photo to Birthday Video Maker Online
Price: $9.99, Free version available

Turning your or your children’s birthday photos into charming videos you can share on social media is easy with Picovico. However, in order to start using the free or paid version of this image to video maker, you first have to create an account and make sure that you are signed in. In addition, if you opt for the free version of Picovico, all videos you create are going to be watermarked, and their quality and duration are going to be limited. So, in order to produce full HD videos that can contain several songs, you must purchase the Birthday Bash subscription plan.
5. Pholody
Price: Free

Besides creating videos from your photos, Pholody also lets you use the Happy Birthday, Merry Christmas or Around the World templates. If you choose to create videos from your own photos, you can save the project you’re working on, and then load it whenever you want to continue working on it. You can import the sound or music files from a hard drive on your computer or you can use the YouTube link to import any audio file you want into your project. Publishing your videos to social media networks requires you to be signed in to your account on Pholody.
6. Mp3Care Photo to Video
Price: Free

This web-based app makes converting JPEG files into MP4 video files a simple two-step process, that just requires you to upload photos and then choose the amount time between two images. The maximum number of photos you can use in a video is limited to just twenty, while the maximum duration of each image in the video can’t exceed the 20-second mark. Adding transitions between pictures is also on the list of options this platform provides, but Mp3 Care Photo to Video lacks any other video editing features. Despite some obvious downsides, this online photo to video maker is still a great option if you want to convert your photos into videos quickly and free of charge.
7. Kizoa
Price: Free, Subscription plans start at $29.99

Kizoa is an online video editor that lets you turn your photos in your videos, so you just have to choose the images you want to use in your project and upload them to the platform. Furthermore, even the free version of the app lets you store up to 1GB of photos and videos, which makes accessing your footage even easier. Nonetheless, the free version of Kizoa only allows you to export videos shorter than two minutes and you must purchase one of the available subscription plans in order to be able to export videos that last more than ten minutes or to create 4K videos.
8. Movie Maker Online
Price: Free

If you don’t already have the photos you want to use in your video, the Movie Maker Online is an excellent choice for you, because the platform offers a rich selection of royalty free images. Additionally, you also use Movie Maker Online to search for free music you can use in your videos without having to worry about the copyrights. The platform’s interface, however, is far from perfect and it may take you some time to get used to it and figure out how to add text to the photos you’re using in your video or how to choose for how long a photo is going to be displayed on the screen.
9. Slideshow Photos
Price: Free

You can create professional slideshows with this web-based app in a few easy steps, as you just have to select one out of four available templates and then upload at least 27 photos. Once you finish uploading the images, you can proceed to add text to your slideshow and then click on the Create a Slideshow button. The platform will then ask for your email address and it will send you an email that informs you that your video is going to be ready in 11 hours unless you want to pay $4 to speed up the delivery time.
10. PhotoShow
Price: Free version available, subscription plans start at $2.49 per month
PhotoShow lets you create slideshows in three easy steps. After you upload the photos you want to use in a slideshow, you can preview the results and customize them in accordance with your demands and then you can share the slideshow. However, you will have to install the latest version of Adobe’s Flash Player in order to use this platform, so make sure that this software is updated before you start creating a new slideshow with it. If you choose one of the subscription plans, you will be able to enhance each photo you include in your slideshow, before you export it to social media.
11. Adobe Spark
Price: Free, Available through Adobe Creative Cloud Plan for $52.99 per month or as a stand-alone app for $9.99 per month

In order to start using Adobe Spark, you will first have to use your Google or Facebook account to sign in to your Adobe account. Furthermore, the free version of Adobe Spark offers only a limited amount of photo and video editing options. If you would like to gain access to premium features such as adding a logo or choosing the font of the text you would like to use in your slideshows, you will either have to purchase Adobe Spark as a stand-alone app or as a part of the Adobe’s Creative Cloud Plan. Creating a slideshow with Adobe Spark is remarkably easy since you just have to insert the text, pick a template and upload the photos you would like to add to the slideshow.
Conclusion
Turning your photos into awe-inspiring videos has never been so simple because you no longer need to have access to expensive professional video editing software products to create videos. Instead, you can produce videos from photos using the online image to video makers that enable you to generate videos in just a few easy steps.
Transform Long Videos into Short Ones Instantly
Turn long videos into viral clips. Effortlessly transform lengthy videos into engaging, shareable clips.

Ollie Mattison
Ollie Mattison is a writer and a lover of all things video.
Follow @Ollie Mattison
Ollie Mattison
Mar 27, 2024• Proven solutions
Over the course of the last couple of decades, the rapid development of Smartphones and digital cameras has made taking photos simpler than ever before. As a result, we all have much more photos stored on our computers and phones than we could possibly publish on our social media accounts.
Creating a short video from the photos you’ve taken can be a great way to share all of your favorite moments from your journey abroad or your child’s birthday with your friends. Moreover, you don’t have to be a skilled video editor to create a video from photos, because there are a lot of online images to video makers that enable you to create a new video in just a few easy steps.
So, in this article, we are going to take you through ten best free and paid online images to video makers you can use to create social media videos your friends are going to love watching.
Recommended: Turn Images to Video with Wondershare Filmora
As shown above, Filmora is an easy-to-use video editing software to create professional look videos, you can totally use this tool to create a video from images with text and titles , filters, transitions, overlays, elements, and effects, and share the video on YouTube or Vimeo directly or save in different formats.
Besides, you can import images to make a video in different aspect ratios, whether landscape or portrait, without any concerns about the black bar issue . In Filmora X, you can set up Crop to Fit or blur the background.
(p.s. Noticing worthy, this program is totally free-to-use, which would be a great option for users who just like to create a slideshow once in a while.)
10+ Best Free and Paid Online Image to Video Makers
Despite the fact that online images to video makers aren’t as powerful as photo and video editing software products such as Filmora, you can still use this online image-to-video maker to create videos effortlessly. However, in order to save time you should prepare all the material you want to use in your video in advance so that you can just upload it to the platform of your choosing and have the video ready in a couple of minutes. Let’s have a look at the image to video makers you can use to create captivating social media videos.
2. Image to Video
Price: Free
This website offers a bunch of different tools you can utilize to produce videos from your photos, trim videos or add 3D transitions between shots. Keep in mind that the maximum number of photos you can use in a single video is limited to thirty. Once you arrive on the home page of this platform you just have to upload the photos and rearrange them in any way you want.
You can also add, text, music, or your company’s logo to the video and then just follow the on-screen instructions to complete the process. You can preview the video after the platform generates it, and decide whether you want to download it or start from the beginning in case you didn’t like the result.
3. Kapwing: Image to Video Tool
Price: Free, Paid to Remove watermark
This online video editing platform enables its users to perform a number of basic video editing actions like trimming videos, adding text to them or resizing them. The Image to Video tool can be quite useful if you are looking for a quick way to convert an image to a video and then select an aspect ratio that fits the requirements of the social network to which you would like to upload that video.
4. Picovico: Instant Photo to Birthday Video Maker Online
Price: $9.99, Free version available
Turning your or your children’s birthday photos into charming videos you can share on social media is easy with Picovico. However, in order to start using the free or paid version of this image to video maker, you first have to create an account and make sure that you are signed in. In addition, if you opt for the free version of Picovico, all videos you create are going to be watermarked, and their quality and duration are going to be limited. So, in order to produce full HD videos that can contain several songs, you must purchase the Birthday Bash subscription plan.
5. Pholody
Price: Free
Besides creating videos from your photos, Pholody also lets you use the Happy Birthday, Merry Christmas or Around the World templates. If you choose to create videos from your own photos, you can save the project you’re working on, and then load it whenever you want to continue working on it. You can import the sound or music files from a hard drive on your computer or you can use the YouTube link to import any audio file you want into your project. Publishing your videos to social media networks requires you to be signed in to your account on Pholody.
6. Mp3Care Photo to Video
Price: Free
This web-based app makes converting JPEG files into MP4 video files a simple two-step process, that just requires you to upload photos and then choose the amount time between two images. The maximum number of photos you can use in a video is limited to just twenty, while the maximum duration of each image in the video can’t exceed the 20-second mark. Adding transitions between pictures is also on the list of options this platform provides, but Mp3 Care Photo to Video lacks any other video editing features. Despite some obvious downsides, this online photo to video maker is still a great option if you want to convert your photos into videos quickly and free of charge.
7. Kizoa
Price: Free, Subscription plans start at $29.99
Kizoa is an online video editor that lets you turn your photos in your videos, so you just have to choose the images you want to use in your project and upload them to the platform. Furthermore, even the free version of the app lets you store up to 1GB of photos and videos, which makes accessing your footage even easier. Nonetheless, the free version of Kizoa only allows you to export videos shorter than two minutes and you must purchase one of the available subscription plans in order to be able to export videos that last more than ten minutes or to create 4K videos.
8. Movie Maker Online
Price: Free
If you don’t already have the photos you want to use in your video, the Movie Maker Online is an excellent choice for you, because the platform offers a rich selection of royalty free images. Additionally, you also use Movie Maker Online to search for free music you can use in your videos without having to worry about the copyrights. The platform’s interface, however, is far from perfect and it may take you some time to get used to it and figure out how to add text to the photos you’re using in your video or how to choose for how long a photo is going to be displayed on the screen.
9. Slideshow Photos
Price: Free
You can create professional slideshows with this web-based app in a few easy steps, as you just have to select one out of four available templates and then upload at least 27 photos. Once you finish uploading the images, you can proceed to add text to your slideshow and then click on the Create a Slideshow button. The platform will then ask for your email address and it will send you an email that informs you that your video is going to be ready in 11 hours unless you want to pay $4 to speed up the delivery time.
10. PhotoShow
Price: Free version available, subscription plans start at $2.49 per month
PhotoShow lets you create slideshows in three easy steps. After you upload the photos you want to use in a slideshow, you can preview the results and customize them in accordance with your demands and then you can share the slideshow. However, you will have to install the latest version of Adobe’s Flash Player in order to use this platform, so make sure that this software is updated before you start creating a new slideshow with it. If you choose one of the subscription plans, you will be able to enhance each photo you include in your slideshow, before you export it to social media.
11. Adobe Spark
Price: Free, Available through Adobe Creative Cloud Plan for $52.99 per month or as a stand-alone app for $9.99 per month
In order to start using Adobe Spark, you will first have to use your Google or Facebook account to sign in to your Adobe account. Furthermore, the free version of Adobe Spark offers only a limited amount of photo and video editing options. If you would like to gain access to premium features such as adding a logo or choosing the font of the text you would like to use in your slideshows, you will either have to purchase Adobe Spark as a stand-alone app or as a part of the Adobe’s Creative Cloud Plan. Creating a slideshow with Adobe Spark is remarkably easy since you just have to insert the text, pick a template and upload the photos you would like to add to the slideshow.
Conclusion
Turning your photos into awe-inspiring videos has never been so simple because you no longer need to have access to expensive professional video editing software products to create videos. Instead, you can produce videos from photos using the online image to video makers that enable you to generate videos in just a few easy steps.
Transform Long Videos into Short Ones Instantly
Turn long videos into viral clips. Effortlessly transform lengthy videos into engaging, shareable clips.
Ollie Mattison
Ollie Mattison is a writer and a lover of all things video.
Follow @Ollie Mattison
Best of the Best: Top Webcam Recording Tools for Windows 10
10 Best Webcam Recording Software for Windows 10

Richard Bennett
Mar 27, 2024• Proven solutions
Which webcam softwarehave you installed on your laptop or desktop? Using the right webcam software to live stream videos, screen record videos, or chat on Skype results in high-quality images, smooth streaming, and high-quality images and videos.
There is a huge number of free webcam software with advanced features yet free for you to download, and use on your PC.
But how would you determine the best webcam software to use?
Before you mounted that webcam on your desktop or laptop, you had a reason. It’s your webcam features and purpose that should guide you to select the right software for the webcam camera.
In this article, we will show you 10 webcam software for Windows in this guide. Included are the most useful factors to consider as you make your choice – complexity of use, free/paid, integrations, editing tools, and more. You will learn:
- Part 1: The Best Webcam & Screen Recorder for Windows and Mac [Video Tutorial]
- Part 2: Top 10 Best Free Webcam Software for Windows
First take a quick look of the 10 best webcam software that is available on your Windows from a video:
For Win 7 or later (64-bit)
 Secure Download
For macOS 10.14 or later
Secure Download
Part 1: The Best Webcam & Screen Recorder for Computer
You need a sound and webcam recorder to record your video tutorials, streaming videos, presentations, or any other type of video. Wondershare Filmora is the software to use. Other than its most admired friendly intuitive interface, it’s simple and easy to use-suitable for both beginners and professionals.
For Win 7 or later (64-bit)
Secure Download
For macOS 10.14 or later
Secure Download
Among the outstanding features, you’ll find in Filmora include,
- Fast-paced recording speed of up to 120 fps
- Adverse professional editing tools that are easy to use
- Simultaneous recording from both webcam and computer screen
- Compatible with 50+ different file formats
- Rich title text and tutorial features
It’s free to download. Have a try now! Join in the Wondershare Video Community and get some inspiration from other Filomora users.
Part 2: Top 10 Best Free Webcam Software for Windows
To help you evaluate which webcam software best suits your needs, I’ve featured the strengths, shortcomings, and support services in each software review.
This is the list of the best free webcam software for Windows 10.
| 1 - Logitech Capture | 2 - CyberLink Youcam |
|---|---|
| 3 - ManyCam | 4 - SplitCam |
| 5 - Bandicam | 6 - NCH - Video Capture Software |
| 7 - YAWCAM | 8 - Windows Camera |
| 9 - Fake Webcam | 10 - IP Camera Viewer |
1. Logitech Capture
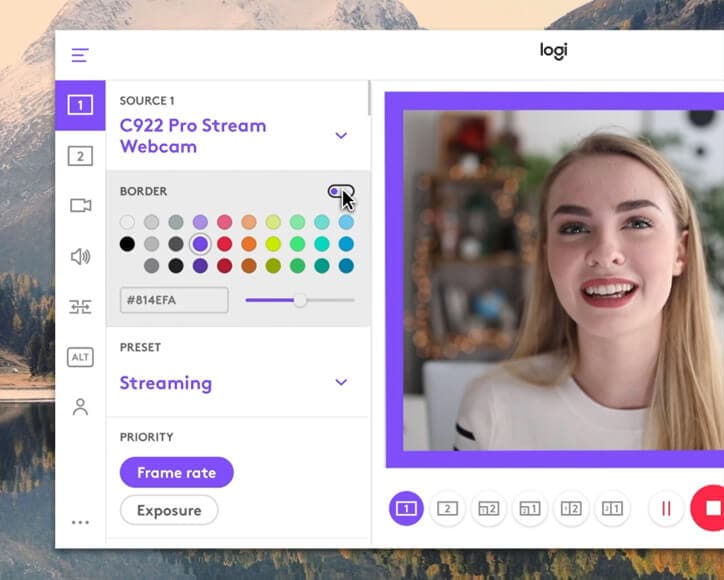
The multiple source recording feature and direct streaming app are the key strengths of this software. According to its mission statement- All-In-One Content Creation- you can use this software to record, edit, customize, and stream to your favorite channel.
Operating systems: Windows 10/8/7
Price: Free
Supported webcams: 1080P PRO STREAM, BRIO STREAM, C920s HD PRO, C922 PRO STREAM
Logitech Capture is among the few free webcam recording software for Windows 10 with studio controls applicable during recording. You can use this feature to adjust your image, create frames, adjust focus and transitions, and enable ChromaKey as you record.
In case you want to create a picture-in-picture presentation, this software allows you to use two webcams simultaneously. With the source switching and the auto-focus features, you can record the best tutorials or guides that show all dimensions and your image.
Pros
- Rich in transitions and effects
- Portrait optimization for mobile devices
- Its Capture app offers direct streaming to YouTube
- You can take passports or still images
Cons
- Limited to YouTube channel
- Account registration is mandatory
2. CyberLink Youcam
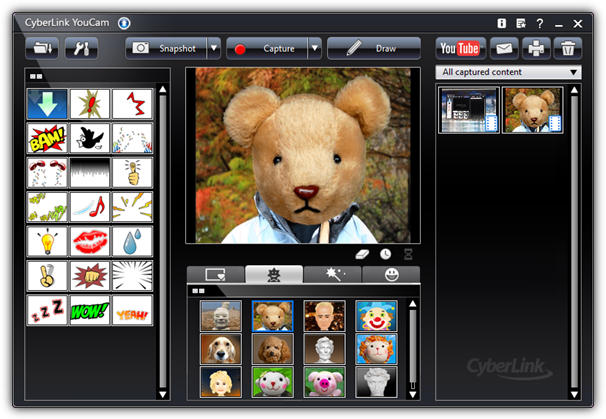
If you are used to video chatting and video recording, then, you’ll have 200+ fun effects to make your real-time videos as interesting as possible. In fact, the seamless app integration feature will keep your live streaming chats without buffering for long.
Operating systems: Windows 10/8/1.8/7
Price: Free/ Paid
Supported file formats: WMV, MP4, AVI
YouCam is the best free webcam software Windows 10 for YouTubers, business professionals, Streamers, home users, and Vloggers. It seamlessly integrates with live streaming media channels like Twitch, Wirecast, OBS Studio, Facebook Live, Xsplit, and YouTube Live.
The YouCam’s AR technology is one of its hidden treasures that will lighten up your skin by applying a natural-looking makeup. If your room is badly light, use the Live Skin Smoothing feature. Just below it is the TrueTheater Enhancement option to help you automatically adjust your facial sharpness and lighting.
Pros
- Hundreds of animated emojis
- Suitable for video conferencing services
- Plenty of interactive colorful particles and distortions
- Availability of face beautification tool
Cons
- Only limited to the Windows operating system
- Very few features for the free plan
3. ManyCam
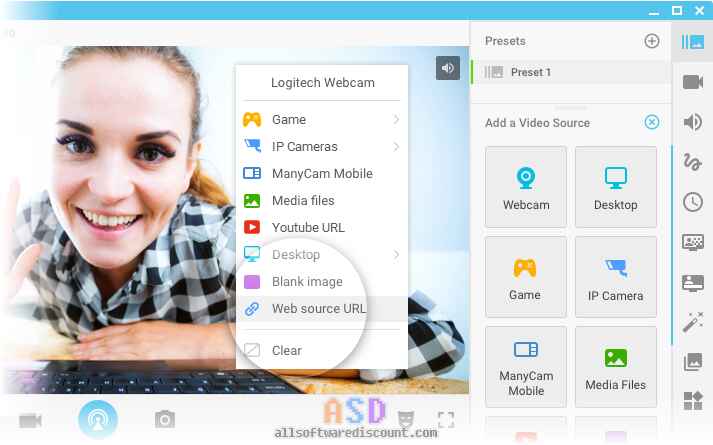
Downloading this webcam software guarantees you smooth streaming and effortless recording of videos. Also, this software will help you during game steaming, online education, mobile live streaming, and live telehealth communication.
Operating systems: Windows 10/8/7 and macOS X
Price: Free /Paid
Supported file formats: MJPEG, IP, MP4, AVI, MPEG, MOV
ManyCam is a free webcam recording software for windows 10 . It’s among the most widely used software internationally-not for many reasons, but because of its friendly intuitive user interface and live streaming tools for lessons and lecturers.
So, if you are a lecturer/teacher, you can use the Software Development Kit (SDK) to integrate the webcam with any online teaching platform. Among the features designed to facilitate better online teaching include the picture in picture, Chroma Key, multiple video sources, and screen sharing.
Pro
- Ability to stream 4K videos
- Real-time camera control settings
- No watermark even on the free plan
- Screencasting and screen recording feature
- Real-time drop and drag effects
Cons
- Expensive business subscription plans
- No Light enhancement features
- Most features are manual as opposed to being automatic

Filmora WebCame & Screen Recorder
Filmora - WebCame & Screen Recorder
• No-time delay to record webcam and screen while live streaming or gaming
• Edit recording video for marketing replay or adding game commentary
• Cross-platform supported - (Windows, Mac, iOS, Android)
Start Webcam & Screen Record Start Webcam & Screen Record Start Webcam & Screen Record Learn More >
4. SplitCam
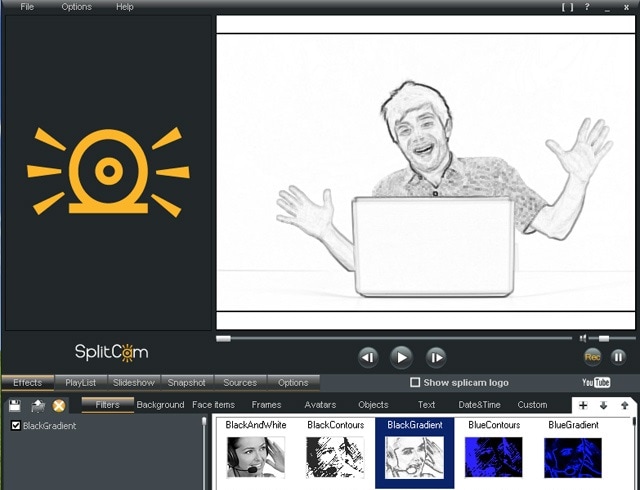
To stream your desktop/laptop screen SplitCam is the most appropriate software. With only the inbuilt virtual webcam, you can share your screen videos to media channels and IMS. Other uses of this software are recording webcam chatting , streaming live videos, and messaging.
Operating systems: Windows 10/8/7
Price: Free
SplitCam is not as popular as the other free webcam software windows 10 like ManyCam and YouCam. This is because it doesn’t integrate with some of the world’s renowned social media platforms- Facebook and Instagram. However, you can use this software to stream, take snapshots, and record videos for YouTube, Skype, Justin.tv, Gtalk, and Windows Live Messenger.
SplitCam is rich in fantastic webcam effects. Haven’t you been surprised to see someone appear to be streaming from the ocean or the Amazon Mountain? This is what you can do with SplitCam. Other cool effects are frames, texts on videos, filters, and facial items like masks and fake face glasses.
Pros
- Open and simple interface
- Integratable with the messaging apps
- Supports a wide range of resolutions ( between 320x180 and 2048x1536)
Cons
- Applicable to a small number of channels
- Supported file formats not defined
5. Bandicam
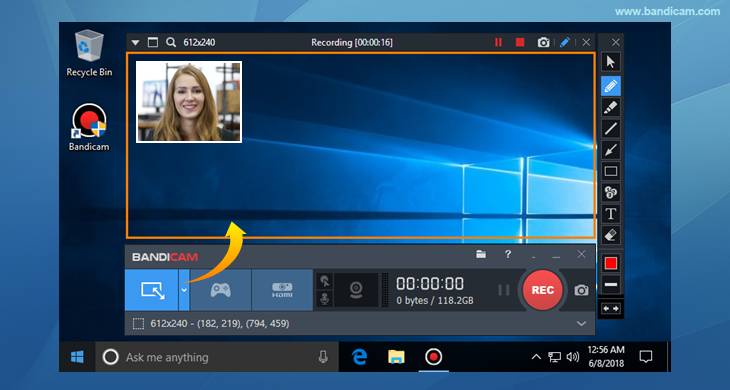
Do you want a recorder for screen recording, recording your gameplay, or capturing videos from devices like smartphones and PlayStation? Look for no other software but BandiCam. You can also merge two or more video files, remove unwanted parts, and select the only part to screen record.
Operating systems: Windows Vista, 10/8/7
Price: Free/paid
Supported file format: AVI, MP4, JPEG, TIF, GIF, PNG
Supported graphics cards: Nvidia NVENC, Nvidia NVENC (),
BandiCam is another HD webcam software Windows 10 with the capability of capturing high compression videos and games on your PC screen videos without compromising the video quality. Don’t forget to record all webinars aired in your niche.
Netflix is becoming more popular each day due to the thrilling videos. With the BandiCam screen recorder, you can record live-streamed videos on Netflix for over 24hrs. These are the tools to edit your recorded video: real-time drawing tool, webcam overlay, sound mixer, and Chroma Key.
Pros
- No hidden features
- Widescreen capture
- Can record 2D/3D videos in HD mode
- Can capture fast-paced videos of up to 144 FPS
Cons
- Not suitable for beginners
- Cannot be used to live stream videos
6. NCH - Video Capture Software

Of all the listed webcam software in this review, this software has the most diverse functions. You can record streaming videos, record your computer screen, record from external devices, and record from a webcam. It’s also perfect for recording audios and simultaneous recording from screen and webcam.
Operating systems: Windows 10, 8, 8.1, 7, XP, Vista 64 bit and Mac OS X 10.5 and above
Price: Free/paid
Supported file formats: MP4, WMV, AVI, MPG, FLV, MOV
Debut Video Capture is the only free webcam recording software for Windows 10 believed to capture or record videos from any external source. It has also preset settings for HD and TV with pre-production enhancement features like color adjustment settings, overlay buttons and frame rate, aspect ratio, and resolution settings.
If you always think of becoming rich, the Express Burn Disc Burner is the tool that will help you make money. Record the most trending videos and use this tool to burn DVDs and CDs.
Pros
- Can record videos for any social media platform
- Supports a wide range of audio and video file formats
- All features are open and easy to use
- Availability of video editing software
Cons
- Only monthly subscriptions for paid plans
- Watermark for the free download
- Difficult to record a full-screen movie
Try Filmora to Smoothly Record WebCame and Screen!
Filmora Web Camera & Screen Recorder can capture any area of the PC screen and webcam. It’s perfect to capture and record while making a live gaming match, marketing promotion, guiding a tour, and more. Plus, you can edit the recording video files in Filmora directly! Worth to have a try!
Start Webcam & Screen Recording Start Webcam & Screen Recording Start Webcam & Screen Recording Learn More >
7. YAWCAM
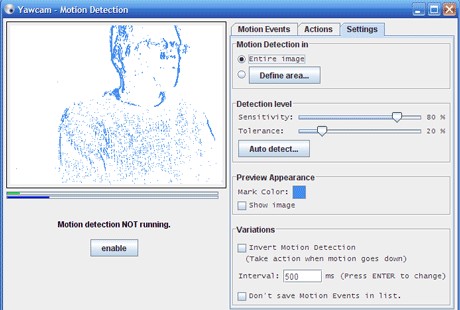
This webcam software can be referred to as the simplest for all beginners with the will to start streaming and recording videos for personal or home use.
Supported file formats: PNG, JPG, MJPEG, GIF, JavaScript
Price: Free
Supported operating systems: Windows 2000/10/8/7/ Vista and XP
YAWCAM is an absolutely free webcam software windows 10. Why is it the simplest software to use? Just download and you will find all features on one page. Simple language commands aligned in a drop-down menu ready to be used with only one click.
Some of the best features include overlay texts and images, scheduler, motion detection, and an inbuilt webserver. For you to use this webcam software, use these supported devices; DirectX compatible webcams, DV-camera, or video capture devices.
Pros
- No watermark
- Easy to use
- Friendly user interface
Cons
- Few transitions and effects
8. Windows Camera
We all trust any app or software by Microsoft over others! If you also do, then you can download Windows Camera and use it to record videos, take snapshots and shoot videos.
Operating system: Windows 10
Price: Free
Supported devices: Xbox One, Windows, mobile
Windows Camera is among the best free webcam software for Windows 10. This is because of the software’s few but easy-to-use and effective features that are expertly designed for PCs and tablets installed with Windows 10.
The automatic photo back combined with the photo-shoot timer makes it perfect for taking selfies and passports. Using the panorama feature, you can take photos of the best scenes and share them on media platforms.
Pros
- Simplicity is its main strength
- Supports resolutions above 1080p
- Good for photographers
Cons
- Has no built-in virtual webcam
- Requires a camera to support 4K videos
9. Fake Webcam

Supported file formats: AVI, MPEG, DVD, VCD, WMV, 3GP, MP4, SVCD, MOV, ASF,
Price: Free /paid
Operating systems: Windows 7/8/10 (32/64 bit)
Fake Webcam is a free webcam software Windows 10 whose name is creatively used to suggest it almost functions like a webcam. This doesn’t fall far from the truth! You can truly use this software to broadcast, add effects and filters, record on full screen, and fake your voice.
To share or stream your photos and videos on Skype, YIM, or Gtalk, using the screen recorder would give the best results. What makes Fake Webcam stand out is the free video converter and the free video toolkit.
Pros
- Free support tools
- Supports all video and audio formats
- Can convert file formats and stream to any channel
- Availability of the screen recorder
- Integratable with almost all instant messengers
Cons
- Major tools not free(Fake Webcam and Screen recorder)
10. IP Camera Viewer
Do you run a supermarket store, mall or you’ve installed security surveillance cameras in your compound? IP Camera Viewer is the most effective webcam software for video monitoring systems.
Supported file formats: JPEG, MPEG-4, MJPEG, and
Price: Free
Operating systems: Windows 10 / 8 / 7 /2012 /Vista and XP
IP Camera Viewer is the most used free webcam recording software for windows 10 as its compatible with almost all IP camera models like Panasonic, Toshiba, Canon, D-Link, Sony, and more the 2000 others. With the capability of viewing and controlling 4 camera feeds at once, you can use this software to monitor your entire compound.
Some of the important advanced IP Camera Viewer functions include listening to webcam audios, adjust image settings, zoom or tilt images, schedule monitoring times, and detect motions.
Pros
- Automatically uploads recorded videos and photos to a server
- Compatible with almost all IP camera models
- Simple and easy to use
Cons
- No inbuilt media player
- Cannot adjust the image or video quality
You may also want to read >>> 10 Best Webcams | A Buyer’s Guide
![]()
A cross-platform for making videos anywhere for all creators

Why your video editing isn’t good enough? How about some creative inspo?
- 100 Million+ Users
- 150+ Countries and Regions
- 4 Million+ Social Media Followers
- 5 Million+ Stock Media for Use
* Secure Download

FAQs about Webcam Software for Windows
1. What is Webcam Software?
A webcam is a video camera that feeds or streams images or video in real-time to or over a computer network. And webcam software enables users to record video or stream video over the Internet.
Webcam software is an application that allows you to capture video from your laptop/desktop webcam and record or stream video over the Internet. You can use them to deliver professional videos, streaming, and online courses easily.
2. Does Windows have built-in webcam software?
Windows 10 has an in-built webcam app called Camera that lets you record videos and take pictures with your webcam. This is definitely better than downloading 3rd party webcam recording software where spyware/malware is rampant.
3. Does a webcam need software?
Yes, if the camera hardware offers depth, low-light support, night vision, etc. If you use any software on the camera, these functions are only available if the driver is installed.
Conclusion
After a keen of all the webcam software above, it’s evident that every developer had an intended purpose. You cannot therefore just randomly wake up and download any without considering its functions, supported devices, file formats, and the auxiliary apps available. All this information is contained herein.
According to some users, there are free webcam software Windows 10 that more often would not show any video images but the audio is absolutely clear. To help your fellow user, what bad experience have you ever had after recording a game using webcam software ? Kindly share your comment or suggestion on our social media platforms.
Richard Bennett
Richard Bennett is a writer and a lover of all things video.
Follow @Richard Bennett
Richard Bennett
Mar 27, 2024• Proven solutions
Which webcam softwarehave you installed on your laptop or desktop? Using the right webcam software to live stream videos, screen record videos, or chat on Skype results in high-quality images, smooth streaming, and high-quality images and videos.
There is a huge number of free webcam software with advanced features yet free for you to download, and use on your PC.
But how would you determine the best webcam software to use?
Before you mounted that webcam on your desktop or laptop, you had a reason. It’s your webcam features and purpose that should guide you to select the right software for the webcam camera.
In this article, we will show you 10 webcam software for Windows in this guide. Included are the most useful factors to consider as you make your choice – complexity of use, free/paid, integrations, editing tools, and more. You will learn:
- Part 1: The Best Webcam & Screen Recorder for Windows and Mac [Video Tutorial]
- Part 2: Top 10 Best Free Webcam Software for Windows
First take a quick look of the 10 best webcam software that is available on your Windows from a video:
For Win 7 or later (64-bit)
Secure Download
For macOS 10.14 or later
Secure Download
Part 1: The Best Webcam & Screen Recorder for Computer
You need a sound and webcam recorder to record your video tutorials, streaming videos, presentations, or any other type of video. Wondershare Filmora is the software to use. Other than its most admired friendly intuitive interface, it’s simple and easy to use-suitable for both beginners and professionals.
For Win 7 or later (64-bit)
Secure Download
For macOS 10.14 or later
Secure Download
Among the outstanding features, you’ll find in Filmora include,
- Fast-paced recording speed of up to 120 fps
- Adverse professional editing tools that are easy to use
- Simultaneous recording from both webcam and computer screen
- Compatible with 50+ different file formats
- Rich title text and tutorial features
It’s free to download. Have a try now! Join in the Wondershare Video Community and get some inspiration from other Filomora users.
Part 2: Top 10 Best Free Webcam Software for Windows
To help you evaluate which webcam software best suits your needs, I’ve featured the strengths, shortcomings, and support services in each software review.
This is the list of the best free webcam software for Windows 10.
| 1 - Logitech Capture | 2 - CyberLink Youcam |
|---|---|
| 3 - ManyCam | 4 - SplitCam |
| 5 - Bandicam | 6 - NCH - Video Capture Software |
| 7 - YAWCAM | 8 - Windows Camera |
| 9 - Fake Webcam | 10 - IP Camera Viewer |
1. Logitech Capture
The multiple source recording feature and direct streaming app are the key strengths of this software. According to its mission statement- All-In-One Content Creation- you can use this software to record, edit, customize, and stream to your favorite channel.
Operating systems: Windows 10/8/7
Price: Free
Supported webcams: 1080P PRO STREAM, BRIO STREAM, C920s HD PRO, C922 PRO STREAM
Logitech Capture is among the few free webcam recording software for Windows 10 with studio controls applicable during recording. You can use this feature to adjust your image, create frames, adjust focus and transitions, and enable ChromaKey as you record.
In case you want to create a picture-in-picture presentation, this software allows you to use two webcams simultaneously. With the source switching and the auto-focus features, you can record the best tutorials or guides that show all dimensions and your image.
Pros
- Rich in transitions and effects
- Portrait optimization for mobile devices
- Its Capture app offers direct streaming to YouTube
- You can take passports or still images
Cons
- Limited to YouTube channel
- Account registration is mandatory
2. CyberLink Youcam
If you are used to video chatting and video recording, then, you’ll have 200+ fun effects to make your real-time videos as interesting as possible. In fact, the seamless app integration feature will keep your live streaming chats without buffering for long.
Operating systems: Windows 10/8/1.8/7
Price: Free/ Paid
Supported file formats: WMV, MP4, AVI
YouCam is the best free webcam software Windows 10 for YouTubers, business professionals, Streamers, home users, and Vloggers. It seamlessly integrates with live streaming media channels like Twitch, Wirecast, OBS Studio, Facebook Live, Xsplit, and YouTube Live.
The YouCam’s AR technology is one of its hidden treasures that will lighten up your skin by applying a natural-looking makeup. If your room is badly light, use the Live Skin Smoothing feature. Just below it is the TrueTheater Enhancement option to help you automatically adjust your facial sharpness and lighting.
Pros
- Hundreds of animated emojis
- Suitable for video conferencing services
- Plenty of interactive colorful particles and distortions
- Availability of face beautification tool
Cons
- Only limited to the Windows operating system
- Very few features for the free plan
3. ManyCam
Downloading this webcam software guarantees you smooth streaming and effortless recording of videos. Also, this software will help you during game steaming, online education, mobile live streaming, and live telehealth communication.
Operating systems: Windows 10/8/7 and macOS X
Price: Free /Paid
Supported file formats: MJPEG, IP, MP4, AVI, MPEG, MOV
ManyCam is a free webcam recording software for windows 10 . It’s among the most widely used software internationally-not for many reasons, but because of its friendly intuitive user interface and live streaming tools for lessons and lecturers.
So, if you are a lecturer/teacher, you can use the Software Development Kit (SDK) to integrate the webcam with any online teaching platform. Among the features designed to facilitate better online teaching include the picture in picture, Chroma Key, multiple video sources, and screen sharing.
Pro
- Ability to stream 4K videos
- Real-time camera control settings
- No watermark even on the free plan
- Screencasting and screen recording feature
- Real-time drop and drag effects
Cons
- Expensive business subscription plans
- No Light enhancement features
- Most features are manual as opposed to being automatic
Filmora WebCame & Screen Recorder
Filmora - WebCame & Screen Recorder
• No-time delay to record webcam and screen while live streaming or gaming
• Edit recording video for marketing replay or adding game commentary
• Cross-platform supported - (Windows, Mac, iOS, Android)
Start Webcam & Screen Record Start Webcam & Screen Record Start Webcam & Screen Record Learn More >
4. SplitCam
To stream your desktop/laptop screen SplitCam is the most appropriate software. With only the inbuilt virtual webcam, you can share your screen videos to media channels and IMS. Other uses of this software are recording webcam chatting , streaming live videos, and messaging.
Operating systems: Windows 10/8/7
Price: Free
SplitCam is not as popular as the other free webcam software windows 10 like ManyCam and YouCam. This is because it doesn’t integrate with some of the world’s renowned social media platforms- Facebook and Instagram. However, you can use this software to stream, take snapshots, and record videos for YouTube, Skype, Justin.tv, Gtalk, and Windows Live Messenger.
SplitCam is rich in fantastic webcam effects. Haven’t you been surprised to see someone appear to be streaming from the ocean or the Amazon Mountain? This is what you can do with SplitCam. Other cool effects are frames, texts on videos, filters, and facial items like masks and fake face glasses.
Pros
- Open and simple interface
- Integratable with the messaging apps
- Supports a wide range of resolutions ( between 320x180 and 2048x1536)
Cons
- Applicable to a small number of channels
- Supported file formats not defined
5. Bandicam
Do you want a recorder for screen recording, recording your gameplay, or capturing videos from devices like smartphones and PlayStation? Look for no other software but BandiCam. You can also merge two or more video files, remove unwanted parts, and select the only part to screen record.
Operating systems: Windows Vista, 10/8/7
Price: Free/paid
Supported file format: AVI, MP4, JPEG, TIF, GIF, PNG
Supported graphics cards: Nvidia NVENC, Nvidia NVENC (),
BandiCam is another HD webcam software Windows 10 with the capability of capturing high compression videos and games on your PC screen videos without compromising the video quality. Don’t forget to record all webinars aired in your niche.
Netflix is becoming more popular each day due to the thrilling videos. With the BandiCam screen recorder, you can record live-streamed videos on Netflix for over 24hrs. These are the tools to edit your recorded video: real-time drawing tool, webcam overlay, sound mixer, and Chroma Key.
Pros
- No hidden features
- Widescreen capture
- Can record 2D/3D videos in HD mode
- Can capture fast-paced videos of up to 144 FPS
Cons
- Not suitable for beginners
- Cannot be used to live stream videos
6. NCH - Video Capture Software
Of all the listed webcam software in this review, this software has the most diverse functions. You can record streaming videos, record your computer screen, record from external devices, and record from a webcam. It’s also perfect for recording audios and simultaneous recording from screen and webcam.
Operating systems: Windows 10, 8, 8.1, 7, XP, Vista 64 bit and Mac OS X 10.5 and above
Price: Free/paid
Supported file formats: MP4, WMV, AVI, MPG, FLV, MOV
Debut Video Capture is the only free webcam recording software for Windows 10 believed to capture or record videos from any external source. It has also preset settings for HD and TV with pre-production enhancement features like color adjustment settings, overlay buttons and frame rate, aspect ratio, and resolution settings.
If you always think of becoming rich, the Express Burn Disc Burner is the tool that will help you make money. Record the most trending videos and use this tool to burn DVDs and CDs.
Pros
- Can record videos for any social media platform
- Supports a wide range of audio and video file formats
- All features are open and easy to use
- Availability of video editing software
Cons
- Only monthly subscriptions for paid plans
- Watermark for the free download
- Difficult to record a full-screen movie
Try Filmora to Smoothly Record WebCame and Screen!
Filmora Web Camera & Screen Recorder can capture any area of the PC screen and webcam. It’s perfect to capture and record while making a live gaming match, marketing promotion, guiding a tour, and more. Plus, you can edit the recording video files in Filmora directly! Worth to have a try!
Start Webcam & Screen Recording Start Webcam & Screen Recording Start Webcam & Screen Recording Learn More >
7. YAWCAM
This webcam software can be referred to as the simplest for all beginners with the will to start streaming and recording videos for personal or home use.
Supported file formats: PNG, JPG, MJPEG, GIF, JavaScript
Price: Free
Supported operating systems: Windows 2000/10/8/7/ Vista and XP
YAWCAM is an absolutely free webcam software windows 10. Why is it the simplest software to use? Just download and you will find all features on one page. Simple language commands aligned in a drop-down menu ready to be used with only one click.
Some of the best features include overlay texts and images, scheduler, motion detection, and an inbuilt webserver. For you to use this webcam software, use these supported devices; DirectX compatible webcams, DV-camera, or video capture devices.
Pros
- No watermark
- Easy to use
- Friendly user interface
Cons
- Few transitions and effects
8. Windows Camera
We all trust any app or software by Microsoft over others! If you also do, then you can download Windows Camera and use it to record videos, take snapshots and shoot videos.
Operating system: Windows 10
Price: Free
Supported devices: Xbox One, Windows, mobile
Windows Camera is among the best free webcam software for Windows 10. This is because of the software’s few but easy-to-use and effective features that are expertly designed for PCs and tablets installed with Windows 10.
The automatic photo back combined with the photo-shoot timer makes it perfect for taking selfies and passports. Using the panorama feature, you can take photos of the best scenes and share them on media platforms.
Pros
- Simplicity is its main strength
- Supports resolutions above 1080p
- Good for photographers
Cons
- Has no built-in virtual webcam
- Requires a camera to support 4K videos
9. Fake Webcam
Supported file formats: AVI, MPEG, DVD, VCD, WMV, 3GP, MP4, SVCD, MOV, ASF,
Price: Free /paid
Operating systems: Windows 7/8/10 (32/64 bit)
Fake Webcam is a free webcam software Windows 10 whose name is creatively used to suggest it almost functions like a webcam. This doesn’t fall far from the truth! You can truly use this software to broadcast, add effects and filters, record on full screen, and fake your voice.
To share or stream your photos and videos on Skype, YIM, or Gtalk, using the screen recorder would give the best results. What makes Fake Webcam stand out is the free video converter and the free video toolkit.
Pros
- Free support tools
- Supports all video and audio formats
- Can convert file formats and stream to any channel
- Availability of the screen recorder
- Integratable with almost all instant messengers
Cons
- Major tools not free(Fake Webcam and Screen recorder)
10. IP Camera Viewer
Do you run a supermarket store, mall or you’ve installed security surveillance cameras in your compound? IP Camera Viewer is the most effective webcam software for video monitoring systems.
Supported file formats: JPEG, MPEG-4, MJPEG, and
Price: Free
Operating systems: Windows 10 / 8 / 7 /2012 /Vista and XP
IP Camera Viewer is the most used free webcam recording software for windows 10 as its compatible with almost all IP camera models like Panasonic, Toshiba, Canon, D-Link, Sony, and more the 2000 others. With the capability of viewing and controlling 4 camera feeds at once, you can use this software to monitor your entire compound.
Some of the important advanced IP Camera Viewer functions include listening to webcam audios, adjust image settings, zoom or tilt images, schedule monitoring times, and detect motions.
Pros
- Automatically uploads recorded videos and photos to a server
- Compatible with almost all IP camera models
- Simple and easy to use
Cons
- No inbuilt media player
- Cannot adjust the image or video quality
You may also want to read >>> 10 Best Webcams | A Buyer’s Guide
![]()
A cross-platform for making videos anywhere for all creators
Why your video editing isn’t good enough? How about some creative inspo?
- 100 Million+ Users
- 150+ Countries and Regions
- 4 Million+ Social Media Followers
- 5 Million+ Stock Media for Use
* Secure Download
FAQs about Webcam Software for Windows
1. What is Webcam Software?
A webcam is a video camera that feeds or streams images or video in real-time to or over a computer network. And webcam software enables users to record video or stream video over the Internet.
Webcam software is an application that allows you to capture video from your laptop/desktop webcam and record or stream video over the Internet. You can use them to deliver professional videos, streaming, and online courses easily.
2. Does Windows have built-in webcam software?
Windows 10 has an in-built webcam app called Camera that lets you record videos and take pictures with your webcam. This is definitely better than downloading 3rd party webcam recording software where spyware/malware is rampant.
3. Does a webcam need software?
Yes, if the camera hardware offers depth, low-light support, night vision, etc. If you use any software on the camera, these functions are only available if the driver is installed.
Conclusion
After a keen of all the webcam software above, it’s evident that every developer had an intended purpose. You cannot therefore just randomly wake up and download any without considering its functions, supported devices, file formats, and the auxiliary apps available. All this information is contained herein.
According to some users, there are free webcam software Windows 10 that more often would not show any video images but the audio is absolutely clear. To help your fellow user, what bad experience have you ever had after recording a game using webcam software ? Kindly share your comment or suggestion on our social media platforms.
Richard Bennett
Richard Bennett is a writer and a lover of all things video.
Follow @Richard Bennett
Cinematic Mastery: Expert Tips for Editing in Final Cut Pro X
Full Guide on Making a Big-budget Cinematic Look Video with Final Cut Pro X

Caroline Laurent
Mar 27, 2024• Proven solutions
Do you enjoy the view of movies? Do you find your videos dull and unexciting? How about giving a cinematic look to your videos?
I bet a lot of editors have been there. However, it won’t take you long to find out that movies are quite different from the video you recorded and edited.
No worries, this article explains why there are differences between self-made videos and movies, as well as simple yet detailed steps to make cinematic look videos with FCPX.
Part 1: Difference between a Cinematic Look and a Normal Video?
The term cinematic is often referred to the black bars or wide-screen frame ratios. Photographers and filmmakers use the term cinematic to describe the look of movies and pictures shot on film.
However, the term has changed its meaning with the advent of digital video and the invention of high-tech devices. With the evolution of the internet across the globe, YouTubers, videographers, and social media influencers have started using this term to describe anything related to cinema and film. In other words, a cinematic look is an unconventional, film-look, and professional appearance of a video that makes a normal clip look elegant and worth watching. See the top 10 movies made by FCPX here.

So, here we draw a line between a normal video and the one with a cinematic look. In the latter, you adjust everything that is directly or indirectly linked to the quality of a video, including but not limited to colors, appearance, light, motion, frame rate, composition, and camera movements.
Resolution refers to the horizontal pixel count such as 2K (2.2 megapixels) or 4K (8.8 megapixels). Similarly, the frame rate defines the number of individual images or frames being displayed on the TV screen per second. The universally accepted film frame rate is 24 FPS, which is used to make high-definition videos. However, most TV broadcasts and shows are recorded at 30fps. See more about FPS here .
Thanks to the advanced video editing tools and applications that have made it easier to capture a cinematic look or make HD cinematic look videos with basic camera setups. If you want to get your desired cinematic look, read the following section.
Part 2: How to Make a Cinematic Look Film Video with FCPX?
The latest features and user-friendly dashboard of Final Cut Pro X allow users (even beginners) to add effects and increase the aesthetics of their videos. Follow these four simple steps to make a cinematic look high-resolution video with Final Cut Pro X.
Step 1: 4K Resolution and Low Frame Rate
To achieve ideal cinematic aesthetics, you need high-quality 4K resolution videos, awesome exposure, the right codec, and lighting. Hence, to start with, capture a high-quality 4K Canon RAW shot with the latest high-tech Canon Log 2 camera. You can also use other devices and choose different codecs and color profiles to get the best color grade.

Step 2: Color Grading and Color Correction
After importing your footage, get ready for color corrections to address issues like conversions for LOG formats through white balance adjustments. Color corrections normalize the color of HD videos into a standard format. Here’s how you can do this:
- Go to the Inspector Panel and select the Extended Function
- Select the C-Log 2 conversion LUT

- Make minor exposure and white balance adjustments as per your scope
- Select the Color Wheels and Color Mask features to custom select specific areas and colors
- Adjust your color grade according to your requirements
- Use Color Masking to improve the shadow’s appearance and warm-up mid-tones
- You will get a strong color contrast in your footage.
Step 3: Use Slow Motion at the Right Timing
Final Cut Pro X allows its users to make both constant and variable speed changes without disturbing the audio’s pitch. By using slow-motion effects at the right timing, you can make your videos adorable and give them a cinematic look.
- Select your video and click on the Retiming button
- Tap on the Slow section

- You will see multiple options to slow down the speed of your clip
- The smaller number will slow down your footage
- To apply custom retiming amounts, again click on the Retiming button and select the Custom option
- Custom the speed of your clip over 100% or less than 100% as you want
- After selecting a value, your selected clip will become longer on the timeline.
Step 4: Adopt Film Grain to Make Film-look Videos
Film grain overlays give your videos vintage and cinematic look. Follow these steps to use these film grains in Final Cut Pro X:
- Import your footage and film grains downloaded from the internet and layer them into your timeline
- Place the film grain on top of your clip
- Select the clip and go to the FCPX blend mode dropdown menu located on the top-right of your screen
- Click on the Overlay and adjust the opacity of the film grain overlay as required.

Part 3: What Other Factors Contribute to Film-Look Videos
While making cinematic-look videos, also considering the following factors:
Framing
While filming, one must be aware of the emotion to be captured in the frame. For this purpose, follow the “Rule of Thirds,” which means to divide your short into three horizontal and vertical sections and select the third shot to produce some effect.
Tilt Shift
Instead of shooting your clips with a UHD camera, you can add cinematic effect with the Tilt-shift feature by setting the focus of your video. For this purpose, right-click on the video, select Power Tool and check the box with the option Apply Tilt-shift to the clip. Use the slider to adjust the focus.
Background Music
Cinematic clips without background music seem to be unexciting and boring. Adding melodious background music makes your videos look more professional and enjoyable. You can add default music or your favorite music downloaded from the internet by clicking on the Music tab.
Titles and Subtitles
Adding subtitles to your videos can make them understandable for viewers who speak a different language. Click on Text/Credit in Filmora and select Subtitles to add subtitles to your video.
Part 4: How to Add Cinematic Look to Your Footage in Easy Ways
Filmora is an advanced video editing tool developed by Wondershare. Its user-friendly and easy-to-understand interface makes it popular among beginners as well as professionals. And the best thing about Filmora is that the editor provides rich options of presets, effects, and filters to add a film look to your video.
Here’s how you can add a cinematic look to your footage with Filmora.
1, choose Effect
2, search for “cinematic” or “film”

3, drag the effect you like to the timeline
4, done!
Simple steps, right? For more stunning effects and film-look packages, try filmstock !

Conclusion
Get rid of unexciting and dull videos with no animations or effects. It’s time to add a cinematic look to your videos to make them look more professional and elegant.
A variety of tools and applications are available to make cinematic look videos such as Final Cut Pro X and Filmora. Both these software offers advanced video editing features and allow you to make high-resolution cinematic-look videos. You can adjust various aspects of your video such as colors, aesthetics, resolution, motion, frame rate, composition, and camera movements with these two applications.
Caroline Laurent
Caroline Laurent is a writer and a lover of all things video.
Follow @Caroline Laurent
Caroline Laurent
Mar 27, 2024• Proven solutions
Do you enjoy the view of movies? Do you find your videos dull and unexciting? How about giving a cinematic look to your videos?
I bet a lot of editors have been there. However, it won’t take you long to find out that movies are quite different from the video you recorded and edited.
No worries, this article explains why there are differences between self-made videos and movies, as well as simple yet detailed steps to make cinematic look videos with FCPX.
Part 1: Difference between a Cinematic Look and a Normal Video?
The term cinematic is often referred to the black bars or wide-screen frame ratios. Photographers and filmmakers use the term cinematic to describe the look of movies and pictures shot on film.
However, the term has changed its meaning with the advent of digital video and the invention of high-tech devices. With the evolution of the internet across the globe, YouTubers, videographers, and social media influencers have started using this term to describe anything related to cinema and film. In other words, a cinematic look is an unconventional, film-look, and professional appearance of a video that makes a normal clip look elegant and worth watching. See the top 10 movies made by FCPX here.
So, here we draw a line between a normal video and the one with a cinematic look. In the latter, you adjust everything that is directly or indirectly linked to the quality of a video, including but not limited to colors, appearance, light, motion, frame rate, composition, and camera movements.
Resolution refers to the horizontal pixel count such as 2K (2.2 megapixels) or 4K (8.8 megapixels). Similarly, the frame rate defines the number of individual images or frames being displayed on the TV screen per second. The universally accepted film frame rate is 24 FPS, which is used to make high-definition videos. However, most TV broadcasts and shows are recorded at 30fps. See more about FPS here .
Thanks to the advanced video editing tools and applications that have made it easier to capture a cinematic look or make HD cinematic look videos with basic camera setups. If you want to get your desired cinematic look, read the following section.
Part 2: How to Make a Cinematic Look Film Video with FCPX?
The latest features and user-friendly dashboard of Final Cut Pro X allow users (even beginners) to add effects and increase the aesthetics of their videos. Follow these four simple steps to make a cinematic look high-resolution video with Final Cut Pro X.
Step 1: 4K Resolution and Low Frame Rate
To achieve ideal cinematic aesthetics, you need high-quality 4K resolution videos, awesome exposure, the right codec, and lighting. Hence, to start with, capture a high-quality 4K Canon RAW shot with the latest high-tech Canon Log 2 camera. You can also use other devices and choose different codecs and color profiles to get the best color grade.
Step 2: Color Grading and Color Correction
After importing your footage, get ready for color corrections to address issues like conversions for LOG formats through white balance adjustments. Color corrections normalize the color of HD videos into a standard format. Here’s how you can do this:
- Go to the Inspector Panel and select the Extended Function
- Select the C-Log 2 conversion LUT
- Make minor exposure and white balance adjustments as per your scope
- Select the Color Wheels and Color Mask features to custom select specific areas and colors
- Adjust your color grade according to your requirements
- Use Color Masking to improve the shadow’s appearance and warm-up mid-tones
- You will get a strong color contrast in your footage.
Step 3: Use Slow Motion at the Right Timing
Final Cut Pro X allows its users to make both constant and variable speed changes without disturbing the audio’s pitch. By using slow-motion effects at the right timing, you can make your videos adorable and give them a cinematic look.
- Select your video and click on the Retiming button
- Tap on the Slow section
- You will see multiple options to slow down the speed of your clip
- The smaller number will slow down your footage
- To apply custom retiming amounts, again click on the Retiming button and select the Custom option
- Custom the speed of your clip over 100% or less than 100% as you want
- After selecting a value, your selected clip will become longer on the timeline.
Step 4: Adopt Film Grain to Make Film-look Videos
Film grain overlays give your videos vintage and cinematic look. Follow these steps to use these film grains in Final Cut Pro X:
- Import your footage and film grains downloaded from the internet and layer them into your timeline
- Place the film grain on top of your clip
- Select the clip and go to the FCPX blend mode dropdown menu located on the top-right of your screen
- Click on the Overlay and adjust the opacity of the film grain overlay as required.
Part 3: What Other Factors Contribute to Film-Look Videos
While making cinematic-look videos, also considering the following factors:
Framing
While filming, one must be aware of the emotion to be captured in the frame. For this purpose, follow the “Rule of Thirds,” which means to divide your short into three horizontal and vertical sections and select the third shot to produce some effect.
Tilt Shift
Instead of shooting your clips with a UHD camera, you can add cinematic effect with the Tilt-shift feature by setting the focus of your video. For this purpose, right-click on the video, select Power Tool and check the box with the option Apply Tilt-shift to the clip. Use the slider to adjust the focus.
Background Music
Cinematic clips without background music seem to be unexciting and boring. Adding melodious background music makes your videos look more professional and enjoyable. You can add default music or your favorite music downloaded from the internet by clicking on the Music tab.
Titles and Subtitles
Adding subtitles to your videos can make them understandable for viewers who speak a different language. Click on Text/Credit in Filmora and select Subtitles to add subtitles to your video.
Part 4: How to Add Cinematic Look to Your Footage in Easy Ways
Filmora is an advanced video editing tool developed by Wondershare. Its user-friendly and easy-to-understand interface makes it popular among beginners as well as professionals. And the best thing about Filmora is that the editor provides rich options of presets, effects, and filters to add a film look to your video.
Here’s how you can add a cinematic look to your footage with Filmora.
1, choose Effect
2, search for “cinematic” or “film”
3, drag the effect you like to the timeline
4, done!
Simple steps, right? For more stunning effects and film-look packages, try filmstock !
Conclusion
Get rid of unexciting and dull videos with no animations or effects. It’s time to add a cinematic look to your videos to make them look more professional and elegant.
A variety of tools and applications are available to make cinematic look videos such as Final Cut Pro X and Filmora. Both these software offers advanced video editing features and allow you to make high-resolution cinematic-look videos. You can adjust various aspects of your video such as colors, aesthetics, resolution, motion, frame rate, composition, and camera movements with these two applications.
Caroline Laurent
Caroline Laurent is a writer and a lover of all things video.
Follow @Caroline Laurent
Also read:
- New In 2024, Free Up Space Fast The Ultimate FCPX Storage Cleanup Guide
- Updated Unleash Your Creativity Top Free Video Editors for Chrome OS for 2024
- Updated 2024 Approved Reduce WebM File Size Top Online Compressors
- Updated In 2024, 10 Open-Source Video Editing Software Options for Linux
- Windows Movie Maker Free Download and Setup A Beginners Tutorial for 2024
- Updated In 2024, Transform Your Video How to Flip a Clip in Final Cut Pro
- Meme Magic 10 Best Apps to Create Hilarious Content for 2024
- New In 2024, Edit Like a Pro GoPro Quik Review & Best PC Alternatives for Video Editing
- Updated 2024 Approved Top TikTok Watermark Erasers Remove Logos in Seconds
- New The Ultimate Showdown Adobe Premiere vs After Effects for Video Creators
- New Free Video Splitter Online and Offline Editors for Dual-Screen Videos for 2024
- New In 2024, Basic Video Editing Solutions for Everyone
- Updated In 2024, Best Premiere Pro Transition Plugins Expert Picks
- Voice Over Mastery Essential FCP Recording Hacks for 2024
- Updated 2024 Approved Take Your WhatsApp Status to the Next Level Top Editing Apps
- 2024 Approved Transform Your Videos Best Time-Lapse Editing Apps for Mobile
- Updated In 2024, Mastering Animation Drawing The 7 Best Software Solutions
- 2024 Approved Mastering Text-to-Speech Essential Conversion Techniques
- Updated In 2024, No Watermark, No Problem 7 Video Merger Solutions
- Updated 2024 Approved MP4 to MP3 Conversion on Mobile The Best Apps and Tools
- New Mastering Video Editing on Mac A Yosemite Guide
- Updated 2024 Approved Try Before You Buy Final Cut Pro 90-Day Free Trial
- In 2024, The Ultimate List 10 Best Free Online Video Looping Software
- Updated 2024 Approved Official 100 Valid Wondershare Filmora Coupon Code Up to 54 OFF
- New In 2024, Best Online TikTok Watermark Removers You Should Try
- New 2024 Approved No Watermark, No Problem Free and Paid Solutions for Filmora
- Updated In 2024, The 10 Most Popular Video Aspect Ratio Editors
- Updated In 2024, No-Cost Game Video Editing Top Software Recommendations
- Updated From Boring to Brilliant 10 Animated Text Converters Youll Love for 2024
- New MP4 Video Editing on a Budget Top 10 Free Tools for 2024
- Updated 2024 Approved FCPX Hacks and Workarounds Expert Advice for Smooth Editing
- 2024 Approved S Top Picks Android Video Editor Apps Compatible with Chromebook
- New Say Goodbye to Software Top Easy Video Merger Alternatives for 2024
- New Refine Your Footage How to Stabilize Videos Like a Pro in AE for 2024
- Updated Unleash Your Voice Top Mac Speech-to-Text Software Thats Free and Easy to Use
- Updated In 2024, Say Goodbye to Windows 10 Photos Top Alternative Photo Editors
- Updated The Ultimate Guide to Motion Tracking on Android and iPhone
- New In 2024, Discover the Best Public Domain Video Libraries Online
- In 2024, The Best of the Best Top MTS Video Editing Software 2023
- In 2024, Take Your Video Creations to the Next Level with 64-Bit Editing
- New In 2024, Top Free WMV Video Assembly Tools for Seamless Playback
- Updated In 2024, Flip, Rotate, and Spin The Ultimate Guide to Online Video Rotators
- Unlock FCP X Advanced Chroma Keying Techniques for Video Editors for 2024
- What Legendaries Are In Pokemon Platinum On Samsung Galaxy F15 5G? | Dr.fone
- New Best of the Best 28 Video to GIF Converter Options
- AddROM Bypass An Android Tool to Unlock FRP Lock Screen For your Lava
- Complete Tutorial to Use VPNa to Fake GPS Location On Vivo V29 Pro | Dr.fone
- A Step-by-Step Guide on Using ADB and Fastboot to Remove FRP Lock from your Google Pixel 8
- Discover Your Images Hidden Ratio with Our Calculator for 2024
- Reliable User Guide to Fix Honor Magic 5 Lite Running Slow and Freezing | Dr.fone
- How to Fake Snapchat Location without Jailbreak On Oppo F25 Pro 5G | Dr.fone
- How To Leave a Life360 Group On Samsung Galaxy F04 Without Anyone Knowing? | Dr.fone
- In 2024, Bypass iCloud Activation Lock with IMEI Code From your Apple iPhone 13 Pro Max
- Quik for PC A Guide to Using GoPros Video Editor and Its Alternatives
- In 2024, Proven Ways in How To Hide Location on Life360 For Motorola Edge 40 Neo | Dr.fone
- Updated Video in Text Cinematic Intro【Filmora Tutorial】
- In 2024, How to Change Location on TikTok to See More Content On your Lava Blaze 2 5G | Dr.fone
- Life360 Learn How Everything Works On Tecno Spark 10 Pro | Dr.fone
- New In 2024, How to Add Subtitles/Captions in Final Cut Pro X?
- Complete guide for recovering music files on Realme C67 5G
- New AVI Editor for Windows 11/10/8.1/8/7 Easily Edit AVI Files on PC
- Bricked Your Poco X6 Pro? Heres A Full Solution | Dr.fone
- In 2024, 5 Techniques to Transfer Data from Vivo X Fold 2 to iPhone 15/14/13/12 | Dr.fone
- How to Recover Deleted Videos from iPhone X Without Backup? | Stellar
- How To Change Vivo Y77t Lock Screen Clock in Seconds
- New In 2024, How to Translate TikTok Videos? All You Want to Know
- How To Unbrick a Dead Vivo Y55s 5G (2023) | Dr.fone
- How To Fix Part of the Touch Screen Not Working on Poco M6 5G | Dr.fone
- In 2024, The Ultimate Guide to Get the Rare Candy on Pokemon Go Fire Red On Samsung Galaxy F15 5G | Dr.fone
- In 2024, How to Transfer from Apple iPhone XS Max to iPhone 8/X/11 | Dr.fone
- In 2024, A Perfect Guide To Remove or Disable Google Smart Lock On Oppo Reno 11 5G
- In 2024, Does Airplane Mode Turn off GPS Location On Motorola Moto G14? | Dr.fone
- Title: New 2024 Approved The Best of the Best Top Premiere Pro Transition Effects
- Author: Morgan
- Created at : 2024-04-28 05:32:47
- Updated at : 2024-04-29 05:32:47
- Link: https://ai-video-tools.techidaily.com/new-2024-approved-the-best-of-the-best-top-premiere-pro-transition-effects/
- License: This work is licensed under CC BY-NC-SA 4.0.
