
:max_bytes(150000):strip_icc():format(webp)/how-to-change-your-tiktok-username-and-profile-picture-048cd3c3b4854846ab46f920e862332f.jpg)
New 2024 Approved Loop Your Videos with Ease 10 Best Free Online Looping Tools
Loop Your Videos with Ease: 10 Best Free Online Looping Tools
Top 10 Free Online Video Loopers 2024

Ollie Mattison
Mar 27, 2024• Proven solutions
If you find a particular section of a video or an entire clip quite interesting and wish that you, your friends, or the target audience on your social networking account should also view that interesting part, again and again, it would be a good idea to play the footage in repeat mode. This is where the loopers come into play as they allow you to configure the video loop multiple times.
Therefore, below is a list of free video looper web solutions that, as per their policies, allow you to set the segment of footage to play repeatedly.
Top 10 Free Online Video Loopers
Note: Although the following list introduces the 10 best video looper online apps, each of them may vary in their nature, level of granularity they offer while setting up the loops, or the size of video they can accept in a single session.
1. Filmora Video Editor - [Free Trial, for Windows or Mac Computer]

If you need more powerful video looper, online tools may be not the first choice. You can have a try Filmora video editor. Filmora offers a unique balance between beginner-friendly video editing software and a feature-rich tool that even experts can edit on. This means anyone can use it to create any video editing project they like.
Making a loop video with Filmora is as easy as spreading warm butter on toast. Just open the program, click on New Project, and follow these simple steps to loop video on Filmora .
2. Clideo Loop Video
Loop Video is not the only feature that Clideo offers, and the web portal can be used as a beginners’ gear to form a strong foundation for anyone who is planning to get a career in the post-production industry. When talking about the solution’s video looper online feature, the interface is well-balanced, with no distracting adverts to hinder your operations.
How to loop video with Clideo?
- Launch any web browser and go to https://clideo.com/editor/loop-video
- Use your preferred method to upload the source video
- Choose an output format from the Format menu at the bottom-left corner of the new page that appears
- From the Loop this clip section on the right, choose how many times you want the video to loop
- Click Loop from the bottom-right corner of the page
- Wait while Clideo prepares your video
- Click Download (or choose your preferred download location) from the next page to obtain the clip once the process completes
Pros
- Lets you produce a looped video an unlimited number of times (at the cost of converting the clip to GIF format)
- Lets you edit the videos post-processing for better output
Cons
- Requires a subscription plan to be purchased to remove the watermark from the output videos
3. Kapwing Loop Video
Kapwing is another multipurpose multimedia and post-production solution that is also a free video looper with a couple of lucrative features. The web solution has a built-in video maker, meme maker, video resizer, GIF editor to add audio, video trimmer, and much more. The portal is trustworthy and is used by giants like Spotify, Amazon, Sony, etc.
How to use Kapwing to loop video?
- Use your preferred web browser to go to https://www.kapwing.com/tools/loop-video
- Click Upload to upload or paste the YouTube URL of the source clip in the given field
- Click Trim Video from the top-left section of the right window (Optional)
- Choose the number of times the video should loop from the Loop this clip section present at the top of the left pane
- Click CREATE from the bottom-left corner
- Edit (optional) and/or download the processed clip from the next page
Pros
- Generates a unique URL that can be used to share with people or on social networking sites
- Requires no registration as long as you are OK with the watermark. Registration is free
Cons
- Free users can upload videos of as long as up to 7 minutes with a file size of up to 250MB in a single session
4. FileConverto Online Video Loop
Offering a plethora of video and audio tools like compressor, joiner, trimmer, and much more, FileConverto is also an MP4 looper that can accept your files from your PC, and can easily loop them multiple times as needed. All the other tools, including the video loop offered with the online solution, are free to use.
How to loop video with FileConverto?
- Go to https://www.fileconverto.com/loop-repeat-video/ using your favorite web browser
- Click Browse on the webpage and upload the source video file
- From the available drop-down list, choose the number of times you want your video to loop
- Click Submit Now
- Wait while the portal processes the video
- Click Download File to save the output clip to your PC
Pros
- Requires no registration or paid subscription plan whatsoever
- The entire process can be completed in 3 simple steps
Cons
- Doesn’t allow to trim the videos or choose their output format
5. Animaker
A decent and feature-equipped tool that not only allows you to loop your videos, it also enables you to add text effects, animated characters, background images and music, objects, and many other such elements to the clips in order to make them more interesting and engaging for the target audience.
How to loop video with Animaker Online?
- Go to https://app.animaker.com/dashboard using any web browser of your choice
- Sign up for an account using your preferred method
- From the left pane, go to Create > Create a video > Blank Page
- Click Upload from the lower section of the navigation pane on the left
- Upload a clip from your PC
- Drag the clip from the Media bin to the Workspace at the center of the page
- Click the Duplicate button present at the bottom of the clip’s thumbnail in the right panel to add a video loop.
Note: You can click the Duplicate button as many times as you want the clip to loop for
- Click Publish from the top-right corner
- Click Download to download the processed video to your PC. Alternatively, choose any other option to share the clip on your preferred social media platform
Pros
- Has plenty of robust and efficient tools to granularly prepare your videos
- Allows you to add multiple elements to the clips before enabling loops
Cons
- A paid subscription is required to remove the watermark
6. Rocketium
A web solution for both indie professionals and teams, Rocketium still allows you to loop your footage for free. All you need to do is, upload the video to the portal, make the required adjustments as per your preferences, and download the processed clip to your PC without any hindrance.
Process of looping video with Rocketium
- Go to https://rocketium.com/is/video-looper/ on your web browser
- Click Upload a file
- Select and upload a clip from your PC
- Choose the number of loops for your video from the right section
- Click Loop Video
- Click Download to save the processed output on your computer
Pros
- Allows video loop at absolutely no cost
- The entire process can be completed in 3 simple steps
Cons
- Registration is required to edit the videos
7. LoopTube
LoopTube is an online YouTube video loop portal that lets you repeat the entire clip or its particular section an unlimited number of times. The best thing is, that the landing page itself has all the features and options, and the entire interface is extremely easy to use, even by those who have least or absolutely no knowledge about video editing or looping.
How to use LoopTube to loop video?
- Launch a web browser on your computer and go to https://looptube.io/
- Paste the URL of the YouTube video in the available field at the top
- Click the Search button to allow LoopTube to search and access the clip
- Use the left and right handles from below the player window to select the segment in the video you want to loop for an unlimited number of times
Pros
- Absolutely free to use
- Lets you select a segment of the video for infinite loop
Cons
- Doesn’t allow you to download or share the output video
8. VEED.IO
A complete online post-production tool for both beginners and professionals, VEED.IO is enriched with plenty of tools to make your source clips look much more engaging, interesting, and informative. While the subscriptions start from $0.00 USD to $24.00 USD per month, the videos can be uploaded, looped, and downloaded for free.
How to loop video with Veed.io?
- Make sure to download the video you want to loop to your local hard drive
- Use a web browser to go to https://www.veed.io/tools/video-looper
- Click Get Started Now
- Use your preferred method to upload the source video
- Use the Playhead (Skimmer) in the Timeline at the bottom to go to a frame, and click Split to split the clip as needed
- Select the unwanted segment and press Delete on your keyboard to remove
- Drag the remaining part to place it in your preferred position
- Click Add Video to add the same clip to the portal again
- Repeat the above step as many times as you want the clip to loop for
- Click Export from the top-right corner, and wait while VEED.IO renders the uploaded video(s)
- Use your preferred method to download or share the output footage when done
Pros
- Free to use
- Has several options to edit and decorate your footage before looping
Cons
- A paid subscription is needed to remove the watermark
9. WoFox Loop Video Tool
A free solution for video loop and making other adjustments to your source footage, WoFox is a decent web app for graphic designing, animated designs, photo collages, logo creation, and much more. The tool can also create animated lyrics and video songs that could be used to impart information or practice singing.
How to loop video with WoFox?
- On your Internet browser, go to https://www.wofox.com/video-editing-tools/loop-video
- Click Upload and select the number of loops from the Loop video section in the left pane
- Click Download from the top-right corner of the page
Pros
- Absolutely free to use
- Is equipped with several other video editing tools
Cons
- Subscription plans are hefty if you ever plan to use the tool for business purposes
- At the time of this writing, the tool doesn’t work with Mozilla Firefox
10. Video Looper Chrome Extension
A free tool that works with the Google Chrome web browser, Video Looper is a Chrome Extension that can be added and enabled in order to loop the videos that you play on YouTube. Post adding, the extension automatically gets enabled as soon as it detects an eligible YouTube video on Chrome. Once enabled, you can even detach the panel to use it independently.
How to use the Chrome extension to loop video?
- Launch Google Chrome and go to https://chrome.google.com/webstore/detail/video-looper/cakhljgchfghghfapljifddkaomfijcn
- Click Add to Chrome, and then click Add Extension when the confirmation box pops up
- Close and then reopen Google Chrome
- Go to the YouTube’s clip URL that you want to video loop
- Click the Video Looper icon from the top-right corner of the browser
- Click Create Repeat
- Enter a value (the number of times you want to loop the video) in the Repeat Times field
- Optionally enter the relevant values in the Start Time and End Time fields to trim the footage
- Click Create
- Click Start & Play on the next box that appears to play the YouTube video for the number of times you specified
Pros
- Free to use
- Can create an unlimited number of presets to play the videos in loops
Cons
- Doesn’t allow you to download the videos
Summary
Depending on your budget, frequency of video loop requirements, and the level of details you need while preparing a full-fledged video with repetitions, you can choose any of the tools explained above. However, if you need a comparatively better solution, Wondershare UniConverter would be your best bet as it is not merely a free video looper, it also offers several other features to get a complete output with quite granular edits.
Ollie Mattison
Ollie Mattison is a writer and a lover of all things video.
Follow @Ollie Mattison
Ollie Mattison
Mar 27, 2024• Proven solutions
If you find a particular section of a video or an entire clip quite interesting and wish that you, your friends, or the target audience on your social networking account should also view that interesting part, again and again, it would be a good idea to play the footage in repeat mode. This is where the loopers come into play as they allow you to configure the video loop multiple times.
Therefore, below is a list of free video looper web solutions that, as per their policies, allow you to set the segment of footage to play repeatedly.
Top 10 Free Online Video Loopers
Note: Although the following list introduces the 10 best video looper online apps, each of them may vary in their nature, level of granularity they offer while setting up the loops, or the size of video they can accept in a single session.
1. Filmora Video Editor - [Free Trial, for Windows or Mac Computer]
If you need more powerful video looper, online tools may be not the first choice. You can have a try Filmora video editor. Filmora offers a unique balance between beginner-friendly video editing software and a feature-rich tool that even experts can edit on. This means anyone can use it to create any video editing project they like.
Making a loop video with Filmora is as easy as spreading warm butter on toast. Just open the program, click on New Project, and follow these simple steps to loop video on Filmora .
2. Clideo Loop Video
Loop Video is not the only feature that Clideo offers, and the web portal can be used as a beginners’ gear to form a strong foundation for anyone who is planning to get a career in the post-production industry. When talking about the solution’s video looper online feature, the interface is well-balanced, with no distracting adverts to hinder your operations.
How to loop video with Clideo?
- Launch any web browser and go to https://clideo.com/editor/loop-video
- Use your preferred method to upload the source video
- Choose an output format from the Format menu at the bottom-left corner of the new page that appears
- From the Loop this clip section on the right, choose how many times you want the video to loop
- Click Loop from the bottom-right corner of the page
- Wait while Clideo prepares your video
- Click Download (or choose your preferred download location) from the next page to obtain the clip once the process completes
Pros
- Lets you produce a looped video an unlimited number of times (at the cost of converting the clip to GIF format)
- Lets you edit the videos post-processing for better output
Cons
- Requires a subscription plan to be purchased to remove the watermark from the output videos
3. Kapwing Loop Video
Kapwing is another multipurpose multimedia and post-production solution that is also a free video looper with a couple of lucrative features. The web solution has a built-in video maker, meme maker, video resizer, GIF editor to add audio, video trimmer, and much more. The portal is trustworthy and is used by giants like Spotify, Amazon, Sony, etc.
How to use Kapwing to loop video?
- Use your preferred web browser to go to https://www.kapwing.com/tools/loop-video
- Click Upload to upload or paste the YouTube URL of the source clip in the given field
- Click Trim Video from the top-left section of the right window (Optional)
- Choose the number of times the video should loop from the Loop this clip section present at the top of the left pane
- Click CREATE from the bottom-left corner
- Edit (optional) and/or download the processed clip from the next page
Pros
- Generates a unique URL that can be used to share with people or on social networking sites
- Requires no registration as long as you are OK with the watermark. Registration is free
Cons
- Free users can upload videos of as long as up to 7 minutes with a file size of up to 250MB in a single session
4. FileConverto Online Video Loop
Offering a plethora of video and audio tools like compressor, joiner, trimmer, and much more, FileConverto is also an MP4 looper that can accept your files from your PC, and can easily loop them multiple times as needed. All the other tools, including the video loop offered with the online solution, are free to use.
How to loop video with FileConverto?
- Go to https://www.fileconverto.com/loop-repeat-video/ using your favorite web browser
- Click Browse on the webpage and upload the source video file
- From the available drop-down list, choose the number of times you want your video to loop
- Click Submit Now
- Wait while the portal processes the video
- Click Download File to save the output clip to your PC
Pros
- Requires no registration or paid subscription plan whatsoever
- The entire process can be completed in 3 simple steps
Cons
- Doesn’t allow to trim the videos or choose their output format
5. Animaker
A decent and feature-equipped tool that not only allows you to loop your videos, it also enables you to add text effects, animated characters, background images and music, objects, and many other such elements to the clips in order to make them more interesting and engaging for the target audience.
How to loop video with Animaker Online?
- Go to https://app.animaker.com/dashboard using any web browser of your choice
- Sign up for an account using your preferred method
- From the left pane, go to Create > Create a video > Blank Page
- Click Upload from the lower section of the navigation pane on the left
- Upload a clip from your PC
- Drag the clip from the Media bin to the Workspace at the center of the page
- Click the Duplicate button present at the bottom of the clip’s thumbnail in the right panel to add a video loop.
Note: You can click the Duplicate button as many times as you want the clip to loop for
- Click Publish from the top-right corner
- Click Download to download the processed video to your PC. Alternatively, choose any other option to share the clip on your preferred social media platform
Pros
- Has plenty of robust and efficient tools to granularly prepare your videos
- Allows you to add multiple elements to the clips before enabling loops
Cons
- A paid subscription is required to remove the watermark
6. Rocketium
A web solution for both indie professionals and teams, Rocketium still allows you to loop your footage for free. All you need to do is, upload the video to the portal, make the required adjustments as per your preferences, and download the processed clip to your PC without any hindrance.
Process of looping video with Rocketium
- Go to https://rocketium.com/is/video-looper/ on your web browser
- Click Upload a file
- Select and upload a clip from your PC
- Choose the number of loops for your video from the right section
- Click Loop Video
- Click Download to save the processed output on your computer
Pros
- Allows video loop at absolutely no cost
- The entire process can be completed in 3 simple steps
Cons
- Registration is required to edit the videos
7. LoopTube
LoopTube is an online YouTube video loop portal that lets you repeat the entire clip or its particular section an unlimited number of times. The best thing is, that the landing page itself has all the features and options, and the entire interface is extremely easy to use, even by those who have least or absolutely no knowledge about video editing or looping.
How to use LoopTube to loop video?
- Launch a web browser on your computer and go to https://looptube.io/
- Paste the URL of the YouTube video in the available field at the top
- Click the Search button to allow LoopTube to search and access the clip
- Use the left and right handles from below the player window to select the segment in the video you want to loop for an unlimited number of times
Pros
- Absolutely free to use
- Lets you select a segment of the video for infinite loop
Cons
- Doesn’t allow you to download or share the output video
8. VEED.IO
A complete online post-production tool for both beginners and professionals, VEED.IO is enriched with plenty of tools to make your source clips look much more engaging, interesting, and informative. While the subscriptions start from $0.00 USD to $24.00 USD per month, the videos can be uploaded, looped, and downloaded for free.
How to loop video with Veed.io?
- Make sure to download the video you want to loop to your local hard drive
- Use a web browser to go to https://www.veed.io/tools/video-looper
- Click Get Started Now
- Use your preferred method to upload the source video
- Use the Playhead (Skimmer) in the Timeline at the bottom to go to a frame, and click Split to split the clip as needed
- Select the unwanted segment and press Delete on your keyboard to remove
- Drag the remaining part to place it in your preferred position
- Click Add Video to add the same clip to the portal again
- Repeat the above step as many times as you want the clip to loop for
- Click Export from the top-right corner, and wait while VEED.IO renders the uploaded video(s)
- Use your preferred method to download or share the output footage when done
Pros
- Free to use
- Has several options to edit and decorate your footage before looping
Cons
- A paid subscription is needed to remove the watermark
9. WoFox Loop Video Tool
A free solution for video loop and making other adjustments to your source footage, WoFox is a decent web app for graphic designing, animated designs, photo collages, logo creation, and much more. The tool can also create animated lyrics and video songs that could be used to impart information or practice singing.
How to loop video with WoFox?
- On your Internet browser, go to https://www.wofox.com/video-editing-tools/loop-video
- Click Upload and select the number of loops from the Loop video section in the left pane
- Click Download from the top-right corner of the page
Pros
- Absolutely free to use
- Is equipped with several other video editing tools
Cons
- Subscription plans are hefty if you ever plan to use the tool for business purposes
- At the time of this writing, the tool doesn’t work with Mozilla Firefox
10. Video Looper Chrome Extension
A free tool that works with the Google Chrome web browser, Video Looper is a Chrome Extension that can be added and enabled in order to loop the videos that you play on YouTube. Post adding, the extension automatically gets enabled as soon as it detects an eligible YouTube video on Chrome. Once enabled, you can even detach the panel to use it independently.
How to use the Chrome extension to loop video?
- Launch Google Chrome and go to https://chrome.google.com/webstore/detail/video-looper/cakhljgchfghghfapljifddkaomfijcn
- Click Add to Chrome, and then click Add Extension when the confirmation box pops up
- Close and then reopen Google Chrome
- Go to the YouTube’s clip URL that you want to video loop
- Click the Video Looper icon from the top-right corner of the browser
- Click Create Repeat
- Enter a value (the number of times you want to loop the video) in the Repeat Times field
- Optionally enter the relevant values in the Start Time and End Time fields to trim the footage
- Click Create
- Click Start & Play on the next box that appears to play the YouTube video for the number of times you specified
Pros
- Free to use
- Can create an unlimited number of presets to play the videos in loops
Cons
- Doesn’t allow you to download the videos
Summary
Depending on your budget, frequency of video loop requirements, and the level of details you need while preparing a full-fledged video with repetitions, you can choose any of the tools explained above. However, if you need a comparatively better solution, Wondershare UniConverter would be your best bet as it is not merely a free video looper, it also offers several other features to get a complete output with quite granular edits.
Ollie Mattison
Ollie Mattison is a writer and a lover of all things video.
Follow @Ollie Mattison
Ditch Vegas Pro? Explore These 10 Mac-Friendly Video Editing Alternatives
For creating high-grade dynamic videos, simply shooting or recording a clip is not enough. Finding the best Sony Ve gas alternatives for Mac is essential since the software mainly targets Windows users.
Thanks to developers, there are many free and paid options to start your video editing journey on a Mac. Let’s first have a look at alternative software you could consider.
- Lightworks
- Wondershare Filmora
- Adobe Premiere Pro
- HitFilm Express
- Kdenlive
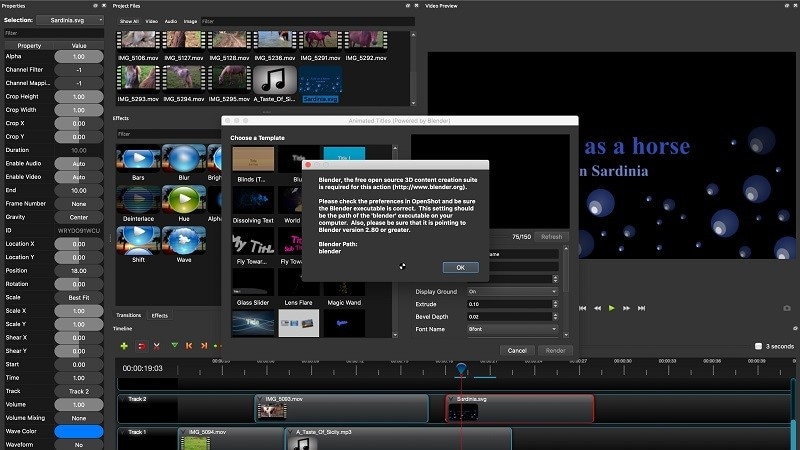
- OpenShot
- Blender
- Jahshaka
- Final Cut Pro
- Cyberlink PowerDirector 365
- What are the limitations when using Sony Vegas (Vegas Pro) on Mac?
- Hot FAQs about Vegas Pro Alternatives
Part 1: Sony Vegas Pro Alternatives & Competitors Overview
Here is a list of the top 10 tools we found after research. For an easier understanding, the following are the essential points of difference between alternative video editing software types for Sony Vegas Pro in a tabular form.
| Software | Supported OS | Price | Editor’s Verdict |
|---|---|---|---|
| Lightworks | Windows, Mac, Linux | Create-$9.99/month, Pro-$23.99/month | Medium-Difficult |
| Wondershare Filmora | Windows, Mac | Annual-$49.99, Perpetual-$79.99 | Easy |
| Adobe Premiere Pro | Windows, Mac | $20.99/month | Easy-Medium |
| HitFilm Express | Windows, Mac | Free | Easy |
| Kdenlive | Windows, Mac, Linux | Free | Medium-Difficult |
| OpenShot | Windows, Mac, Linux, OsX | Free | Medium-Difficult |
| Blender | Windows, Mac, Linux | Free | Easy |
| Jahshaka | Windows, Linux, OsX | Free | Easy-Medium |
| Final Cut Pro | Mac | Lifetime-$299.99 | Easy-Medium |
| Cyberlink PowerDirector 365 | Windows, Mac | Lifetime-$52.50 | Easy-Medium |
Part 2: Top 10 Sony Vegas (Vegas Pro) Alternatives & Competitors
Now that you know the primary differences between the Sony Vegas Pro alternatives. Are you find anything you like? Let’s move on to more details for your further consideration.
1. Lightworks
With Lightworks, using the independent timeline codec, format, and resolution alteration in videos is extremely simple. In addition, you can use the multi-cam editing feature for real-time, high-quality editing work. Moreover, drag and drop elements into videos for optimized video editing work, including pre-existing Storyboard points.
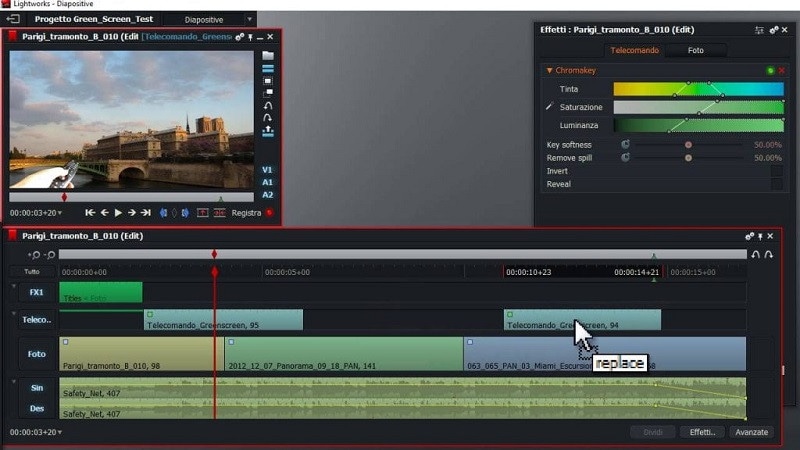
Main Features:
- Industry-grade features like QC, transcoding, and automated transfer are available.
- Edit files at different FPS limits and use three-point editing for recording/source files.
- Insert files and overwrite on a new project, replace, backfill, and fit to fill your video clips.
- Attach Storyboard tiles and match-frame clips/sub-clips easily.
Pros
- Flexible functionality and speedy transfers
- Edit files with professional movie-like quality
- Auto Sync feature for automatic timeline re-syncing is available
Cons
- Direct X is only available on the Windows version
- TotalFX plugin is not available for free- you have to upgrade to use them
OS Compatibility: Windows , Mac , Linux
Best For: Editing experts creating visually animated and professional-looking short videos can work with Lightworks.
What users say:
For professional-level video editing work, Lightworks brings a lot of resources and elements to users. According to reviews , people who have tried it have experienced better video editing functionality with these resources.
2. Wondershare Filmora
The top Vegas Pro alternative that both Windows and Mac users can opt for is Filmora. The software has advanced AI-incorporated editing functions for automated editing work, including preset effects from FX plugins. Besides that, you can easily add pre-set transitions, audio clips, text, images, and more.
Beginners find it simple to navigate through its interface and can opt for the Instant Mode function for automatic video edits .
Free Download For Win 7 or later(64-bit)
Free Download For macOS 10.14 or later

For a better idea of how this works, you should check out this tutorial video: https://filmora.wondershare.com/get-creative/make-a-video-quickly.html
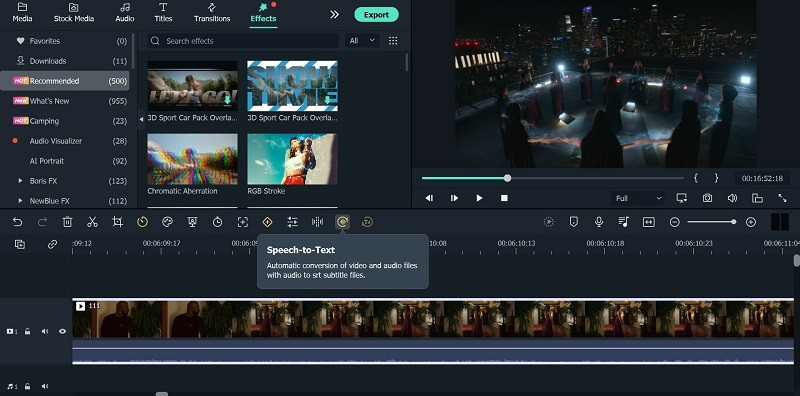
Main Features:
- Instant Mode is available for automatic video/audio project editing out of 6 shorter clips.
- Support Advanced editing tools like Chroma Key and AI Portrait.
- Record voiceover, apply speech-to-text/text-to-speech functions, and more audio editing features.
- OpenFX plugins like BorisFX and NewBlue FX for a better list of pre-set effects.
Pros
- Simple to use and navigate on the editor timeline, especially with drag-and-drop support
- Output your editing files in different video/audio formats
- Quickly share the file on Vimeo or YouTube, besides downloading it on the local hard drive
Cons
- Free trial users cannot bring their Instant Mode-created videos into the editor timeline
- 4K support only with selected MKV, MOV, M4V (for Mac), and MP4 codecs
OS Compatibility: Windows , Mac
G2 Rating: 4.4 out of 5
Best For: All types of users like educators, students, homeowners, businesses, and video editors for comprehensive video editing tools and uses.
What users say:
Filmora is extremely simple to use, with advanced features available for top-level video editing work. Users mention in reviews how they have benefitted from the simple functionality and dynamic AI-based features available here for video editing.
3. Adobe Premiere Pro
If you are looking for high-quality programs like Sony Vegas, Adobe Premiere Pro is a reliable choice. This editing software allows you to easily create, delete, and move big video projects. Moreover, you can work on multiple files simultaneously and use shortcuts for faster editing work.
Preset filters and editing features are also available here, especially if they choose the Adobe Creative Cloud option.
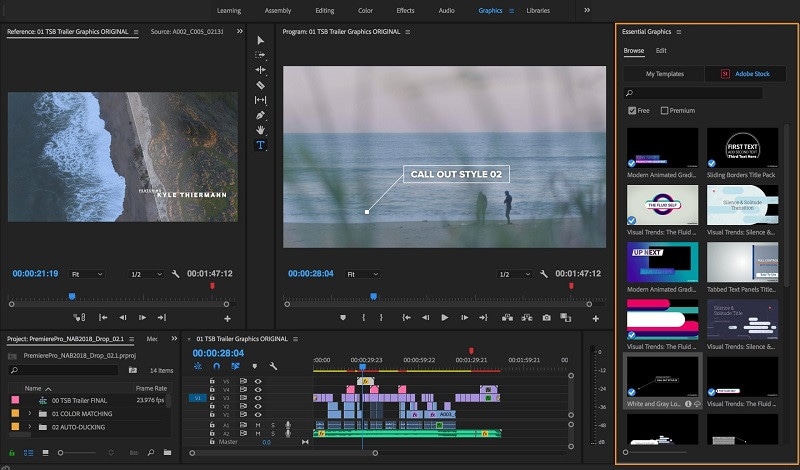
Main Features:
- Multiple pre-set transitions and effects are available for quick thematic changes.
- Add graphics, titles, and captions.
- Color grading and correction tools are available.
- It is possible to add keyframing and animation elements.
Pros
- Opting for group plans for video editing practice and learning using Adobe Premiere Pro is possible
- Aligns audio with videos instantly during editing
- Utilize Quick Export functionality for video files in some taps
Cons
- Windows High Contrast Mode is supported but to a limited extent, like with menus and title bars
- HDR workflows can only be handled on the Windows version with DisplayHDR 400 support
OS Compatibility: Windows , Mac
G2 Rating: 4.5 out of 5
Best For: Professional editors and trainers can use the various plans under Adobe Premiere Pro for video/audio editing.
What users say:
Advertisers and videographers enjoy high-grade video editing features and like the simple effects and interface quality. The motion graphics support in Adobe Premiere Pro is high-grade as well.
4. HitFilm Express
A capable Sony Vegas free alternative that you should check out is HitFilm Express. With this, you can expect many prepared designs for quick video edits. Additionally, you can manually customize the video files you are working on with high-grade personalization features available in the timeline.

Main Features:
- Pre-set customizable designs are available.
- Built-in sound effects and soundtracks are usable for free.
- Cache renders in timelines are optimized.
- The New Grade Clips feature allows users to apply varying effects to many video clips.
Pros
- Stable process of switching between timelines with an active orbit tool
- Easy to switch between 2D/3D timelines while using the text tool
- Simple to use for an unlimited period
Cons
- Does not work on older versions than Windows 10 and macOS 10.14
- Users cannot integrate this with Vegas Pro like before
OS Compatibility: Windows , Mac
TechRadar Rating: 4.5 out of 5
Best For: This software is a high-quality video editor for custom video editing work, fit for beginners and professionals alike.
What users say:
HitFilm Express is easy to use and efficient in the market for professional-level editing. The tutorial is available here for quick learning about the steps, and expandable features are well-admired by users.
5. Kdenlive
A high-quality Sony Vegas open-source variety that you should seriously consider is Kdenlive. The video editor comes with MLT framework support and holds many tools for optimizing video editing.
To simplify, you can arrange and adjust various video/audio tracks and mute or lock specific ones as needed. Add everything from filters, texts, and transitions using this editor for high-grade video projects.
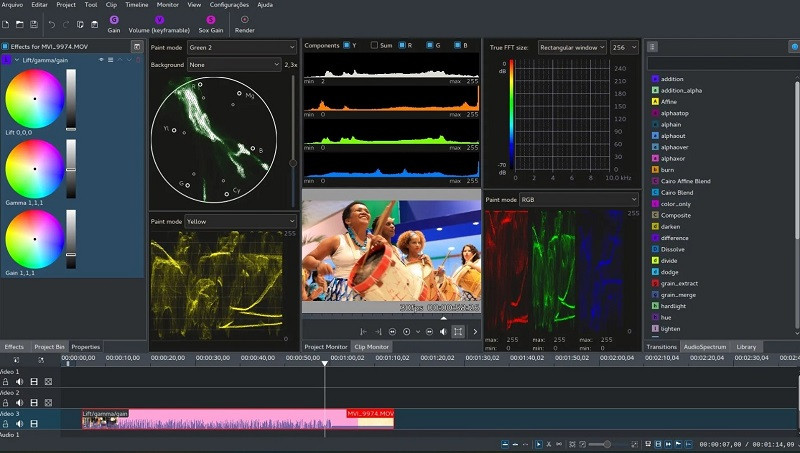
Main Features:
- Get an automatic backup of your video project while you are editing it.
- Use proxy editing to create low-resolution source clip copies and render them later on computers.
- Multiple video/audio scopes are available for monitoring projects like vectorscope, waveform, and RDB Parade.
- Many transition and effect choices to use.
Pros
- Flexibility with themes to add with multiple options
- Pre-render specific timeline parts for preview
- Effects are simple to use with keyframing quality
Cons
- Complex for completely non-technical users to adapt to
- Only supports 64-bit versions in regards to Windows-based compatibility
Trustpilot Rating: 3.7 out of 5
Best For: High-level editing experts who need strong video editing and monitoring features in an open-source platform.
What users say:
Kdenlive, as an open-source video editing software, assures quick and straightforward usability with projects. Per reviews , users like the ability to make simple video edits without bugs in this editor and quickly export finished projects.
6. OpenShot
OpenShot is a high-quality cross-platform video editor that you can use on different devices for quick but dynamic video project edits. Use keyframing ability here to adjust the animated elements you add to the file.
Moreover, cut the videos with simple steps and add many audio tracks/background videos/watermarks in layers. Also, get several video effects to optimize the video look easily.
Main Features:
- Adjust video speed in reverse motion, fast forward, and slow motion.
- Render effects and 3D animated elements into the video project.
- Get title templates and edit them as needed.
- Visualize the background audio beats with waveform support.
Pros
- Very user-friendly interface with a simple navigation guarantee
- Supports more than 70 languages that you can translate as well using LaunchPad
- Drag-and-drop functionality is supported for adding images, audio, and videos into the OpenShot editor timeline
Cons
- Some bug issues can occur
- Slightly complex learning curve
OS Compatibility: Windows , Linux , OsX
G2 Rating: 4.4 out of 5
Best For: Professional-level video editing experts can opt for this cross-platform free software for high-quality video creations.
What users say:
The OpenShot software is suitable for high-quality video editing across different devices and operating systems. Users like the lack of automated watermarks on all videos, its simple dashboard, and its multi-track editing ability, all available for free.
7. Blender
Blender is free video editing software like Sony Vegas that users can use for video editing, but it is also effective for game development with animations. Indeed, you can create and render dynamic-looking scenes with features like Cycles.
Furthermore, the software has a rich modelling toolset with solutions like curves and sculpting tools.

Main Features:
- Completely customization-friendly UI, shortcuts, and window layout here.
- Customization and scripting are possible to do with this software due to the Python API support.
- Supports access and integration of many pipeline tools for projects.
- Comes with advanced simulation-based features available in MantaFlow and Bullet libraries.
Pros
- Basic and advanced tools for quick video edits
- Strong composition and masking ability with object-based motion tracking benefits
- Easily create short animations with Blender
Cons
- Data under the standalone games created here fall under GPL conditions
- Strict licensing rules are applicable here
OS Compatibility: Windows , Mac , Linux
G2 Rating: 4.5 out of 5
Best For: Game developers and videographers for companies can use this open-source platform for creation and editing.
What users say:
Blender is a capable software for animation-based editing, with high-quality game-based features and interactive elements that make editing simple. As per reviews , users like the simple animation-based tools and fast rendering it offers.
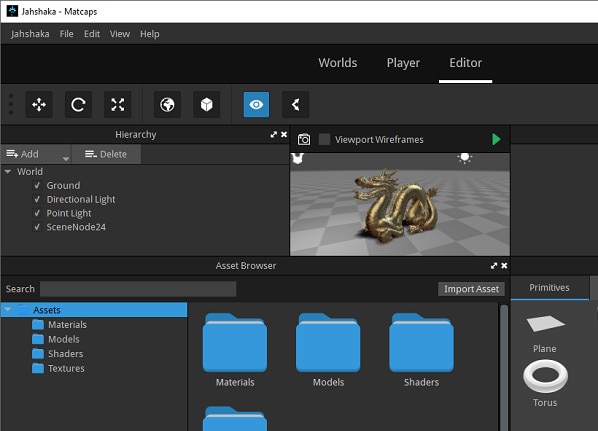
8. Jahshaka
Users of Jahshaka can experience an inclusive, collaborative environment for metaverse-level editing work. This free editing software, like Sony Vegas, focuses mainly on VR-based editing functions and comes with powerful tools for project management and content creation.
Take the help of other team members to collaborate on dynamic virtual world building, editing, and publishing.
Main Features:
- Compatible player for different desktop and mobile devices.
- Create diversified worlds and scenes with one comprehensive platform.
- Immersive software 3D video development.
- Access to pre-built content and libraries of scenes and assets
Pros
- Easily share and distribute your virtual projects
- Deliver final projects offline and online
- An interactive multi-user engine is available
Cons
- Usable for a niche audience and does not include standard video editing tools
- Jahshaka V2 legacy support is no longer active
OS Compatibility: Windows , Linux , OsX
SourceForge Rating: 4.4 out of 5
Best For: Professional video editors who want a collaborative experience in VR-based development and publishing.
What users say:
Jahshaka is a suitable program for optimized VR-based editing with many preset features and themes to choose from. Most users enjoy the new features and worlds and can work with them efficiently.
9. Final Cut Pro
One of the top Sony Vegas alternatives Mac users can safely turn to is Final Cut Pro, which has powerful modern video editing features. With this software, you will access Cinematic Mode, which you can use to create stylish and thematic video scenes.
Similarly, the Object Tracker features utilize ML technology to automatically detect objects and faces in moving videos. It can align effects and titles accurately with the graphical elements in videos.

Main Features:
- Object Tracker feature for using color correction and adding texts into moving videos.
- Accelerated functional for motion tracking with Apple Neural Engine.
- Add high-quality effects and titles into videos with Cinematic Mode support.
- Preset audio tracks and royalty-free sound effects are available for editing.
Pros
- Handle color grading for optimized scene quality
- Adjust the field depth and focus depth in clips
- Share projects across iOS and macOS platforms
Cons
- Not valid for Windows users
- Relatively high cost to avail the paid version with all advanced features
OS Compatibility: Mac
TrustRadius Rating: 4.8 out of 5
Best For: Professional video editors, students, and filmmakers who want to create cinematic-quality video projects.
What users say:
Final Cut Pro is an efficient Mac-based video editing tool with easy sharing and editing capabilities, rich effects/transitions options, and fast rendering ability. Customers enjoy the intuitive non-linear editor, easy accessibility to social media platforms for file exporting, and live scrubbing, as noted in one review .
10. Cyberlink PowerDirector 365
Another Sony Vegas mac alternative for Windows you should give a try is PowerDirector 365 from Cyberlink. This software removes or compiles video clips and uses masking features like image/custom masks.
Preset special effects, blending modes, and sound effects are available here for quick editing. Additionally, the AI-powered Motion Tracking traces objects in clips and adds graphics, animations, and text quickly in line with it.

Main Features:
- You can create and remove videos with masking features.
- Drag and drop the pre-set effects and texts into videos.
- Adjust video clips with tools for border, gradation, and shadowing.
- Multiple animations, callouts, graphics, and stickers to add to videos.
Pros
- Use green screen functionality for quick background removal or editing
- Automatic audio mastering and mixing functionality are available
- Keyframing benefits for customized animations like scaling and positioning
Cons
- Dolby Digital-centric audio codec is not available for users
- Users can try features like Room Echo Removal and NVIDIA A/V Denoise only on Windows 11
OS Compatibility: Windows
TechRadar Rating: 4.5 out of 5
Best For: Professional videographers and regular users who want a Windows-based video editing software for standard video clip editing.
What users say:
Cyberlink PowerDirector is a powerful video editor with standard editing functions many users have tried and benefited from. According to customers , the program has high-quality video and audio editing benefits for presentations, with additional effects/splitting/cropping features.
Part 3: What are the limitations when using Sony Vegas (Vegas Pro) on Mac?
Yes, with the given Sony Vegas alternatives, Mac and Windows users can benefit heavily. But why is it important to try for a replacement when Sony Vegas Pro is relatively efficient software?
To know the answer, you should take the time to understand its limitations, which do exist.
It only works for Windows users
The Sony Vegas Pro software is not available for Mac or other operating systems besides Windows. In addition, it’ll be really complex and time-consuming, even if you opt for virtual machine software or handle dual booting techniques to configure the software on your Mac or Linux.
You need to invest in other hardware
Sony Vegas Pro does do not work within one comprehensive platform like other capable video editing software types, like Wondershare Filmora . You have to acquire a powerful PC and tools to operate it separately. The software works very slowly on older devices.
Not incredibly unique
The functions of Sony Vegas Pro match somewhat with other options in the market. So, users would not expect much value in purchasing this software’s plans that they want to upgrade from their previous system, but on the other hand, the available features are mostly standard-level in functionality as well.
Hot FAQs about Vegas Pro Alternatives
After knowing these details, many users still have specific common queries about opting for a Sony Vegas Pro alternatively. So these are some common FAQs about this- answered.
1. Can Sony Vegas be used on a Mac?
No, it is impossible to directly use Sony Vegas on macOS devices since it does not support it. Instead, you have to separately use a dual boot strategy or virtual machine software to activate the video editor on Mac devices, but the process for that is complex.
2. Is Wondershare Filmora or Vegas Pro better?
Wondershare Filmora and Vegas Pro are top-level options in video and audio editing projects with professional-level editing accuracy. However, Filmora has a cohesive ecosystem with rich AI and standard functions and comes with Mac/Windows support. So, in that sense, Filmora is comparatively a better choice.
Final Words
In place of Sony Vegas Pro, any of these options would also give you a great user experience. Out of them, Filmora is one that we will recommend due to its multi-faceted benefits and features for Mac and Windows users. Ultimately, make your decision based on your particular needs.
Free Download For Win 7 or later(64-bit)
Free Download For macOS 10.14 or later
Part 1: Sony Vegas Pro Alternatives & Competitors Overview
Here is a list of the top 10 tools we found after research. For an easier understanding, the following are the essential points of difference between alternative video editing software types for Sony Vegas Pro in a tabular form.
| Software | Supported OS | Price | Editor’s Verdict |
|---|---|---|---|
| Lightworks | Windows, Mac, Linux | Create-$9.99/month, Pro-$23.99/month | Medium-Difficult |
| Wondershare Filmora | Windows, Mac | Annual-$49.99, Perpetual-$79.99 | Easy |
| Adobe Premiere Pro | Windows, Mac | $20.99/month | Easy-Medium |
| HitFilm Express | Windows, Mac | Free | Easy |
| Kdenlive | Windows, Mac, Linux | Free | Medium-Difficult |
| OpenShot | Windows, Mac, Linux, OsX | Free | Medium-Difficult |
| Blender | Windows, Mac, Linux | Free | Easy |
| Jahshaka | Windows, Linux, OsX | Free | Easy-Medium |
| Final Cut Pro | Mac | Lifetime-$299.99 | Easy-Medium |
| Cyberlink PowerDirector 365 | Windows, Mac | Lifetime-$52.50 | Easy-Medium |
Part 2: Top 10 Sony Vegas (Vegas Pro) Alternatives & Competitors
Now that you know the primary differences between the Sony Vegas Pro alternatives. Are you find anything you like? Let’s move on to more details for your further consideration.
1. Lightworks
With Lightworks, using the independent timeline codec, format, and resolution alteration in videos is extremely simple. In addition, you can use the multi-cam editing feature for real-time, high-quality editing work. Moreover, drag and drop elements into videos for optimized video editing work, including pre-existing Storyboard points.
Main Features:
- Industry-grade features like QC, transcoding, and automated transfer are available.
- Edit files at different FPS limits and use three-point editing for recording/source files.
- Insert files and overwrite on a new project, replace, backfill, and fit to fill your video clips.
- Attach Storyboard tiles and match-frame clips/sub-clips easily.
Pros
- Flexible functionality and speedy transfers
- Edit files with professional movie-like quality
- Auto Sync feature for automatic timeline re-syncing is available
Cons
- Direct X is only available on the Windows version
- TotalFX plugin is not available for free- you have to upgrade to use them
OS Compatibility: Windows , Mac , Linux
Best For: Editing experts creating visually animated and professional-looking short videos can work with Lightworks.
What users say:
For professional-level video editing work, Lightworks brings a lot of resources and elements to users. According to reviews , people who have tried it have experienced better video editing functionality with these resources.
2. Wondershare Filmora
The top Vegas Pro alternative that both Windows and Mac users can opt for is Filmora. The software has advanced AI-incorporated editing functions for automated editing work, including preset effects from FX plugins. Besides that, you can easily add pre-set transitions, audio clips, text, images, and more.
Beginners find it simple to navigate through its interface and can opt for the Instant Mode function for automatic video edits .
Free Download For Win 7 or later(64-bit)
Free Download For macOS 10.14 or later
For a better idea of how this works, you should check out this tutorial video: https://filmora.wondershare.com/get-creative/make-a-video-quickly.html
Main Features:
- Instant Mode is available for automatic video/audio project editing out of 6 shorter clips.
- Support Advanced editing tools like Chroma Key and AI Portrait.
- Record voiceover, apply speech-to-text/text-to-speech functions, and more audio editing features.
- OpenFX plugins like BorisFX and NewBlue FX for a better list of pre-set effects.
Pros
- Simple to use and navigate on the editor timeline, especially with drag-and-drop support
- Output your editing files in different video/audio formats
- Quickly share the file on Vimeo or YouTube, besides downloading it on the local hard drive
Cons
- Free trial users cannot bring their Instant Mode-created videos into the editor timeline
- 4K support only with selected MKV, MOV, M4V (for Mac), and MP4 codecs
OS Compatibility: Windows , Mac
G2 Rating: 4.4 out of 5
Best For: All types of users like educators, students, homeowners, businesses, and video editors for comprehensive video editing tools and uses.
What users say:
Filmora is extremely simple to use, with advanced features available for top-level video editing work. Users mention in reviews how they have benefitted from the simple functionality and dynamic AI-based features available here for video editing.
3. Adobe Premiere Pro
If you are looking for high-quality programs like Sony Vegas, Adobe Premiere Pro is a reliable choice. This editing software allows you to easily create, delete, and move big video projects. Moreover, you can work on multiple files simultaneously and use shortcuts for faster editing work.
Preset filters and editing features are also available here, especially if they choose the Adobe Creative Cloud option.
Main Features:
- Multiple pre-set transitions and effects are available for quick thematic changes.
- Add graphics, titles, and captions.
- Color grading and correction tools are available.
- It is possible to add keyframing and animation elements.
Pros
- Opting for group plans for video editing practice and learning using Adobe Premiere Pro is possible
- Aligns audio with videos instantly during editing
- Utilize Quick Export functionality for video files in some taps
Cons
- Windows High Contrast Mode is supported but to a limited extent, like with menus and title bars
- HDR workflows can only be handled on the Windows version with DisplayHDR 400 support
OS Compatibility: Windows , Mac
G2 Rating: 4.5 out of 5
Best For: Professional editors and trainers can use the various plans under Adobe Premiere Pro for video/audio editing.
What users say:
Advertisers and videographers enjoy high-grade video editing features and like the simple effects and interface quality. The motion graphics support in Adobe Premiere Pro is high-grade as well.
4. HitFilm Express
A capable Sony Vegas free alternative that you should check out is HitFilm Express. With this, you can expect many prepared designs for quick video edits. Additionally, you can manually customize the video files you are working on with high-grade personalization features available in the timeline.
Main Features:
- Pre-set customizable designs are available.
- Built-in sound effects and soundtracks are usable for free.
- Cache renders in timelines are optimized.
- The New Grade Clips feature allows users to apply varying effects to many video clips.
Pros
- Stable process of switching between timelines with an active orbit tool
- Easy to switch between 2D/3D timelines while using the text tool
- Simple to use for an unlimited period
Cons
- Does not work on older versions than Windows 10 and macOS 10.14
- Users cannot integrate this with Vegas Pro like before
OS Compatibility: Windows , Mac
TechRadar Rating: 4.5 out of 5
Best For: This software is a high-quality video editor for custom video editing work, fit for beginners and professionals alike.
What users say:
HitFilm Express is easy to use and efficient in the market for professional-level editing. The tutorial is available here for quick learning about the steps, and expandable features are well-admired by users.
5. Kdenlive
A high-quality Sony Vegas open-source variety that you should seriously consider is Kdenlive. The video editor comes with MLT framework support and holds many tools for optimizing video editing.
To simplify, you can arrange and adjust various video/audio tracks and mute or lock specific ones as needed. Add everything from filters, texts, and transitions using this editor for high-grade video projects.
Main Features:
- Get an automatic backup of your video project while you are editing it.
- Use proxy editing to create low-resolution source clip copies and render them later on computers.
- Multiple video/audio scopes are available for monitoring projects like vectorscope, waveform, and RDB Parade.
- Many transition and effect choices to use.
Pros
- Flexibility with themes to add with multiple options
- Pre-render specific timeline parts for preview
- Effects are simple to use with keyframing quality
Cons
- Complex for completely non-technical users to adapt to
- Only supports 64-bit versions in regards to Windows-based compatibility
Trustpilot Rating: 3.7 out of 5
Best For: High-level editing experts who need strong video editing and monitoring features in an open-source platform.
What users say:
Kdenlive, as an open-source video editing software, assures quick and straightforward usability with projects. Per reviews , users like the ability to make simple video edits without bugs in this editor and quickly export finished projects.
6. OpenShot
OpenShot is a high-quality cross-platform video editor that you can use on different devices for quick but dynamic video project edits. Use keyframing ability here to adjust the animated elements you add to the file.
Moreover, cut the videos with simple steps and add many audio tracks/background videos/watermarks in layers. Also, get several video effects to optimize the video look easily.
Main Features:
- Adjust video speed in reverse motion, fast forward, and slow motion.
- Render effects and 3D animated elements into the video project.
- Get title templates and edit them as needed.
- Visualize the background audio beats with waveform support.
Pros
- Very user-friendly interface with a simple navigation guarantee
- Supports more than 70 languages that you can translate as well using LaunchPad
- Drag-and-drop functionality is supported for adding images, audio, and videos into the OpenShot editor timeline
Cons
- Some bug issues can occur
- Slightly complex learning curve
OS Compatibility: Windows , Linux , OsX
G2 Rating: 4.4 out of 5
Best For: Professional-level video editing experts can opt for this cross-platform free software for high-quality video creations.
What users say:
The OpenShot software is suitable for high-quality video editing across different devices and operating systems. Users like the lack of automated watermarks on all videos, its simple dashboard, and its multi-track editing ability, all available for free.
7. Blender
Blender is free video editing software like Sony Vegas that users can use for video editing, but it is also effective for game development with animations. Indeed, you can create and render dynamic-looking scenes with features like Cycles.
Furthermore, the software has a rich modelling toolset with solutions like curves and sculpting tools.
Main Features:
- Completely customization-friendly UI, shortcuts, and window layout here.
- Customization and scripting are possible to do with this software due to the Python API support.
- Supports access and integration of many pipeline tools for projects.
- Comes with advanced simulation-based features available in MantaFlow and Bullet libraries.
Pros
- Basic and advanced tools for quick video edits
- Strong composition and masking ability with object-based motion tracking benefits
- Easily create short animations with Blender
Cons
- Data under the standalone games created here fall under GPL conditions
- Strict licensing rules are applicable here
OS Compatibility: Windows , Mac , Linux
G2 Rating: 4.5 out of 5
Best For: Game developers and videographers for companies can use this open-source platform for creation and editing.
What users say:
Blender is a capable software for animation-based editing, with high-quality game-based features and interactive elements that make editing simple. As per reviews , users like the simple animation-based tools and fast rendering it offers.
8. Jahshaka
Users of Jahshaka can experience an inclusive, collaborative environment for metaverse-level editing work. This free editing software, like Sony Vegas, focuses mainly on VR-based editing functions and comes with powerful tools for project management and content creation.
Take the help of other team members to collaborate on dynamic virtual world building, editing, and publishing.
Main Features:
- Compatible player for different desktop and mobile devices.
- Create diversified worlds and scenes with one comprehensive platform.
- Immersive software 3D video development.
- Access to pre-built content and libraries of scenes and assets
Pros
- Easily share and distribute your virtual projects
- Deliver final projects offline and online
- An interactive multi-user engine is available
Cons
- Usable for a niche audience and does not include standard video editing tools
- Jahshaka V2 legacy support is no longer active
OS Compatibility: Windows , Linux , OsX
SourceForge Rating: 4.4 out of 5
Best For: Professional video editors who want a collaborative experience in VR-based development and publishing.
What users say:
Jahshaka is a suitable program for optimized VR-based editing with many preset features and themes to choose from. Most users enjoy the new features and worlds and can work with them efficiently.
9. Final Cut Pro
One of the top Sony Vegas alternatives Mac users can safely turn to is Final Cut Pro, which has powerful modern video editing features. With this software, you will access Cinematic Mode, which you can use to create stylish and thematic video scenes.
Similarly, the Object Tracker features utilize ML technology to automatically detect objects and faces in moving videos. It can align effects and titles accurately with the graphical elements in videos.
Main Features:
- Object Tracker feature for using color correction and adding texts into moving videos.
- Accelerated functional for motion tracking with Apple Neural Engine.
- Add high-quality effects and titles into videos with Cinematic Mode support.
- Preset audio tracks and royalty-free sound effects are available for editing.
Pros
- Handle color grading for optimized scene quality
- Adjust the field depth and focus depth in clips
- Share projects across iOS and macOS platforms
Cons
- Not valid for Windows users
- Relatively high cost to avail the paid version with all advanced features
OS Compatibility: Mac
TrustRadius Rating: 4.8 out of 5
Best For: Professional video editors, students, and filmmakers who want to create cinematic-quality video projects.
What users say:
Final Cut Pro is an efficient Mac-based video editing tool with easy sharing and editing capabilities, rich effects/transitions options, and fast rendering ability. Customers enjoy the intuitive non-linear editor, easy accessibility to social media platforms for file exporting, and live scrubbing, as noted in one review .
10. Cyberlink PowerDirector 365
Another Sony Vegas mac alternative for Windows you should give a try is PowerDirector 365 from Cyberlink. This software removes or compiles video clips and uses masking features like image/custom masks.
Preset special effects, blending modes, and sound effects are available here for quick editing. Additionally, the AI-powered Motion Tracking traces objects in clips and adds graphics, animations, and text quickly in line with it.
Main Features:
- You can create and remove videos with masking features.
- Drag and drop the pre-set effects and texts into videos.
- Adjust video clips with tools for border, gradation, and shadowing.
- Multiple animations, callouts, graphics, and stickers to add to videos.
Pros
- Use green screen functionality for quick background removal or editing
- Automatic audio mastering and mixing functionality are available
- Keyframing benefits for customized animations like scaling and positioning
Cons
- Dolby Digital-centric audio codec is not available for users
- Users can try features like Room Echo Removal and NVIDIA A/V Denoise only on Windows 11
OS Compatibility: Windows
TechRadar Rating: 4.5 out of 5
Best For: Professional videographers and regular users who want a Windows-based video editing software for standard video clip editing.
What users say:
Cyberlink PowerDirector is a powerful video editor with standard editing functions many users have tried and benefited from. According to customers , the program has high-quality video and audio editing benefits for presentations, with additional effects/splitting/cropping features.
Part 3: What are the limitations when using Sony Vegas (Vegas Pro) on Mac?
Yes, with the given Sony Vegas alternatives, Mac and Windows users can benefit heavily. But why is it important to try for a replacement when Sony Vegas Pro is relatively efficient software?
To know the answer, you should take the time to understand its limitations, which do exist.
It only works for Windows users
The Sony Vegas Pro software is not available for Mac or other operating systems besides Windows. In addition, it’ll be really complex and time-consuming, even if you opt for virtual machine software or handle dual booting techniques to configure the software on your Mac or Linux.
You need to invest in other hardware
Sony Vegas Pro does do not work within one comprehensive platform like other capable video editing software types, like Wondershare Filmora . You have to acquire a powerful PC and tools to operate it separately. The software works very slowly on older devices.
Not incredibly unique
The functions of Sony Vegas Pro match somewhat with other options in the market. So, users would not expect much value in purchasing this software’s plans that they want to upgrade from their previous system, but on the other hand, the available features are mostly standard-level in functionality as well.
Hot FAQs about Vegas Pro Alternatives
After knowing these details, many users still have specific common queries about opting for a Sony Vegas Pro alternatively. So these are some common FAQs about this- answered.
1. Can Sony Vegas be used on a Mac?
No, it is impossible to directly use Sony Vegas on macOS devices since it does not support it. Instead, you have to separately use a dual boot strategy or virtual machine software to activate the video editor on Mac devices, but the process for that is complex.
2. Is Wondershare Filmora or Vegas Pro better?
Wondershare Filmora and Vegas Pro are top-level options in video and audio editing projects with professional-level editing accuracy. However, Filmora has a cohesive ecosystem with rich AI and standard functions and comes with Mac/Windows support. So, in that sense, Filmora is comparatively a better choice.
Final Words
In place of Sony Vegas Pro, any of these options would also give you a great user experience. Out of them, Filmora is one that we will recommend due to its multi-faceted benefits and features for Mac and Windows users. Ultimately, make your decision based on your particular needs.
Free Download For Win 7 or later(64-bit)
Free Download For macOS 10.14 or later
The Ultimate Adobe Premiere Shortcut Guide: 20 Essentials
Top 20 Adobe Premiere Shortcuts You Will Use When Editing Video Files

Benjamin Arango
Mar 27, 2024• Proven solutions
Whilst the conventional mouse control allows you to perform any task that Premiere is capable of, for efficient workflow the keyboard shortcuts cannot be beaten. We all work a little differently, and thankfully Adobe understands that, so although here we will be concentrating on the standard keyboard layout, the keyboard shortcuts can be customized to be anything you want and saved as a custom profile, there are even presets already included for Avid Media Composer and Final Cut Pro for those who are maybe transitioning from those packages or just prefer the way they work.
This is a basic tutorial about Adobe Premiere, professional video editing software. However, if video editing is new to you, consider Wondershare Filmora (originally Wondershare Video Editor) , which is a powerful but easy-to-use tool for users just starting out. Download the free trial version below.
 Download Mac Version ](https://tools.techidaily.com/wondershare/filmora/download/ )
This is achieved by going through the path edit > keyboard shortcuts as below:

Before we step into the most useful shortcuts, a brief note here on the different platforms, although I’m sure most readers are aware. The PC and Mac versions of the software do share the same basic shortcuts with the one caveat that where the PC uses the Control and Alt keys, the Mac has Command and Option keys instead. Other than that the functionality is the same. I’ll include the shortcuts for both platforms with each to make referencing easier.
1Select Window
I’m starting with this one simply because I find it the most used of all, especially if like me you prefer a custom layout for all your windows. If your program monitor is hidden for instance, you can just press shift+4 and there it is. The shortcuts are the same for both platforms here.
- Audio Clip Mixer Shift+9
- Audio Track Mixer Shift+6
- Effect Controls Shift+5
- Effects Shift+7
- Media Browser Shift+8
- Program Monitor Shift+4
- Project Shift+1
- Source Monitor Shift+2
- Timelines Shift+3
2 Import
Whilst the shortcuts for editing and manipulating clips are extremely important for efficient workflow, it should be remembered that those relating to the basic operation of the program are just as useful, as we see here. Using Control and I (Command and I on Mac) brings up the import media dialogue box instantly.

3Capture Panel
There are multiple shortcuts that can be used within the capture panel, but because this is such an intrinsic aspect of the Premiere workflow, being the entry into a project for all media, I think the available shortcuts are all as valuable as each other here.
- Navigate Through Fields - Tab
- Cancel Capture - Esc
- Fast Forward - F
- Rewind - R
- Go to In Point - Q
- Go to Out Point - W
- Record - G
- Stop - S
- Step Back - Left Arrow
- Step Forward - Right Arrow

4 Timeline Panel
In a similar vein to the Capture Panel, the Timeline Panel has a set of shortcuts specific to all its basic operations, and are essential for a faster workflow.
- Clear Ins and Outs - G
- Clear In Point - D
- Clear Out Point - F
- Go to In Point- Q
- Go to Out Point - W
- Match Frame - M
- Start and Stop - Spacebar
- Play Normal Speed - L
- Play Reverse Normal Speed - J
- Set In Point - I
- Set Out Point - o
- Shuttle Stop - K
- Trim - T
- Arc Tool - A
- Ellipse Tool – E

5 Navigation within a clip
This one works within the program monitor/timeline or source monitor windows, ensure the desired one is active first of course. You can move to a specific time code within the clip, or go forwards or backwards a set number of frames using the number pad. To go to a specific time code simply type that on the number pad. To travel a set number of frames simply type + or – (to signify direction) and the number of frames.
6Marking Clips
By far the simplest way to mark clips is to use the keyboard shortcut.
For marking clips use X , whilst marking a selection is / .
7 In and Out
In addition to marking clips via shortcuts, it is also far easier to mark In and Out points this way.
- To Mark In use I , whilst to mark Out use O .
- To Clear In the shortcut is Control+Shift+I for PC and Option+I for Mac.
- To Clear Out Control+Shift+O for PC, Option+O for Mac.
8Playing Clips
Going hand in hand with the shortcuts for marking, are the keyboard commands for playing clips. These are:
- Play In to Out: Control+Shift+Space (PC) and Option+K for Mac
- Clear In and Out: Control+Shift+X (PC) and Option+X for Mac
- Play Around: The same for both platforms and is Shift+K.
To get the best from this it is necessary to set some options beforehand, as Play Around plays the portion of the timeline around the Playhead, and where it plays is dependent on the options set. This is done through the menu via edit > preferences > playback, here I have preroll and postroll set to 4 seconds, meaning that it plays 4 seconds prior and following the point where the playhead is placed.

In addition, turning on looping for this can help to fine tune edits.
9Toggle Audio During Scrubbing
There are times you may want to hear audio when scrubbing, however turning it off can have beneficial effects on performance for lower end computers. The shortcut makes it an easy process to turn off and on as required.
The shortcut is Shift+S for both platforms.
10Slide a clip within the sequence
There are a couple of options available here from the shortcuts, slide one frame or 5 frames.
- To slide one frame to the left is Alt+, for PC or Option+, for Mac. To increase to five frames add Shift to either shortcut.
- To slide one frame to the right is Alt+. for PC and Option+. for Mac. Again, to increase to five frames add Shift.
11Slip within a sequence
As with the slide options, the choice is one frame or five frames.
- To slip one frame to the left is Control+Alt+Left for PC or Option+Command+Left for Mac. To increase to five frames add Shift to either shortcut.
- To slip one frame to the right is Control+Alt+Right for PC and Option+Command+Right for Mac. Again, to increase to five frames add Shift.
12Nudging
You can move a clip up or down simply by using the Up and Down arrow keys, whilst holding Alt or Option at the same time allows you to select just the video or audio to move.
13Multi Camera Selection
This is a tool that allows you to work with multiple camera angles of the same subject or scene. To switch between different cameras quickly is extremely useful and accomplished with the numerical keys.
Numbers 1 through 9 select the corresponding camera.
14Add an edit
This option cuts the track (or tracks) that are targeted. The shortcut for this is Control+K or Command+K.
You can view all added edits within a sequence by selecting show through edits within the sequence menu.

15Add the default Transition
This option applies the default transition to all selected media. To do this use Shift+D.
16 Match Frame
Locating a specific frame within the sequence for adding in a second clip is very useful, the shortcut is M, a great timesaver.
17Zoom to sequence
Being able to zoom in is great, it makes working in the sequence panel much easier, at least for me, however the one drawback I find is that I tend to get lost when looking for a particular clip. Using / enable you to quickly zoom out for navigation and back in again to work
18Jump to Edit
Navigating from edit to edit is a very simple process with the shortcuts available to you.
Page up takes you to the previous edit point, whilst page down takes you to the next.
With practice these shortcuts become second nature and you will find your workflow becomes not only faster but a smoother operation as well.
19Toggle the type of Trim used
Quickly shift between Standard, Ripple and Roll trim types.
Shift+T for PC, Control+T for Mac
20Ripple Trim
This enables you to trim the head or tail of the clip very quickly, making an extremely efficient workflow. To trim the next edit from the Playhead use W, for the previous edit from the playhead use Q.
Benjamin Arango
Benjamin Arango is a writer and a lover of all things video.
Follow @Benjamin Arango
Benjamin Arango
Mar 27, 2024• Proven solutions
Whilst the conventional mouse control allows you to perform any task that Premiere is capable of, for efficient workflow the keyboard shortcuts cannot be beaten. We all work a little differently, and thankfully Adobe understands that, so although here we will be concentrating on the standard keyboard layout, the keyboard shortcuts can be customized to be anything you want and saved as a custom profile, there are even presets already included for Avid Media Composer and Final Cut Pro for those who are maybe transitioning from those packages or just prefer the way they work.
This is a basic tutorial about Adobe Premiere, professional video editing software. However, if video editing is new to you, consider Wondershare Filmora (originally Wondershare Video Editor) , which is a powerful but easy-to-use tool for users just starting out. Download the free trial version below.
Download Mac Version ](https://tools.techidaily.com/wondershare/filmora/download/ )
This is achieved by going through the path edit > keyboard shortcuts as below:
Before we step into the most useful shortcuts, a brief note here on the different platforms, although I’m sure most readers are aware. The PC and Mac versions of the software do share the same basic shortcuts with the one caveat that where the PC uses the Control and Alt keys, the Mac has Command and Option keys instead. Other than that the functionality is the same. I’ll include the shortcuts for both platforms with each to make referencing easier.
1Select Window
I’m starting with this one simply because I find it the most used of all, especially if like me you prefer a custom layout for all your windows. If your program monitor is hidden for instance, you can just press shift+4 and there it is. The shortcuts are the same for both platforms here.
- Audio Clip Mixer Shift+9
- Audio Track Mixer Shift+6
- Effect Controls Shift+5
- Effects Shift+7
- Media Browser Shift+8
- Program Monitor Shift+4
- Project Shift+1
- Source Monitor Shift+2
- Timelines Shift+3
2 Import
Whilst the shortcuts for editing and manipulating clips are extremely important for efficient workflow, it should be remembered that those relating to the basic operation of the program are just as useful, as we see here. Using Control and I (Command and I on Mac) brings up the import media dialogue box instantly.
3Capture Panel
There are multiple shortcuts that can be used within the capture panel, but because this is such an intrinsic aspect of the Premiere workflow, being the entry into a project for all media, I think the available shortcuts are all as valuable as each other here.
- Navigate Through Fields - Tab
- Cancel Capture - Esc
- Fast Forward - F
- Rewind - R
- Go to In Point - Q
- Go to Out Point - W
- Record - G
- Stop - S
- Step Back - Left Arrow
- Step Forward - Right Arrow
4 Timeline Panel
In a similar vein to the Capture Panel, the Timeline Panel has a set of shortcuts specific to all its basic operations, and are essential for a faster workflow.
- Clear Ins and Outs - G
- Clear In Point - D
- Clear Out Point - F
- Go to In Point- Q
- Go to Out Point - W
- Match Frame - M
- Start and Stop - Spacebar
- Play Normal Speed - L
- Play Reverse Normal Speed - J
- Set In Point - I
- Set Out Point - o
- Shuttle Stop - K
- Trim - T
- Arc Tool - A
- Ellipse Tool – E
5 Navigation within a clip
This one works within the program monitor/timeline or source monitor windows, ensure the desired one is active first of course. You can move to a specific time code within the clip, or go forwards or backwards a set number of frames using the number pad. To go to a specific time code simply type that on the number pad. To travel a set number of frames simply type + or – (to signify direction) and the number of frames.
6Marking Clips
By far the simplest way to mark clips is to use the keyboard shortcut.
For marking clips use X , whilst marking a selection is / .
7 In and Out
In addition to marking clips via shortcuts, it is also far easier to mark In and Out points this way.
- To Mark In use I , whilst to mark Out use O .
- To Clear In the shortcut is Control+Shift+I for PC and Option+I for Mac.
- To Clear Out Control+Shift+O for PC, Option+O for Mac.
8Playing Clips
Going hand in hand with the shortcuts for marking, are the keyboard commands for playing clips. These are:
- Play In to Out: Control+Shift+Space (PC) and Option+K for Mac
- Clear In and Out: Control+Shift+X (PC) and Option+X for Mac
- Play Around: The same for both platforms and is Shift+K.
To get the best from this it is necessary to set some options beforehand, as Play Around plays the portion of the timeline around the Playhead, and where it plays is dependent on the options set. This is done through the menu via edit > preferences > playback, here I have preroll and postroll set to 4 seconds, meaning that it plays 4 seconds prior and following the point where the playhead is placed.
In addition, turning on looping for this can help to fine tune edits.
9Toggle Audio During Scrubbing
There are times you may want to hear audio when scrubbing, however turning it off can have beneficial effects on performance for lower end computers. The shortcut makes it an easy process to turn off and on as required.
The shortcut is Shift+S for both platforms.
10Slide a clip within the sequence
There are a couple of options available here from the shortcuts, slide one frame or 5 frames.
- To slide one frame to the left is Alt+, for PC or Option+, for Mac. To increase to five frames add Shift to either shortcut.
- To slide one frame to the right is Alt+. for PC and Option+. for Mac. Again, to increase to five frames add Shift.
11Slip within a sequence
As with the slide options, the choice is one frame or five frames.
- To slip one frame to the left is Control+Alt+Left for PC or Option+Command+Left for Mac. To increase to five frames add Shift to either shortcut.
- To slip one frame to the right is Control+Alt+Right for PC and Option+Command+Right for Mac. Again, to increase to five frames add Shift.
12Nudging
You can move a clip up or down simply by using the Up and Down arrow keys, whilst holding Alt or Option at the same time allows you to select just the video or audio to move.
13Multi Camera Selection
This is a tool that allows you to work with multiple camera angles of the same subject or scene. To switch between different cameras quickly is extremely useful and accomplished with the numerical keys.
Numbers 1 through 9 select the corresponding camera.
14Add an edit
This option cuts the track (or tracks) that are targeted. The shortcut for this is Control+K or Command+K.
You can view all added edits within a sequence by selecting show through edits within the sequence menu.
15Add the default Transition
This option applies the default transition to all selected media. To do this use Shift+D.
16 Match Frame
Locating a specific frame within the sequence for adding in a second clip is very useful, the shortcut is M, a great timesaver.
17Zoom to sequence
Being able to zoom in is great, it makes working in the sequence panel much easier, at least for me, however the one drawback I find is that I tend to get lost when looking for a particular clip. Using / enable you to quickly zoom out for navigation and back in again to work
18Jump to Edit
Navigating from edit to edit is a very simple process with the shortcuts available to you.
Page up takes you to the previous edit point, whilst page down takes you to the next.
With practice these shortcuts become second nature and you will find your workflow becomes not only faster but a smoother operation as well.
19Toggle the type of Trim used
Quickly shift between Standard, Ripple and Roll trim types.
Shift+T for PC, Control+T for Mac
20Ripple Trim
This enables you to trim the head or tail of the clip very quickly, making an extremely efficient workflow. To trim the next edit from the Playhead use W, for the previous edit from the playhead use Q.
Benjamin Arango
Benjamin Arango is a writer and a lover of all things video.
Follow @Benjamin Arango
Top 10 Video Editing Software That Outshine Adobe Premiere Elements
Top 10 Adobe Premiere Elements Alternatives
Benjamin Arango
Mar 27, 2024• Proven solutions
Adobe Premiere Elements is a scaled-down version of the Adobe Premiere Pro, designed to novice editors and consumers. However, some beginning users still find it’s a little bit difficult for them to master this video editing software. Plus, Adobe is a company that constantly releases updates that have occasionally caused the users’ programs to stop functioning. Thus, they need to find a good alternative to Adobe Premiere Elements. In this piece of writing we are going to look at the 10 best Adobe Premiere Elements alternative which can help you do your job.
1. Wondershare Filmora - Best Premiere Elements Alternative
- Create amazing movies with video, audio & photos in any popular formats .
- Edit video/audio/photos with classic features like trim, split & crop
- Personalize home video with texts, filters, transitions & more.
- Provides more advanced features like picture-in-picture, mosaic, tilt shift, face off and & more.
- Share your movies anywhere: TV, YouTube, iPhone & more.
Download Mac Version ](https://tools.techidaily.com/wondershare/filmora/download/ )
How to edit videos with Adobe movie maker alternative: Wondershare Filmora
- Import video files
To import your video files, just click “Import” to browse your file folder and load them together. When they successfully load onto the Album, just drag and drop them in the video Timeline.

- Basic video editing: crop, rotate, trim, split
Double click the video item, you’ll open the video and audio editing panel. Here, you can rotate video 90 degree, adjust Brightness, Saturation, Contrast, slow or speed up the playing speed, crop to a suitable size, set audio pitch, volume, fade in/out, and more.
- Apply transition, intro/credit & other effects
It’s pretty easy to add titles, effect and intro/credits to your movie using this Adobe Premiere Elements alternative. Hit Transition, Text, or Effect tab above the Timeline, and then drag your favorite template between every two video clips.
If needed, you can also apply a Close-up, Jump Cut, Tilt-Shift, Mosaic, and Face-off to your video. To do this, just hit the “Power Tool” above the timeline and choose the effect you need.
- Export the new video
Before exporting, you can preview your new video on the right window. When everything satisfied, just click “Export” to access the output window. This Adobe Premiere Elements provides various way to save your video creation and share it. Also, you can choose to burn a DVD disc for enjoying on wide screen TV or any DVD player.
Check more other alternatives to Adobe Premiere Elements below.
2. Avidemux – Best Video Editing Software

Avidemux is the free video editor made for the simple cutting, encoding and filtering tasks. This supports several file types, which includes DVD MPEG files, AVI, MP4 & ASF, using many codecs. The tasks can get automated using the projects, powerful scripting and job queue. Avidemux also allows you store the current audio or video encoder as well as filters settings that can also be used as the additional “profiles” for some target formats (for example for the playback on the portable devices), or just as the preferred encoder options (so you do not need to set it manually again and again). You can use Avidemux to easily edit video .
3. VirtualDub –Can Process Large Number Of Files

VirtualDub is the video capture and processing utility for over 32bit and 64bit of Windows platforms (ME/98/2000/NT4/Vista/XP/7), licensed under GNU Public License (GPL). This lacks editing power of the general purpose editor like Adobe Premiere, however is streamlined for the fast linear operations on video. It also has got the batch processing capabilities to process large numbers of the files and can get extended with the 3rd party video filters. The VirtualDub is primarily geared in processing the AVI files, even hough it will read (and not write) MPEG-1 as well as handle certain sets of the BMP images. Thus is one of the best video capturing apps to look at.
4. Adobe Premiere Pro – Built With Amazing Features

Now, you can edit video much faster than before with powerful and connected Adobe Premiere CC. Many brand new features that include redesigned timeline, streamlined color grading and improved media management. You can sync your shortcuts and settings to any PC at any edit bay and get an access to the new features when they are released. Your whole creative world, is one place. You can learn Premiere video editing tutorials if you feel like Premiere is too difficult to start editing. The Adobe Premiere Pro is the customizable, powerful, and nonlinear video editor, which allows you to edit your way. You can import and combine virtually any kind of media, from the video shot on phone to the raw 5K or higher resolution footage, and edit in the native format without even wasting any time in
5. Lightworks – Award Winning Video Editing Software

Lightworks is the editing powerhouse that delivers flexibility and unparalleled speed, completely integrated with other members of Complete Collaboration family. The Lightworks is the Emmy and Academy award winning grade video editor having over twenty years of the history in broadcast and film industry. Having cut many films like The Departed, Pulp Fiction, Shutter Island, Centurion, Martin Scorsese’s Departed, The King’s Speech, Pulp Fiction, Mission Impossible, Batman and Braveheart, it includes the full feature of the editorial tools – right from the advanced trimming & media management, to real time effects and stereoscopic support that includes the multiple color correctors. The Lightworks has advanced effects pipeline, using power of GPU. With support for 2K of workflows with the real time effects, it’s highly advanced editing app available.
6. Windows Live - Movie Maker – Carry Out Multiple Tast

Windows Movie Maker app makes your home movies totally fun. With the Movie Maker, you may create, share and edit your movies right on the computer. You can also build your own movie with some very simple drag & drops. You can delete the bad shots as well as include just some of the best scenes that you want. After that, you can share the movie through e-mail, Web, and CD. By using any third party application you can also take the movies you have made and turn it in the DVDs. You may as well save the movie back to your video tape in the camera so that you can play back on the TV or on camera itself.
7. iMovie – Video Sharing Made Simple

Maybe you wish to throw together some video clips. Or you have time and wish to fine-tune each edit. Or you just wish to flip through the clips in a way you flip through the album covers in iTunes. The iMovie apps allows you do this all — and then share this. iMovie makes it simple to browse and share HD video that you shoot on iOS device. You can turn your preferred clips in blockbuster movies and Hollywood style of trailers. You can watch the mini master pieces anywhere with the iMovie Theater. Some taps, swipes, and you are set for the big premiere at home. Want to use iMovie on Windows? Here are 10 iMovie alternatives for your choice .
8. VideoLAN Movie Creator – Arriving Soon With Some Amazing Features

(VideoLAN Movie Creator or VLMC is the free video editing program, giving features to get semi-professional quality films, however with an aim to stay user-friendly and simple. Developers of the most famous video players in world, the VLC Media Player, now have started the new and promising project: called Videolan Movie Creator. It is “promising” because the Videolan Movie Creator still is at the early stage of the development. From the developers, it is just the pre-alpha release, and with many important features missing & plenty of bugs. However, they are taking a close look on it that nobody could resist this temptation! Testing Videolan Movie Creator is an adventure. Program still is unstable & buggy, thus expect some crashes.
9. PiTiVi – Accomplish Several Task In One Software

PiTiVi is the open source editor, written in the Python and based at GStreamer & GTK+. Taking in account a fact that not everyone has similar knowledge of the video editing, and nor same requirements, PiTIVi gives many ways of modifying and creating the timeline. Ranging from the simple synopsis view to full editing view (or Complex View) puts you in total control of editing. PiTiVi may encode and capture video and audio, trim and split video clips, enhance and trim audio & render projects at any format that is supported by GStreamer framework. The PiTiVi was been added by kn (the Contributor) at 17/04/2009 and latest change was made
10. Cinelerra – Best Free Video Editing Software In Market

Cinelerra is the highly professional and advanced video editing program, however still remains the open source. Cinelerra will solve 3 important tasks: capturing, compositing and editing. There is no limit to video resolution thus whether it is standard or HD does not really matter at Cinelerra. Cinelerra always has been free and may remain so since developers are working very closely with traditional technical design & manufacturing companies and media and broadcast production companies all along with the Independent Artists & Technologists to bring some new capabilities and higher functionality. We know that Cinelerra isn’t perfect, however, it’s one platform that we can build on together to make our independent and professional studios.
Benjamin Arango
Benjamin Arango is a writer and a lover of all things video.
Follow @Benjamin Arango
Benjamin Arango
Mar 27, 2024• Proven solutions
Adobe Premiere Elements is a scaled-down version of the Adobe Premiere Pro, designed to novice editors and consumers. However, some beginning users still find it’s a little bit difficult for them to master this video editing software. Plus, Adobe is a company that constantly releases updates that have occasionally caused the users’ programs to stop functioning. Thus, they need to find a good alternative to Adobe Premiere Elements. In this piece of writing we are going to look at the 10 best Adobe Premiere Elements alternative which can help you do your job.
1. Wondershare Filmora - Best Premiere Elements Alternative
- Create amazing movies with video, audio & photos in any popular formats .
- Edit video/audio/photos with classic features like trim, split & crop
- Personalize home video with texts, filters, transitions & more.
- Provides more advanced features like picture-in-picture, mosaic, tilt shift, face off and & more.
- Share your movies anywhere: TV, YouTube, iPhone & more.
Download Mac Version ](https://tools.techidaily.com/wondershare/filmora/download/ )
How to edit videos with Adobe movie maker alternative: Wondershare Filmora
- Import video files
To import your video files, just click “Import” to browse your file folder and load them together. When they successfully load onto the Album, just drag and drop them in the video Timeline.
- Basic video editing: crop, rotate, trim, split
Double click the video item, you’ll open the video and audio editing panel. Here, you can rotate video 90 degree, adjust Brightness, Saturation, Contrast, slow or speed up the playing speed, crop to a suitable size, set audio pitch, volume, fade in/out, and more.
- Apply transition, intro/credit & other effects
It’s pretty easy to add titles, effect and intro/credits to your movie using this Adobe Premiere Elements alternative. Hit Transition, Text, or Effect tab above the Timeline, and then drag your favorite template between every two video clips.
If needed, you can also apply a Close-up, Jump Cut, Tilt-Shift, Mosaic, and Face-off to your video. To do this, just hit the “Power Tool” above the timeline and choose the effect you need.
- Export the new video
Before exporting, you can preview your new video on the right window. When everything satisfied, just click “Export” to access the output window. This Adobe Premiere Elements provides various way to save your video creation and share it. Also, you can choose to burn a DVD disc for enjoying on wide screen TV or any DVD player.
Check more other alternatives to Adobe Premiere Elements below.
2. Avidemux – Best Video Editing Software
Avidemux is the free video editor made for the simple cutting, encoding and filtering tasks. This supports several file types, which includes DVD MPEG files, AVI, MP4 & ASF, using many codecs. The tasks can get automated using the projects, powerful scripting and job queue. Avidemux also allows you store the current audio or video encoder as well as filters settings that can also be used as the additional “profiles” for some target formats (for example for the playback on the portable devices), or just as the preferred encoder options (so you do not need to set it manually again and again). You can use Avidemux to easily edit video .
3. VirtualDub –Can Process Large Number Of Files
VirtualDub is the video capture and processing utility for over 32bit and 64bit of Windows platforms (ME/98/2000/NT4/Vista/XP/7), licensed under GNU Public License (GPL). This lacks editing power of the general purpose editor like Adobe Premiere, however is streamlined for the fast linear operations on video. It also has got the batch processing capabilities to process large numbers of the files and can get extended with the 3rd party video filters. The VirtualDub is primarily geared in processing the AVI files, even hough it will read (and not write) MPEG-1 as well as handle certain sets of the BMP images. Thus is one of the best video capturing apps to look at.
4. Adobe Premiere Pro – Built With Amazing Features
Now, you can edit video much faster than before with powerful and connected Adobe Premiere CC. Many brand new features that include redesigned timeline, streamlined color grading and improved media management. You can sync your shortcuts and settings to any PC at any edit bay and get an access to the new features when they are released. Your whole creative world, is one place. You can learn Premiere video editing tutorials if you feel like Premiere is too difficult to start editing. The Adobe Premiere Pro is the customizable, powerful, and nonlinear video editor, which allows you to edit your way. You can import and combine virtually any kind of media, from the video shot on phone to the raw 5K or higher resolution footage, and edit in the native format without even wasting any time in
5. Lightworks – Award Winning Video Editing Software
Lightworks is the editing powerhouse that delivers flexibility and unparalleled speed, completely integrated with other members of Complete Collaboration family. The Lightworks is the Emmy and Academy award winning grade video editor having over twenty years of the history in broadcast and film industry. Having cut many films like The Departed, Pulp Fiction, Shutter Island, Centurion, Martin Scorsese’s Departed, The King’s Speech, Pulp Fiction, Mission Impossible, Batman and Braveheart, it includes the full feature of the editorial tools – right from the advanced trimming & media management, to real time effects and stereoscopic support that includes the multiple color correctors. The Lightworks has advanced effects pipeline, using power of GPU. With support for 2K of workflows with the real time effects, it’s highly advanced editing app available.
6. Windows Live - Movie Maker – Carry Out Multiple Tast
Windows Movie Maker app makes your home movies totally fun. With the Movie Maker, you may create, share and edit your movies right on the computer. You can also build your own movie with some very simple drag & drops. You can delete the bad shots as well as include just some of the best scenes that you want. After that, you can share the movie through e-mail, Web, and CD. By using any third party application you can also take the movies you have made and turn it in the DVDs. You may as well save the movie back to your video tape in the camera so that you can play back on the TV or on camera itself.
7. iMovie – Video Sharing Made Simple
Maybe you wish to throw together some video clips. Or you have time and wish to fine-tune each edit. Or you just wish to flip through the clips in a way you flip through the album covers in iTunes. The iMovie apps allows you do this all — and then share this. iMovie makes it simple to browse and share HD video that you shoot on iOS device. You can turn your preferred clips in blockbuster movies and Hollywood style of trailers. You can watch the mini master pieces anywhere with the iMovie Theater. Some taps, swipes, and you are set for the big premiere at home. Want to use iMovie on Windows? Here are 10 iMovie alternatives for your choice .
8. VideoLAN Movie Creator – Arriving Soon With Some Amazing Features
(VideoLAN Movie Creator or VLMC is the free video editing program, giving features to get semi-professional quality films, however with an aim to stay user-friendly and simple. Developers of the most famous video players in world, the VLC Media Player, now have started the new and promising project: called Videolan Movie Creator. It is “promising” because the Videolan Movie Creator still is at the early stage of the development. From the developers, it is just the pre-alpha release, and with many important features missing & plenty of bugs. However, they are taking a close look on it that nobody could resist this temptation! Testing Videolan Movie Creator is an adventure. Program still is unstable & buggy, thus expect some crashes.
9. PiTiVi – Accomplish Several Task In One Software
PiTiVi is the open source editor, written in the Python and based at GStreamer & GTK+. Taking in account a fact that not everyone has similar knowledge of the video editing, and nor same requirements, PiTIVi gives many ways of modifying and creating the timeline. Ranging from the simple synopsis view to full editing view (or Complex View) puts you in total control of editing. PiTiVi may encode and capture video and audio, trim and split video clips, enhance and trim audio & render projects at any format that is supported by GStreamer framework. The PiTiVi was been added by kn (the Contributor) at 17/04/2009 and latest change was made
10. Cinelerra – Best Free Video Editing Software In Market
Cinelerra is the highly professional and advanced video editing program, however still remains the open source. Cinelerra will solve 3 important tasks: capturing, compositing and editing. There is no limit to video resolution thus whether it is standard or HD does not really matter at Cinelerra. Cinelerra always has been free and may remain so since developers are working very closely with traditional technical design & manufacturing companies and media and broadcast production companies all along with the Independent Artists & Technologists to bring some new capabilities and higher functionality. We know that Cinelerra isn’t perfect, however, it’s one platform that we can build on together to make our independent and professional studios.
Benjamin Arango
Benjamin Arango is a writer and a lover of all things video.
Follow @Benjamin Arango
Also read:
- Updated Unlock Cross-Platform Video Editing A Chromebook Users Guide for 2024
- Updated Create Engaging Videos with These 8 Leading Explainer Video Tools for 2024
- New If You Know the Magic of Social Media and Want to Create Social Media Video Content, Then Have a Look on All the Essential Things that Are Needed for Making Perfect Videos for 2024
- New The Ultimate Shortcut Making Reaction Videos with Filmora for 2024
- Updated In 2024, Create Stunning Lyric Videos with These Top Online Tools
- New Slideshow Mastery Unlocking the Power of Final Cut Pro for 2024
- Updated In 2024, Rotating the Audio and Video Files Is Quite a Challenging Task Though, but the Arrival of some of the Well Known Video Rotators Has Solved This Problem
- Updated Must-Have 3D Video Editing Software for Creators for 2024
- New Unlocking the Power of Speech Synthesis Expert Conversion Tips for 2024
- The Ultimate List of Online WebM Video Compressors for 2024
- New Transform Your Photos Into Videos Best iOS Collage Apps for 2024
- New 2024 Approved The Ultimate Guide to Video Blur Effects on iPhone and Android
- The Top Reasons to Read This Article About Mp3 Converter Windows Right Now for 2024
- Updated Camtasia Tutorial Change Video Speed for 2024
- New In 2024, 10 Powerful Video Editing Software Alternatives to Final Cut Pro X
- 2024 Approved Unlock Twitter Video Size Secrets Aspect Ratio Revealed
- Updated In 2024, Free MPEG Video Merger Top 5 Picks
- Updated Video Cropping 101 A Beginners Guide to Using Avidemux
- Updated From Start to Finish A Comprehensive Guide to QuickTime Video Editing on Mac for 2024
- New 2024 Approved WebM to MP3 Conversion Made Simple Top Tools
- New Discover the Best Public Domain Video Libraries Online for 2024
- Updated In 2024, Maximize Your Music Library Expert Tips on Converting YouTube Videos to MP3
- The Ultimate OS X Mavericks Video Editing Crash Course for 2024
- Updated In 2024, Understanding Resolution A Tutorial on Pixel Ratio Calculation
- New 2024 Approved Unleash the 80S Adding VHS Flair to Your FCP Projects
- Updated 2024 Approved Lessons Learned Choosing the Ideal OGG Converter
- Updated Crop Like a Pro Mastering Video Editing with Avidemux for 2024
- 2024 Approved Mastering Text-to-Speech Essential Conversion Techniques
- Updated Split 3GP Files Into Multiple Segments Easy Guide 2023
- New The Ultimate Aiff Converter Selection Handbook
- Updated In 2024, Make a Statement with These WhatsApp Status Maker Apps
- 2024 Approved Top Virtualdub Competitors A Comprehensive Review
- 2024 Approved The Ultimate Time-Lapse Video Editing Software Roundup
- 2024 Approved Top-Rated FLV Editor for Windows 8 Unlock Professional Video Editing
- New 2024 Approved From Dull to Dazzling Top Video Brightening Apps and Software
- New The Ultimate Guide to Stop Motion Animation Software for Mac and PC for 2024
- New Splice Video Editor A Complete Breakdown of Its Capabilities
- Updated 2024 Approved Wav Converter Essentials A Comprehensive Guide
- Updated Unlocking YouTube Audio A Simple Downloading Tutorial for 2024
- In 2024, Videopad Video Editor 2023 A Detailed Review and Recommendation
- Updated Beyond Quik Exploring the Best PC Video Editing Software for GoPro Users for 2024
- Updated In 2024, Pro-Level Video Stabilization in Adobe Premiere Pro A Beginners Guide
- New In 2024, Convert 4K Videos for Free Top 10 Tools
- New In 2024, Video Stabilization Magic Transforming Shaky Clips in Adobe Premiere Pro
- In 2024, Ubuntus Top Picks Best Free Video Editors for Creators
- In 2024, How to Come up With the Best Pokemon Team On Nubia Z50S Pro? | Dr.fone
- In 2024, How to Mirror Your Nokia C32 Screen to PC with Chromecast | Dr.fone
- How to Stop My Spouse from Spying on My Realme V30 | Dr.fone
- Things You Dont Know About Samsung Galaxy M54 5G Reset Code | Dr.fone
- 5 Best Route Generator Apps You Should Try On Samsung Galaxy A24 | Dr.fone
- In 2024, How Can You Transfer Files From Itel P55+ To iPhone 15/14/13? | Dr.fone
- How to Fix Apple iPhone 12 Pro Max Passcode not Working? | Dr.fone
- Apple ID Unlock From Apple iPhone 15 Pro? How to Fix it?
- In 2024, Ways to Learn Discord Game Bots – Even if Youre Just Starting Out 20
- A Quick Guide to ZTE FRP Bypass Instantly
- In 2024, How To Use Special Features - Virtual Location On Itel P55? | Dr.fone
- Updated 15 Best CapCut Templates for Slow Motion Editing for 2024
- Updated Free MPEG Video Assembly Top 5 Programs for 2024
- In 2024, 4 Ways to Unlock iPhone 15 Pro Max to Use USB Accessories Without Passcode
- In 2024, How Can I Catch the Regional Pokémon without Traveling On Samsung Galaxy S23+ | Dr.fone
- 6 Fixes to Unfortunately WhatsApp has stopped Error Popups On Motorola Razr 40 Ultra | Dr.fone
- 4 Ways to Unlock Apple iPhone 6 Plus to Use USB Accessories Without Passcode
- In 2024, Reasons why Pokémon GPS does not Work On Oppo Reno 8T 5G? | Dr.fone
- Guide on How To Free Up iPhone 8 Plus Space | Dr.fone
- Downloading SamFw FRP Tool 3.0 for Realme Narzo N53
- Beginners Guide Top Cartoon Video Makers Online and Offline for 2024
- Things You Should Know When Unlocking Total Wireless Of iPhone 15 Pro Max | Dr.fone
- How To Simulate GPS Movement With Location Spoofer On Oppo Find N3 Flip? | Dr.fone
- How to Bypass FRP on Nokia 130 Music?
- Your Complete Guide To Reset Infinix Smart 8 HD | Dr.fone
- Network Locked SIM Card Inserted On Your Vivo V30 Lite 5G Phone? Unlock It Now
- Fix App Not Available in Your Country Play Store Problem on Honor 90 Lite | Dr.fone
- In 2024, How to Bypass Google FRP Lock on Xiaomi Devices
- Oppo A56s 5G Bootloop Problem, How to Fix it Without Data Loss | Dr.fone
- In 2024, Guide on How To Remove Apple ID From iPhone SE (2022)
- 15 Best Strongest Pokémon To Use in Pokémon GO PvP Leagues For Poco C55 | Dr.fone
- In 2024, Locked Out of Apple iPhone 14 Pro? 5 Ways to get into a Locked Apple iPhone 14 Pro | Dr.fone
- Prank Your Friends! Easy Ways to Fake and Share Google Maps Location On Apple iPhone 6 Plus | Dr.fone
- In 2024, How to Transfer Apps from Samsung Galaxy F14 5G to Another | Dr.fone
- How To Bypass the Required Apple Store Verification For iPhone 14 Plus | Dr.fone
- How to watch AVCHD MTS video on Samsung Galaxy S23?
- Title: New 2024 Approved Loop Your Videos with Ease 10 Best Free Online Looping Tools
- Author: Morgan
- Created at : 2024-04-28 05:25:54
- Updated at : 2024-04-29 05:25:54
- Link: https://ai-video-tools.techidaily.com/new-2024-approved-loop-your-videos-with-ease-10-best-free-online-looping-tools/
- License: This work is licensed under CC BY-NC-SA 4.0.
