
:max_bytes(150000):strip_icc():format(webp)/On-Line-Job-Search-aa2565e859bd43a2aa34dfa1537dbd50.jpg)
New 2024 Approved Free Video Blur Tool A Step-by-Step Guide
Free Video Blur Tool: A Step-by-Step Guide
How to Blur Video Online for Free

Liza Brown
Mar 27, 2024• Proven solutions
Sometimes it becomes important to blur the entire video or a particular part or section of it to draw the viewers’ attention or hide some sensitive or objectionable details from them respectively. Even though you can download and use any efficient app to get the job done, why take the pain when you can blur video online, and that too for free? Right?
With that said, in the following sections, you will learn about some portals available on the Internet that let you blur video background online. In addition, the options present in some of these web apps can also be exploited to blur part of video online free.
Best Online Tools to Blur Videos
A list of some of the best websites and their essential details are given below:
1. PickFrom
Visit: https://pickfrom.net/blur-video
PickFrom is a one-stop shop for almost all types of post-production tasks. For instance, you can blur a video or part of it, convert video to audio, add filters to the clips, and much more.
You Must Know About PickFrom Blur Tool
- No registration is required
- The free version adds a watermark while exporting
- Offers three pricing plans, namely Starter, Premium, and Enterprise
To blur video online with PickFrom:
- Go to the official website using your favorite Internet browser, and then click the Click to add files button
- Locate and upload the source video from your PC, and check the Blur part of the video box from the right pane
- Drag the selection box over the subject that you don’t want to get blurred, and resize the selection box as needed
- Turn off the Blur inside switch from the right pane, and choose a format from the Save As menu present at the bottom-left corner.
- Click Start, and then click Download or Copy the link to download the modified video to your PC or share it online, respectively.

Limitations
- Maximum acceptable video size is up to 2GB and 5GB for Starter and Premium subscriptions respectively.
- Enables you to blur either the full video or a part of it
- At the time of this writing, the ‘Blur video background’ feature isn’t smart enough to differentiate between the background and the main subject (humans)
2. WoFox
Visit: https://www.wofox.com/video-editing-tools/blur-an-object-in-video
WoFox is another website that offers almost every important tool for designing, post-production, and audio and video treatments. For example, you can create animation designs, GIF templates, infographic images, etc., with the web app.
You Must Know About Using WoFox to Blur Video
- No registration or credit card details are required
- Even the free access doesn’t add any watermark to the exported videos
- Offers three types of subscription plans, namely Free, Business Plan, Team Plan, and Virtual Assistant Plan
To blur part of video online free with WoFox:
- Launch your favorite web browser, and use the link given above to visit the portal;
- Click Upload and upload the source video, and then position and scale the selection box to cover the portion of the video that needs to be blurred.
- Optionally click the + button from the navigation pane on the left to add more selection boxes to cover multiple video portions. Click Download from the top-right corner of the page to download the modified clip.

Limitations of using Wo Fox to Blur Video Online
- In this writing, WoFox cannot differentiate between the normal background and humans.
- The free version can create videos only of up to 30 seconds
- The free version can export videos only in 360p resolution
3. Flixier
Visit: https://flixier.com/tools/blur-or-pixelate-video
This online portal offers many tools to make your source videos look more engaging and professional. With Flixier, you can create innovative adverts, slideshows, intros/outros, lyric videos, and even birthday clips. As for the social media part, you can create videos for YouTube, Twitch, Instagram, and Facebook.
Things You Must Know About Flixier
- Registration is required before you can start using Flixier
- The free access adds a watermark to the exported videos
- Offers three subscription plans, namely Creator, Business, and Enterprise
To blur video online with Flixier:
- Use your web browser to visit the URL given above, and then click Get Started;
- Sign up for a new account, or if you already have one, click login from the upper-right corner of the left section of the page;
- Right-click anywhere inside the Personal Library pane on the left, and then click Import;
- Choose your preferred method, and upload the source video to Flixier, and then click Import all when done;
- Close the Pick a layout box and drag the video from the Personal Library pane to the Timeline at the bottom;
- Position the Skimmer (Playhead) on the frame you want to start blurring the video from, and then click to select Shapes from the toolbox on the left;
- Click the Expand arrow next to the Square shape in the Shapes pane, and then click Square mask from the menu;
- Position and scale the square mask in the preview window, and then choose your preferred effect from the available options under the Masks section in the right pane;
- Drag the sides of the mask layer in the Timeline to specify for how long the mask should be applied in the video;
- Click Export from the top-right corner, and customize the output settings, and if need be, choose the target platform(s);
- Click Export Video from the lower area of the right pane, and wait while the video is rendered before you can start downloading it.

Limitations of using Flixier
- The free account can have only up to 2GB of storage
- It supports only 10 minutes of videos per month to be exported with a free account
- The maximum resolution for the videos exported with a free account is 720p
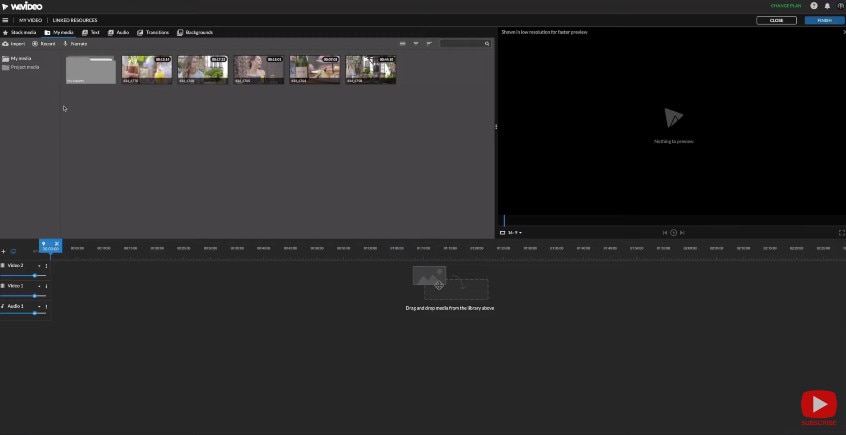
4. Kapwing
Visit: https://www.kapwing.com/studio
Kapwing is a trusted portal known to almost everyone who prefers online resources over PC applications. The website allows you to edit the videos, create memes for social media platforms, add audio and subtitles to the clips, resize them, etc.
Things You Must Know About Kapwing
- Registration is not necessary to blur video background online with Kapwing
- The free version does not add a watermark to the videos while exporting.
- Offers three subscription plans, namely Free, Pro, and For Teams
To blur video background online with Kapwing:
- Launch a web browser and visit the link given above
- Click Upload File, and upload the source video (or paste its URL if the clip is published online)
- Click Duplicate from the LAYER section of the right pane, and click to select the duplicate layer
- Click Crop from the top of the right pane, and crop the portion of the video that needs to be blurred
- Click Done Cropping, and then click Adjust from the top of the right pane
- Use the Blur slider to adjust the intensity of the blur effect
- Click Done Adjustingand use the Forward, Front, Backward, or Back buttons under the LAYER section to make the duplicate layer visible.
- Click Export Video from the top-right corner of the page, and wait while the modified video is rendered.
- Click the Download or Copy link to save the video to your PC or share it online, respectively.

Limitations
- You must register and sign in to a free account before exporting the videos to get rid of the watermark.
- Files of only up to 250MB can be uploaded while using a free account
- Videos of only up to 7 minutes each can be exported with a free account, while the total duration of the videos that can be exported is up to 3 hours.
5. Hippo Video
Visit: https://www.hippovideo.io/users/sign%5Fin
In addition to having various tools to edit the clips, including blur video online, Hippo Video can also record your PC screen and audio and even capture webcam footage. Creating engaging slideshows from the uploaded images is yet another feature that the web app offers.
You Must Know
- Registration is mandatory before you can start using Hippo Video
- The free/trial version doesn’t add a watermark to the exported videos
- Offers four subscription plans, namely Free, Personal, Classroom, and School
To blur video background online for free with Hippo Video:
- Use your favorite web browser to visit the URL given above
- Click Sign Up from the lower area of the Sign In to your account box (or sign in if you already have a Hippo Video account)
- Choose your preferred method to create an account, and then sign in
- Click Get Started and then populate the fields on the next couple of pages with the correct information on the next page.
- After completing the account creation process, click Import Video on the page that appears.
- On the Import Video box, choose your preferred method to locate and upload the source video, i.e., from your local computer or G-Drive.
- Click PROCEED from the bottom-right corner, and on the next page, add the necessary details related to the video (optional)
- Click IMPORT from the bottom-right corner to import the video and click EDIT VIDEO from the upper-right area of the preview window on the next page.
- Click Quick Edit from the list that appears, and then click the Blur tool from the bottom of the preview window.
- Click Add New Blur and position and scale the selection box in the preview window to cover the area that needs to be blurred.
- Drag the Blur marker in the progress bar to define the effect duration, and use the Strength slider to manage the intensity of the blur effect, and then click SAVE
- Back on the previous page, click EXPORT from the lower area of the preview window.
- Choose your preferred platform to export and publish the modified video to

Limitations
- The video resolution remains 480p while using a free account
- With the free version, you only get 1GB of bandwidth per month
6. YouTube Studio
Visit: https://studio.youtube.com/
Being one of the most viewed streaming media portals that offer free uploads and even lets you monetize your creations, YouTube has a separate section called YouTube Studio, where you can edit clips before publishing.
You Must Know
- A Gmail account is required to use YouTube Studio.
- All the videos can be uploaded without a watermark for free without any expiration date
- No subscription plans are enforced
To blur video online with YouTube Studio:
- Visit the URL given above using your favorite web browser (Google Chrome is recommended)
- If not already signed in, do so with your Gmail account when prompted for
- Click UPLOAD VIDEOS from the Channel dashboard section and on the Upload videos box, click SELECT FILES, and select and upload the source video from your PC
- While the video uploads, specify other publishing preferences using the options present on the box that appears
- Click NEXT from the bottom-right corner when done.
- On the Video elements box, add your preferred elements, click NEXT, review the details on the Checks box, click NEXT, choose your visibility preferences on the Visibility box, and click.
- Back on the main page, click Content from the navigation pane on the left and hover the mouse over the thumbnail of the video you uploaded, and click the Details icon that appears on the right.
- Click Editor from the Your video pane on the left and click GET STARTED from the right window and click BLUR PARTS OF YOUR VIDEO from the lower area of the Video editor window on the right.
- Click Custom blur from the list that appears and position and scale the selection box in the preview window to cover the object that needs to be blurred and drag the Blur slider in the Timeline to specify the duration of the effect.
- Optionally click BLUR from the upper-left area of the Video editor window to add another instance of the blur effect to blur another segment of the clip and click SAVE from the upper-right side.
- Click SAVE again on the Save changes confirmation box to save the changes
- Wait while Google reviews the modifications, and the video is made available for viewing
- Once this is done, get back to the Content section as explained earlier
- Hover mouse over the thumbnail, and click the Options icon from the right this time
- Click Download from the list to download the video with the blur effect to your PC

You can check more details of blurring videos with YouTube Studio .
Limitations
- Your YouTube account must be verified before you can publish long videos. Account verification is free.
- No copyright content is allowed to be published on YouTube
- No pornography or unethical content is allowed to be posted on YouTube
Bonus: How to Blur Video with Wondershare Filmora
 Download Mac Version ](https://tools.techidaily.com/wondershare/filmora/download/ )
Wondershare Filmora is a versatile post-production application with a built-in video editing tools and effects to edit videos with ease. The tool is usually considered a good competitor of Adobe Premiere Pro, Final Cut Pro X, etc.
Like any other similar program, even Filmora allows you to blur both landscape and portrait videos. The processes of getting these tasks done are given below:
1. Blur a Part of Video (Landscape Video)
Step 1: Import and Add the Source Video to Timeline
Launch Wondershare Filmora on your Windows or Mac computer (MacBook Pro M1 is used here), make sure that the 16:9 (Widescreen) layout preset is selected under the Select Project Aspect Ratio section on the flash screen, and click New Project.

Next, click to select My Media from the menu bar if not already selected, and from the navigation pane on the left, select Project Media.

Then, click Import from the Media box, select and import the source video to the program, drag the clip from the Media box to the Timeline at the bottom, and when the confirmation box appears, choose the option either under the Keep Project Settings or Match to Media sections to add the video to the Timeline.

Step 2: Add Blur Effect
Go to Effects from the menu bar, select Default from the top of the navigation pane on the left, and select Utility from the available list. From the right box, drag the Mosaic effect, and place it on a separate layer above the video track in the Timeline.

Step 3: Customize the Effect to Blur a Part of Video
Double-click the Blur effect in the Timeline, use the scaling handles in the preview window to scale and position the effect to cover your preferred part of the video and place it at your desired location respectively, choose a Mosaic style from the Type list present in the left box, and use the Intensity and Opacity sliders to customize further the appearance of effect as needed. Optionally, you can drag the side handles of the effect in the Timeline to adjust the duration of its visibility, and click OK from the bottom-right area of the upper-left box to save the changes.

2. Blur a Vertical Video
Download Mac Version ](https://tools.techidaily.com/wondershare/filmora/download/ )
Step 1: Import a Vertical Video and Add It to the Timeline
Use the above method to import the source vertical video to Filmora X and add it to the Timeline. However, it is important to choose the button under the Keep Project Settings label when the confirmation box appears, so you get some real estate because of the landscape mode to add the blur effect.
Step 2: Add Background Blur
Go to Effects and choose Default from the left pane, as explained earlier. Next, expand the Filters tree if not already expanded, click to select Background Blur from the list, from the box on the right, choose and drag your preferred blur effect, and place it on a separate layer in the Timeline above the video track.

Step 3: Customize the Blur Effect
Double-click the Blur effect in the Timeline, and use the available sliders to customize the effect that best fits your needs.

You can find more details about how to blur the background in the portrait video with Filmora .
Conclusion
If you want to have full control over the post-production process, having an efficient desktop program like Wondershare Filmora X would be something you might be looking for. On the other hand, if you are not a professional editor or are not much into editing and prefer playing around with the tools for personal use, going for a decent web portal to blur video online is your best bet.
Liza Brown
Liza Brown is a writer and a lover of all things video.
Follow @Liza Brown
Liza Brown
Mar 27, 2024• Proven solutions
Sometimes it becomes important to blur the entire video or a particular part or section of it to draw the viewers’ attention or hide some sensitive or objectionable details from them respectively. Even though you can download and use any efficient app to get the job done, why take the pain when you can blur video online, and that too for free? Right?
With that said, in the following sections, you will learn about some portals available on the Internet that let you blur video background online. In addition, the options present in some of these web apps can also be exploited to blur part of video online free.
Best Online Tools to Blur Videos
A list of some of the best websites and their essential details are given below:
1. PickFrom
Visit: https://pickfrom.net/blur-video
PickFrom is a one-stop shop for almost all types of post-production tasks. For instance, you can blur a video or part of it, convert video to audio, add filters to the clips, and much more.
You Must Know About PickFrom Blur Tool
- No registration is required
- The free version adds a watermark while exporting
- Offers three pricing plans, namely Starter, Premium, and Enterprise
To blur video online with PickFrom:
- Go to the official website using your favorite Internet browser, and then click the Click to add files button
- Locate and upload the source video from your PC, and check the Blur part of the video box from the right pane
- Drag the selection box over the subject that you don’t want to get blurred, and resize the selection box as needed
- Turn off the Blur inside switch from the right pane, and choose a format from the Save As menu present at the bottom-left corner.
- Click Start, and then click Download or Copy the link to download the modified video to your PC or share it online, respectively.
Limitations
- Maximum acceptable video size is up to 2GB and 5GB for Starter and Premium subscriptions respectively.
- Enables you to blur either the full video or a part of it
- At the time of this writing, the ‘Blur video background’ feature isn’t smart enough to differentiate between the background and the main subject (humans)
2. WoFox
Visit: https://www.wofox.com/video-editing-tools/blur-an-object-in-video
WoFox is another website that offers almost every important tool for designing, post-production, and audio and video treatments. For example, you can create animation designs, GIF templates, infographic images, etc., with the web app.
You Must Know About Using WoFox to Blur Video
- No registration or credit card details are required
- Even the free access doesn’t add any watermark to the exported videos
- Offers three types of subscription plans, namely Free, Business Plan, Team Plan, and Virtual Assistant Plan
To blur part of video online free with WoFox:
- Launch your favorite web browser, and use the link given above to visit the portal;
- Click Upload and upload the source video, and then position and scale the selection box to cover the portion of the video that needs to be blurred.
- Optionally click the + button from the navigation pane on the left to add more selection boxes to cover multiple video portions. Click Download from the top-right corner of the page to download the modified clip.
Limitations of using Wo Fox to Blur Video Online
- In this writing, WoFox cannot differentiate between the normal background and humans.
- The free version can create videos only of up to 30 seconds
- The free version can export videos only in 360p resolution
3. Flixier
Visit: https://flixier.com/tools/blur-or-pixelate-video
This online portal offers many tools to make your source videos look more engaging and professional. With Flixier, you can create innovative adverts, slideshows, intros/outros, lyric videos, and even birthday clips. As for the social media part, you can create videos for YouTube, Twitch, Instagram, and Facebook.
Things You Must Know About Flixier
- Registration is required before you can start using Flixier
- The free access adds a watermark to the exported videos
- Offers three subscription plans, namely Creator, Business, and Enterprise
To blur video online with Flixier:
- Use your web browser to visit the URL given above, and then click Get Started;
- Sign up for a new account, or if you already have one, click login from the upper-right corner of the left section of the page;
- Right-click anywhere inside the Personal Library pane on the left, and then click Import;
- Choose your preferred method, and upload the source video to Flixier, and then click Import all when done;
- Close the Pick a layout box and drag the video from the Personal Library pane to the Timeline at the bottom;
- Position the Skimmer (Playhead) on the frame you want to start blurring the video from, and then click to select Shapes from the toolbox on the left;
- Click the Expand arrow next to the Square shape in the Shapes pane, and then click Square mask from the menu;
- Position and scale the square mask in the preview window, and then choose your preferred effect from the available options under the Masks section in the right pane;
- Drag the sides of the mask layer in the Timeline to specify for how long the mask should be applied in the video;
- Click Export from the top-right corner, and customize the output settings, and if need be, choose the target platform(s);
- Click Export Video from the lower area of the right pane, and wait while the video is rendered before you can start downloading it.
Limitations of using Flixier
- The free account can have only up to 2GB of storage
- It supports only 10 minutes of videos per month to be exported with a free account
- The maximum resolution for the videos exported with a free account is 720p
4. Kapwing
Visit: https://www.kapwing.com/studio
Kapwing is a trusted portal known to almost everyone who prefers online resources over PC applications. The website allows you to edit the videos, create memes for social media platforms, add audio and subtitles to the clips, resize them, etc.
Things You Must Know About Kapwing
- Registration is not necessary to blur video background online with Kapwing
- The free version does not add a watermark to the videos while exporting.
- Offers three subscription plans, namely Free, Pro, and For Teams
To blur video background online with Kapwing:
- Launch a web browser and visit the link given above
- Click Upload File, and upload the source video (or paste its URL if the clip is published online)
- Click Duplicate from the LAYER section of the right pane, and click to select the duplicate layer
- Click Crop from the top of the right pane, and crop the portion of the video that needs to be blurred
- Click Done Cropping, and then click Adjust from the top of the right pane
- Use the Blur slider to adjust the intensity of the blur effect
- Click Done Adjustingand use the Forward, Front, Backward, or Back buttons under the LAYER section to make the duplicate layer visible.
- Click Export Video from the top-right corner of the page, and wait while the modified video is rendered.
- Click the Download or Copy link to save the video to your PC or share it online, respectively.
Limitations
- You must register and sign in to a free account before exporting the videos to get rid of the watermark.
- Files of only up to 250MB can be uploaded while using a free account
- Videos of only up to 7 minutes each can be exported with a free account, while the total duration of the videos that can be exported is up to 3 hours.
5. Hippo Video
Visit: https://www.hippovideo.io/users/sign%5Fin
In addition to having various tools to edit the clips, including blur video online, Hippo Video can also record your PC screen and audio and even capture webcam footage. Creating engaging slideshows from the uploaded images is yet another feature that the web app offers.
You Must Know
- Registration is mandatory before you can start using Hippo Video
- The free/trial version doesn’t add a watermark to the exported videos
- Offers four subscription plans, namely Free, Personal, Classroom, and School
To blur video background online for free with Hippo Video:
- Use your favorite web browser to visit the URL given above
- Click Sign Up from the lower area of the Sign In to your account box (or sign in if you already have a Hippo Video account)
- Choose your preferred method to create an account, and then sign in
- Click Get Started and then populate the fields on the next couple of pages with the correct information on the next page.
- After completing the account creation process, click Import Video on the page that appears.
- On the Import Video box, choose your preferred method to locate and upload the source video, i.e., from your local computer or G-Drive.
- Click PROCEED from the bottom-right corner, and on the next page, add the necessary details related to the video (optional)
- Click IMPORT from the bottom-right corner to import the video and click EDIT VIDEO from the upper-right area of the preview window on the next page.
- Click Quick Edit from the list that appears, and then click the Blur tool from the bottom of the preview window.
- Click Add New Blur and position and scale the selection box in the preview window to cover the area that needs to be blurred.
- Drag the Blur marker in the progress bar to define the effect duration, and use the Strength slider to manage the intensity of the blur effect, and then click SAVE
- Back on the previous page, click EXPORT from the lower area of the preview window.
- Choose your preferred platform to export and publish the modified video to
Limitations
- The video resolution remains 480p while using a free account
- With the free version, you only get 1GB of bandwidth per month
6. YouTube Studio
Visit: https://studio.youtube.com/
Being one of the most viewed streaming media portals that offer free uploads and even lets you monetize your creations, YouTube has a separate section called YouTube Studio, where you can edit clips before publishing.
You Must Know
- A Gmail account is required to use YouTube Studio.
- All the videos can be uploaded without a watermark for free without any expiration date
- No subscription plans are enforced
To blur video online with YouTube Studio:
- Visit the URL given above using your favorite web browser (Google Chrome is recommended)
- If not already signed in, do so with your Gmail account when prompted for
- Click UPLOAD VIDEOS from the Channel dashboard section and on the Upload videos box, click SELECT FILES, and select and upload the source video from your PC
- While the video uploads, specify other publishing preferences using the options present on the box that appears
- Click NEXT from the bottom-right corner when done.
- On the Video elements box, add your preferred elements, click NEXT, review the details on the Checks box, click NEXT, choose your visibility preferences on the Visibility box, and click.
- Back on the main page, click Content from the navigation pane on the left and hover the mouse over the thumbnail of the video you uploaded, and click the Details icon that appears on the right.
- Click Editor from the Your video pane on the left and click GET STARTED from the right window and click BLUR PARTS OF YOUR VIDEO from the lower area of the Video editor window on the right.
- Click Custom blur from the list that appears and position and scale the selection box in the preview window to cover the object that needs to be blurred and drag the Blur slider in the Timeline to specify the duration of the effect.
- Optionally click BLUR from the upper-left area of the Video editor window to add another instance of the blur effect to blur another segment of the clip and click SAVE from the upper-right side.
- Click SAVE again on the Save changes confirmation box to save the changes
- Wait while Google reviews the modifications, and the video is made available for viewing
- Once this is done, get back to the Content section as explained earlier
- Hover mouse over the thumbnail, and click the Options icon from the right this time
- Click Download from the list to download the video with the blur effect to your PC
You can check more details of blurring videos with YouTube Studio .
Limitations
- Your YouTube account must be verified before you can publish long videos. Account verification is free.
- No copyright content is allowed to be published on YouTube
- No pornography or unethical content is allowed to be posted on YouTube
Bonus: How to Blur Video with Wondershare Filmora
Download Mac Version ](https://tools.techidaily.com/wondershare/filmora/download/ )
Wondershare Filmora is a versatile post-production application with a built-in video editing tools and effects to edit videos with ease. The tool is usually considered a good competitor of Adobe Premiere Pro, Final Cut Pro X, etc.
Like any other similar program, even Filmora allows you to blur both landscape and portrait videos. The processes of getting these tasks done are given below:
1. Blur a Part of Video (Landscape Video)
Step 1: Import and Add the Source Video to Timeline
Launch Wondershare Filmora on your Windows or Mac computer (MacBook Pro M1 is used here), make sure that the 16:9 (Widescreen) layout preset is selected under the Select Project Aspect Ratio section on the flash screen, and click New Project.
Next, click to select My Media from the menu bar if not already selected, and from the navigation pane on the left, select Project Media.
Then, click Import from the Media box, select and import the source video to the program, drag the clip from the Media box to the Timeline at the bottom, and when the confirmation box appears, choose the option either under the Keep Project Settings or Match to Media sections to add the video to the Timeline.
Step 2: Add Blur Effect
Go to Effects from the menu bar, select Default from the top of the navigation pane on the left, and select Utility from the available list. From the right box, drag the Mosaic effect, and place it on a separate layer above the video track in the Timeline.
Step 3: Customize the Effect to Blur a Part of Video
Double-click the Blur effect in the Timeline, use the scaling handles in the preview window to scale and position the effect to cover your preferred part of the video and place it at your desired location respectively, choose a Mosaic style from the Type list present in the left box, and use the Intensity and Opacity sliders to customize further the appearance of effect as needed. Optionally, you can drag the side handles of the effect in the Timeline to adjust the duration of its visibility, and click OK from the bottom-right area of the upper-left box to save the changes.
2. Blur a Vertical Video
Download Mac Version ](https://tools.techidaily.com/wondershare/filmora/download/ )
Step 1: Import a Vertical Video and Add It to the Timeline
Use the above method to import the source vertical video to Filmora X and add it to the Timeline. However, it is important to choose the button under the Keep Project Settings label when the confirmation box appears, so you get some real estate because of the landscape mode to add the blur effect.
Step 2: Add Background Blur
Go to Effects and choose Default from the left pane, as explained earlier. Next, expand the Filters tree if not already expanded, click to select Background Blur from the list, from the box on the right, choose and drag your preferred blur effect, and place it on a separate layer in the Timeline above the video track.
Step 3: Customize the Blur Effect
Double-click the Blur effect in the Timeline, and use the available sliders to customize the effect that best fits your needs.
You can find more details about how to blur the background in the portrait video with Filmora .
Conclusion
If you want to have full control over the post-production process, having an efficient desktop program like Wondershare Filmora X would be something you might be looking for. On the other hand, if you are not a professional editor or are not much into editing and prefer playing around with the tools for personal use, going for a decent web portal to blur video online is your best bet.
Liza Brown
Liza Brown is a writer and a lover of all things video.
Follow @Liza Brown
13 Windows Movie Maker Alternatives You Need to Try
Windows Movie Maker has been a cornerstone tool for video editors for quite a while. There are a lot of amateurs who’ve made use of the free program and have done wonders with it. As it is discontinued, many Windows Movie Maker alternatives claim to offer ‘just the right video editing tool for you,’ few can live up to their promises—and most are very expensive.
We have ten other programs that can be used to create videos that include everything from Apple iMovie to other basic alternatives.
So whether you’re a beginner who wants to learn how to make a movie, a pro looking for an excellent alternative to Windows Movie Maker, or someone who wants to make a simple slide presentation or online video, you’re bound to find a video creation program here.
- Wondershare Filmora
- Avidemux Video Editor
- VirtualDub
- Sony Vegas Movie Studio
- WeVideo
- Lightworks
- ShotCut
- OpenShot
- Movavi Video Editor Plus
- VSDC Free Video Editor
- VideoPad Video Editor
- HitFilm
- Magix Movie Studio
- How To Edit a Video With a Windows Movie Maker Alternative
- Hot FAQs on Windows Movie Maker Alternatives
Part 1: Top 3 Picks for Windows Movie Maker Alternatives
The world’s best video editing software is about to change. We look at three of the most popular and valuable alternatives to Windows Movie Maker.
You will need to consider these alternatives to ensure they meet your expectations and needs.
1. Wondershare Filmora - Best Overall

Filmora is the best Windows Movie Maker Alternative designed according to your convenience.
Ratings: 4.4 Stars out 5
Starting from $49.99
2. Magix Movie Studio - Best for Collages

This alternative offers a variety of tools and plugins for anyone who wants to create professional-level videos in under a minute.
Download on Windows
Ratings: 4 stars out of 5
30-day free trials, then starts from $69.99 all the way to $129
3. Avidemux Video Editor - Best Open-Source Editor

An open-source editor that supports a wide range of formats is free! Avidemux has an interface similar to Windows Movie Maker, which makes it a perfect alternative.
Download on Windows
Ratings: 4.0 stars out of 5
Free Trial
Part 2: Ultimate Overview on 13 Best Alternatives to Windows Movie Maker
We live in visual culture, and we constantly see, capture, upload, and share videos on our smartphones, tablets, and laptops. So, it is only natural that more people seek ways to edit their videos. Windows Movie Maker was one of the most popular video editing apps. So it’s time to dig into the best Windows Movie Maker alternatives, which are arguably better and feature-rich.
| Software | OS | Media Resources | AI editing | Easy to Use | Free Trial |
|---|---|---|---|---|---|
| Wondershare Filmora | WindowsMacMobile | Yes | Yes | Yes | Yes |
| Avidemux | WindowsOS XLinuxBSD | Yes | No | Yes | Yes |
| Virtual Dub | Windows | No | No | Yes | Yes |
| Vegas Movie Studio | Windows | Yes | Yes | No | No |
| WeVideo | Online | Yes | No | Yes | Yes |
| Lightworks | LinuxOS X Windows | Yes | Yes | No | No |
| ShotCut | WindowsMacLinuxBSD | Yes | No | No | Yes |
| OpenShot | WindowsMacLinuxChrome OS | Yes | No | Yes | Yes |
| Movavi Plus | WindowsMac | Yes | No | Yes | Yes |
| VSDC | Windows | Yes | No | Yes | Yes |
| VideoPad | WindowsMaciPad/iPhone | Yes | No | Yes | Yes |
| HitFilm | WindowsMac | Yes | Yes | Yes | Yes |
| Magix Movie Studio | Windows | Yes | Yes | No | Yes |
Part 3: 13 Best Windows Movie Maker Alternatives for Windows
As we all know, Windows Movie Maker is the most used and trusted tool for creating videos in Windows. With its unique features and user-friendly interface, people often use this software to develop short and entertaining videos.
However, the fact is that Windows Movie Maker is not the current best video editing software for creating complex video projects. For this reason, we compiled a list of the 12 best alternatives to offer you a better option for Windows Movie Maker.
1. Wondershare Filmora
Filmora 11 is a powerful, easy-to-use video editor specially designed to streamline your workflow and save you hours weekly. It supports everything from Windows, Mac, and IOS to Android. The latest update to the flagship app includes several key enhancements that result in a much more efficient video creation workflow and one that’s easier to use than its rivals.
Key features
- Preset Templates
- Instant Mode
- Motion Tracking
- AI Editing Effects
- Auto Synchronization
- Plug-ins
Price
- Annual Plan: $49.99
- Perpetual Plan: $79.99
Pros
- Seamless interface for beginners
- Great customer support
- Plenty of effects and preset templates
- 4K video output options
Cons
- Rendering requires too much time
- The mobile app requires separate subscription
Supported OS: Windows , Mac , iOS , Android , iPad
G2 Ratings: 4.4 stars out of 5
Summary
Filmora’s intuitive interface allows experienced and brand-new users to create incredible videos with flawless special effects. Its high ratings and multiple supported formats make it quite popular among users.
2. Avidemux Video Editor
If you are a beginner and want to use a free, open-source software program for basic video editing, then Avidemux is a good choice. The interface is not as fancy as it could be, but there are some presets that’ll save you a lot of time. Avidemux is a cross-platform video editor that allows you to create custom videos, but it doesn’t feature the ability to share the edited footage to social media directly,
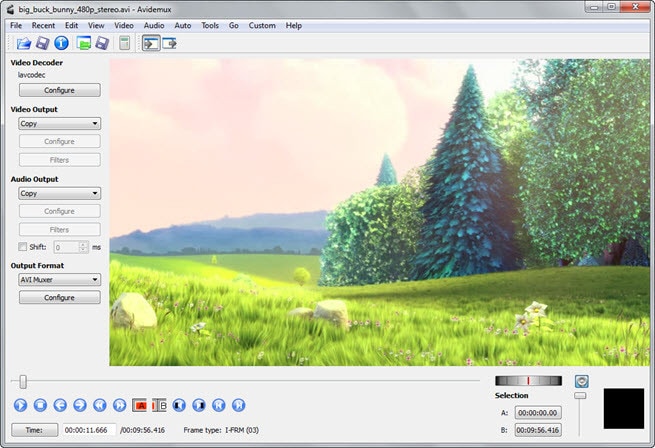
Key features
- Video and Audio Filters
- Support Popular Formats
- Convert Video For Archiving or Publishing
Price: Free
Pros
- It can convert Video To A Smaller Size
- Easy cut, trim, split video
Cons
- Out-dated UI
- Lacks sharing option
Supported OS: Windows , OS X , Linux , BSD
Uptodown Ratings: 4.0 stars out of 5
Summary
An open-source video editor that supports most formats. Due to its obsolete UI and lack of sharing features, Avidemux has average ratings.
3. VirtualDub
This open-source software is user-friendly and allows users with little experience to navigate the software without much trouble. It supports 3rd party apps and also offers batch-processing, which means working on multiple videos simultaneously makes it possible.
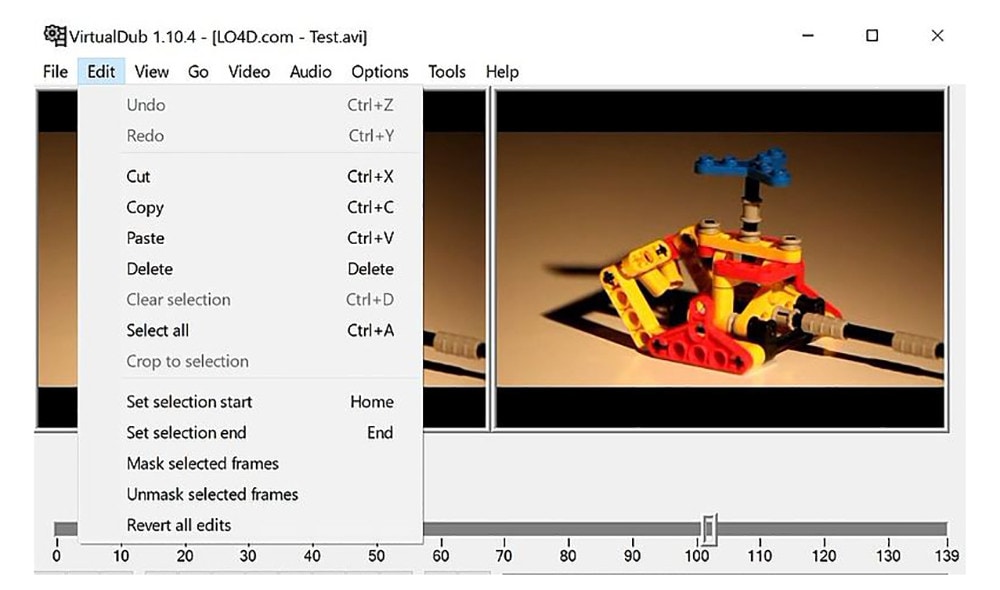
Key features
- Integrated volume and histogram meter
- Optimized disk
- Noise reduction
- Fractional frame rates
Price: Free
Pros
- Clean interface, easy to use
- Keyboard and mouse shortcuts for faster operation
- Free to use
Cons
- Not suitable for 4K editing
- Lack learning material
- Obsolete Interface
Supported OS: Windows
Compare Camp Ratings: 4.0 stars out of 5
Summary
Virtual Dub supports multitasking, and its features are pretty helpful. However, it lacks 4k editing and a friendly interface. Overall Virtual Dub is a good choice.
4. Sony Vegas Movie Studio
This video editing software makes it easy to create professional-looking videos in minimum time and effort. Vegas Movie Studio software is best for video editing professionals who have been doing it for some time and are looking for something a little more sophisticated than free alternatives. Not only does it has a high retail price, but its internal elements can be too complex for those just beginning.
Key features
- Color correction
- HDV and AVCHD-editing
- DV batch capture
- Wide variety of file formats and codecs
Price: Starting from $7.99 USD per month
Pros
- Customizable interface
- Multicam editing
- Lots of effects and transitions, with plug-in capability
- Good slow motion and warp flow transition tools
Cons
- Less intuitive interface than competitors
- Import from camcorder not ideal
- Some tools are complex
Supported OS: Windows
G2 Ratings: 4.4 out of 5
Summary
Vegas Movie Studio is the choice of professionals. It does all the work without taking up a lot of resources, and like most programs, there is a learning curve. It’s not always intuitive for beginners, but its professional and powerful features score decent in most reviews.
5. WeVideo
This cloud-based application is a simple-to-use video editing and sharing suite. WeVideo is a full-featured video editing application that uses JumpStart technology to create amazing videos. It’s an innovative app that offers a seamless editing experience as it supports multiple formats of video, images, audio, and graphics.
Key features
- WeVideo JumpStart
- Cloud storage
- Built-in graphics
- Customizable environment
- Advanced text editing
- Multi-track editing and storyboard
Price
- Free trial
- Power Plan: $9.99/month
- Unlimited Plan: $15.99/month
- Professional Plan: $39.99/month
- Business Plan: $73.99/month
Pros
- Constantly improving features
- Ease of use
- Storage is cloud-based
Cons
- Old fashion transition
- Leaves a watermark on free trial
Supported OS: Online
Trustpilot Ratings: 4 stars out of 5
Summary
WeVideo is a straightforward yet robust video editor. It offers a variety of features and supports multiple formats, plus its comprehensive pricing plan makes it useful for everyone.
6. Lightworks
Lightworks is the most powerful video editor in its class and an excellent tool for professionals who want to make amazing videos quickly. Lightworks is very fast and straightforward to use, and it has some great features you won’t find in any other video editor. It is available on all popular OS.

Key features
- Audio and Video Effect Plugin Support
- Cloud Connected
- Motion Graphics
- Advanced Metadata
- Proxy Workflows
- Apple ProRes decoding
Price
- Monthly Plan: $9.99/user
- Yearly Plan: $9.99/user
- Perpetual: $154.99
Pros
- High-resolution timeline rendering
- It has social media export templates
- Interfaces for multiple OS are consistent
- Instant autosave
Cons
- Commands are not always intuitive
- A bit pricey as compared to its competitors
Supported OS: Windows , Mac , Linux
Techradar Pro Ratings: 4 stars out of 5
Summary
Lightworks is not any other video editing tool available on the market of video editing tools. This video editing tool provides amateurs with the most sophisticated features in an optimized platform. Its scores are the highest on almost every review site.
7. ShotCut
Shotcut is a multiplatform video editor that lets you work with various formats for audio, video, image files, etc. This video editor makes it easy to mix and match the resolution and frame rates in a video file. All the changes you make in the editor can be undone and redone often. Shotcut is the best choice for video editing, without question.

Key features
- Webcam capture
- Audio scopes and filters
- Deinterlacing
- Eyedropper tool
- Video wipe transitions
- Keyframes for filter parameters
Price: Free
Pros
- Support for 4K resolutions
- Free
Cons
- Less intuitive than commercial apps
- Lacks built-in sharing to popular sites
Supported OS: Windows , Mac , Linux
GetApp Ratings: 4.5 out of 5 stars
Summary
Shotcut is an open-source video editor for creative professionals and is available on mac, Windows, and Linux. The free version of Shotcut has many excellent features, but it doesn’t have the slick interface or advanced techniques of the top paid editors.
8. OpenShot
An award-winning open-source video editor that creates stunning videos. OpenShot is a fast, easy-to-use, and surprisingly powerful video editor. OpenShot Video Editor allows you to work with many different types of tracks so that your edits will seem natural. OpenShot Video Editor allows you to add your custom animations or titles. The options are endless, so it all depends on your time and interest. It is available in more than 70 languages, making it ideal for all types of users.
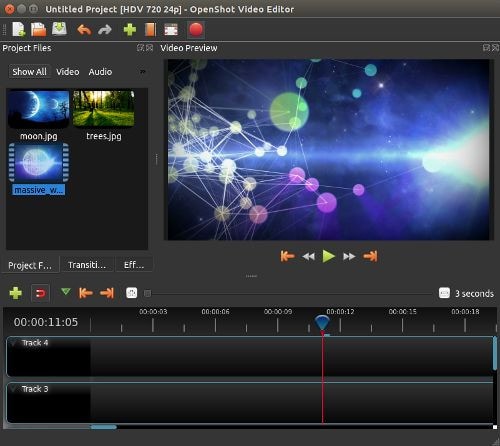
Key features
- 3D animations
- Animation and keyframes
- Multiple languages and formats
- Cross-platform
- Video-effects
Price: Free
Pros
- It is a non-linear editor with infinite tracks
- 100% free without watermark
- Frequent updates
Cons
- Obsolete interface
- Unstable performance
- Lacks some editing features
Supported OS: Window , Mac , Linux , Chrome OS
Getapp Ratings: 4.2 stars out of 5
Summary
Another open-source video-editor in the list is named OpenShot. It’s a multi-lingual and multi-supported app with unique features. Despite its unstable performance, OpenShot is still an ideal choice for many users.
9. Movavi Video Editor Plus
Movavi Video Editor Plus is the perfect tool to bring your creative ideas to life. It has special effects, ready-made intros, and keyframe animation. Using chroma keying, you can change the background of your video clips to any color or pattern that suits your need. Movavi has now redesigned its user interface to make it easy to use.
Key features
- Effects and transitions
- Built-in media pack
- Fast processing of 4K videos
- Keyframe animation
- Automatic video creation
- Cutting, trimming, joining
Price
- Free version: 7 days
- Video Editor Plus 1 year /1 PC: $49.95
- Video Editor Plus Lifetime /1 PC: $69.95
- Video Suite Lifetime /1 PC: $89.95
Pros
- Easy-to-understand user interface
- Transitions with sound
- Motion tracking and picture-in-picture tools
- Chroma-key capability
- Quick movie-creation tool
Cons
- Lacks advanced trim modes
- Slow rendering
PCMag Ratings: 4.0 stars out of 5
Summary
If you want to edit your videos with a minimal learning curve, try Movavi. You get PiP, chroma-keying, titling, basic keying, and motion tracking. The program is simple to use but doesn’t have all the features and stands four stars.
10. VSDC Free Video Editor
VSDC Free Video Editor is an online tool that lets you edit audio and video files to make your creations like movies, YouTube tutorial videos, and more. The audio and video files supported are extensive, and the software includes a codec manager. The Pro version isn’t necessary if you’re using the free edition of the software; it’s more than enough to get the job done.
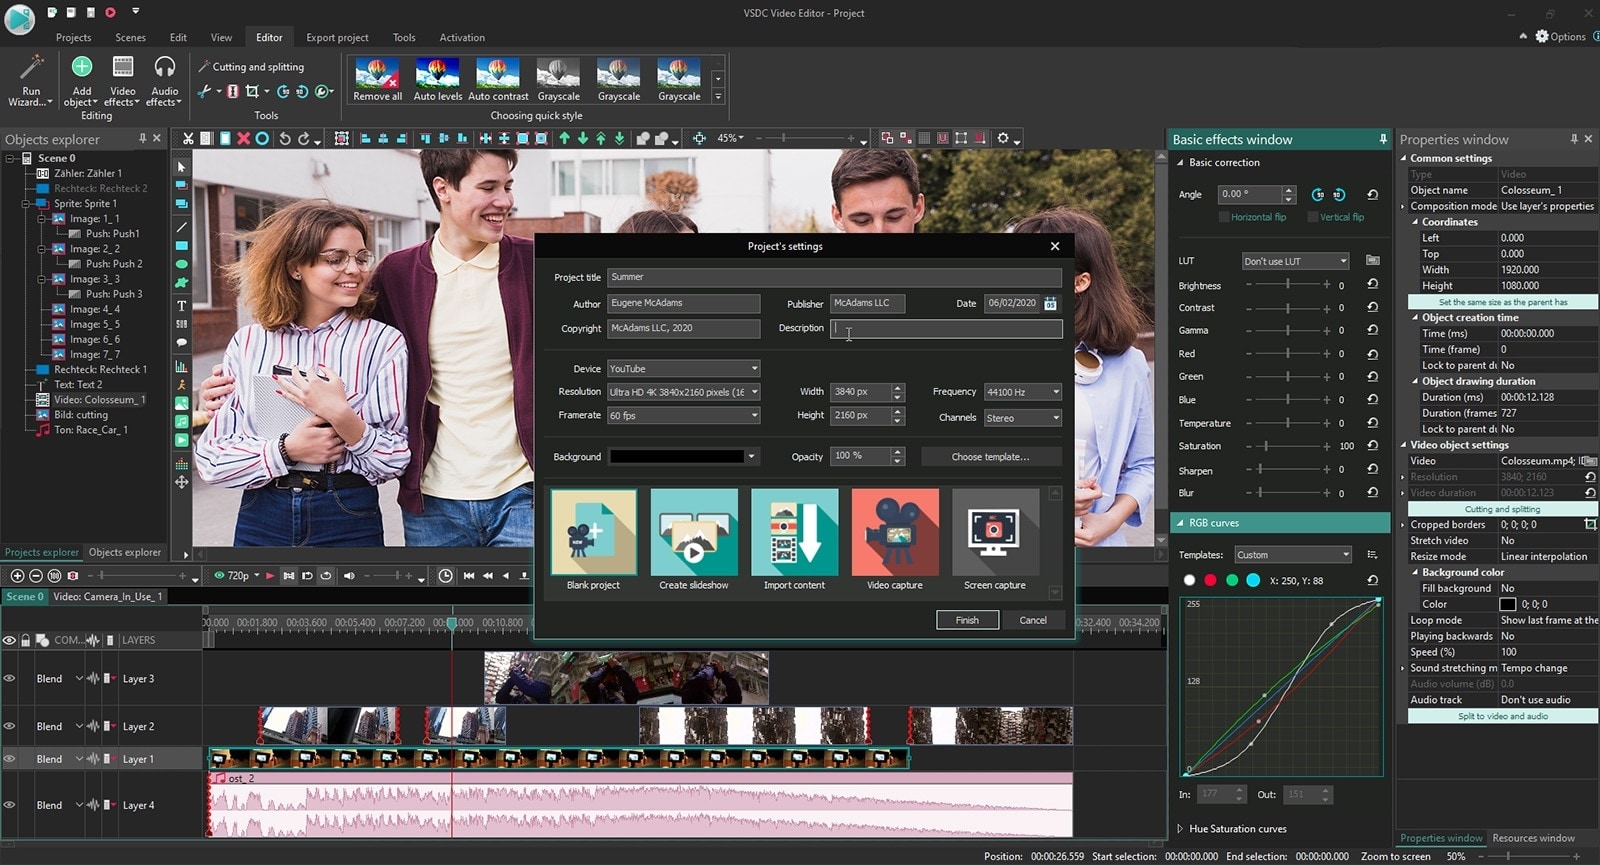
Key features
- Dark theme
- Subpixel Accuracy
- Powerful Chroma Key tool
- Trendy video effects, filters, and transitions
- Color Blending And Filters
- Built-In DVD Burning Tool
Price: Free
Pros
- Non-linear
- Video effects library
- Video stabilization
- Masking
Cons
- Outdated interface
- Lack keyboard shortcuts
- Only available on Windows
Supported OS: Windows
Capterra Ratings: 4.5 stars out 5
Summary
VSDC is a non-linear editor with extensive format support. It includes all the essential features an editor requires but with an obsolete UI. It is also ideal for many who need a powerful yet free video editor.
11. VideoPad Video Editor
VideoPad is a free video editor that can create stunning videos and perform basic editing tasks. A good video editor can help you to create videos for different social media platforms. You can make your videos look professional and polished with a few clicks and some simple editing skills. There’s nothing particularly exciting or advanced about this app; it’s simple enough for anyone new to video editing or even for seasoned editors. But the simple and easy-to-use interface makes the entire process very exciting.
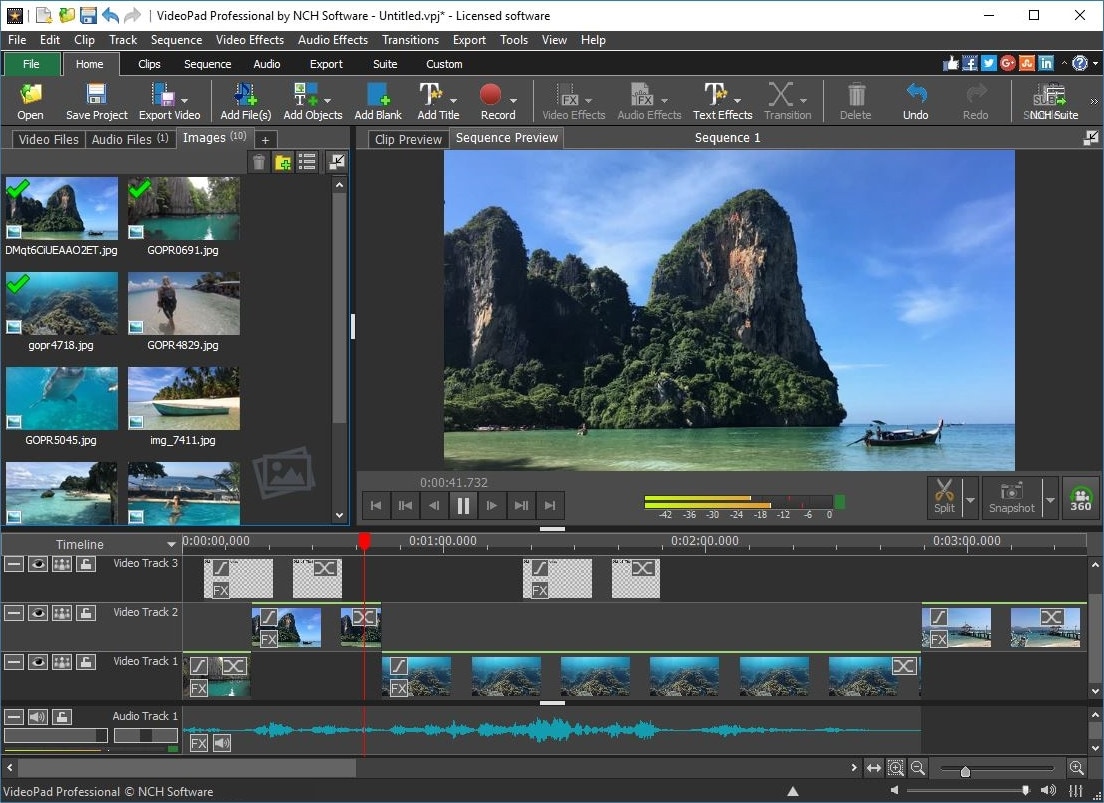
Key features
- Text snippets
- Range of transitional effects
- Plug-ins Library
- Burn finished videos to Blu-Ray, DVD, etc.
- Color correction and light balance.
Price: Free
Pros
- Simple and clean interface
- Supports multiple file formats
- Includes video effects
- Lightweight on system resources
Cons
- Lack of advanced features
Supported OS: Windows , Mac , iPad/iPhone
Tom’s guide Ratings: 3.5 stars out of 5
Summary
Video pad is a free video editor designed for beginners that is lightweight and simple. VideoPad is also great for creating quick videos for social media purposes like Youtube and Facebook. The software has a high rating, as shown above, and it’s available on Windows.
12. HitFilm
HitFilm is a helpful video editing software that makes editing easier for users. In addition to basic features, the program also provides advanced-level functions that make edited videos pop. Hitfilm Express Download has more than 400 features to help casual video editors save time. Features like: visual effects, cinematic elements, and compositing tools preset help unleash your creativity.
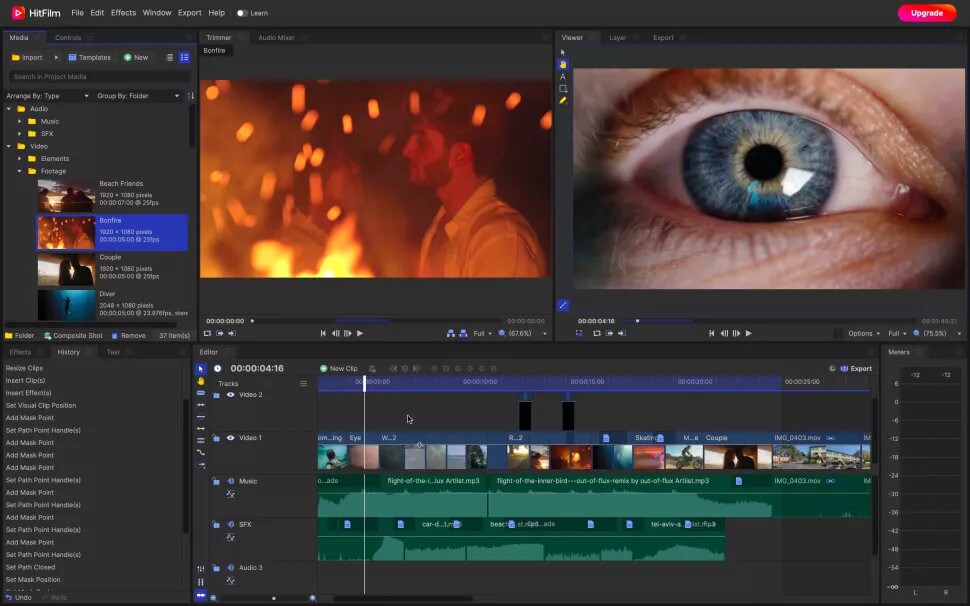
Key features
- Color Grading and correction
- Smart search
- Commentator recorder
- Lightning and lens flares
- 3D camera tracker
Price
- Free trial
- Creator: $7.50
- Pro: $12.50
- Enterprise: Custom pricing
Pros
- Intuitive interface
- It offers free tutorials and masterclasses
- Works on both Windows and Mac
Cons
- It requires heavy system requirements
TechRadar Ratings: 4.5 stars out of 5
Summary
HitFilm Express 15 is a powerful free video editing program that enables you to create high-quality videos in minutes with an intuitive interface. It offers advanced editing features such as advanced video trimming, 3D editing, and more.
13. Magix Movie Studio
Magix is the world’s leading professional audiovisual media software, with Sequoia being its industry-standard audio editing software. This movie editor is an enthusiast-level video editing software that competes with software from Adobe and CyberLink, and it even boasts support for 4K content and 360 degrees. There are many reasons to upgrade. This year’s update includes stabilization, 8K editing, motion tracking, and an in-app plug-in store.
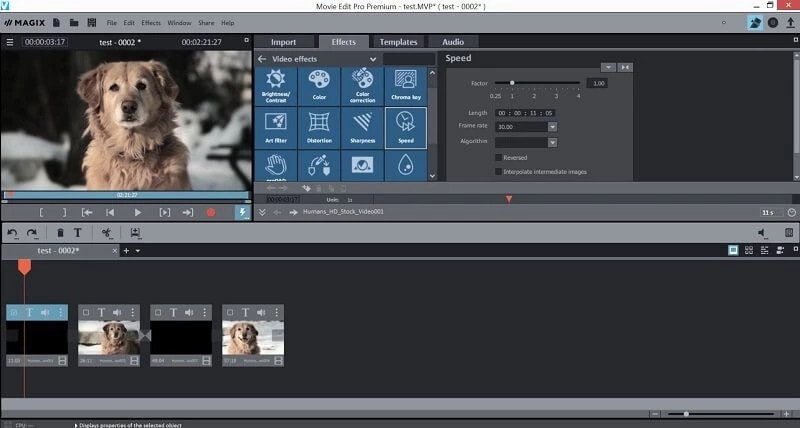
Key features
- NewBlue effects
- Fly-in animation
- New filter view
- Stabilization
- Motion tracking
- 8k support
Price
- Movie Studio 2024: $69.99 (30-day free trial)
- Movie Studio 2024 Platinum: $99.99 (30-day free trial)
- Movie Studio 2024 Suite: $129.00 (30-day free trial)
Pros
- Lots of video effects
- Responsive editing interface
- Multicam
- Trailer-like movie templates
- Solid audio editing
Cons
- Slower project rendering than others
- Lacks import and organization tools
Supported OS: Windows
PCMag Ratings: 3 stars out of 5
Summary
Magix movie studio is a powerful all-around video editing tool with many features that professional users have come to expect. It’s also relatively simple to use. But usability and performance are poor compared to other software programs like Filmora .
Part 4: How To Edit a Video With a Windows Movie Maker Alternative
Windows Movie Maker was great for editing a video, but it’s no match for some of the best video editing software. We’re talking about software capable of creating a cinematic experience in seconds, all on your computer.
When you need to edit a video with simple, quick edits, like adding a special effect or changing the background, try Filmora . Filmora is an easy-to-use application that allows you to create a movie using simple tools that don’t require additional training. You can’t beat this option if you want to create a professional-quality video for your blog or website.
Let’s dive into a quick tutorial on editing videos in Filmora:
Free Download For Win 7 or later(64-bit)
Free Download For macOS 10.14 or later
Step1 Open Wondershare Filmora on your PC or Mac
You can start a new project by clicking on ‘New Project’. And you can also change the ‘Aspect Ratio’ according to your project demand.
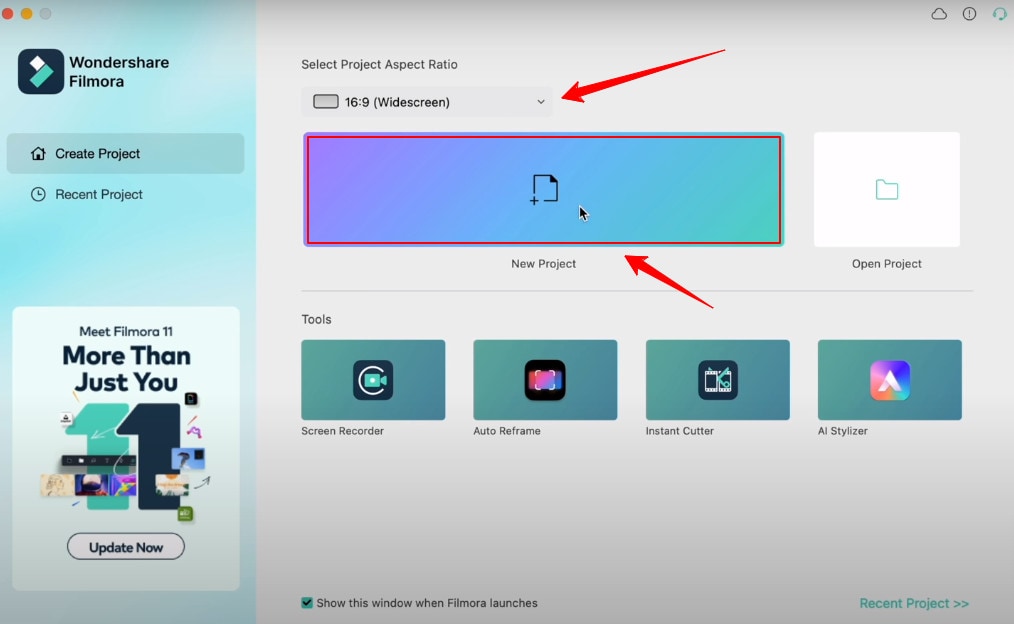
Step2 Import Videos
You can import your file by clicking the import tab on the upper-left side or clicking the import icon on the main window.
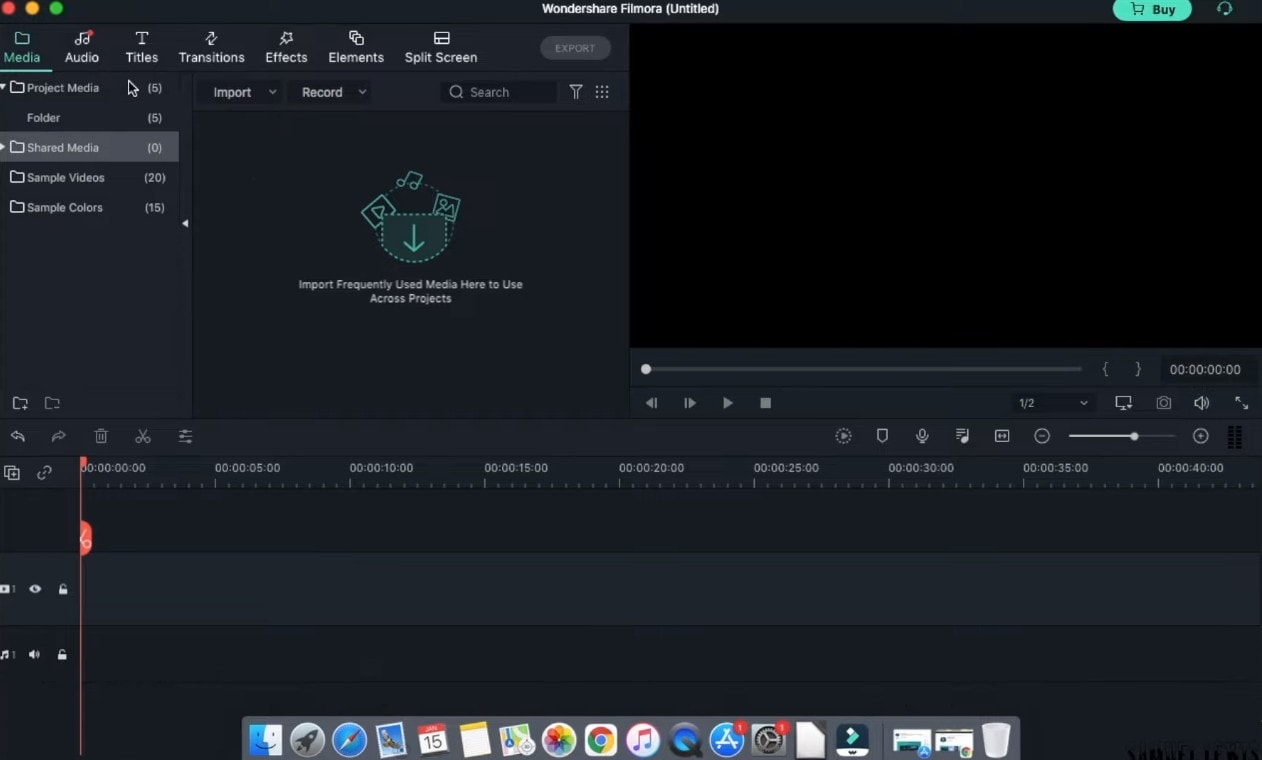
Step3 Drag and drop your footage to the timeline
After importing all the files, click and hold each individual video and drag and drop it to the timeline area according to your ideal sequence.
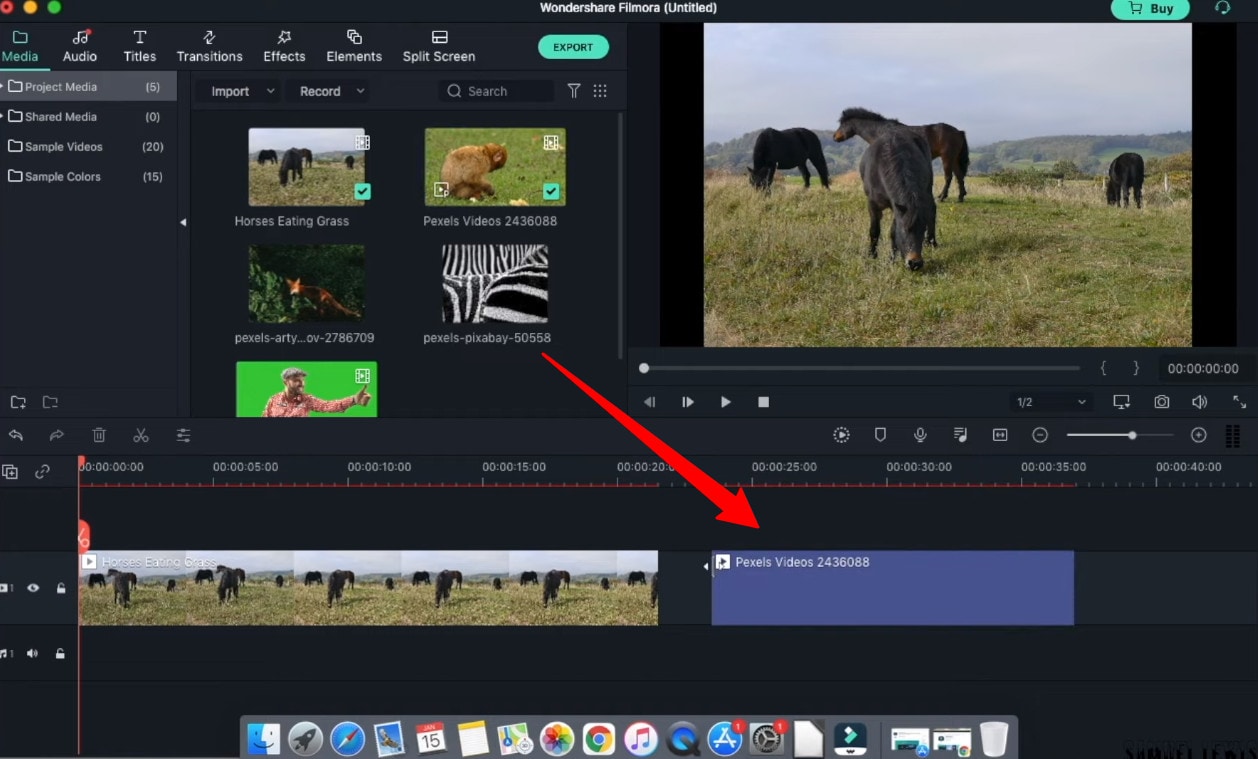
Step4 Add Audio
Go to the ‘Audio’ tab and select the audio file from the audio library. Once selected, drag and drop the audio file into the music timeline.
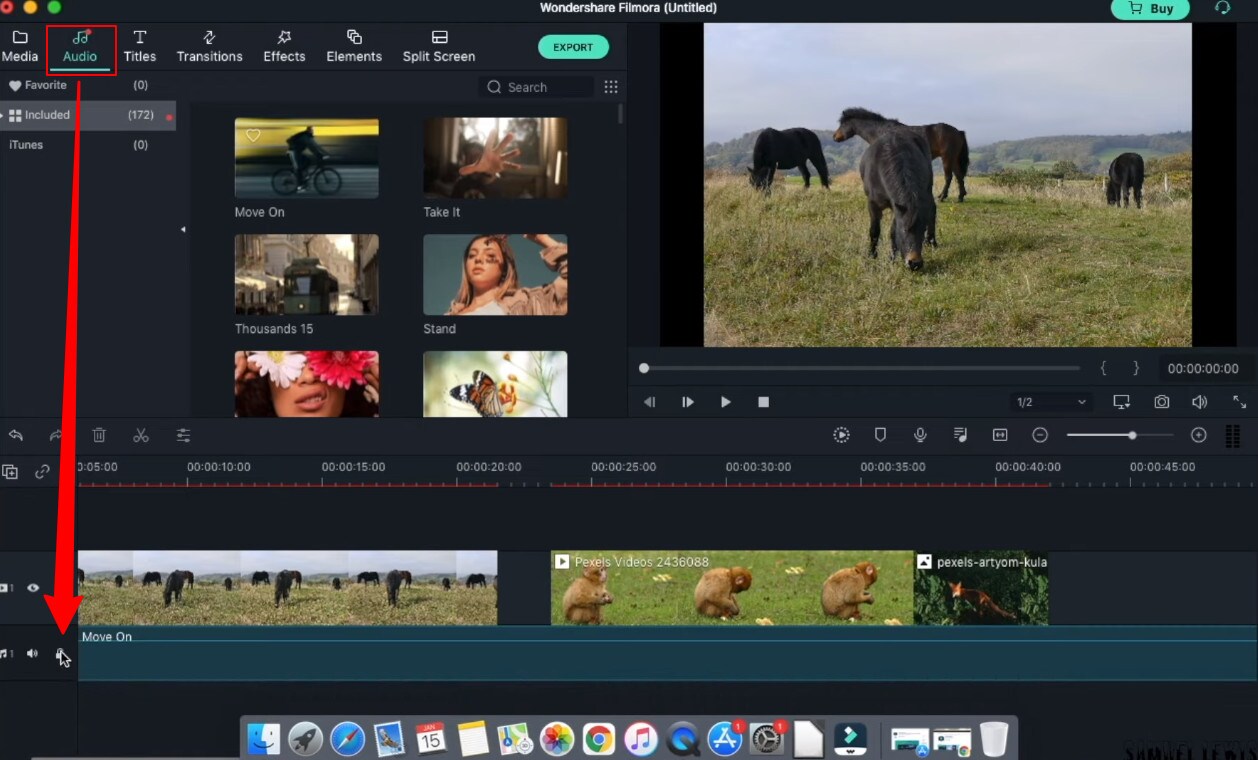
Step5 Add Titles
In your video intro, you can insert some title text. Go to the ‘Titles’ tab and select the one you like, and drag and drop it on top of the timeline. Double-click and edit the text and state your ideal statements. You can customize your text fonts and color too.
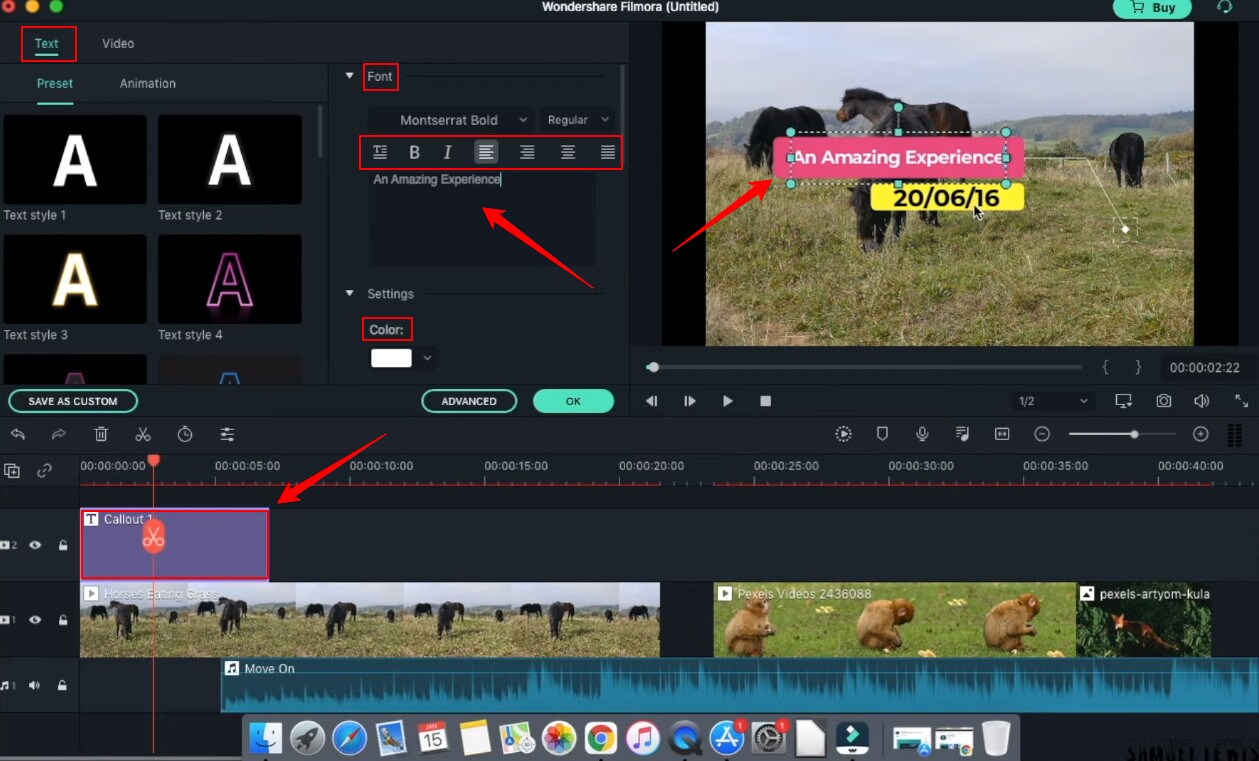
Step6 Add Transitions
You can add transition effects to ensure a smooth transition from one scene to another. The overall will get more professional look.
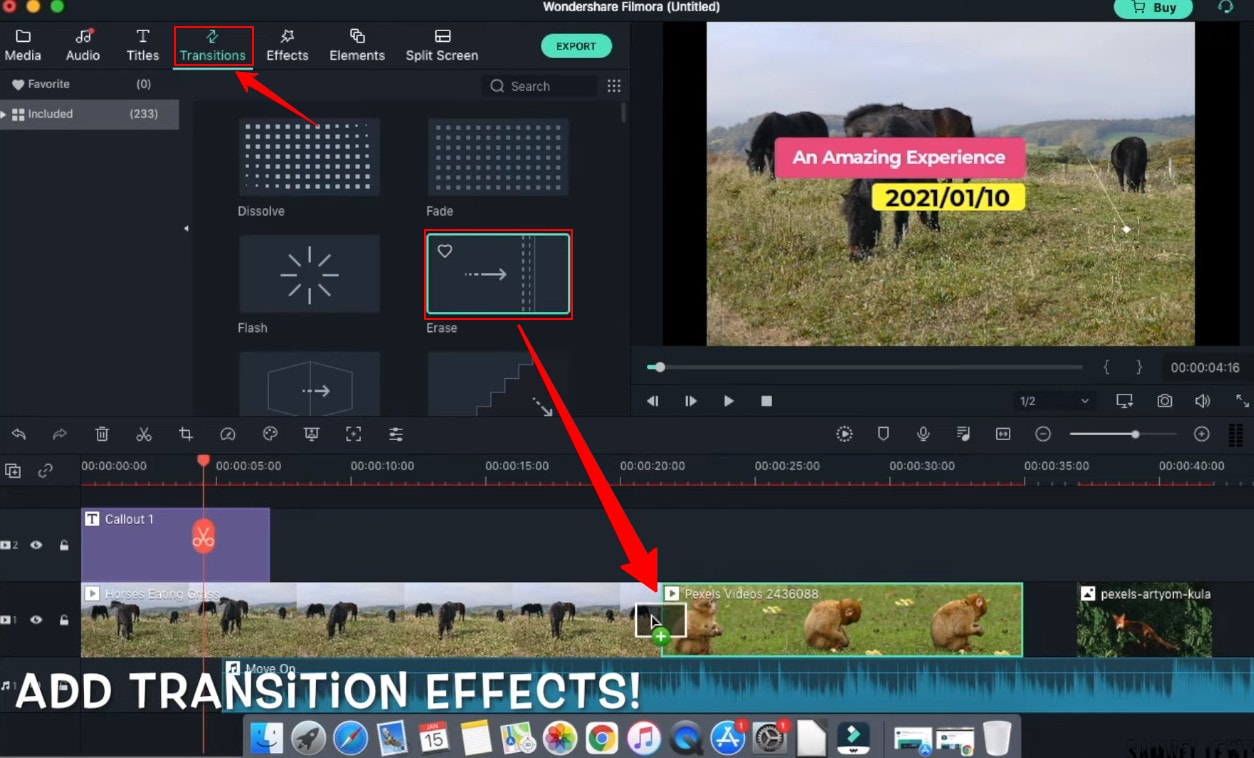
Step7 Add Effects
Next; you can get special effects to your video to make them more attractive and engaging to watch. Simple drag down the effect to your video and watch the effect take place in your selective scene.
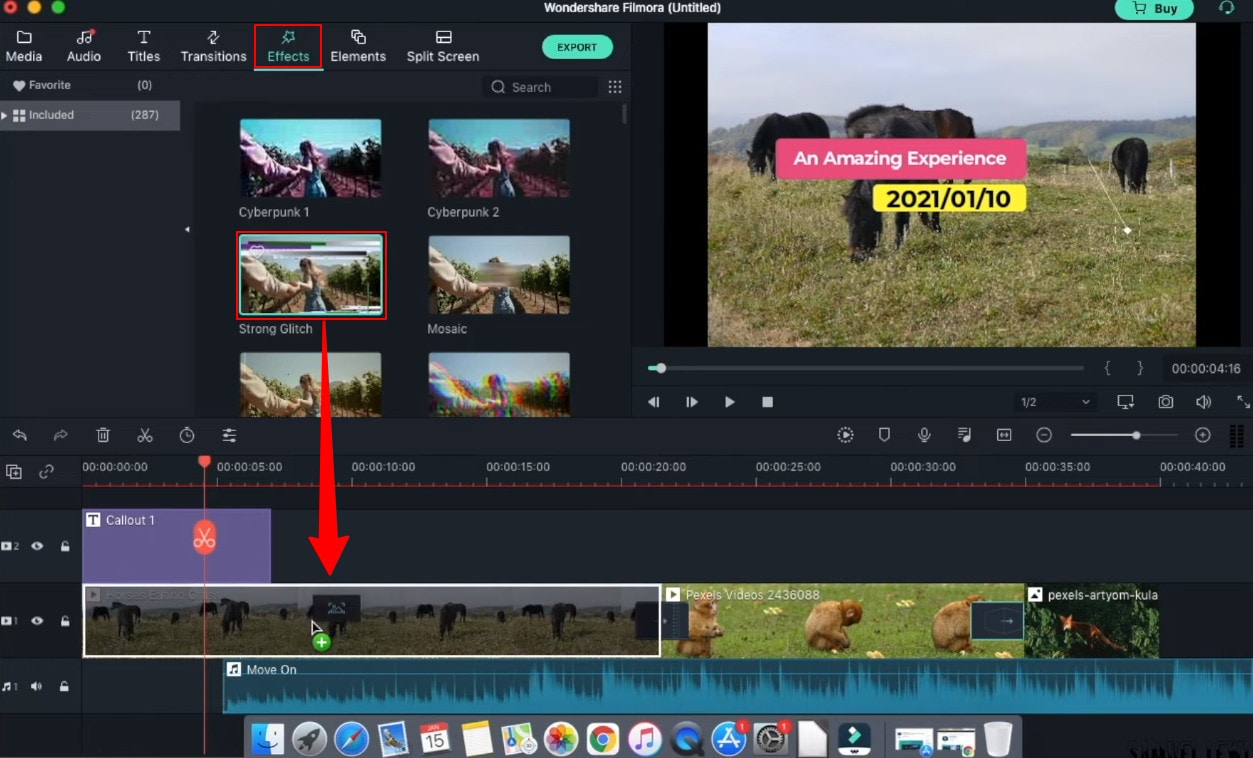
Step8 Export your work
Once all the changes have been made, hit ‘export’ from the top tab. A window will appear where you can change the settings, resolution, frame rate, bit rate, etc. Next, click the ‘export’ button down on that window, and then you can save the file in your drive.
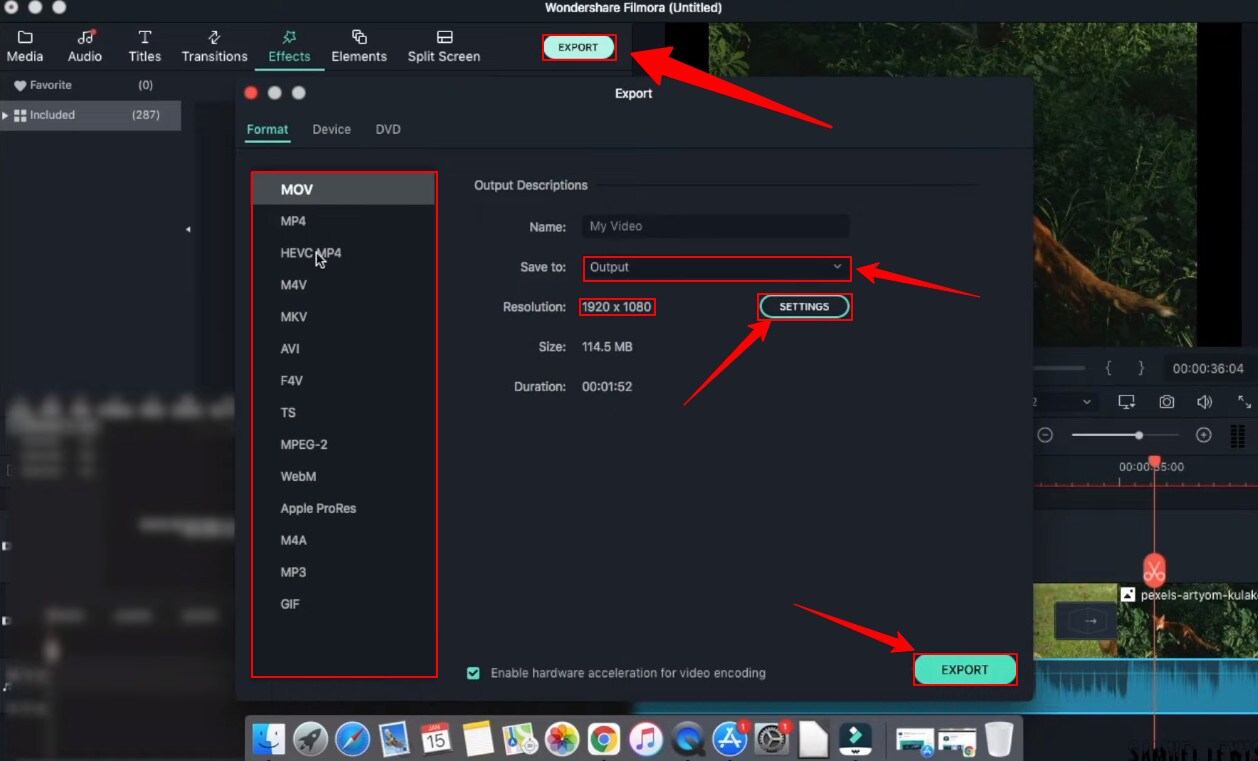
Part 5: Hot FAQs on Windows Movie Maker Alternatives
1. Why is Windows Movie Maker discontinued?
Microsoft’s video editing program, Windows Movie Maker, did not become a big hit with the public because it failed to do well on the market. Microsoft couldn’t get the support they were looking for from the program’s users. As a result, Microsoft had to cease its support of the program.
2. Is there a free version of Windows Movie Maker?
Microsoft Windows Movie maker was always accessible and pre-installed every windows product. Microsoft has discontinued support for Movie Maker and warns about free downloads of Movie Maker provided by third parties that might contain malware, viruses, or other issues.
3. What are the best free Windows Movie Maker Alternatives for Mac?
After switching to a Mac, you’ll find that the Windows Movie Maker alternatives offer much more than just a simple video editor. They provide advanced features, easy transitions, and less technical know-how to create pro-quality results. You should try using these platforms on your Mac if you have a video to edit.
- Wondershare Filmora
- Movavi
- OpenShot
Final Words
Windows Movie Maker is an excellent Windows video editor application for Windows users. But in recent years, it has become outdated due to the continuous development of new technologies. There are many alternatives for Windows Movie Maker, and here we listed some of the best ones. Most of them are free and featured packs. Each program has its unique set of features and capabilities, and each one excels in different areas. Check them out and see what you think.
Free Download For Win 7 or later(64-bit)
Free Download For macOS 10.14 or later
Part 1: Top 3 Picks for Windows Movie Maker Alternatives
The world’s best video editing software is about to change. We look at three of the most popular and valuable alternatives to Windows Movie Maker.
You will need to consider these alternatives to ensure they meet your expectations and needs.
1. Wondershare Filmora - Best Overall
Filmora is the best Windows Movie Maker Alternative designed according to your convenience.
Ratings: 4.4 Stars out 5
Starting from $49.99
2. Magix Movie Studio - Best for Collages
This alternative offers a variety of tools and plugins for anyone who wants to create professional-level videos in under a minute.
Download on Windows
Ratings: 4 stars out of 5
30-day free trials, then starts from $69.99 all the way to $129
3. Avidemux Video Editor - Best Open-Source Editor
An open-source editor that supports a wide range of formats is free! Avidemux has an interface similar to Windows Movie Maker, which makes it a perfect alternative.
Download on Windows
Ratings: 4.0 stars out of 5
Free Trial
Part 2: Ultimate Overview on 13 Best Alternatives to Windows Movie Maker
We live in visual culture, and we constantly see, capture, upload, and share videos on our smartphones, tablets, and laptops. So, it is only natural that more people seek ways to edit their videos. Windows Movie Maker was one of the most popular video editing apps. So it’s time to dig into the best Windows Movie Maker alternatives, which are arguably better and feature-rich.
| Software | OS | Media Resources | AI editing | Easy to Use | Free Trial |
|---|---|---|---|---|---|
| Wondershare Filmora | WindowsMacMobile | Yes | Yes | Yes | Yes |
| Avidemux | WindowsOS XLinuxBSD | Yes | No | Yes | Yes |
| Virtual Dub | Windows | No | No | Yes | Yes |
| Vegas Movie Studio | Windows | Yes | Yes | No | No |
| WeVideo | Online | Yes | No | Yes | Yes |
| Lightworks | LinuxOS X Windows | Yes | Yes | No | No |
| ShotCut | WindowsMacLinuxBSD | Yes | No | No | Yes |
| OpenShot | WindowsMacLinuxChrome OS | Yes | No | Yes | Yes |
| Movavi Plus | WindowsMac | Yes | No | Yes | Yes |
| VSDC | Windows | Yes | No | Yes | Yes |
| VideoPad | WindowsMaciPad/iPhone | Yes | No | Yes | Yes |
| HitFilm | WindowsMac | Yes | Yes | Yes | Yes |
| Magix Movie Studio | Windows | Yes | Yes | No | Yes |
Part 3: 13 Best Windows Movie Maker Alternatives for Windows
As we all know, Windows Movie Maker is the most used and trusted tool for creating videos in Windows. With its unique features and user-friendly interface, people often use this software to develop short and entertaining videos.
However, the fact is that Windows Movie Maker is not the current best video editing software for creating complex video projects. For this reason, we compiled a list of the 12 best alternatives to offer you a better option for Windows Movie Maker.
1. Wondershare Filmora
Filmora 11 is a powerful, easy-to-use video editor specially designed to streamline your workflow and save you hours weekly. It supports everything from Windows, Mac, and IOS to Android. The latest update to the flagship app includes several key enhancements that result in a much more efficient video creation workflow and one that’s easier to use than its rivals.
Key features
- Preset Templates
- Instant Mode
- Motion Tracking
- AI Editing Effects
- Auto Synchronization
- Plug-ins
Price
- Annual Plan: $49.99
- Perpetual Plan: $79.99
Pros
- Seamless interface for beginners
- Great customer support
- Plenty of effects and preset templates
- 4K video output options
Cons
- Rendering requires too much time
- The mobile app requires separate subscription
Supported OS: Windows , Mac , iOS , Android , iPad
G2 Ratings: 4.4 stars out of 5
Summary
Filmora’s intuitive interface allows experienced and brand-new users to create incredible videos with flawless special effects. Its high ratings and multiple supported formats make it quite popular among users.
2. Avidemux Video Editor
If you are a beginner and want to use a free, open-source software program for basic video editing, then Avidemux is a good choice. The interface is not as fancy as it could be, but there are some presets that’ll save you a lot of time. Avidemux is a cross-platform video editor that allows you to create custom videos, but it doesn’t feature the ability to share the edited footage to social media directly,
Key features
- Video and Audio Filters
- Support Popular Formats
- Convert Video For Archiving or Publishing
Price: Free
Pros
- It can convert Video To A Smaller Size
- Easy cut, trim, split video
Cons
- Out-dated UI
- Lacks sharing option
Supported OS: Windows , OS X , Linux , BSD
Uptodown Ratings: 4.0 stars out of 5
Summary
An open-source video editor that supports most formats. Due to its obsolete UI and lack of sharing features, Avidemux has average ratings.
3. VirtualDub
This open-source software is user-friendly and allows users with little experience to navigate the software without much trouble. It supports 3rd party apps and also offers batch-processing, which means working on multiple videos simultaneously makes it possible.
Key features
- Integrated volume and histogram meter
- Optimized disk
- Noise reduction
- Fractional frame rates
Price: Free
Pros
- Clean interface, easy to use
- Keyboard and mouse shortcuts for faster operation
- Free to use
Cons
- Not suitable for 4K editing
- Lack learning material
- Obsolete Interface
Supported OS: Windows
Compare Camp Ratings: 4.0 stars out of 5
Summary
Virtual Dub supports multitasking, and its features are pretty helpful. However, it lacks 4k editing and a friendly interface. Overall Virtual Dub is a good choice.
4. Sony Vegas Movie Studio
This video editing software makes it easy to create professional-looking videos in minimum time and effort. Vegas Movie Studio software is best for video editing professionals who have been doing it for some time and are looking for something a little more sophisticated than free alternatives. Not only does it has a high retail price, but its internal elements can be too complex for those just beginning.
Key features
- Color correction
- HDV and AVCHD-editing
- DV batch capture
- Wide variety of file formats and codecs
Price: Starting from $7.99 USD per month
Pros
- Customizable interface
- Multicam editing
- Lots of effects and transitions, with plug-in capability
- Good slow motion and warp flow transition tools
Cons
- Less intuitive interface than competitors
- Import from camcorder not ideal
- Some tools are complex
Supported OS: Windows
G2 Ratings: 4.4 out of 5
Summary
Vegas Movie Studio is the choice of professionals. It does all the work without taking up a lot of resources, and like most programs, there is a learning curve. It’s not always intuitive for beginners, but its professional and powerful features score decent in most reviews.
5. WeVideo
This cloud-based application is a simple-to-use video editing and sharing suite. WeVideo is a full-featured video editing application that uses JumpStart technology to create amazing videos. It’s an innovative app that offers a seamless editing experience as it supports multiple formats of video, images, audio, and graphics.
Key features
- WeVideo JumpStart
- Cloud storage
- Built-in graphics
- Customizable environment
- Advanced text editing
- Multi-track editing and storyboard
Price
- Free trial
- Power Plan: $9.99/month
- Unlimited Plan: $15.99/month
- Professional Plan: $39.99/month
- Business Plan: $73.99/month
Pros
- Constantly improving features
- Ease of use
- Storage is cloud-based
Cons
- Old fashion transition
- Leaves a watermark on free trial
Supported OS: Online
Trustpilot Ratings: 4 stars out of 5
Summary
WeVideo is a straightforward yet robust video editor. It offers a variety of features and supports multiple formats, plus its comprehensive pricing plan makes it useful for everyone.
6. Lightworks
Lightworks is the most powerful video editor in its class and an excellent tool for professionals who want to make amazing videos quickly. Lightworks is very fast and straightforward to use, and it has some great features you won’t find in any other video editor. It is available on all popular OS.
Key features
- Audio and Video Effect Plugin Support
- Cloud Connected
- Motion Graphics
- Advanced Metadata
- Proxy Workflows
- Apple ProRes decoding
Price
- Monthly Plan: $9.99/user
- Yearly Plan: $9.99/user
- Perpetual: $154.99
Pros
- High-resolution timeline rendering
- It has social media export templates
- Interfaces for multiple OS are consistent
- Instant autosave
Cons
- Commands are not always intuitive
- A bit pricey as compared to its competitors
Supported OS: Windows , Mac , Linux
Techradar Pro Ratings: 4 stars out of 5
Summary
Lightworks is not any other video editing tool available on the market of video editing tools. This video editing tool provides amateurs with the most sophisticated features in an optimized platform. Its scores are the highest on almost every review site.
7. ShotCut
Shotcut is a multiplatform video editor that lets you work with various formats for audio, video, image files, etc. This video editor makes it easy to mix and match the resolution and frame rates in a video file. All the changes you make in the editor can be undone and redone often. Shotcut is the best choice for video editing, without question.
Key features
- Webcam capture
- Audio scopes and filters
- Deinterlacing
- Eyedropper tool
- Video wipe transitions
- Keyframes for filter parameters
Price: Free
Pros
- Support for 4K resolutions
- Free
Cons
- Less intuitive than commercial apps
- Lacks built-in sharing to popular sites
Supported OS: Windows , Mac , Linux
GetApp Ratings: 4.5 out of 5 stars
Summary
Shotcut is an open-source video editor for creative professionals and is available on mac, Windows, and Linux. The free version of Shotcut has many excellent features, but it doesn’t have the slick interface or advanced techniques of the top paid editors.
8. OpenShot
An award-winning open-source video editor that creates stunning videos. OpenShot is a fast, easy-to-use, and surprisingly powerful video editor. OpenShot Video Editor allows you to work with many different types of tracks so that your edits will seem natural. OpenShot Video Editor allows you to add your custom animations or titles. The options are endless, so it all depends on your time and interest. It is available in more than 70 languages, making it ideal for all types of users.
Key features
- 3D animations
- Animation and keyframes
- Multiple languages and formats
- Cross-platform
- Video-effects
Price: Free
Pros
- It is a non-linear editor with infinite tracks
- 100% free without watermark
- Frequent updates
Cons
- Obsolete interface
- Unstable performance
- Lacks some editing features
Supported OS: Window , Mac , Linux , Chrome OS
Getapp Ratings: 4.2 stars out of 5
Summary
Another open-source video-editor in the list is named OpenShot. It’s a multi-lingual and multi-supported app with unique features. Despite its unstable performance, OpenShot is still an ideal choice for many users.
9. Movavi Video Editor Plus
Movavi Video Editor Plus is the perfect tool to bring your creative ideas to life. It has special effects, ready-made intros, and keyframe animation. Using chroma keying, you can change the background of your video clips to any color or pattern that suits your need. Movavi has now redesigned its user interface to make it easy to use.
Key features
- Effects and transitions
- Built-in media pack
- Fast processing of 4K videos
- Keyframe animation
- Automatic video creation
- Cutting, trimming, joining
Price
- Free version: 7 days
- Video Editor Plus 1 year /1 PC: $49.95
- Video Editor Plus Lifetime /1 PC: $69.95
- Video Suite Lifetime /1 PC: $89.95
Pros
- Easy-to-understand user interface
- Transitions with sound
- Motion tracking and picture-in-picture tools
- Chroma-key capability
- Quick movie-creation tool
Cons
- Lacks advanced trim modes
- Slow rendering
PCMag Ratings: 4.0 stars out of 5
Summary
If you want to edit your videos with a minimal learning curve, try Movavi. You get PiP, chroma-keying, titling, basic keying, and motion tracking. The program is simple to use but doesn’t have all the features and stands four stars.
10. VSDC Free Video Editor
VSDC Free Video Editor is an online tool that lets you edit audio and video files to make your creations like movies, YouTube tutorial videos, and more. The audio and video files supported are extensive, and the software includes a codec manager. The Pro version isn’t necessary if you’re using the free edition of the software; it’s more than enough to get the job done.
Key features
- Dark theme
- Subpixel Accuracy
- Powerful Chroma Key tool
- Trendy video effects, filters, and transitions
- Color Blending And Filters
- Built-In DVD Burning Tool
Price: Free
Pros
- Non-linear
- Video effects library
- Video stabilization
- Masking
Cons
- Outdated interface
- Lack keyboard shortcuts
- Only available on Windows
Supported OS: Windows
Capterra Ratings: 4.5 stars out 5
Summary
VSDC is a non-linear editor with extensive format support. It includes all the essential features an editor requires but with an obsolete UI. It is also ideal for many who need a powerful yet free video editor.
11. VideoPad Video Editor
VideoPad is a free video editor that can create stunning videos and perform basic editing tasks. A good video editor can help you to create videos for different social media platforms. You can make your videos look professional and polished with a few clicks and some simple editing skills. There’s nothing particularly exciting or advanced about this app; it’s simple enough for anyone new to video editing or even for seasoned editors. But the simple and easy-to-use interface makes the entire process very exciting.
Key features
- Text snippets
- Range of transitional effects
- Plug-ins Library
- Burn finished videos to Blu-Ray, DVD, etc.
- Color correction and light balance.
Price: Free
Pros
- Simple and clean interface
- Supports multiple file formats
- Includes video effects
- Lightweight on system resources
Cons
- Lack of advanced features
Supported OS: Windows , Mac , iPad/iPhone
Tom’s guide Ratings: 3.5 stars out of 5
Summary
Video pad is a free video editor designed for beginners that is lightweight and simple. VideoPad is also great for creating quick videos for social media purposes like Youtube and Facebook. The software has a high rating, as shown above, and it’s available on Windows.
12. HitFilm
HitFilm is a helpful video editing software that makes editing easier for users. In addition to basic features, the program also provides advanced-level functions that make edited videos pop. Hitfilm Express Download has more than 400 features to help casual video editors save time. Features like: visual effects, cinematic elements, and compositing tools preset help unleash your creativity.
Key features
- Color Grading and correction
- Smart search
- Commentator recorder
- Lightning and lens flares
- 3D camera tracker
Price
- Free trial
- Creator: $7.50
- Pro: $12.50
- Enterprise: Custom pricing
Pros
- Intuitive interface
- It offers free tutorials and masterclasses
- Works on both Windows and Mac
Cons
- It requires heavy system requirements
TechRadar Ratings: 4.5 stars out of 5
Summary
HitFilm Express 15 is a powerful free video editing program that enables you to create high-quality videos in minutes with an intuitive interface. It offers advanced editing features such as advanced video trimming, 3D editing, and more.
13. Magix Movie Studio
Magix is the world’s leading professional audiovisual media software, with Sequoia being its industry-standard audio editing software. This movie editor is an enthusiast-level video editing software that competes with software from Adobe and CyberLink, and it even boasts support for 4K content and 360 degrees. There are many reasons to upgrade. This year’s update includes stabilization, 8K editing, motion tracking, and an in-app plug-in store.
Key features
- NewBlue effects
- Fly-in animation
- New filter view
- Stabilization
- Motion tracking
- 8k support
Price
- Movie Studio 2024: $69.99 (30-day free trial)
- Movie Studio 2024 Platinum: $99.99 (30-day free trial)
- Movie Studio 2024 Suite: $129.00 (30-day free trial)
Pros
- Lots of video effects
- Responsive editing interface
- Multicam
- Trailer-like movie templates
- Solid audio editing
Cons
- Slower project rendering than others
- Lacks import and organization tools
Supported OS: Windows
PCMag Ratings: 3 stars out of 5
Summary
Magix movie studio is a powerful all-around video editing tool with many features that professional users have come to expect. It’s also relatively simple to use. But usability and performance are poor compared to other software programs like Filmora .
Part 4: How To Edit a Video With a Windows Movie Maker Alternative
Windows Movie Maker was great for editing a video, but it’s no match for some of the best video editing software. We’re talking about software capable of creating a cinematic experience in seconds, all on your computer.
When you need to edit a video with simple, quick edits, like adding a special effect or changing the background, try Filmora . Filmora is an easy-to-use application that allows you to create a movie using simple tools that don’t require additional training. You can’t beat this option if you want to create a professional-quality video for your blog or website.
Let’s dive into a quick tutorial on editing videos in Filmora:
Free Download For Win 7 or later(64-bit)
Free Download For macOS 10.14 or later
Step1 Open Wondershare Filmora on your PC or Mac
You can start a new project by clicking on ‘New Project’. And you can also change the ‘Aspect Ratio’ according to your project demand.
Step2 Import Videos
You can import your file by clicking the import tab on the upper-left side or clicking the import icon on the main window.
Step3 Drag and drop your footage to the timeline
After importing all the files, click and hold each individual video and drag and drop it to the timeline area according to your ideal sequence.
Step4 Add Audio
Go to the ‘Audio’ tab and select the audio file from the audio library. Once selected, drag and drop the audio file into the music timeline.
Step5 Add Titles
In your video intro, you can insert some title text. Go to the ‘Titles’ tab and select the one you like, and drag and drop it on top of the timeline. Double-click and edit the text and state your ideal statements. You can customize your text fonts and color too.
Step6 Add Transitions
You can add transition effects to ensure a smooth transition from one scene to another. The overall will get more professional look.
Step7 Add Effects
Next; you can get special effects to your video to make them more attractive and engaging to watch. Simple drag down the effect to your video and watch the effect take place in your selective scene.
Step8 Export your work
Once all the changes have been made, hit ‘export’ from the top tab. A window will appear where you can change the settings, resolution, frame rate, bit rate, etc. Next, click the ‘export’ button down on that window, and then you can save the file in your drive.
Part 5: Hot FAQs on Windows Movie Maker Alternatives
1. Why is Windows Movie Maker discontinued?
Microsoft’s video editing program, Windows Movie Maker, did not become a big hit with the public because it failed to do well on the market. Microsoft couldn’t get the support they were looking for from the program’s users. As a result, Microsoft had to cease its support of the program.
2. Is there a free version of Windows Movie Maker?
Microsoft Windows Movie maker was always accessible and pre-installed every windows product. Microsoft has discontinued support for Movie Maker and warns about free downloads of Movie Maker provided by third parties that might contain malware, viruses, or other issues.
3. What are the best free Windows Movie Maker Alternatives for Mac?
After switching to a Mac, you’ll find that the Windows Movie Maker alternatives offer much more than just a simple video editor. They provide advanced features, easy transitions, and less technical know-how to create pro-quality results. You should try using these platforms on your Mac if you have a video to edit.
- Wondershare Filmora
- Movavi
- OpenShot
Final Words
Windows Movie Maker is an excellent Windows video editor application for Windows users. But in recent years, it has become outdated due to the continuous development of new technologies. There are many alternatives for Windows Movie Maker, and here we listed some of the best ones. Most of them are free and featured packs. Each program has its unique set of features and capabilities, and each one excels in different areas. Check them out and see what you think.
Free Download For Win 7 or later(64-bit)
Free Download For macOS 10.14 or later
VHS Chic: Best Mobile Apps for Achieving a Retro Aesthetic in Your Videos
VHS references the Video Home System video capture format created by the Japanese corporation JVC. It was a big step forward for consumers at the time, putting the ability to record and replay the video at the disposal of the general people, and it swiftly expanded into most houses.
Anyone who has possessed an old camcorder knows that the quality of the films and photographs it took was far inferior to what we are accustomed to with newer camcorders. However, such retro cameras are no longer in use. But, you may still achieve the impression of antique images by using a VHS app. A few of the excellent ones are reviewed by this article. Let’s get going!
In this article
01 Best VHS Apps to Apply Old VHS Effect to Your Videos on iPhone and Android
02 How to Get VHS Effects in Filmora Video Editor?
Part 1: Best VHS Apps to Apply Old VHS Effect to Your Videos on iPhone and Android
Vintage photography and videotapes are something modern technology can never replace. If you want to recreate the vintage-like footage, the following apps can help you:
1. Camcorder - Record VHS Home Videos
Supported OS: iOS

The first app on our list of the top smartphone VHS applications is Camcorder. This simple-to-use app with a great retro design approach for shooting camcorder-esque home recordings right to your iPhone.
You can import a file from your photo library to Camcorder. The filter and the oh-so-important date will automatically apply in the corner effect. This iOS app is now ad-free and free for use. It enables you to use the Front Flash when making a home video in selfie mode in low-light conditions.
Features
- It has a simple-to-use interface
- You can add a VHS effect to the video
- Lets you use the flash for selfie
2. Vaporgram: Vaporwave, VHS & Glitch Photo Editor
Supported OS: Android

VHS is a common effect in the steam wave aesthetic. If you want to create your images more visually appealing, you may use the Vaporgram app.
In addition to the VHS illusion, Vaporgram has various effects such as RGB, Glitches, 3D, and many others. You will be able to convert your images into authentic Polaroid photos, regaining popularity. Vaporgram mixes an old camera with various photo effects and other embellishments and labels that reflect the mood of the images.
Features
- Allows you to add glitches and 3D to the image
- Lets you add the stickers to your recordings
- The user interface is influenced by vintage computers
3. VHS Glitch Camcorder

Many celebrities utilize throwback filters on their movies, social media posts, and other media. VHS Glitch Camcorder is an app that will make you feel connected to famous individuals by allowing you to utilize the same effects they employ.
The VHS Glitch Camcorder program offers a plethora of capabilities to assist you in processing your images. VHS-style filming, adjusting the date shown on a picture or video, modifying a finished movie, and filming with immediate effects are all examples of these functions.
Features
- Allows you to add soundtracks to your videos
- The free plan offers several editing tools
- It has an easy-to-use interface
4. Rarevision VHS Lite

The Rarevision VHS Lite is widely regarded as one of the best VHS effect app utilized. The effect immediately submerges you in the ambiance of the 1980s, and you can appear just like you looked as a youngster.
Here, you may immediately begin making films with this effect — and then email them to your contacts. It may be a practical prank and a sleek and fascinating piece of material.
You may utilize your phone as an old camera by zooming in and out and shooting in reality mode. The free plan of Rarevision VHS Lite has a time restriction - if you buy a subscription, it will continuously shoot.
Features
- It lets you zoom in and out while recording
- Lets you email the video after editing
- You shoot the video in reality mode
5. VHS Cam - Retro Camcorder FX
Supported OS: iOS
This program has a straightforward UI that you will pick up on as you begin recording. Your iPhone will transform into an antique camera, recording everything that occurs around you.
With the VHS Cam app, you could either produce videos or add effects to existing ones. Because most vintage cameras feature a date display that shows the date and time of recording, it is also included here. You can edit the video as you see fit or delete it entirely from the image.
Features
- It has an easy-to-use interface
- feature a date display to show date and time
- Lets you alter the footage after recording

6. VHS Cam + 8mm
Supported OS: iOS

This simple program will quickly give your phone video a retro look. There aren’t as many frills and bells as you’ll find in a few other applications on our list, but this doesn’t require them. As you shoot, apply film grit, scraped film, and colorized effects to see how your footage will look.
The name 8mm VHS Camcorder is a lot. Still, it fits the criteria as a multi-purpose application that can add various photo filters and effects to your films for a total throwback atmosphere. So you get your VHS fill and other footage that appears to be 8mm.
Features
- Videos appear as an 8mm footage
- It lets you customize the effects
- It is a multi-purpose app
7. Glitch Video Effect
Supported OS: iOS

Glitch Video Effect provides over 100 VHS, Glitch, CRT, and more effects to distort your photos and videos artistically. It also contains a plethora of Retro and Vintage Filters. With a single swipe, you can transform an ordinary photo or video into a one-of-a-kind work of art.
With this app, you will be transported back to the 1980s and 1990s! Use the same antique home movie-type camcorder that your grandparents and parents used to capture and edit images and films. Not to add the fantastic Glitches and scratches that will give your films the screwed-up VHS look of the past!
Features
- It has various Vintage and Retro filters
- Allows you to add VHS with a single swipe
- Features glitches and scratched to add
8. VHS Cam: Vintage Video Filters
Supported OS: iOS

VHS Cam can enhance your images and videos with vintage camera effects. You’ll be able to make attractive retro films for social networks. Your pals will like your trendy videos with old effects and filters.
This VHS camera app will transform your iPhone camera into an 80s camcorder, giving your captured films a beautiful retro vibe that will make your footage appear more relaxed. When it comes to generating distinctive films for your social media profiles, the app’s different vintage filters and effects provide plenty of creative options.
Features
- Allows you to share to the social media
- You can import the video from your phone
- It helps you do the old videotape recordings
9. VHS Video Editor, Vintage Cam
Supported OS: iOS

There are several vintage filters available for use in movies and photos. You’ll also discover options for blending, combining, and adjusting various parts of each filter. The filter gives your photographs a realistic 1950s and 1960s look without entirely distorting them. There are other video effects like noise, distortion, and glitches.
Features
- It features a simple-to-use interface
- It includes multiple editing tools
- Allows you to add glitches and noise distortion
10. 1984 Cam
Supported OS: Android
1984 Cam is a unique program that provides various VHS-style video effects. Your shot will appear like a footage from an old tape you discovered in the attic.
The 1984 Cam will assist in recreating the lost ambiance of filming in the 1980s when the camcorder was an actual work of art. To obtain the ambient movie, you must first choose it from the library and record it ahead of time.
Features
- It has an easy-to-use interface
- feature a date display to show date and time
- Lets you alter the footage after recording
Part 2: How to Get VHS Effects in Filmora Video Editor?
For Win 7 or later (64-bit)
For macOS 10.14 or later
download filmora app for ios ](https://app.adjust.com/b0k9hf2%5F4bsu85t ) download filmora app for android ](https://app.adjust.com/b0k9hf2%5F4bsu85t )
Click here to get Filmora for PC by email
If you want to add VHS effects to video on your Windows or Mac computers, you can try Wondershare Filmora to get VHS effects easily. Filmora video editing software is a simple and effective video editing tool that provides lots of effects. Follow the instruction below to get VHS effects to videos using Filmora video editor:
Step 1: Launch Filmora video editor, and then click create a new project to start. Import the video in the Filmora media library and drag it to the timeline.

Step 2: Go to the Effects tab and the top, and search VHS in the search bar. You will see many VHS effects listed. Drag any of them above the video on the timeline. After that, drag it to the video’s length.

You can adjust the VHS settings as needed by double-clicking it in the timeline. See, adding VHS effects to video with Filmora is easy!
Conclusion
You may use VHS effects to add variety to the photographs and videos you upload to social media and create something unique. Designing to the past is always appropriate; the essential thing is to have an excellent concept and be in a good mood. With this article, we hope you discovered a helpful VHS app.
02 How to Get VHS Effects in Filmora Video Editor?
Part 1: Best VHS Apps to Apply Old VHS Effect to Your Videos on iPhone and Android
Vintage photography and videotapes are something modern technology can never replace. If you want to recreate the vintage-like footage, the following apps can help you:
1. Camcorder - Record VHS Home Videos
Supported OS: iOS
The first app on our list of the top smartphone VHS applications is Camcorder. This simple-to-use app with a great retro design approach for shooting camcorder-esque home recordings right to your iPhone.
You can import a file from your photo library to Camcorder. The filter and the oh-so-important date will automatically apply in the corner effect. This iOS app is now ad-free and free for use. It enables you to use the Front Flash when making a home video in selfie mode in low-light conditions.
Features
- It has a simple-to-use interface
- You can add a VHS effect to the video
- Lets you use the flash for selfie
2. Vaporgram: Vaporwave, VHS & Glitch Photo Editor
Supported OS: Android
VHS is a common effect in the steam wave aesthetic. If you want to create your images more visually appealing, you may use the Vaporgram app.
In addition to the VHS illusion, Vaporgram has various effects such as RGB, Glitches, 3D, and many others. You will be able to convert your images into authentic Polaroid photos, regaining popularity. Vaporgram mixes an old camera with various photo effects and other embellishments and labels that reflect the mood of the images.
Features
- Allows you to add glitches and 3D to the image
- Lets you add the stickers to your recordings
- The user interface is influenced by vintage computers
3. VHS Glitch Camcorder
Many celebrities utilize throwback filters on their movies, social media posts, and other media. VHS Glitch Camcorder is an app that will make you feel connected to famous individuals by allowing you to utilize the same effects they employ.
The VHS Glitch Camcorder program offers a plethora of capabilities to assist you in processing your images. VHS-style filming, adjusting the date shown on a picture or video, modifying a finished movie, and filming with immediate effects are all examples of these functions.
Features
- Allows you to add soundtracks to your videos
- The free plan offers several editing tools
- It has an easy-to-use interface
4. Rarevision VHS Lite
The Rarevision VHS Lite is widely regarded as one of the best VHS effect app utilized. The effect immediately submerges you in the ambiance of the 1980s, and you can appear just like you looked as a youngster.
Here, you may immediately begin making films with this effect — and then email them to your contacts. It may be a practical prank and a sleek and fascinating piece of material.
You may utilize your phone as an old camera by zooming in and out and shooting in reality mode. The free plan of Rarevision VHS Lite has a time restriction - if you buy a subscription, it will continuously shoot.
Features
- It lets you zoom in and out while recording
- Lets you email the video after editing
- You shoot the video in reality mode
5. VHS Cam - Retro Camcorder FX
Supported OS: iOS
This program has a straightforward UI that you will pick up on as you begin recording. Your iPhone will transform into an antique camera, recording everything that occurs around you.
With the VHS Cam app, you could either produce videos or add effects to existing ones. Because most vintage cameras feature a date display that shows the date and time of recording, it is also included here. You can edit the video as you see fit or delete it entirely from the image.
Features
- It has an easy-to-use interface
- feature a date display to show date and time
- Lets you alter the footage after recording
6. VHS Cam + 8mm
Supported OS: iOS
This simple program will quickly give your phone video a retro look. There aren’t as many frills and bells as you’ll find in a few other applications on our list, but this doesn’t require them. As you shoot, apply film grit, scraped film, and colorized effects to see how your footage will look.
The name 8mm VHS Camcorder is a lot. Still, it fits the criteria as a multi-purpose application that can add various photo filters and effects to your films for a total throwback atmosphere. So you get your VHS fill and other footage that appears to be 8mm.
Features
- Videos appear as an 8mm footage
- It lets you customize the effects
- It is a multi-purpose app
7. Glitch Video Effect
Supported OS: iOS
Glitch Video Effect provides over 100 VHS, Glitch, CRT, and more effects to distort your photos and videos artistically. It also contains a plethora of Retro and Vintage Filters. With a single swipe, you can transform an ordinary photo or video into a one-of-a-kind work of art.
With this app, you will be transported back to the 1980s and 1990s! Use the same antique home movie-type camcorder that your grandparents and parents used to capture and edit images and films. Not to add the fantastic Glitches and scratches that will give your films the screwed-up VHS look of the past!
Features
- It has various Vintage and Retro filters
- Allows you to add VHS with a single swipe
- Features glitches and scratched to add
8. VHS Cam: Vintage Video Filters
Supported OS: iOS
VHS Cam can enhance your images and videos with vintage camera effects. You’ll be able to make attractive retro films for social networks. Your pals will like your trendy videos with old effects and filters.
This VHS camera app will transform your iPhone camera into an 80s camcorder, giving your captured films a beautiful retro vibe that will make your footage appear more relaxed. When it comes to generating distinctive films for your social media profiles, the app’s different vintage filters and effects provide plenty of creative options.
Features
- Allows you to share to the social media
- You can import the video from your phone
- It helps you do the old videotape recordings
9. VHS Video Editor, Vintage Cam
Supported OS: iOS
There are several vintage filters available for use in movies and photos. You’ll also discover options for blending, combining, and adjusting various parts of each filter. The filter gives your photographs a realistic 1950s and 1960s look without entirely distorting them. There are other video effects like noise, distortion, and glitches.
Features
- It features a simple-to-use interface
- It includes multiple editing tools
- Allows you to add glitches and noise distortion
10. 1984 Cam
Supported OS: Android
1984 Cam is a unique program that provides various VHS-style video effects. Your shot will appear like a footage from an old tape you discovered in the attic.
The 1984 Cam will assist in recreating the lost ambiance of filming in the 1980s when the camcorder was an actual work of art. To obtain the ambient movie, you must first choose it from the library and record it ahead of time.
Features
- It has an easy-to-use interface
- feature a date display to show date and time
- Lets you alter the footage after recording
Part 2: How to Get VHS Effects in Filmora Video Editor?
For Win 7 or later (64-bit)
For macOS 10.14 or later
download filmora app for ios ](https://app.adjust.com/b0k9hf2%5F4bsu85t ) download filmora app for android ](https://app.adjust.com/b0k9hf2%5F4bsu85t )
Click here to get Filmora for PC by email
If you want to add VHS effects to video on your Windows or Mac computers, you can try Wondershare Filmora to get VHS effects easily. Filmora video editing software is a simple and effective video editing tool that provides lots of effects. Follow the instruction below to get VHS effects to videos using Filmora video editor:
Step 1: Launch Filmora video editor, and then click create a new project to start. Import the video in the Filmora media library and drag it to the timeline.
Step 2: Go to the Effects tab and the top, and search VHS in the search bar. You will see many VHS effects listed. Drag any of them above the video on the timeline. After that, drag it to the video’s length.
You can adjust the VHS settings as needed by double-clicking it in the timeline. See, adding VHS effects to video with Filmora is easy!
Conclusion
You may use VHS effects to add variety to the photographs and videos you upload to social media and create something unique. Designing to the past is always appropriate; the essential thing is to have an excellent concept and be in a good mood. With this article, we hope you discovered a helpful VHS app.
Mastering Image Cropping in FCPX: Advanced Techniques
Final Cut Pro X: How to Crop an Image

Benjamin Arango
Mar 27, 2024• Proven solutions
Cropping an image means to remove a portion of the image, either to hide something you don’t want the audience to see or emphasize different elements within the image. Just as Photoshop allows us to crop still images, Final Cut Pro X allows us to crop moving video clips, as you’ll learn in this article.
This is a basic tutorial about Apple Final Cut Pro X, professional video editing software. However, if video editing is new to you, consider Wondershare Filmora for Mac . This is a powerful but easy-to-use tool for users just starting out. Download the free trial version below.
Download Mac Version ](https://tools.techidaily.com/wondershare/filmora/download/ )
How to Crop an Image in Final Cut Pro X
However, before I show how this is done, I need to explain one really important fact about video: all video uses what’s called “fixed resolution.” Fixed resolution means that high-definition video is always displayed at one of two sizes:
You May Also Like: How to Crop GIF Images >>
- 1920 x 1080 pixels
- 1920 x 1080 pixels
Unlike still images which can be thousands of pixels on a side, video clips are locked into one of these two sizes. This means that if you crop a video clip, to remove something you don’t like, the remaining pixels are often enlarged to fill the frame. Crop too much and your video clip will look blurry, blocky, and edges will look stair-stepped.
I’ll show you two ways to crop a video clip in this article, one that maintains a high image quality but reduces the size of the frame (called “trimming”) and the other that fills the frame with the image but reduces image quality (called “cropping”). You get to pick which one works the best for you.
TRIMMING
Trimming is the process of removing portions of a video clip without changing the size of the clip. This retains the highest amount of image quality.

For instance, here an image - courtesy of Pond5 (<www.pond5.com>). Let’s say that we want to emphasize the barn and not the sky.

The easiest way to do this is to click the icon in the lower left corner of the Viewer and choose “Crop.”

This displays the cropping tools in the Viewer.

Click the Trim button to turn on Trim mode. (This article discusses Trim and Crop. I’ll cover the Ken Burns effect in a future article.)

Grab one of the blue dots and drag to hide portions of the frame. I generally grab a corner, but any blue dot will do.
NOTE: Press and hold the Option key while dragging to drag opposite edges or corners. Press and hold the Shift key to constrain the trim to the same aspect ratio as the frame.

Drag other corners or edges to further trim the image.

When you have trimmed the image the way you want, click the “Done” button in the top right corner to exit trimming mode.

If no other clip is below the trimmed clip, the background will be black.

But, it actually isn’t black, it’s transparent. If you put another clip below it, you’ll see the lower clip underneath the trimmed image.
Trimming allows us to hide portions of a video clip, without changing the image quality of the clip that remains. However, trimming always creates transparent sections within an image.
CROPPING
Cropping allows us to select just a portion of a video clip, without creating any transparent sections, BUT, it degrades image quality.
There are several ways we can choose to crop an image:

- Click the Crop icon, as we illustrated above

- Right-mouse click (or Control-click) inside the Viewer and choose
- Type Shift+C

* In the Inspector > Video tab > Crop (this option provides the most precision, but is the least intuitive to use)

If you selected any option except the Inspector, click the Crop button in the Viewer.

Now, drag a blue button in one of the corners. Because cropping, unlike trimming, fills the frame with the portion of the image we select, we can only move corners and the image is always sized to match the aspect ratio of our sequence.
Final Cut displays numbers at the top of the Viewer indicating how much the image has been cropped.

Reposition the frame by grabbing inside the rectangle and dragging.

When you are happy with the results, click the Done button in the top right corner.

Notice that the selected portion of the image now fills the frame. Even though there is a clip below our cropped clip, we don’t see it.
And, if you look closely, you’ll see that the cropped image is softer (blurrier) than the original and edges are more likely to be stair-stepped.
RESET

To reset a cropped image back to its default settings, open the Inspector and click the small curved arrow to the right of the word “Crop.”
SUMMARY
Trimming is used to hide portions of an image and superimpose it over another image.
Cropping is used to reframe an image, say from a medium shot to a close-up, but runs the risk of overly softening an image. The general rule is that cropping a little is OK, but don’t crop too much.
I use both these techniques frequently in my own editing.
Benjamin Arango
Benjamin Arango is a writer and a lover of all things video.
Follow @Benjamin Arango
Benjamin Arango
Mar 27, 2024• Proven solutions
Cropping an image means to remove a portion of the image, either to hide something you don’t want the audience to see or emphasize different elements within the image. Just as Photoshop allows us to crop still images, Final Cut Pro X allows us to crop moving video clips, as you’ll learn in this article.
This is a basic tutorial about Apple Final Cut Pro X, professional video editing software. However, if video editing is new to you, consider Wondershare Filmora for Mac . This is a powerful but easy-to-use tool for users just starting out. Download the free trial version below.
Download Mac Version ](https://tools.techidaily.com/wondershare/filmora/download/ )
How to Crop an Image in Final Cut Pro X
However, before I show how this is done, I need to explain one really important fact about video: all video uses what’s called “fixed resolution.” Fixed resolution means that high-definition video is always displayed at one of two sizes:
You May Also Like: How to Crop GIF Images >>
- 1920 x 1080 pixels
- 1920 x 1080 pixels
Unlike still images which can be thousands of pixels on a side, video clips are locked into one of these two sizes. This means that if you crop a video clip, to remove something you don’t like, the remaining pixels are often enlarged to fill the frame. Crop too much and your video clip will look blurry, blocky, and edges will look stair-stepped.
I’ll show you two ways to crop a video clip in this article, one that maintains a high image quality but reduces the size of the frame (called “trimming”) and the other that fills the frame with the image but reduces image quality (called “cropping”). You get to pick which one works the best for you.
TRIMMING
Trimming is the process of removing portions of a video clip without changing the size of the clip. This retains the highest amount of image quality.
For instance, here an image - courtesy of Pond5 (<www.pond5.com>). Let’s say that we want to emphasize the barn and not the sky.
The easiest way to do this is to click the icon in the lower left corner of the Viewer and choose “Crop.”
This displays the cropping tools in the Viewer.
Click the Trim button to turn on Trim mode. (This article discusses Trim and Crop. I’ll cover the Ken Burns effect in a future article.)
Grab one of the blue dots and drag to hide portions of the frame. I generally grab a corner, but any blue dot will do.
NOTE: Press and hold the Option key while dragging to drag opposite edges or corners. Press and hold the Shift key to constrain the trim to the same aspect ratio as the frame.
Drag other corners or edges to further trim the image.
When you have trimmed the image the way you want, click the “Done” button in the top right corner to exit trimming mode.
If no other clip is below the trimmed clip, the background will be black.
But, it actually isn’t black, it’s transparent. If you put another clip below it, you’ll see the lower clip underneath the trimmed image.
Trimming allows us to hide portions of a video clip, without changing the image quality of the clip that remains. However, trimming always creates transparent sections within an image.
CROPPING
Cropping allows us to select just a portion of a video clip, without creating any transparent sections, BUT, it degrades image quality.
There are several ways we can choose to crop an image:
- Click the Crop icon, as we illustrated above
- Right-mouse click (or Control-click) inside the Viewer and choose
- Type Shift+C
* In the Inspector > Video tab > Crop (this option provides the most precision, but is the least intuitive to use)
If you selected any option except the Inspector, click the Crop button in the Viewer.
Now, drag a blue button in one of the corners. Because cropping, unlike trimming, fills the frame with the portion of the image we select, we can only move corners and the image is always sized to match the aspect ratio of our sequence.
Final Cut displays numbers at the top of the Viewer indicating how much the image has been cropped.
Reposition the frame by grabbing inside the rectangle and dragging.
When you are happy with the results, click the Done button in the top right corner.
Notice that the selected portion of the image now fills the frame. Even though there is a clip below our cropped clip, we don’t see it.
And, if you look closely, you’ll see that the cropped image is softer (blurrier) than the original and edges are more likely to be stair-stepped.
RESET
To reset a cropped image back to its default settings, open the Inspector and click the small curved arrow to the right of the word “Crop.”
SUMMARY
Trimming is used to hide portions of an image and superimpose it over another image.
Cropping is used to reframe an image, say from a medium shot to a close-up, but runs the risk of overly softening an image. The general rule is that cropping a little is OK, but don’t crop too much.
I use both these techniques frequently in my own editing.
Benjamin Arango
Benjamin Arango is a writer and a lover of all things video.
Follow @Benjamin Arango
Also read:
- Updated Quik on Windows/Mac Best Options for Editing GoPro Footage for 2024
- In 2024, Slow and Steady Wins the Race How to Use VLCs Slow Motion Feature
- 2024 Approved Ultimate Selection Top Android Movie Making Apps
- Updated In 2024, The Ultimate List of Facebook MP3 Converters Online
- Updated 2024 Approved Top 10 2D Animation Tools Free and Paid Options
- Updated In 2024, Top-Rated Free Video Storage Sites for Online Sharing
- Updated 2024 Approved Best Converter How to Convert and Download 4K Video in MP4 Format
- Updated Unlock Your Creative Potential Video Editing Tips for Home Movies
- New In 2024, Google Plays Hidden Gems Underrated but Amazing Apps
- New 2024 Approved The Ultimate List of Neon Text Generators Top 9 Picks
- New In 2024, We Have Listed the Top 10 Free Final Cut Pro X Plugins with Their Respective Uses. Also, You Can Check a Quick Step-by-Step Guide to Install Such Plugins
- Updated 2024 Approved Best Free Video Editors for Trimming Videos on Windows 10
- New In 2024, MP4 to MP3 Conversion Made Easy Best Software and Online Tools
- New The Science Behind Instagram Video Dimensions What Works Best for 2024
- New Retro Video Revival Top VHS Apps for Smartphones for 2024
- New Slow Down Time Add Free Slow-Mo Effects to Your Videos with Filmora for 2024
- Updated The Ultimate Guide to Finding a Reliable YouTube MP3 Converter
- Screen Record with Ease Top 10 Webcam Software for Windows 10 for 2024
- New In 2024, Elevate Your Video Experience Free Online Quality Enhancement Tools
- Updated The Best Value Video Editing Software for 2024
- Updated In 2024, Cut, Trim, and Edit Free Video Software for Windows 10
- New The Ultimate List 10 Vegas Pro Alternatives for Mac Users (Free, Paid, and Everything in Between)
- Updated Say Goodbye to Adobe 10 Free Linux Video Editing Software Options for 2024
- In 2024, The Art of Time-Stopping Freeze Frame Techniques for Stunning Videos
- In 2024, The Lowdown on OGG Conversion Top Software Picks
- New 2024 Approved The Ultimate List of 10 Free Online Subtitle Creators for Videos
- Updated Windows 11/10 Video Editors Alternatives to iMovie Youll Love for 2024
- New Say Goodbye to Format Issues 10 Best WebM to MP4 Converters
- Updated Premiere Pro Compatibility Ensure Smooth Performance on Your Computer
- Updated Online Video Editing Software with Music and Transitions
- New In 2024, From AVI to MKV How to Stream Any Video Format to Your Chromecast
- Updated 2024 Approved What You Need to Know About M4R Converters Before Diving In
- Updated In 2024, Cut and Edit MOV Videos for Free Top Tools
- New 2024 Approved S Top-Rated Free M4A Audio Editors
- New 2024 Approved The Most Efficient Video Editing Tools for Your Computer
- Updated Ultimate Photo to Music Video Converters for 2024
- Updated In 2024, The Ultimate Guide to Motion Tracking on Android and iPhone
- New Best FLV Editor for Windows 8 Effortless Video Editing Software for 2024
- 2024 Approved The FCP Factor 10 Blockbuster Movies Edited with Final Cut Pro
- New Unbiased Comparison Final Cut Pro and LumaFusion - Which One Is Right for You, In 2024
- New Final Cut Pro X Jump Cuts From Beginner to Pro in No Time for 2024
- Updated 2024 Approved Slow Down or Speed Up Videos Best Software for Windows, Mac, and Mobile
- Updated Discover the Best of Minitool Movie Maker Review, Tutorial, and Alternative Solutions for 2024
- Updated 2024 Approved Combine MOV Videos without Watermarks Top 5 Free Tools
- Updated 2024 Approved Many Photographers, Museums and Cultural Institutions Are Choosing to Forfeit Their Rights and to Publish Public Domain Images. So, in This Article, We Are Going to Take You Through the Ten Best Publi
- Updated 2024 Approved Splice Video Editor for Mac Free Download and Start Creating
- Updated Slowing Down the Action VLC Video Playback Tricks
- New DVD Mastery Choosing the Right Movie Making Software for Beginners for 2024
- How to share/fake gps on Uber for Oppo A1x 5G | Dr.fone
- new How To Convert Video Voice to Text Online for Free,In 2024
- In 2024, Best Apple iPhone 8 & iPad Screen Mirroring App | Dr.fone
- In 2024, How to Unlock Nubia Z50 Ultra Phone with Broken Screen
- Use Device Manager to identify missing or malfunctioning hardware drivers with Windows Device Manager on Windows 10
- In 2024, How To Change Vivo V29 Pro Lock Screen Password?
- In 2024, 9 Mind-Blowing Tricks to Hatch Eggs in Pokemon Go Without Walking On Oppo A18 | Dr.fone
- How Do You Remove Restricted Mode on Apple iPhone 12 Pro | Dr.fone
- Top 6 Apps/Services to Trace Any Realme Narzo 60 5G Location By Mobile Number | Dr.fone
- 3 Easy Solutions to Hard Reset Motorola Moto G Stylus (2023) | Dr.fone
- How to Hard Reset Tecno Spark 10C Without Password | Dr.fone
- Ultimate Guide, How to Transfer Music From Apple iPhone 6 to iPhone | Dr.fone
- In 2024, How Do You Remove Restricted Mode on iPhone 11
- Best Pokemons for PVP Matches in Pokemon Go For Honor V Purse | Dr.fone
- How to remove Google FRP Lock on Realme 10T 5G
- Fake the Location to Get Around the MLB Blackouts on Xiaomi Redmi K70E | Dr.fone
- Tips And Tricks To Tell if Your Apple iPhone 11 Pro Max Is Unlocked
- How to Fix Android.Process.Media Has Stopped on Vivo V29 Pro | Dr.fone
- Troubleshooting Guide How to Fix an Unresponsive Honor Magic 5 Lite Screen | Dr.fone
- How to Mirror Infinix Hot 30 5G to Mac? | Dr.fone
- In 2024, How to Use Life360 on Windows PC For Tecno Pop 8? | Dr.fone
- In 2024, The 10 Best Tools to Bypass iCloud Activation Lock From Apple iPhone XR You Should Try Out
- How to Stop Life360 from Tracking You On Apple iPhone 8 Plus? | Dr.fone
- In 2024, Top 7 iCloud Activation Bypass Tools For your Apple iPhone 11 Pro Max
- In 2024, Recommended Best Applications for Mirroring Your Xiaomi 14 Pro Screen | Dr.fone
- In 2024, Here are Some of the Best Pokemon Discord Servers to Join On Honor Magic 6 Lite | Dr.fone
- In 2024, Pokémon Go Cooldown Chart On Motorola G54 5G | Dr.fone
- What Is the Best Frame Rate for 4K Videos?
- Remove FRP Lock on K11x
- Methods to Change GPS Location On Samsung Galaxy S23+ | Dr.fone
- Your Search for the Best GIF Creator Tools Ends Here for 2024
- 2024 Approved List of Supported Whatsapp Video Format You May Want to Know
- Fix App Not Available in Your Country Play Store Problem on Honor X9b | Dr.fone
- 7 Solutions to Fix Chrome Crashes or Wont Open on Samsung Galaxy M54 5G | Dr.fone
- In 2024, What Pokémon Evolve with A Dawn Stone For Asus ROG Phone 8? | Dr.fone
- The Ultimate Guide to Xiaomi 14 Ultra Pattern Lock Screen Everything You Need to Know
- 4 Ways to Transfer Music from Samsung Galaxy A05 to iPhone | Dr.fone
- A Detailed VPNa Fake GPS Location Free Review On HTC U23 Pro | Dr.fone
- In 2024, Here are Some Pro Tips for Pokemon Go PvP Battles On Honor 100 | Dr.fone
- Undelete lost pictures from Nokia C12.
- The Magnificent Art of Pokemon Go Streaming On OnePlus 12? | Dr.fone
- Full Guide to Fix iToolab AnyGO Not Working On OnePlus Nord N30 5G | Dr.fone
- What to Do if Google Play Services Keeps Stopping on Vivo X Flip | Dr.fone
- In 2024, How to Mirror PC Screen to Realme C33 2023 Phones? | Dr.fone
- Latest Guide How To Bypass Meizu 21 FRP Without Computer
- In 2024, About Oppo Reno 11 Pro 5G FRP Bypass
- Title: New 2024 Approved Free Video Blur Tool A Step-by-Step Guide
- Author: Morgan
- Created at : 2024-04-28 05:22:05
- Updated at : 2024-04-29 05:22:05
- Link: https://ai-video-tools.techidaily.com/new-2024-approved-free-video-blur-tool-a-step-by-step-guide/
- License: This work is licensed under CC BY-NC-SA 4.0.
