
:max_bytes(150000):strip_icc():format(webp)/set-top-dvr-1130767-f2aa7f11e3d2442b966d53b8aa2d25fd.png)
In 2024, The Battle for Video Editing Supremacy Sony Vegas Pro vs Adobe Premiere Pro
The Battle for Video Editing Supremacy: Sony Vegas Pro vs Adobe Premiere Pro
Sony Vegas VS Adobe Premiere, Which One is Better?

Ollie Mattison
Mar 27, 2024• Proven solutions
It’s an age-old battle, Vegas or Premiere , a comparison that many have made over the last few years in the market, as always when making a comparison, things are always skewed by the writer’s own views, so it is hard to draw any definitive conclusions. Here we aim to lay out the specifications of each product and discuss their effects on workflow, output, and usability to form an opinion beyond the ‘this is the one I like’ argument. However, we are aware of making a completely fair comparison is impossible. We will try our best. Hope you will enjoy it!
Part 1: Sony Vegas VS Adobe Premiere
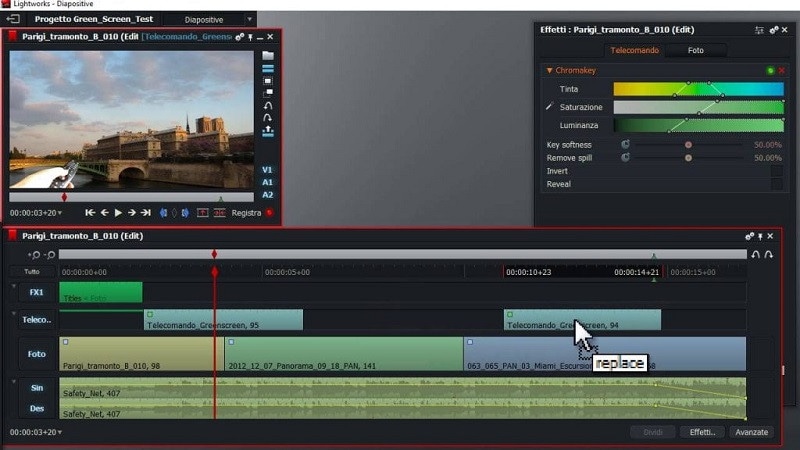
1. Sony Vegas VS Adobe Premiere: Interface and Features Comparison

Adobe Premiere Interface

Vegas Interface
| Editing Features | Adobe Premiere | Sony Vegas |
|---|---|---|
| Animation Tools |  |
|
| Audio Transitions | |
|
| Color Correction | |
|
| Direct Camcorder Capture | |
|
| Drag and Drop | |
|
| DVD Burning | |
|
| Green Screen (Chroma Keying) | |
|
| HD Support | |
|
| Speed Change | |
|
| Subtitles | |
|
| Video Transitions | |
|
| Multi-Cam Support | |
|
| 3D Editing | |
|
| Visual Effects | |
Again the Premiere spec-sheet suggests it is a close call , and to be brutally honest that is mostly the truth. Premiere does have more ability within the editing department there is no question. There are very few things that Vegas does better (3D manipulation being the standout), but distilled into the bare bones of a list of ‘things’, so the differences are not so obvious. The usability factor for Vegas carries on into the editing process too, although it is perhaps inevitable that Premiere’s more complex abilities lead to a more complex interface structure and a steeper learning curve, it is still a truth that Vegas is just easier to get results from at the start.
Underneath the Vegas specifications though, Premiere does have plenty going for it, the Mercury Playback Engine that drives the editing suite enables renders real-time playback that saves time and makes for a much smoother workflow for any project, and whilst it will not apply to everyone, the multiple camera abilities are second to none and for those that use them, an invaluable and significant tool for producing professional-grade output.
I keep returning to this point, but in a comparison of the two products it is a very important one, whilst ultimately Premiere has more ability within it for producing high-quality video, it is the learning curve that is the major difference for new users . This should be a consideration for anyone looking at the two, however, the complexity of Premiere is not an insurmountable issue. There are numerous tutorials, both free and commercial, available to get any level of the user through the first steps of understanding the processes within Premiere, and of course the same is true of Vegas, although to my mind they would not be as essentially an item, whereas with Premiere, the very least that is required is going through Adobe’s own online video education for the software.
2. Sony Vegas VS Adobe Premiere: Specification Comparison
As we can see at first glance the two seem very comparable regarding the basic tools and utilities. The one glaring difference does not mentioned in the basic specs outlined above, however, is that Sony Vegas is a Windows-only product. Premiere has versions for both Mac and Windows , and whilst the dominance of Apple within the creative industries is nowhere near what it once was, a sizable number of people still use the Mac platform, and for them, Vegas isn’t even an option without resorting to emulation, which is a processor-intensive operation like video editing is not really a viable solution.
It is also important to consider that the spec-sheet itself doesn’t tell the whole story, with the audio and effect modules more advanced in Premiere , however, Vegas has the benefit of being a much easier program to get to grips with for anyone new to the video editing world, and although its abilities are perhaps ultimately not as sophisticated as Premiere, new users often find they get better results with Vegas due to the accessibility of its tools. For the more experienced this is probably not a factor, but it is worth considering for newcomers.
3. Sony Vegas VS Adobe Premiere: Workflow comparison
Once that initial barrier is overcome, however, I feel that the added functionality, workflow efficiency, and compatibility-out-of-the-box Premiere can deal with roughly double the number of media formats - of Adobe’s product makes it a superior product for long-term use.
The key here is long term, no one wants to relearn everything every couple of years, switching platforms endlessly searching for the ultimate product, so when making a choice for video editing I would always suggest that prospective users consider not just what they want now, but what they may want in the future. Vegas has the easier entry path, there is absolutely no question, however what if you later want the more sophisticated editing facilities? If you switch then you still have to go through learning Premiere, after learning Vegas. Learning one piece of software is a better choice, so which one will fulfill future needs should be taken into account.
4. Sony Vegas VS Adobe Premiere: Compatibility Comparison
There is also the issue of other production requirements. If you are aiming towards motion effects, animation, and other composite effects within your work, then consider the platform that will be carried out on as well. Here is where Adobe’s strength shines. The various products they put out work together extremely well, and in the case of video effects , Premiere and After Effects together offer a workflow and output quality that is as good as it gets. Saying either will do the job is not really a satisfactory conclusion for these types of comparisons, even if it is actually true. However, there are answers here.
Part 2: FAQ about Vegas
1. Can Sony Vegas be used on a Mac?
Sony Vegas professional was not generally a SONY item, and it is not, at this point, a SONY item.
It was offered to Magix before this previous year. It was initially a DAW Digital Audio Workstation programming that had video highlights. After some time, it developed into the item a considerable lot of us know and love, Vegas Pro.
A hearty and expert video altering programming! SONY hoped to port Vegas over to Mac for quite a while. They had effectively discharged a Mac form of SoundForge, and Vegas would have been straightaway.
I surmise they ran into a huge amount of specialized issues, the greatest being that they just needed Mac programming abilities.
Apple additionally discharged FCPX as a $299 altering application for Mac, which removed any gainfulness from the condition for SONY. So that answers why Sony Vegas on Mac is impossible.
2. Is there a Sony Vegas for free?
No, you do not get a Sony Vegas on Mac completely free at any time. However, there is a way in which you can torrent it or go for a free trial version.
Despite the option, the better suggestion for you is to go and purchase it instead of downloading it from anywhere else. It is because choosing the second option may lead to leakage of data from your computer.
Otherwise, you can also use alternative software such as Hitfilm Express or Lightworks. So, now you know that the Sony Vegas ‘Pro’ is just a faux term because there is no difference between the professional and normal version.
Both come at a premium cost anyway.
3. How much does Sony Vegas cost?
There are different plans of the Sony Vegas such as Vegas Pro Edit, Vegas Pro, Vegas Pro 365, Vegas Pro Suite. The Vegas Pro Edit generally costs around $698. Next, The Vegas Pro comes at the cost of $898. The popular Vegas Pro 365 is priced at $16.67 for every 3 months.
So, you need to pay a total of $66.68 annually. Lastly, the Sony Vegas Pro Suite comes at $1098 and is the costliest of all the versions.
Conclusion
In conclusion, Premiere is the more capable program, both in terms of workflow, output, and its ability to integrate with other applications to produce much more advanced output. For anyone looking for more than just an editor, it is the choice to make. Find some instructional material, dive in, and have fun.
This is a basic comparison between Adobe Premiere and Sony Vegas, which both are professional video editing software. If you want to learn more about Sony Vegas, please check Sony Vegas Editing . If you want to learn more about Premiere, you should not miss Adobe Premiere Editing Tips .
If neither Sony Vegas nor Adobe Premiere is the best suitable video editing software for you, you can visit The Best Sony Vegas Alternative for Windows , or Adobe Premiere Pro Alternatives and Similar Programs
 Download Mac Version ](https://tools.techidaily.com/wondershare/filmora/download/ )
Ollie Mattison
Ollie Mattison is a writer and a lover of all things video.
Follow @Ollie Mattison
Ollie Mattison
Mar 27, 2024• Proven solutions
It’s an age-old battle, Vegas or Premiere , a comparison that many have made over the last few years in the market, as always when making a comparison, things are always skewed by the writer’s own views, so it is hard to draw any definitive conclusions. Here we aim to lay out the specifications of each product and discuss their effects on workflow, output, and usability to form an opinion beyond the ‘this is the one I like’ argument. However, we are aware of making a completely fair comparison is impossible. We will try our best. Hope you will enjoy it!
Part 1: Sony Vegas VS Adobe Premiere
1. Sony Vegas VS Adobe Premiere: Interface and Features Comparison
Adobe Premiere Interface
Vegas Interface
| Editing Features | Adobe Premiere | Sony Vegas |
|---|---|---|
| Animation Tools | |
|
| Audio Transitions | |
|
| Color Correction | |
|
| Direct Camcorder Capture | |
|
| Drag and Drop | |
|
| DVD Burning | |
|
| Green Screen (Chroma Keying) | |
|
| HD Support | |
|
| Speed Change | |
|
| Subtitles | |
|
| Video Transitions | |
|
| Multi-Cam Support | |
|
| 3D Editing | |
|
| Visual Effects | |
Again the Premiere spec-sheet suggests it is a close call , and to be brutally honest that is mostly the truth. Premiere does have more ability within the editing department there is no question. There are very few things that Vegas does better (3D manipulation being the standout), but distilled into the bare bones of a list of ‘things’, so the differences are not so obvious. The usability factor for Vegas carries on into the editing process too, although it is perhaps inevitable that Premiere’s more complex abilities lead to a more complex interface structure and a steeper learning curve, it is still a truth that Vegas is just easier to get results from at the start.
Underneath the Vegas specifications though, Premiere does have plenty going for it, the Mercury Playback Engine that drives the editing suite enables renders real-time playback that saves time and makes for a much smoother workflow for any project, and whilst it will not apply to everyone, the multiple camera abilities are second to none and for those that use them, an invaluable and significant tool for producing professional-grade output.
I keep returning to this point, but in a comparison of the two products it is a very important one, whilst ultimately Premiere has more ability within it for producing high-quality video, it is the learning curve that is the major difference for new users . This should be a consideration for anyone looking at the two, however, the complexity of Premiere is not an insurmountable issue. There are numerous tutorials, both free and commercial, available to get any level of the user through the first steps of understanding the processes within Premiere, and of course the same is true of Vegas, although to my mind they would not be as essentially an item, whereas with Premiere, the very least that is required is going through Adobe’s own online video education for the software.
2. Sony Vegas VS Adobe Premiere: Specification Comparison
As we can see at first glance the two seem very comparable regarding the basic tools and utilities. The one glaring difference does not mentioned in the basic specs outlined above, however, is that Sony Vegas is a Windows-only product. Premiere has versions for both Mac and Windows , and whilst the dominance of Apple within the creative industries is nowhere near what it once was, a sizable number of people still use the Mac platform, and for them, Vegas isn’t even an option without resorting to emulation, which is a processor-intensive operation like video editing is not really a viable solution.
It is also important to consider that the spec-sheet itself doesn’t tell the whole story, with the audio and effect modules more advanced in Premiere , however, Vegas has the benefit of being a much easier program to get to grips with for anyone new to the video editing world, and although its abilities are perhaps ultimately not as sophisticated as Premiere, new users often find they get better results with Vegas due to the accessibility of its tools. For the more experienced this is probably not a factor, but it is worth considering for newcomers.
3. Sony Vegas VS Adobe Premiere: Workflow comparison
Once that initial barrier is overcome, however, I feel that the added functionality, workflow efficiency, and compatibility-out-of-the-box Premiere can deal with roughly double the number of media formats - of Adobe’s product makes it a superior product for long-term use.
The key here is long term, no one wants to relearn everything every couple of years, switching platforms endlessly searching for the ultimate product, so when making a choice for video editing I would always suggest that prospective users consider not just what they want now, but what they may want in the future. Vegas has the easier entry path, there is absolutely no question, however what if you later want the more sophisticated editing facilities? If you switch then you still have to go through learning Premiere, after learning Vegas. Learning one piece of software is a better choice, so which one will fulfill future needs should be taken into account.
4. Sony Vegas VS Adobe Premiere: Compatibility Comparison
There is also the issue of other production requirements. If you are aiming towards motion effects, animation, and other composite effects within your work, then consider the platform that will be carried out on as well. Here is where Adobe’s strength shines. The various products they put out work together extremely well, and in the case of video effects , Premiere and After Effects together offer a workflow and output quality that is as good as it gets. Saying either will do the job is not really a satisfactory conclusion for these types of comparisons, even if it is actually true. However, there are answers here.
Part 2: FAQ about Vegas
1. Can Sony Vegas be used on a Mac?
Sony Vegas professional was not generally a SONY item, and it is not, at this point, a SONY item.
It was offered to Magix before this previous year. It was initially a DAW Digital Audio Workstation programming that had video highlights. After some time, it developed into the item a considerable lot of us know and love, Vegas Pro.
A hearty and expert video altering programming! SONY hoped to port Vegas over to Mac for quite a while. They had effectively discharged a Mac form of SoundForge, and Vegas would have been straightaway.
I surmise they ran into a huge amount of specialized issues, the greatest being that they just needed Mac programming abilities.
Apple additionally discharged FCPX as a $299 altering application for Mac, which removed any gainfulness from the condition for SONY. So that answers why Sony Vegas on Mac is impossible.
2. Is there a Sony Vegas for free?
No, you do not get a Sony Vegas on Mac completely free at any time. However, there is a way in which you can torrent it or go for a free trial version.
Despite the option, the better suggestion for you is to go and purchase it instead of downloading it from anywhere else. It is because choosing the second option may lead to leakage of data from your computer.
Otherwise, you can also use alternative software such as Hitfilm Express or Lightworks. So, now you know that the Sony Vegas ‘Pro’ is just a faux term because there is no difference between the professional and normal version.
Both come at a premium cost anyway.
3. How much does Sony Vegas cost?
There are different plans of the Sony Vegas such as Vegas Pro Edit, Vegas Pro, Vegas Pro 365, Vegas Pro Suite. The Vegas Pro Edit generally costs around $698. Next, The Vegas Pro comes at the cost of $898. The popular Vegas Pro 365 is priced at $16.67 for every 3 months.
So, you need to pay a total of $66.68 annually. Lastly, the Sony Vegas Pro Suite comes at $1098 and is the costliest of all the versions.
Conclusion
In conclusion, Premiere is the more capable program, both in terms of workflow, output, and its ability to integrate with other applications to produce much more advanced output. For anyone looking for more than just an editor, it is the choice to make. Find some instructional material, dive in, and have fun.
This is a basic comparison between Adobe Premiere and Sony Vegas, which both are professional video editing software. If you want to learn more about Sony Vegas, please check Sony Vegas Editing . If you want to learn more about Premiere, you should not miss Adobe Premiere Editing Tips .
If neither Sony Vegas nor Adobe Premiere is the best suitable video editing software for you, you can visit The Best Sony Vegas Alternative for Windows , or Adobe Premiere Pro Alternatives and Similar Programs
Download Mac Version ](https://tools.techidaily.com/wondershare/filmora/download/ )
Ollie Mattison
Ollie Mattison is a writer and a lover of all things video.
Follow @Ollie Mattison
Final Cut Pro X Title Tutorial: A Step-by-Step Guide
How to Add Titles in Final Cut Pro X

Benjamin Arango
Mar 27, 2024• Proven solutions
We add text titles to our projects to tell the audience something they can’t figure out on their own, such as the title of our program, the name of the person speaking, or technical details about a subject.
This is a basic tutorial about Apple Final Cut Pro X, professional video editing software. However, if video editing is new to you, consider Wondershare Filmora for Mac . This is a powerful but easy-to-use tool for users just starting out. Download the free trial version below.
 Download Mac Version ](https://tools.techidaily.com/wondershare/filmora/download/ )
Final Cut Pro X has almost 200 different text effects that we can add, but the process of adding titles is essentially the same. Adding titles is what this article is about.
DEFINITIONS
Just to keep us all on the same page, here are my definitions of key terms related to text:
- Text or titles. Words placed on the screen. I use these terms interchangeably.
- Superimpose. Text displayed on the the screen with other video below it. These are also called “supers” or “keys.”
- Full-screen. Text which occupies the entire screen.
- Lower-third. Text which fits below a person talking; in the “lower-third” of the screen.
- Info-graphics. Full-screen text which is superimposed on a graphic, generally used to convey technical information. Typical uses are sports statistics or other information which is easier to convey using text than having someone read the words.
JUST THE BASICS

I’d like to introduce “Yertle,” he’s a sea turtle and the star of this article. (Footage courtesy of Jim Walker and Lobsters Gone Wild Productions.)
At its simplest, we use titles to display his (its?) name.

In the Timeline, put the playhead where you want a title to appear and type Shift+Control+T. This inserts the default lower-third title at the position of the playhead. The title, like almost all titles, has a default duration of 10:00 seconds.

Look at the Browser and see the results of your work. A lower-third title is superimposed over the video in the lower left corner. (I’ll talk about formatting the text in a few paragraphs.)
NOTE: The big limitation of this lower-third title is that it can only be positioned in the left corner. Moving it to the center or right corner requires manual adjustment.
You position or trim a title the same as any video clip: drag the clip to a different location, or drag an edge to change its duration.
Select that title and delete it by pressing the Delete key.

This time, type Control+T and the default full-screen title appears in the center of the screen. Again, this has a default duration of 10 seconds.

If you look right in the center of the screen, you’ll see the word “Title.” Yes, its darn near invisible. And, yes, it looks, um, ugly. However, we have a TON of formatting control to make this look however we want.
Select and delete that full-screen title.
There’s one more way to apply a title: dragging from the Titles Browser.

Click the Title icon in the Toolbar. This displays the contents of the Title Browser. The column on the left displays title categories, the icons on the right indicate individual titles, the search box at the bottom allows you to search for specific titles by name, while the number in the lower right indicates the number of titles currently displayed. (Your number may not match mine because I’ve added a few custom titles to my system.)

Let’s add a totally ridiculous title to our turtle - drag Clouds from the Title Browser and place it above the clip at the point where you want a title to appear.
NOTE: I’m using a marker in the Timeline to help me find the same place in a clip so my screen shots are consistent. Markers are not needed in any way for titles.

Um, yeah. So, some titles look more professional than others… You can delete this title now.
So, we:
- Add titles using keyboard shortcuts
- Drag titles from the Title Browser
- Change position by dragging the title
- Change duration by dragging the edge of the clip
- Delete a title by selecting it and pressing the Delete key
CHANGING TEXT

Add a new full-screen title (type Control+T) to the Timeline. To change the text in a title, double-click it in the Viewer. Here, I’ve changed my title to “An Undersea Adventure.”
NOTE: We can also change the text using the Inspector. I’ll show you how in a few paragraphs. Pick whichever method is easiest for you.
All text, in any title, can be changed by double-clicking it in the Viewer to select it, then typing the new text you want to use.
FORMATTING TEXT

You can format any text that you can select. This means that you can format entire phrases, words, or individual letters differently. For this article, I will format everything the same, because once you know how this works, you can experiment on your own.
Here, I selected my entire title and opened the Inspector (shortcut Cmd+4). Click the Text tab at the top. This section of the Inspector allows you to format the text.
NOTE: The text box near the top of the panel is the second place you can select text for formatting.
If you want a fast way to format text, click the word “Normal” at the top. This displays a menu filled with different text formats. Some of these formats look pretty dreadful; the rest look worse.
NOTE: You can create your own text styles. Refer to the Help for information on how.

The Basic section of the Inspector allows you to change fonts, size, alignment… all the standard font settings we see in other programs. Here, I’ve changed the font to Hobo Std, at 167 points.
While many of these settings you already know there are a few you may not:
- Line spacing. Adjusts the vertical distance between lines within the same paragraph.
- Tracking. Adjusts the horizontal spacing between letters.
- Baseline. Adjusts the vertical spacing of text compared to the horizontal line running thru the center of the white circle in the Viewer.

The Face section allows us to change font color, opacity and blue. Outline and Glow allows us to add, not surprisingly, outlines and glows. You can adjust these as you see fit - I tend not to add outlines or glows.

However, I STRONGLY recommend adding drop shadows to all text that you want viewers to read. Video, even HD video, is low resolution compared to print. Drop shadows make your text much easier to read. These are the settings I recommend for drop shadows.

After making a few changes in the Inspector, here’s the final result. Very cool - and very different from where we started!
ACTION SAFE/TITLE SAFE ZONES
Since television was first invented, we needed to compensate for the differences in TV sets by designing graphics to stay within Action Safe and Title Safe boundaries.
While much of today’s video is designed for the web, your titles will look the best if you follow the same guidelines.
Titles015

Go to the Switch in the Viewer and select “Show Action Safe/Title Safe Zones.”

This displays two pale rectangles in the frame. The outer rectangle is called “Action Safe,” the inner one is called “Title Safe.” Action Safe is 5% in from all edges; Title Safe is 10% in from all edges.
When designing text and graphics for the web, keep all essential elements inside the outer rectangle. When designing graphics and text for broadcast or cable, keep all essential elements inside the inner rectangle.
Here, for example, notice that my title is fully contained within Action Safe.
SUMMARY
Titles give our programs character and personality, plus they explain what’s going on to the audience. Final Cut Pro X provides a wealth of formatting options to make our text look great.
Benjamin Arango
Benjamin Arango is a writer and a lover of all things video.
Follow @Benjamin Arango
Benjamin Arango
Mar 27, 2024• Proven solutions
We add text titles to our projects to tell the audience something they can’t figure out on their own, such as the title of our program, the name of the person speaking, or technical details about a subject.
This is a basic tutorial about Apple Final Cut Pro X, professional video editing software. However, if video editing is new to you, consider Wondershare Filmora for Mac . This is a powerful but easy-to-use tool for users just starting out. Download the free trial version below.
Download Mac Version ](https://tools.techidaily.com/wondershare/filmora/download/ )
Final Cut Pro X has almost 200 different text effects that we can add, but the process of adding titles is essentially the same. Adding titles is what this article is about.
DEFINITIONS
Just to keep us all on the same page, here are my definitions of key terms related to text:
- Text or titles. Words placed on the screen. I use these terms interchangeably.
- Superimpose. Text displayed on the the screen with other video below it. These are also called “supers” or “keys.”
- Full-screen. Text which occupies the entire screen.
- Lower-third. Text which fits below a person talking; in the “lower-third” of the screen.
- Info-graphics. Full-screen text which is superimposed on a graphic, generally used to convey technical information. Typical uses are sports statistics or other information which is easier to convey using text than having someone read the words.
JUST THE BASICS
I’d like to introduce “Yertle,” he’s a sea turtle and the star of this article. (Footage courtesy of Jim Walker and Lobsters Gone Wild Productions.)
At its simplest, we use titles to display his (its?) name.
In the Timeline, put the playhead where you want a title to appear and type Shift+Control+T. This inserts the default lower-third title at the position of the playhead. The title, like almost all titles, has a default duration of 10:00 seconds.
Look at the Browser and see the results of your work. A lower-third title is superimposed over the video in the lower left corner. (I’ll talk about formatting the text in a few paragraphs.)
NOTE: The big limitation of this lower-third title is that it can only be positioned in the left corner. Moving it to the center or right corner requires manual adjustment.
You position or trim a title the same as any video clip: drag the clip to a different location, or drag an edge to change its duration.
Select that title and delete it by pressing the Delete key.
This time, type Control+T and the default full-screen title appears in the center of the screen. Again, this has a default duration of 10 seconds.
If you look right in the center of the screen, you’ll see the word “Title.” Yes, its darn near invisible. And, yes, it looks, um, ugly. However, we have a TON of formatting control to make this look however we want.
Select and delete that full-screen title.
There’s one more way to apply a title: dragging from the Titles Browser.
Click the Title icon in the Toolbar. This displays the contents of the Title Browser. The column on the left displays title categories, the icons on the right indicate individual titles, the search box at the bottom allows you to search for specific titles by name, while the number in the lower right indicates the number of titles currently displayed. (Your number may not match mine because I’ve added a few custom titles to my system.)
Let’s add a totally ridiculous title to our turtle - drag Clouds from the Title Browser and place it above the clip at the point where you want a title to appear.
NOTE: I’m using a marker in the Timeline to help me find the same place in a clip so my screen shots are consistent. Markers are not needed in any way for titles.
Um, yeah. So, some titles look more professional than others… You can delete this title now.
So, we:
- Add titles using keyboard shortcuts
- Drag titles from the Title Browser
- Change position by dragging the title
- Change duration by dragging the edge of the clip
- Delete a title by selecting it and pressing the Delete key
CHANGING TEXT
Add a new full-screen title (type Control+T) to the Timeline. To change the text in a title, double-click it in the Viewer. Here, I’ve changed my title to “An Undersea Adventure.”
NOTE: We can also change the text using the Inspector. I’ll show you how in a few paragraphs. Pick whichever method is easiest for you.
All text, in any title, can be changed by double-clicking it in the Viewer to select it, then typing the new text you want to use.
FORMATTING TEXT
You can format any text that you can select. This means that you can format entire phrases, words, or individual letters differently. For this article, I will format everything the same, because once you know how this works, you can experiment on your own.
Here, I selected my entire title and opened the Inspector (shortcut Cmd+4). Click the Text tab at the top. This section of the Inspector allows you to format the text.
NOTE: The text box near the top of the panel is the second place you can select text for formatting.
If you want a fast way to format text, click the word “Normal” at the top. This displays a menu filled with different text formats. Some of these formats look pretty dreadful; the rest look worse.
NOTE: You can create your own text styles. Refer to the Help for information on how.
The Basic section of the Inspector allows you to change fonts, size, alignment… all the standard font settings we see in other programs. Here, I’ve changed the font to Hobo Std, at 167 points.
While many of these settings you already know there are a few you may not:
- Line spacing. Adjusts the vertical distance between lines within the same paragraph.
- Tracking. Adjusts the horizontal spacing between letters.
- Baseline. Adjusts the vertical spacing of text compared to the horizontal line running thru the center of the white circle in the Viewer.
The Face section allows us to change font color, opacity and blue. Outline and Glow allows us to add, not surprisingly, outlines and glows. You can adjust these as you see fit - I tend not to add outlines or glows.
However, I STRONGLY recommend adding drop shadows to all text that you want viewers to read. Video, even HD video, is low resolution compared to print. Drop shadows make your text much easier to read. These are the settings I recommend for drop shadows.
After making a few changes in the Inspector, here’s the final result. Very cool - and very different from where we started!
ACTION SAFE/TITLE SAFE ZONES
Since television was first invented, we needed to compensate for the differences in TV sets by designing graphics to stay within Action Safe and Title Safe boundaries.
While much of today’s video is designed for the web, your titles will look the best if you follow the same guidelines.
Titles015
Go to the Switch in the Viewer and select “Show Action Safe/Title Safe Zones.”
This displays two pale rectangles in the frame. The outer rectangle is called “Action Safe,” the inner one is called “Title Safe.” Action Safe is 5% in from all edges; Title Safe is 10% in from all edges.
When designing text and graphics for the web, keep all essential elements inside the outer rectangle. When designing graphics and text for broadcast or cable, keep all essential elements inside the inner rectangle.
Here, for example, notice that my title is fully contained within Action Safe.
SUMMARY
Titles give our programs character and personality, plus they explain what’s going on to the audience. Final Cut Pro X provides a wealth of formatting options to make our text look great.
Benjamin Arango
Benjamin Arango is a writer and a lover of all things video.
Follow @Benjamin Arango
Video Editing on a Mac? Here Are 10 Fantastic Vegas Pro Alternatives
For creating high-grade dynamic videos, simply shooting or recording a clip is not enough. Finding the best Sony Ve gas alternatives for Mac is essential since the software mainly targets Windows users.
Thanks to developers, there are many free and paid options to start your video editing journey on a Mac. Let’s first have a look at alternative software you could consider.
- Lightworks
- Wondershare Filmora
- Adobe Premiere Pro
- HitFilm Express
- Kdenlive
- OpenShot
- Blender
- Jahshaka
- Final Cut Pro
- Cyberlink PowerDirector 365
- What are the limitations when using Sony Vegas (Vegas Pro) on Mac?
- Hot FAQs about Vegas Pro Alternatives
Part 1: Sony Vegas Pro Alternatives & Competitors Overview
Here is a list of the top 10 tools we found after research. For an easier understanding, the following are the essential points of difference between alternative video editing software types for Sony Vegas Pro in a tabular form.
| Software | Supported OS | Price | Editor’s Verdict |
|---|---|---|---|
| Lightworks | Windows, Mac, Linux | Create-$9.99/month, Pro-$23.99/month | Medium-Difficult |
| Wondershare Filmora | Windows, Mac | Annual-$49.99, Perpetual-$79.99 | Easy |
| Adobe Premiere Pro | Windows, Mac | $20.99/month | Easy-Medium |
| HitFilm Express | Windows, Mac | Free | Easy |
| Kdenlive | Windows, Mac, Linux | Free | Medium-Difficult |
| OpenShot | Windows, Mac, Linux, OsX | Free | Medium-Difficult |
| Blender | Windows, Mac, Linux | Free | Easy |
| Jahshaka | Windows, Linux, OsX | Free | Easy-Medium |
| Final Cut Pro | Mac | Lifetime-$299.99 | Easy-Medium |
| Cyberlink PowerDirector 365 | Windows, Mac | Lifetime-$52.50 | Easy-Medium |
Part 2: Top 10 Sony Vegas (Vegas Pro) Alternatives & Competitors
Now that you know the primary differences between the Sony Vegas Pro alternatives. Are you find anything you like? Let’s move on to more details for your further consideration.
1. Lightworks
With Lightworks, using the independent timeline codec, format, and resolution alteration in videos is extremely simple. In addition, you can use the multi-cam editing feature for real-time, high-quality editing work. Moreover, drag and drop elements into videos for optimized video editing work, including pre-existing Storyboard points.
Main Features:
- Industry-grade features like QC, transcoding, and automated transfer are available.
- Edit files at different FPS limits and use three-point editing for recording/source files.
- Insert files and overwrite on a new project, replace, backfill, and fit to fill your video clips.
- Attach Storyboard tiles and match-frame clips/sub-clips easily.
Pros
- Flexible functionality and speedy transfers
- Edit files with professional movie-like quality
- Auto Sync feature for automatic timeline re-syncing is available
Cons
- Direct X is only available on the Windows version
- TotalFX plugin is not available for free- you have to upgrade to use them
OS Compatibility: Windows , Mac , Linux
Best For: Editing experts creating visually animated and professional-looking short videos can work with Lightworks.
What users say:
For professional-level video editing work, Lightworks brings a lot of resources and elements to users. According to reviews , people who have tried it have experienced better video editing functionality with these resources.
2. Wondershare Filmora
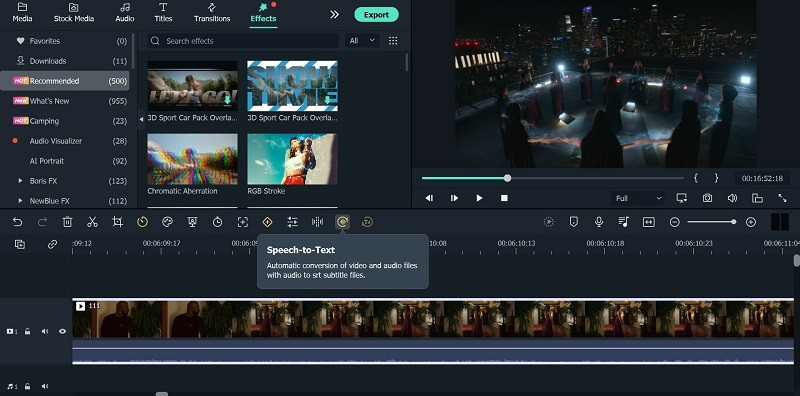
The top Vegas Pro alternative that both Windows and Mac users can opt for is Filmora. The software has advanced AI-incorporated editing functions for automated editing work, including preset effects from FX plugins. Besides that, you can easily add pre-set transitions, audio clips, text, images, and more.
Beginners find it simple to navigate through its interface and can opt for the Instant Mode function for automatic video edits .
Free Download For Win 7 or later(64-bit)
Free Download For macOS 10.14 or later

For a better idea of how this works, you should check out this tutorial video: https://filmora.wondershare.com/get-creative/make-a-video-quickly.html
Main Features:
- Instant Mode is available for automatic video/audio project editing out of 6 shorter clips.
- Support Advanced editing tools like Chroma Key and AI Portrait.
- Record voiceover, apply speech-to-text/text-to-speech functions, and more audio editing features.
- OpenFX plugins like BorisFX and NewBlue FX for a better list of pre-set effects.
Pros
- Simple to use and navigate on the editor timeline, especially with drag-and-drop support
- Output your editing files in different video/audio formats
- Quickly share the file on Vimeo or YouTube, besides downloading it on the local hard drive
Cons
- Free trial users cannot bring their Instant Mode-created videos into the editor timeline
- 4K support only with selected MKV, MOV, M4V (for Mac), and MP4 codecs
OS Compatibility: Windows , Mac
G2 Rating: 4.4 out of 5
Best For: All types of users like educators, students, homeowners, businesses, and video editors for comprehensive video editing tools and uses.
What users say:
Filmora is extremely simple to use, with advanced features available for top-level video editing work. Users mention in reviews how they have benefitted from the simple functionality and dynamic AI-based features available here for video editing.
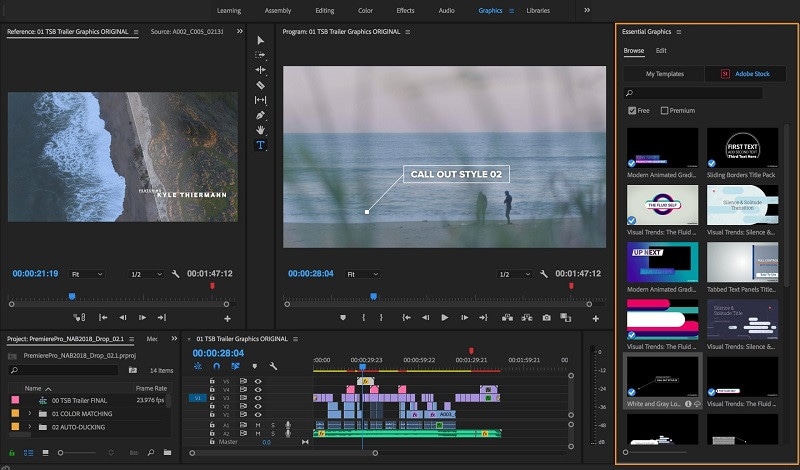
3. Adobe Premiere Pro
If you are looking for high-quality programs like Sony Vegas, Adobe Premiere Pro is a reliable choice. This editing software allows you to easily create, delete, and move big video projects. Moreover, you can work on multiple files simultaneously and use shortcuts for faster editing work.
Preset filters and editing features are also available here, especially if they choose the Adobe Creative Cloud option.
Main Features:
- Multiple pre-set transitions and effects are available for quick thematic changes.
- Add graphics, titles, and captions.
- Color grading and correction tools are available.
- It is possible to add keyframing and animation elements.
Pros
- Opting for group plans for video editing practice and learning using Adobe Premiere Pro is possible
- Aligns audio with videos instantly during editing
- Utilize Quick Export functionality for video files in some taps
Cons
- Windows High Contrast Mode is supported but to a limited extent, like with menus and title bars
- HDR workflows can only be handled on the Windows version with DisplayHDR 400 support
OS Compatibility: Windows , Mac
G2 Rating: 4.5 out of 5
Best For: Professional editors and trainers can use the various plans under Adobe Premiere Pro for video/audio editing.
What users say:
Advertisers and videographers enjoy high-grade video editing features and like the simple effects and interface quality. The motion graphics support in Adobe Premiere Pro is high-grade as well.
4. HitFilm Express
A capable Sony Vegas free alternative that you should check out is HitFilm Express. With this, you can expect many prepared designs for quick video edits. Additionally, you can manually customize the video files you are working on with high-grade personalization features available in the timeline.

Main Features:
- Pre-set customizable designs are available.
- Built-in sound effects and soundtracks are usable for free.
- Cache renders in timelines are optimized.
- The New Grade Clips feature allows users to apply varying effects to many video clips.
Pros
- Stable process of switching between timelines with an active orbit tool
- Easy to switch between 2D/3D timelines while using the text tool
- Simple to use for an unlimited period
Cons
- Does not work on older versions than Windows 10 and macOS 10.14
- Users cannot integrate this with Vegas Pro like before
OS Compatibility: Windows , Mac
TechRadar Rating: 4.5 out of 5
Best For: This software is a high-quality video editor for custom video editing work, fit for beginners and professionals alike.
What users say:
HitFilm Express is easy to use and efficient in the market for professional-level editing. The tutorial is available here for quick learning about the steps, and expandable features are well-admired by users.
5. Kdenlive
A high-quality Sony Vegas open-source variety that you should seriously consider is Kdenlive. The video editor comes with MLT framework support and holds many tools for optimizing video editing.
To simplify, you can arrange and adjust various video/audio tracks and mute or lock specific ones as needed. Add everything from filters, texts, and transitions using this editor for high-grade video projects.
Main Features:
- Get an automatic backup of your video project while you are editing it.
- Use proxy editing to create low-resolution source clip copies and render them later on computers.
- Multiple video/audio scopes are available for monitoring projects like vectorscope, waveform, and RDB Parade.
- Many transition and effect choices to use.
Pros
- Flexibility with themes to add with multiple options
- Pre-render specific timeline parts for preview
- Effects are simple to use with keyframing quality
Cons
- Complex for completely non-technical users to adapt to
- Only supports 64-bit versions in regards to Windows-based compatibility
Trustpilot Rating: 3.7 out of 5
Best For: High-level editing experts who need strong video editing and monitoring features in an open-source platform.
What users say:
Kdenlive, as an open-source video editing software, assures quick and straightforward usability with projects. Per reviews , users like the ability to make simple video edits without bugs in this editor and quickly export finished projects.
6. OpenShot
OpenShot is a high-quality cross-platform video editor that you can use on different devices for quick but dynamic video project edits. Use keyframing ability here to adjust the animated elements you add to the file.
Moreover, cut the videos with simple steps and add many audio tracks/background videos/watermarks in layers. Also, get several video effects to optimize the video look easily.
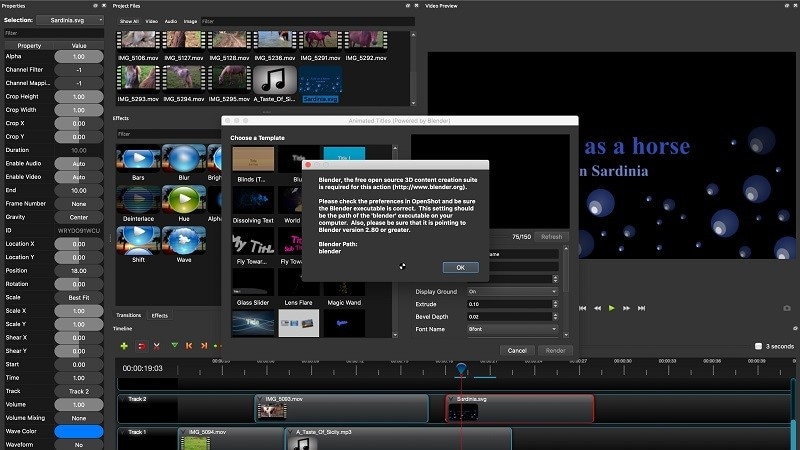
Main Features:
- Adjust video speed in reverse motion, fast forward, and slow motion.
- Render effects and 3D animated elements into the video project.
- Get title templates and edit them as needed.
- Visualize the background audio beats with waveform support.
Pros
- Very user-friendly interface with a simple navigation guarantee
- Supports more than 70 languages that you can translate as well using LaunchPad
- Drag-and-drop functionality is supported for adding images, audio, and videos into the OpenShot editor timeline
Cons
- Some bug issues can occur
- Slightly complex learning curve
OS Compatibility: Windows , Linux , OsX
G2 Rating: 4.4 out of 5
Best For: Professional-level video editing experts can opt for this cross-platform free software for high-quality video creations.
What users say:
The OpenShot software is suitable for high-quality video editing across different devices and operating systems. Users like the lack of automated watermarks on all videos, its simple dashboard, and its multi-track editing ability, all available for free.
7. Blender
Blender is free video editing software like Sony Vegas that users can use for video editing, but it is also effective for game development with animations. Indeed, you can create and render dynamic-looking scenes with features like Cycles.
Furthermore, the software has a rich modelling toolset with solutions like curves and sculpting tools.

Main Features:
- Completely customization-friendly UI, shortcuts, and window layout here.
- Customization and scripting are possible to do with this software due to the Python API support.
- Supports access and integration of many pipeline tools for projects.
- Comes with advanced simulation-based features available in MantaFlow and Bullet libraries.
Pros
- Basic and advanced tools for quick video edits
- Strong composition and masking ability with object-based motion tracking benefits
- Easily create short animations with Blender
Cons
- Data under the standalone games created here fall under GPL conditions
- Strict licensing rules are applicable here
OS Compatibility: Windows , Mac , Linux
G2 Rating: 4.5 out of 5
Best For: Game developers and videographers for companies can use this open-source platform for creation and editing.
What users say:
Blender is a capable software for animation-based editing, with high-quality game-based features and interactive elements that make editing simple. As per reviews , users like the simple animation-based tools and fast rendering it offers.
8. Jahshaka
Users of Jahshaka can experience an inclusive, collaborative environment for metaverse-level editing work. This free editing software, like Sony Vegas, focuses mainly on VR-based editing functions and comes with powerful tools for project management and content creation.
Take the help of other team members to collaborate on dynamic virtual world building, editing, and publishing.
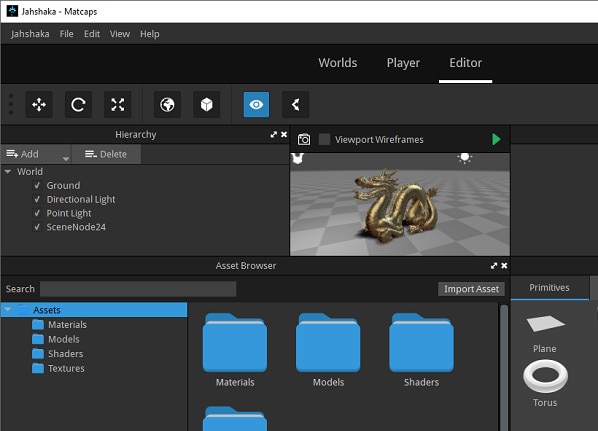
Main Features:
- Compatible player for different desktop and mobile devices.
- Create diversified worlds and scenes with one comprehensive platform.
- Immersive software 3D video development.
- Access to pre-built content and libraries of scenes and assets
Pros
- Easily share and distribute your virtual projects
- Deliver final projects offline and online
- An interactive multi-user engine is available
Cons
- Usable for a niche audience and does not include standard video editing tools
- Jahshaka V2 legacy support is no longer active
OS Compatibility: Windows , Linux , OsX
SourceForge Rating: 4.4 out of 5
Best For: Professional video editors who want a collaborative experience in VR-based development and publishing.
What users say:
Jahshaka is a suitable program for optimized VR-based editing with many preset features and themes to choose from. Most users enjoy the new features and worlds and can work with them efficiently.
9. Final Cut Pro
One of the top Sony Vegas alternatives Mac users can safely turn to is Final Cut Pro, which has powerful modern video editing features. With this software, you will access Cinematic Mode, which you can use to create stylish and thematic video scenes.
Similarly, the Object Tracker features utilize ML technology to automatically detect objects and faces in moving videos. It can align effects and titles accurately with the graphical elements in videos.

Main Features:
- Object Tracker feature for using color correction and adding texts into moving videos.
- Accelerated functional for motion tracking with Apple Neural Engine.
- Add high-quality effects and titles into videos with Cinematic Mode support.
- Preset audio tracks and royalty-free sound effects are available for editing.
Pros
- Handle color grading for optimized scene quality
- Adjust the field depth and focus depth in clips
- Share projects across iOS and macOS platforms
Cons
- Not valid for Windows users
- Relatively high cost to avail the paid version with all advanced features
OS Compatibility: Mac
TrustRadius Rating: 4.8 out of 5
Best For: Professional video editors, students, and filmmakers who want to create cinematic-quality video projects.
What users say:
Final Cut Pro is an efficient Mac-based video editing tool with easy sharing and editing capabilities, rich effects/transitions options, and fast rendering ability. Customers enjoy the intuitive non-linear editor, easy accessibility to social media platforms for file exporting, and live scrubbing, as noted in one review .
10. Cyberlink PowerDirector 365
Another Sony Vegas mac alternative for Windows you should give a try is PowerDirector 365 from Cyberlink. This software removes or compiles video clips and uses masking features like image/custom masks.
Preset special effects, blending modes, and sound effects are available here for quick editing. Additionally, the AI-powered Motion Tracking traces objects in clips and adds graphics, animations, and text quickly in line with it.

Main Features:
- You can create and remove videos with masking features.
- Drag and drop the pre-set effects and texts into videos.
- Adjust video clips with tools for border, gradation, and shadowing.
- Multiple animations, callouts, graphics, and stickers to add to videos.
Pros
- Use green screen functionality for quick background removal or editing
- Automatic audio mastering and mixing functionality are available
- Keyframing benefits for customized animations like scaling and positioning
Cons
- Dolby Digital-centric audio codec is not available for users
- Users can try features like Room Echo Removal and NVIDIA A/V Denoise only on Windows 11
OS Compatibility: Windows
TechRadar Rating: 4.5 out of 5
Best For: Professional videographers and regular users who want a Windows-based video editing software for standard video clip editing.
What users say:
Cyberlink PowerDirector is a powerful video editor with standard editing functions many users have tried and benefited from. According to customers , the program has high-quality video and audio editing benefits for presentations, with additional effects/splitting/cropping features.
Part 3: What are the limitations when using Sony Vegas (Vegas Pro) on Mac?
Yes, with the given Sony Vegas alternatives, Mac and Windows users can benefit heavily. But why is it important to try for a replacement when Sony Vegas Pro is relatively efficient software?
To know the answer, you should take the time to understand its limitations, which do exist.
It only works for Windows users
The Sony Vegas Pro software is not available for Mac or other operating systems besides Windows. In addition, it’ll be really complex and time-consuming, even if you opt for virtual machine software or handle dual booting techniques to configure the software on your Mac or Linux.
You need to invest in other hardware
Sony Vegas Pro does do not work within one comprehensive platform like other capable video editing software types, like Wondershare Filmora . You have to acquire a powerful PC and tools to operate it separately. The software works very slowly on older devices.
Not incredibly unique
The functions of Sony Vegas Pro match somewhat with other options in the market. So, users would not expect much value in purchasing this software’s plans that they want to upgrade from their previous system, but on the other hand, the available features are mostly standard-level in functionality as well.
Hot FAQs about Vegas Pro Alternatives
After knowing these details, many users still have specific common queries about opting for a Sony Vegas Pro alternatively. So these are some common FAQs about this- answered.
1. Can Sony Vegas be used on a Mac?
No, it is impossible to directly use Sony Vegas on macOS devices since it does not support it. Instead, you have to separately use a dual boot strategy or virtual machine software to activate the video editor on Mac devices, but the process for that is complex.
2. Is Wondershare Filmora or Vegas Pro better?
Wondershare Filmora and Vegas Pro are top-level options in video and audio editing projects with professional-level editing accuracy. However, Filmora has a cohesive ecosystem with rich AI and standard functions and comes with Mac/Windows support. So, in that sense, Filmora is comparatively a better choice.
Final Words
In place of Sony Vegas Pro, any of these options would also give you a great user experience. Out of them, Filmora is one that we will recommend due to its multi-faceted benefits and features for Mac and Windows users. Ultimately, make your decision based on your particular needs.
Free Download For Win 7 or later(64-bit)
Free Download For macOS 10.14 or later
Part 1: Sony Vegas Pro Alternatives & Competitors Overview
Here is a list of the top 10 tools we found after research. For an easier understanding, the following are the essential points of difference between alternative video editing software types for Sony Vegas Pro in a tabular form.
| Software | Supported OS | Price | Editor’s Verdict |
|---|---|---|---|
| Lightworks | Windows, Mac, Linux | Create-$9.99/month, Pro-$23.99/month | Medium-Difficult |
| Wondershare Filmora | Windows, Mac | Annual-$49.99, Perpetual-$79.99 | Easy |
| Adobe Premiere Pro | Windows, Mac | $20.99/month | Easy-Medium |
| HitFilm Express | Windows, Mac | Free | Easy |
| Kdenlive | Windows, Mac, Linux | Free | Medium-Difficult |
| OpenShot | Windows, Mac, Linux, OsX | Free | Medium-Difficult |
| Blender | Windows, Mac, Linux | Free | Easy |
| Jahshaka | Windows, Linux, OsX | Free | Easy-Medium |
| Final Cut Pro | Mac | Lifetime-$299.99 | Easy-Medium |
| Cyberlink PowerDirector 365 | Windows, Mac | Lifetime-$52.50 | Easy-Medium |
Part 2: Top 10 Sony Vegas (Vegas Pro) Alternatives & Competitors
Now that you know the primary differences between the Sony Vegas Pro alternatives. Are you find anything you like? Let’s move on to more details for your further consideration.
1. Lightworks
With Lightworks, using the independent timeline codec, format, and resolution alteration in videos is extremely simple. In addition, you can use the multi-cam editing feature for real-time, high-quality editing work. Moreover, drag and drop elements into videos for optimized video editing work, including pre-existing Storyboard points.
Main Features:
- Industry-grade features like QC, transcoding, and automated transfer are available.
- Edit files at different FPS limits and use three-point editing for recording/source files.
- Insert files and overwrite on a new project, replace, backfill, and fit to fill your video clips.
- Attach Storyboard tiles and match-frame clips/sub-clips easily.
Pros
- Flexible functionality and speedy transfers
- Edit files with professional movie-like quality
- Auto Sync feature for automatic timeline re-syncing is available
Cons
- Direct X is only available on the Windows version
- TotalFX plugin is not available for free- you have to upgrade to use them
OS Compatibility: Windows , Mac , Linux
Best For: Editing experts creating visually animated and professional-looking short videos can work with Lightworks.
What users say:
For professional-level video editing work, Lightworks brings a lot of resources and elements to users. According to reviews , people who have tried it have experienced better video editing functionality with these resources.
2. Wondershare Filmora
The top Vegas Pro alternative that both Windows and Mac users can opt for is Filmora. The software has advanced AI-incorporated editing functions for automated editing work, including preset effects from FX plugins. Besides that, you can easily add pre-set transitions, audio clips, text, images, and more.
Beginners find it simple to navigate through its interface and can opt for the Instant Mode function for automatic video edits .
Free Download For Win 7 or later(64-bit)
Free Download For macOS 10.14 or later
For a better idea of how this works, you should check out this tutorial video: https://filmora.wondershare.com/get-creative/make-a-video-quickly.html
Main Features:
- Instant Mode is available for automatic video/audio project editing out of 6 shorter clips.
- Support Advanced editing tools like Chroma Key and AI Portrait.
- Record voiceover, apply speech-to-text/text-to-speech functions, and more audio editing features.
- OpenFX plugins like BorisFX and NewBlue FX for a better list of pre-set effects.
Pros
- Simple to use and navigate on the editor timeline, especially with drag-and-drop support
- Output your editing files in different video/audio formats
- Quickly share the file on Vimeo or YouTube, besides downloading it on the local hard drive
Cons
- Free trial users cannot bring their Instant Mode-created videos into the editor timeline
- 4K support only with selected MKV, MOV, M4V (for Mac), and MP4 codecs
OS Compatibility: Windows , Mac
G2 Rating: 4.4 out of 5
Best For: All types of users like educators, students, homeowners, businesses, and video editors for comprehensive video editing tools and uses.
What users say:
Filmora is extremely simple to use, with advanced features available for top-level video editing work. Users mention in reviews how they have benefitted from the simple functionality and dynamic AI-based features available here for video editing.
3. Adobe Premiere Pro
If you are looking for high-quality programs like Sony Vegas, Adobe Premiere Pro is a reliable choice. This editing software allows you to easily create, delete, and move big video projects. Moreover, you can work on multiple files simultaneously and use shortcuts for faster editing work.
Preset filters and editing features are also available here, especially if they choose the Adobe Creative Cloud option.
Main Features:
- Multiple pre-set transitions and effects are available for quick thematic changes.
- Add graphics, titles, and captions.
- Color grading and correction tools are available.
- It is possible to add keyframing and animation elements.
Pros
- Opting for group plans for video editing practice and learning using Adobe Premiere Pro is possible
- Aligns audio with videos instantly during editing
- Utilize Quick Export functionality for video files in some taps
Cons
- Windows High Contrast Mode is supported but to a limited extent, like with menus and title bars
- HDR workflows can only be handled on the Windows version with DisplayHDR 400 support
OS Compatibility: Windows , Mac
G2 Rating: 4.5 out of 5
Best For: Professional editors and trainers can use the various plans under Adobe Premiere Pro for video/audio editing.
What users say:
Advertisers and videographers enjoy high-grade video editing features and like the simple effects and interface quality. The motion graphics support in Adobe Premiere Pro is high-grade as well.
4. HitFilm Express
A capable Sony Vegas free alternative that you should check out is HitFilm Express. With this, you can expect many prepared designs for quick video edits. Additionally, you can manually customize the video files you are working on with high-grade personalization features available in the timeline.
Main Features:
- Pre-set customizable designs are available.
- Built-in sound effects and soundtracks are usable for free.
- Cache renders in timelines are optimized.
- The New Grade Clips feature allows users to apply varying effects to many video clips.
Pros
- Stable process of switching between timelines with an active orbit tool
- Easy to switch between 2D/3D timelines while using the text tool
- Simple to use for an unlimited period
Cons
- Does not work on older versions than Windows 10 and macOS 10.14
- Users cannot integrate this with Vegas Pro like before
OS Compatibility: Windows , Mac
TechRadar Rating: 4.5 out of 5
Best For: This software is a high-quality video editor for custom video editing work, fit for beginners and professionals alike.
What users say:
HitFilm Express is easy to use and efficient in the market for professional-level editing. The tutorial is available here for quick learning about the steps, and expandable features are well-admired by users.
5. Kdenlive
A high-quality Sony Vegas open-source variety that you should seriously consider is Kdenlive. The video editor comes with MLT framework support and holds many tools for optimizing video editing.
To simplify, you can arrange and adjust various video/audio tracks and mute or lock specific ones as needed. Add everything from filters, texts, and transitions using this editor for high-grade video projects.
Main Features:
- Get an automatic backup of your video project while you are editing it.
- Use proxy editing to create low-resolution source clip copies and render them later on computers.
- Multiple video/audio scopes are available for monitoring projects like vectorscope, waveform, and RDB Parade.
- Many transition and effect choices to use.
Pros
- Flexibility with themes to add with multiple options
- Pre-render specific timeline parts for preview
- Effects are simple to use with keyframing quality
Cons
- Complex for completely non-technical users to adapt to
- Only supports 64-bit versions in regards to Windows-based compatibility
Trustpilot Rating: 3.7 out of 5
Best For: High-level editing experts who need strong video editing and monitoring features in an open-source platform.
What users say:
Kdenlive, as an open-source video editing software, assures quick and straightforward usability with projects. Per reviews , users like the ability to make simple video edits without bugs in this editor and quickly export finished projects.
6. OpenShot
OpenShot is a high-quality cross-platform video editor that you can use on different devices for quick but dynamic video project edits. Use keyframing ability here to adjust the animated elements you add to the file.
Moreover, cut the videos with simple steps and add many audio tracks/background videos/watermarks in layers. Also, get several video effects to optimize the video look easily.
Main Features:
- Adjust video speed in reverse motion, fast forward, and slow motion.
- Render effects and 3D animated elements into the video project.
- Get title templates and edit them as needed.
- Visualize the background audio beats with waveform support.
Pros
- Very user-friendly interface with a simple navigation guarantee
- Supports more than 70 languages that you can translate as well using LaunchPad
- Drag-and-drop functionality is supported for adding images, audio, and videos into the OpenShot editor timeline
Cons
- Some bug issues can occur
- Slightly complex learning curve
OS Compatibility: Windows , Linux , OsX
G2 Rating: 4.4 out of 5
Best For: Professional-level video editing experts can opt for this cross-platform free software for high-quality video creations.
What users say:
The OpenShot software is suitable for high-quality video editing across different devices and operating systems. Users like the lack of automated watermarks on all videos, its simple dashboard, and its multi-track editing ability, all available for free.
7. Blender
Blender is free video editing software like Sony Vegas that users can use for video editing, but it is also effective for game development with animations. Indeed, you can create and render dynamic-looking scenes with features like Cycles.
Furthermore, the software has a rich modelling toolset with solutions like curves and sculpting tools.
Main Features:
- Completely customization-friendly UI, shortcuts, and window layout here.
- Customization and scripting are possible to do with this software due to the Python API support.
- Supports access and integration of many pipeline tools for projects.
- Comes with advanced simulation-based features available in MantaFlow and Bullet libraries.
Pros
- Basic and advanced tools for quick video edits
- Strong composition and masking ability with object-based motion tracking benefits
- Easily create short animations with Blender
Cons
- Data under the standalone games created here fall under GPL conditions
- Strict licensing rules are applicable here
OS Compatibility: Windows , Mac , Linux
G2 Rating: 4.5 out of 5
Best For: Game developers and videographers for companies can use this open-source platform for creation and editing.
What users say:
Blender is a capable software for animation-based editing, with high-quality game-based features and interactive elements that make editing simple. As per reviews , users like the simple animation-based tools and fast rendering it offers.
8. Jahshaka
Users of Jahshaka can experience an inclusive, collaborative environment for metaverse-level editing work. This free editing software, like Sony Vegas, focuses mainly on VR-based editing functions and comes with powerful tools for project management and content creation.
Take the help of other team members to collaborate on dynamic virtual world building, editing, and publishing.
Main Features:
- Compatible player for different desktop and mobile devices.
- Create diversified worlds and scenes with one comprehensive platform.
- Immersive software 3D video development.
- Access to pre-built content and libraries of scenes and assets
Pros
- Easily share and distribute your virtual projects
- Deliver final projects offline and online
- An interactive multi-user engine is available
Cons
- Usable for a niche audience and does not include standard video editing tools
- Jahshaka V2 legacy support is no longer active
OS Compatibility: Windows , Linux , OsX
SourceForge Rating: 4.4 out of 5
Best For: Professional video editors who want a collaborative experience in VR-based development and publishing.
What users say:
Jahshaka is a suitable program for optimized VR-based editing with many preset features and themes to choose from. Most users enjoy the new features and worlds and can work with them efficiently.
9. Final Cut Pro
One of the top Sony Vegas alternatives Mac users can safely turn to is Final Cut Pro, which has powerful modern video editing features. With this software, you will access Cinematic Mode, which you can use to create stylish and thematic video scenes.
Similarly, the Object Tracker features utilize ML technology to automatically detect objects and faces in moving videos. It can align effects and titles accurately with the graphical elements in videos.
Main Features:
- Object Tracker feature for using color correction and adding texts into moving videos.
- Accelerated functional for motion tracking with Apple Neural Engine.
- Add high-quality effects and titles into videos with Cinematic Mode support.
- Preset audio tracks and royalty-free sound effects are available for editing.
Pros
- Handle color grading for optimized scene quality
- Adjust the field depth and focus depth in clips
- Share projects across iOS and macOS platforms
Cons
- Not valid for Windows users
- Relatively high cost to avail the paid version with all advanced features
OS Compatibility: Mac
TrustRadius Rating: 4.8 out of 5
Best For: Professional video editors, students, and filmmakers who want to create cinematic-quality video projects.
What users say:
Final Cut Pro is an efficient Mac-based video editing tool with easy sharing and editing capabilities, rich effects/transitions options, and fast rendering ability. Customers enjoy the intuitive non-linear editor, easy accessibility to social media platforms for file exporting, and live scrubbing, as noted in one review .
10. Cyberlink PowerDirector 365
Another Sony Vegas mac alternative for Windows you should give a try is PowerDirector 365 from Cyberlink. This software removes or compiles video clips and uses masking features like image/custom masks.
Preset special effects, blending modes, and sound effects are available here for quick editing. Additionally, the AI-powered Motion Tracking traces objects in clips and adds graphics, animations, and text quickly in line with it.
Main Features:
- You can create and remove videos with masking features.
- Drag and drop the pre-set effects and texts into videos.
- Adjust video clips with tools for border, gradation, and shadowing.
- Multiple animations, callouts, graphics, and stickers to add to videos.
Pros
- Use green screen functionality for quick background removal or editing
- Automatic audio mastering and mixing functionality are available
- Keyframing benefits for customized animations like scaling and positioning
Cons
- Dolby Digital-centric audio codec is not available for users
- Users can try features like Room Echo Removal and NVIDIA A/V Denoise only on Windows 11
OS Compatibility: Windows
TechRadar Rating: 4.5 out of 5
Best For: Professional videographers and regular users who want a Windows-based video editing software for standard video clip editing.
What users say:
Cyberlink PowerDirector is a powerful video editor with standard editing functions many users have tried and benefited from. According to customers , the program has high-quality video and audio editing benefits for presentations, with additional effects/splitting/cropping features.
Part 3: What are the limitations when using Sony Vegas (Vegas Pro) on Mac?
Yes, with the given Sony Vegas alternatives, Mac and Windows users can benefit heavily. But why is it important to try for a replacement when Sony Vegas Pro is relatively efficient software?
To know the answer, you should take the time to understand its limitations, which do exist.
It only works for Windows users
The Sony Vegas Pro software is not available for Mac or other operating systems besides Windows. In addition, it’ll be really complex and time-consuming, even if you opt for virtual machine software or handle dual booting techniques to configure the software on your Mac or Linux.
You need to invest in other hardware
Sony Vegas Pro does do not work within one comprehensive platform like other capable video editing software types, like Wondershare Filmora . You have to acquire a powerful PC and tools to operate it separately. The software works very slowly on older devices.
Not incredibly unique
The functions of Sony Vegas Pro match somewhat with other options in the market. So, users would not expect much value in purchasing this software’s plans that they want to upgrade from their previous system, but on the other hand, the available features are mostly standard-level in functionality as well.
Hot FAQs about Vegas Pro Alternatives
After knowing these details, many users still have specific common queries about opting for a Sony Vegas Pro alternatively. So these are some common FAQs about this- answered.
1. Can Sony Vegas be used on a Mac?
No, it is impossible to directly use Sony Vegas on macOS devices since it does not support it. Instead, you have to separately use a dual boot strategy or virtual machine software to activate the video editor on Mac devices, but the process for that is complex.
2. Is Wondershare Filmora or Vegas Pro better?
Wondershare Filmora and Vegas Pro are top-level options in video and audio editing projects with professional-level editing accuracy. However, Filmora has a cohesive ecosystem with rich AI and standard functions and comes with Mac/Windows support. So, in that sense, Filmora is comparatively a better choice.
Final Words
In place of Sony Vegas Pro, any of these options would also give you a great user experience. Out of them, Filmora is one that we will recommend due to its multi-faceted benefits and features for Mac and Windows users. Ultimately, make your decision based on your particular needs.
Free Download For Win 7 or later(64-bit)
Free Download For macOS 10.14 or later
Minitool Movie Maker: A Detailed Review, User Guide, and Alternative Options
We all spend so much time on YouTube, watching our favorite YouTubers’ videos. There are two reasons why we get attracted to any video. One attraction factor is the content. Whereas the other attractive factor to any video is the editing.
The internet is full of great videos, and the market is flooded with amazing editors. This is all because of the competition and the editing skills everyone has. If you are not confident with your editing, then this article might be a miracle for you. MiniTool Movie Maker will be discussed in detail. This article will be a complete guide on MiniTool MovieMaker; along with that, we will also share its alternatives.
In this article
01 What Is Minitool Movie Maker?
02 How to Use Minitool Movie Maker [Step by Step]
03 4 Best Alternatives for Minitool Movie Maker
Part 1. What Is MiniTool Movie Maker?
MiniTool Movie Maker is a very powerful tool used to edit videos. With MiniTool movie maker, you can create unlimited videos. The tool is free. Using MiniTool, you can edit stunning, eye-catching videos that everyone will love to watch. Mini Tool MovieMaker is the secret behind every mind-blowing video that you love to watch.
The best thing about Mini movie maker is that it has a very easy-to-use interface. Even beginners can easily create videos on MiniTool. You don’t need any video designing experience to create a video on this movie maker. The procedure to edit videos is also very basic. You just have to import the media to MiniTool MovieMaker, and then the cool editing elements will do a magical makeover to your video.
MiniTool MovieMaker is a well-known and very famous tool because of its unmatched features. With MiniTool MovieMaker, you can create perfect aesthetic videos that everyone loves to watch. The tool is full of wonders and surprises. If you are impatient to learn about its features, then the wait is over. Let us shed light on its incomparable features.
- MiniTool movie makersupports Windows 8.1 and Windows 10. Whereas from old Windows version, it supports Windows 7.
- With the stunning Mini movie maker, you can do batch processing where you can edit multiple videos and images with just one click.
- The MovieMaker also lets you edit the audio from the original video. Which includes mute, fade in/ fade out, and volume control.
- The tool offers a variety of effects, transitions, text templates, and a lot more. All these elements enhance your video visually.
Part 2. How to Use MiniTool Movie Maker [Step by Step]
Now that the features of MiniTool Moviemaker have been discussed, you all must be very impressed by the tool. It is the secret ingredient that we all fall for because this makes your video stand out. Editing is a very crucial part of movie-making. It is said that editing can either make it or break it. This is why you should always select a powerful tool for editing.
One such tool is being discussed here today. Mini Tool Movie Maker is the editor that falls perfectly in this category where you can edit brilliant movies. If this tool is new for you, then you can take guidance from this article because we are going to share its step-by-step guideline with you.
Step 1: The first step to start using MiniTool movie maker is to launch it on your device. Then, from the main screen, the Project Library window, select ‘New Project.’

Step 2: Now, it’s time to import the media files. For this, click on ‘Import Media Files. After that, you have to locate the files that you want to import. Once done, click on ‘Open’; this will load all the media files. You will be able to see the files in the Media Library.

Step 3: After the media has been imported, now comes the fun part where you have to edit the movie. With MiniTool movie maker, you can add various transitions to your clips. By visiting the “Transitions” tab, you can select your favorite transition, and then by right-clicking on it, you can apply it.

Step 4: Like transitions, you can also add multiple effects to your movie and make it visually attractive. The “Effects” tab is full of classic and cool effects. You just have to explore the effects and then drag and drop the best effect on the target clip.

Step 5: With MiniTool Movie Maker, you can also add text to your movie. The wonderful tool has several title templates that could be used to add text to your videos. All these templates are under the “Text” section. You can completely customize the text.

Step 6: Along with these amazing services, Mini Tool Movie Maker has a lot to offer. You can add “Motion” effects to your movie clips. With this tool, you can trim and even split the video. Even editing audio of the original video and reversing a video are offered by this tool.

Step 7: Lastly, after all the fancy edits, you can export the movie to your device. For this, click on the Export option from the toolbar. You can select a file format and hit the ‘Export’ button to get the movie.

Part 3. 4 Best Alternatives for Minitool Movie Maker
This article is a complete guide on Mini Tool moviemaker. Everything you need to know about this crazy powerful tool is in this article. Not just this tool, but we also promised to talk about its alternatives. In this section, we will discuss the 4 best alternatives for MiniTool moviemaker.
1. Wondershare Filmora
The very first and best alternative for mini-movie makers is Wondershare Filmora. This movie editing software rules over the editing world because of its unique and impressive features. You can do professional editing with Filmora.
It lets you do countless edits. Filmora owns a massive asset library that is full of images, audio effects, transitions, filters, elements, and whatnot. Filmora is a one-stop-shop where you can get every possible thing required for editing.

For Win 7 or later (64-bit)
For macOS 10.12 or later
2. OpenShot
The next famous and amazing alternative is OpenShot. With OpenShot, you can trim, merge and even cut your movie clips. Another very interesting and attractive element seen in movies is the split-screen. OpenShot also offers a split-screen. You can export movies without a watermark in 2.5K and also in 4K.

3. VSDC Free Video Editor
Another alternative is VSDC Free Video Editor. The editor is very beneficial to use because of its unmatched features. The fascinating thing about this editor is that it has a built-in DVD Burning Tool. The video editor offers color blending along with various amazing filters. It supports HD and 4K file formats.

4. Windows Movie Maker
The last alternative to be discussed is Windows Movie Maker. The Windows Movie Maker is famous because it has simple controls, a user-friendly interface, and automatic preview. This Movie Maker has transition overlays that enhance the movie visually. The editor also has a title customization tool from which you can add and edit stylish titles.

Final Thoughts
As mentioned earlier that this article is a complete pack of information on moviemakers. After learning about MiniTool Movie Maker from this article, you will surely use it to edit your movies. The MovieMaker promises to deliver quality material. Its unique and matchless features make the tool worthy of trying.
Versatile Video Editor - Wondershare Filmora
An easy yet powerful editor
Numerous effects to choose from
Detailed tutorials provided by the official channel
02 How to Use Minitool Movie Maker [Step by Step]
03 4 Best Alternatives for Minitool Movie Maker
Part 1. What Is MiniTool Movie Maker?
MiniTool Movie Maker is a very powerful tool used to edit videos. With MiniTool movie maker, you can create unlimited videos. The tool is free. Using MiniTool, you can edit stunning, eye-catching videos that everyone will love to watch. Mini Tool MovieMaker is the secret behind every mind-blowing video that you love to watch.
The best thing about Mini movie maker is that it has a very easy-to-use interface. Even beginners can easily create videos on MiniTool. You don’t need any video designing experience to create a video on this movie maker. The procedure to edit videos is also very basic. You just have to import the media to MiniTool MovieMaker, and then the cool editing elements will do a magical makeover to your video.
MiniTool MovieMaker is a well-known and very famous tool because of its unmatched features. With MiniTool MovieMaker, you can create perfect aesthetic videos that everyone loves to watch. The tool is full of wonders and surprises. If you are impatient to learn about its features, then the wait is over. Let us shed light on its incomparable features.
- MiniTool movie makersupports Windows 8.1 and Windows 10. Whereas from old Windows version, it supports Windows 7.
- With the stunning Mini movie maker, you can do batch processing where you can edit multiple videos and images with just one click.
- The MovieMaker also lets you edit the audio from the original video. Which includes mute, fade in/ fade out, and volume control.
- The tool offers a variety of effects, transitions, text templates, and a lot more. All these elements enhance your video visually.
Part 2. How to Use MiniTool Movie Maker [Step by Step]
Now that the features of MiniTool Moviemaker have been discussed, you all must be very impressed by the tool. It is the secret ingredient that we all fall for because this makes your video stand out. Editing is a very crucial part of movie-making. It is said that editing can either make it or break it. This is why you should always select a powerful tool for editing.
One such tool is being discussed here today. Mini Tool Movie Maker is the editor that falls perfectly in this category where you can edit brilliant movies. If this tool is new for you, then you can take guidance from this article because we are going to share its step-by-step guideline with you.
Step 1: The first step to start using MiniTool movie maker is to launch it on your device. Then, from the main screen, the Project Library window, select ‘New Project.’
Step 2: Now, it’s time to import the media files. For this, click on ‘Import Media Files. After that, you have to locate the files that you want to import. Once done, click on ‘Open’; this will load all the media files. You will be able to see the files in the Media Library.
Step 3: After the media has been imported, now comes the fun part where you have to edit the movie. With MiniTool movie maker, you can add various transitions to your clips. By visiting the “Transitions” tab, you can select your favorite transition, and then by right-clicking on it, you can apply it.
Step 4: Like transitions, you can also add multiple effects to your movie and make it visually attractive. The “Effects” tab is full of classic and cool effects. You just have to explore the effects and then drag and drop the best effect on the target clip.
Step 5: With MiniTool Movie Maker, you can also add text to your movie. The wonderful tool has several title templates that could be used to add text to your videos. All these templates are under the “Text” section. You can completely customize the text.
Step 6: Along with these amazing services, Mini Tool Movie Maker has a lot to offer. You can add “Motion” effects to your movie clips. With this tool, you can trim and even split the video. Even editing audio of the original video and reversing a video are offered by this tool.
Step 7: Lastly, after all the fancy edits, you can export the movie to your device. For this, click on the Export option from the toolbar. You can select a file format and hit the ‘Export’ button to get the movie.
Part 3. 4 Best Alternatives for Minitool Movie Maker
This article is a complete guide on Mini Tool moviemaker. Everything you need to know about this crazy powerful tool is in this article. Not just this tool, but we also promised to talk about its alternatives. In this section, we will discuss the 4 best alternatives for MiniTool moviemaker.
1. Wondershare Filmora
The very first and best alternative for mini-movie makers is Wondershare Filmora. This movie editing software rules over the editing world because of its unique and impressive features. You can do professional editing with Filmora.
It lets you do countless edits. Filmora owns a massive asset library that is full of images, audio effects, transitions, filters, elements, and whatnot. Filmora is a one-stop-shop where you can get every possible thing required for editing.
For Win 7 or later (64-bit)
For macOS 10.12 or later
2. OpenShot
The next famous and amazing alternative is OpenShot. With OpenShot, you can trim, merge and even cut your movie clips. Another very interesting and attractive element seen in movies is the split-screen. OpenShot also offers a split-screen. You can export movies without a watermark in 2.5K and also in 4K.
3. VSDC Free Video Editor
Another alternative is VSDC Free Video Editor. The editor is very beneficial to use because of its unmatched features. The fascinating thing about this editor is that it has a built-in DVD Burning Tool. The video editor offers color blending along with various amazing filters. It supports HD and 4K file formats.
4. Windows Movie Maker
The last alternative to be discussed is Windows Movie Maker. The Windows Movie Maker is famous because it has simple controls, a user-friendly interface, and automatic preview. This Movie Maker has transition overlays that enhance the movie visually. The editor also has a title customization tool from which you can add and edit stylish titles.
Final Thoughts
As mentioned earlier that this article is a complete pack of information on moviemakers. After learning about MiniTool Movie Maker from this article, you will surely use it to edit your movies. The MovieMaker promises to deliver quality material. Its unique and matchless features make the tool worthy of trying.
Versatile Video Editor - Wondershare Filmora
An easy yet powerful editor
Numerous effects to choose from
Detailed tutorials provided by the official channel
Also read:
- 2024 Approved Ultimate Guide Best Music Video Creators for Everyone
- New In 2024, Converting Like a Pro The Experts Guide to Wav Converter
- New Virtualdub vs Other Video Editors A 2023 Comparison and Review
- New In 2024, Preserve Your Memories Burning Videos to DVD on Windows and Mac
- New 2024 Approved The 5 Most Popular Hand-Drawn Whiteboard Animation Creators
- New Final Cut Pro X Troubleshooting Handbook Quick Fixes and Workarounds for 2024
- New Streamline Your Content How to Make Reaction Videos Quickly with Filmora for 2024
- New In 2024, Extracting Crystal-Clear Audio From Videos A Step-by-Step Guide
- New In 2024, Top Free WMV Video Assembly Tools for Seamless Playback
- 2024 Approved Unlock Easy Audio Downloads Top YouTube to MP3 Converter Reviews
- Updated Remove Filmora Logo From Your Videos Easy Solutions
- New 2024 Approved Premiere Pro Transitions List of 10 Best Transition Plugins
- Updated In 2024, Top-Rated Free Video Editing Apps with Special Effects for Mobile
- New In 2024, The Smart Way to Choose a Video to Audio Converter Top Tips and Tricks
- Updated The Ultimate Guide to Selecting a Reliable FLAC Converter
- New 2024 Approved This Article Is a Complete Pack of Information on MiniTool MovieMaker. Learn About Its Features, Steps, and Also Its Alternatives From One Platform
- In 2024, No Budget, No Problem 9 Free Online Movie Makers
- 2024 Approved The Ultimate VLC Guide Slow Motion Video Playback on Desktop and Mobile Devices
- Updated 2024 Approved FLAC Converter Reviews Discover the Perfect One for You
- In 2024, Slowing Down the Action VLC Video Playback Tricks
- New 2024 Approved From Audio to Visual Key Considerations for MP3 to MP4 Conversion
- 2024 Approved Trim VLC Files on Mac with Precision No Quality Degradation
- Updated 2024 Approved Get Ready to Glitch Top Video Editing Software for PC, Mac, and Web
- New Dont Know Which Video Splitter to Choose? Just Check Out Our List of the 5 Best Video Software for Splitting Videos Below for 2024
- New In 2024, Video Privacy Made Easy Best Blur Apps for iPhone and Android
- In 2024, Mobile Video Editing Essentials Top Apps for iOS and Android
- 2024 Approved Sony Vegas Not Cutting It? Find the Perfect Windows Alternative Here
- Updated 2024 Approved 10 Free and Open-Source Premiere Pro Alternatives for Linux
- Updated S Most Popular Free 4K Video Editors for Creators
- Updated In 2024, The Ultimate List WebM to MP3 Converters for Every Need
- Selecting the Right Video to Audio Converter My Top Priorities
- Updated 10 Powerful Video Editing Software Alternatives to Final Cut Pro X for 2024
- Top 4 Android System Repair Software for Tecno Spark 10C Bricked Devices | Dr.fone
- How To Bypass iCloud By Checkra1n Even On Apple iPhone X If Youve Tried Everything
- How to Restore Deleted Y100i Contacts An Easy Method Explained.
- How to Turn Off Google Location to Stop Tracking You on Vivo V30 | Dr.fone
- Best 10 Free Video Translators to Mitigate Translation Risks
- Delete Gmail Account With/Without Password On Meizu 21
- Possible solutions to restore deleted messages from Vivo Y100i
- New 2024 Approved Smooth Operator 3 Techniques to Stabilize Footage in AE
- Complete List of Podcast Directories for 2024
- In 2024, How to Unlock Nubia Z50 Ultra Phone Pattern Lock without Factory Reset
- How to Send and Fake Live Location on Facebook Messenger Of your Oppo A58 4G | Dr.fone
- In 2024, How to Cast Infinix Hot 30 5G Screen to PC Using WiFi | Dr.fone
- New 2024 Approved Add Green Screen Effects in Final Cut Pro
- Updated In 2024, Full Compendium of Podcast Directory Hubs
- Updated No Budget, No Problem Best Free Open-Source Video Editors
- In 2024, Best Ways to Bypass iCloud Activation Lock from Apple iPhone 13/iPad/iPod
- Does Galaxy A34 5G has native MOV support?
- In 2024, The Magnificent Art of Pokemon Go Streaming On Vivo S17? | Dr.fone
- Is GSM Flasher ADB Legit? Full Review To Bypass Your Motorola Moto G04FRP Lock
- Why Apple Account Disabled From your Apple iPhone 6? How to Fix
- In 2024, Does Airplane Mode Turn off GPS Location On Samsung Galaxy M14 4G? | Dr.fone
- Does Life360 Notify When You Log Out On Vivo V30? | Dr.fone
- In 2024, 3 Ways for Android Pokemon Go Spoofing On Samsung Galaxy F54 5G | Dr.fone
- Updated The Professionals Method for Soundless iPhone Video Editing
- Title: In 2024, The Battle for Video Editing Supremacy Sony Vegas Pro vs Adobe Premiere Pro
- Author: Morgan
- Created at : 2024-05-19 16:02:35
- Updated at : 2024-05-20 16:02:35
- Link: https://ai-video-tools.techidaily.com/in-2024-the-battle-for-video-editing-supremacy-sony-vegas-pro-vs-adobe-premiere-pro/
- License: This work is licensed under CC BY-NC-SA 4.0.
